Page 32 of 455
25
Depending on the condition and
durability of the high voltage battery,
charger specifications, and ambient
temperature, the time required for
charging the battery may vary.11.You may prevent possible charg-
ing cable theft by taking the fol-
lowing steps. Lock the door after
the charging cable is connected,
by pressing the lock button on the
smart key or on the central door
lock switch.
When the door is locked, the
charging connector will become
locked and this will prevent possi-
ble theft.
So, after charging is complete,
you must release the door lock in
order to disconnect the charging
connector.
■ ■Unlock Charging Door in
Emergency
If the charging door does not open
due to battery discharge and failure
of the electric wires, open the hood
and slightly pull the emergency cable
as shown above. The charging door
will then open.
CHARGING ELECTRIC VEHICLE
(NORMAL CHARGE)
OPSE0Q4016
Page 33 of 455

26
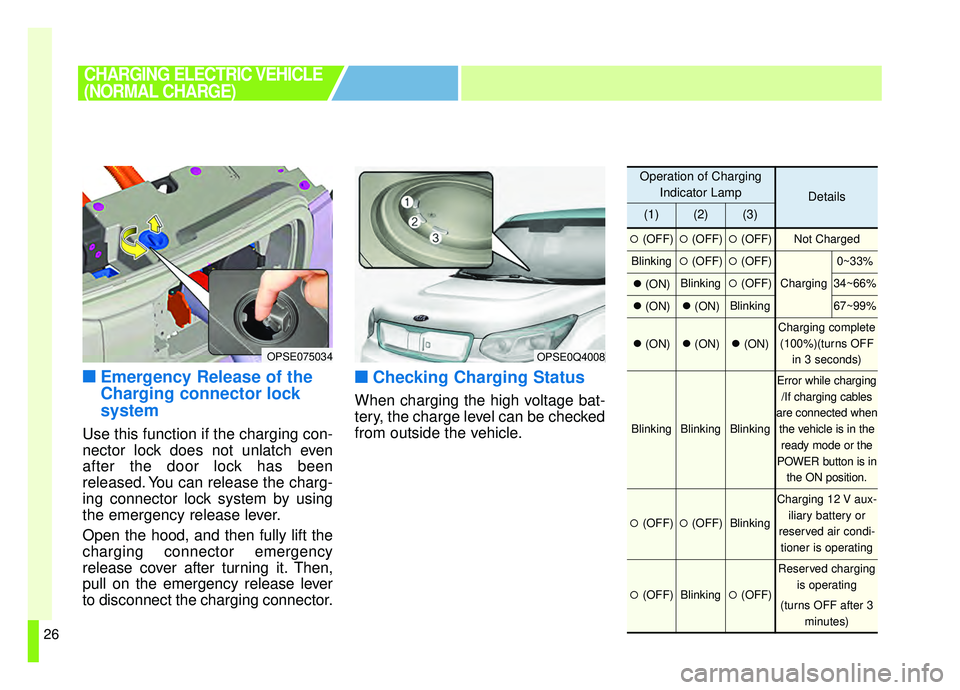
■ ■Emergency Release of the
Charging connector lock
system
Use this function if the charging con-
nector lock does not unlatch even
after the door lock has been
released. You can release the charg-
ing connector lock system by using
the emergency release lever.
Open the hood, and then fully lift the
charging connector emergency
release cover after turning it. Then,
pull on the emergency release lever
to disconnect the charging connector.
■ ■Checking Charging Status
When charging the high voltage bat-
tery, the charge level can be checked
from outside the vehicle.
CHARGING ELECTRIC VEHICLE
(NORMAL CHARGE)
OPSE0Q4008
Operation of Charging
Indicator Lamp
Details
(1)(2)(3)
�(OFF)�(OFF)�(OFF)Not Charged
Blinking�(OFF)�(OFF)
Charging
0~33%
�(ON)Blinking�(OFF)34~66%
�(ON)�(ON)Blinking67~99%
�(ON)�(ON)�(ON)
Charging complete
(100%)(turns OFF in 3 seconds)
BlinkingBlinkingBlinking
Error while charging/If charging cables
are connected when the vehicle is in theready mode or the
POWER button is in the ON position.
�(OFF)�(OFF)Blinking
Charging 12 V aux- iliary battery or
reserved air condi- tioner is operating
�(OFF)Blinking�(OFF)
Reserved charging is operating
(turns OFF after 3 minutes)
OPSE075034
Page 46 of 455
39
■ ■Unlock Charging Door in
Emergency
If the charging door does not open
due to battery discharge and failure
of the electric wires, open the hood
and slightly pull the emergency cable
as shown above. The charging door
will then open.
■ ■Emergency Release of the
Charging connector lock
system
Use this function if the charging con-
nector lock does not unlatch even
after the door lock has been
released. You can release the charg-
ing connector lock system by using
the emergency release lever.
Open the hood, and then fully lift the
charging connector emergency
release cover after turning it. Then,
pull on the emergency release lever
to disconnect the charging connector.
■ ■Checking Charging Status
When charging the high voltage bat-
tery, the charge level can be checked
from outside the vehicle.
OPSE0Q4016OPSE075034OPSE0Q4008
CHARGING ELECTRIC VEHICLE
(TRICKLE CHARGE)
Page 77 of 455

Your vehicle at a glance
42
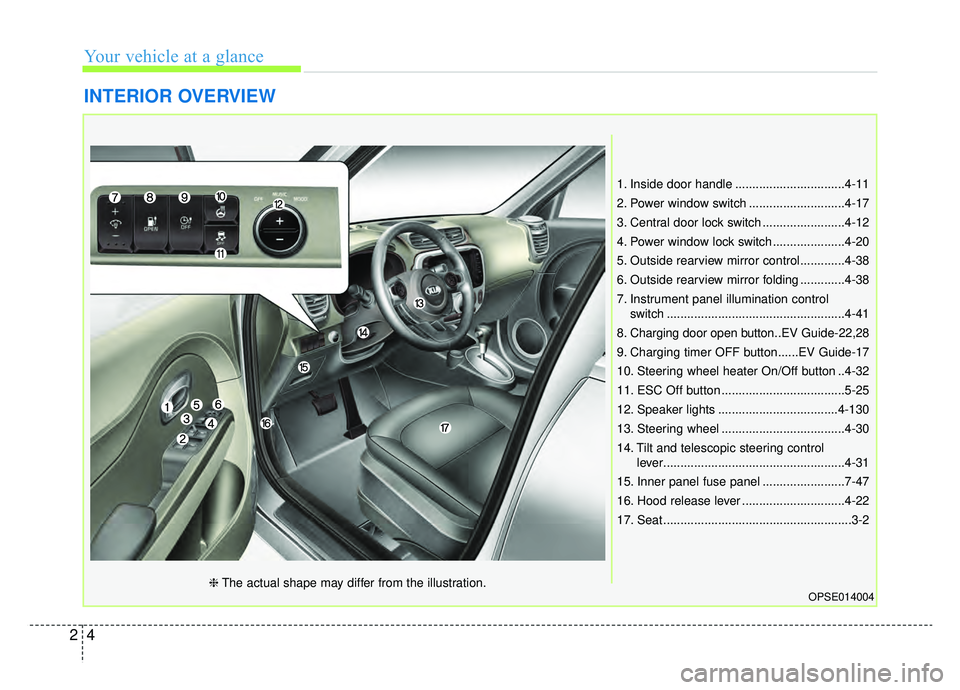
INTERIOR OVERVIEW
1. Inside door handle ................................4-11
2. Power window switch ............................4-17
3. Central door lock switch ........................4-12
4. Power window lock switch .....................4-20
5. Outside rearview mirror control.............4-38
6. Outside rearview mirror folding .............4-38
7. Instrument panel illumination controlswitch ....................................................4-41
8. Charging door open button..EV Guide-22,28
9. Charging timer OFF button......EV Guide-17
10. Steering wheel heater On/Off button ..4-32
11. ESC Off button ....................................5-25
12. Speaker lights ...................................4-130
13. Steering wheel ....................................4-30
14. Tilt and telescopic steering control lever.....................................................4-31
15. Inner panel fuse panel ........................7-47
16. Hood release lever ..............................4-22
17. Seat .......................................................3-2
OPSE014004❈ The actual shape may differ from the illustration.
Page 141 of 455

Features of your vehicle
44
Record your key number
The key code num-
ber is stamped on
the key code tag
attached to the key
set. Should you
lose your keys, this number will
enable an authorized Kia dealer to
duplicate the keys easily. Remove
the key code tag and store it in a safe
place. Also, record the key code
number and keep it in a safe and
handy place, but not in the vehicle.
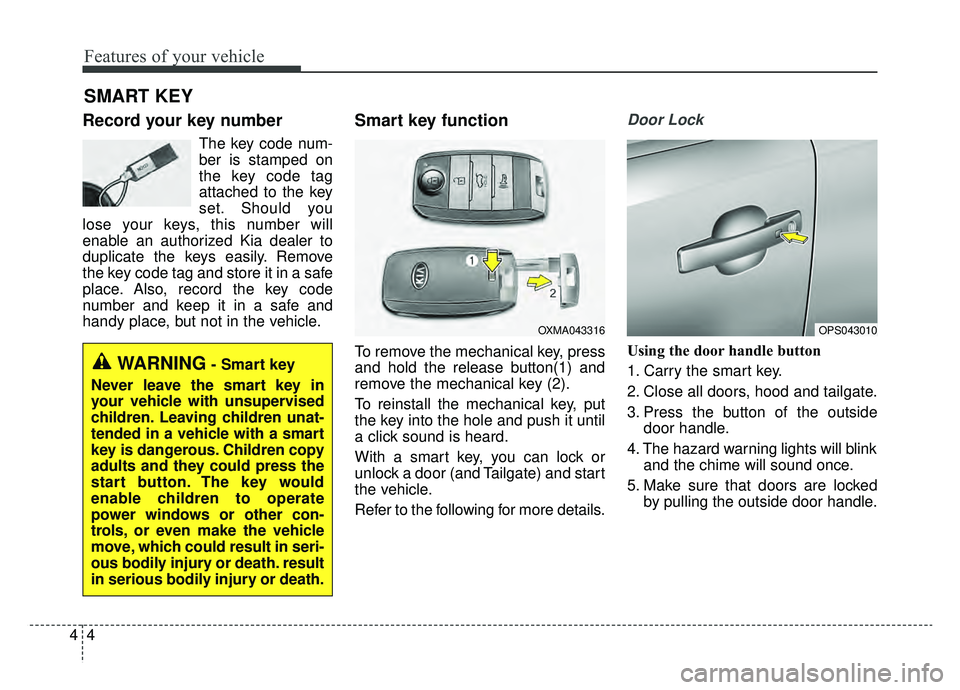
Smart key function
To remove the mechanical key, press
and hold the release button(1) and
remove the mechanical key (2).
To reinstall the mechanical key, put
the key into the hole and push it until
a click sound is heard.
With a smart key, you can lock or
unlock a door (and Tailgate) and start
the vehicle.
Refer to the following for more details.
Door Lock
Using the door handle button
1. Carry the smart key.
2. Close all doors, hood and tailgate.
3. Press the button of the outside door handle.
4. The hazard warning lights will blink and the chime will sound once.
5. Make sure that doors are locked by pulling the outside door handle.
SMART KEY
OXMA043316
WARNING- Smart key
Never leave the smart key in
your vehicle with unsupervised
children. Leaving children unat-
tended in a vehicle with a smart
key is dangerous. Children copy
adults and they could press the
start button. The key would
enable children to operate
power windows or other con-
trols, or even make the vehicle
move, which could result in seri-
ous bodily injury or death. result
in serious bodily injury or death.
OPS043010
Page 159 of 455

Features of your vehicle
22
4
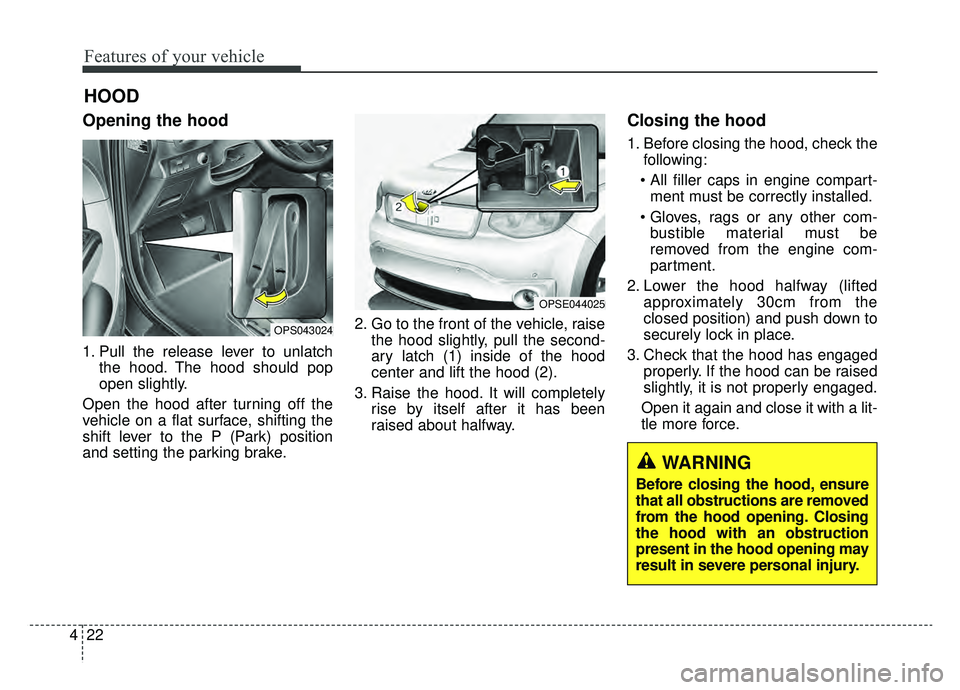
Opening the hood
1. Pull the release lever to unlatch
the hood. The hood should pop
open slightly.
Open the hood after turning off the
vehicle on a flat surface, shifting the
shift lever to the P (Park) position
and setting the parking brake. 2. Go to the front of the vehicle, raise
the hood slightly, pull the second-
ary latch (1) inside of the hood
center and lift the hood (2).
3. Raise the hood. It will completely rise by itself after it has been
raised about halfway.
Closing the hood
1. Before closing the hood, check thefollowing:
ment must be correctly installed.
bustible material must be
removed from the engine com-
partment.
2. Lower the hood halfway (lifted approximately 30cm from the
closed position) and push down to
securely lock in place.
3. Check that the hood has engaged properly. If the hood can be raised
slightly, it is not properly engaged.
Open it again and close it with a lit-
tle more force.
HOOD
OPS043024
OPSE044025
WARNING
Before closing the hood, ensure
that all obstructions are removed
from the hood opening. Closing
the hood with an obstruction
present in the hood opening may
result in severe personal injury.