Page 55 of 573
Safety features of your vehicle
38
3
CHILD RESTRAINT SYSTEM
Children riding in the vehicle should
sit in the rear seat and must always
be properly restrained to minimize
the risk of injury in an accident, sud-
den stop or sudden maneuver.
According to accident statistics, chil-
dren are safer when properly
restrained in the rear seats than in
the front seat. Larger children not in
a child restraint should use one of
the seat belts provided.
You should be aware of the specific
requirements in your country. Child
and/or infant safety seats must be
properly placed and installed in the
rear seat. You must use a commer-
cially available child restraint system
that meets the requirements of the
Safety Standards of your country.
Child restraint systems are designed
to be secured in vehicle seats by the
lap belt portion of a lap/shoulder belt,
or by a tether anchor and/or LATCH
anchors (if equipped). Children could be injured or killed in
a crash if their restraints are not
properly secured. For small children
and babies, a child seat or infant seat
must be used. Before buying a par-
ticular child restraint system, make
sure it fits your vehicle seat and seat
belts, and fits your child.
Follow all the instructions provided
by the manufacturer when installing
the child restraint system.
When the child restraint system is
not in use, store it in the luggage
area or fasten it with a seat belt so
that it will not be thrown forward in
case of a sudden stop or an acci-
dent.
WARNING- Restraintlocation
Never install a child or infant
seat on the front passenger's
seat. A child riding in the front
passenger seat can be forceful-
ly struck by an inflating airbag.
WARNING- Hot child restraint
A child restraint system can
become very hot if it is left in a
closed vehicle on a sunny day.
Be sure to check the seat cover,
buckles and latches before
placing a child in the restraint
system.
Page 259 of 573
4171
Features of your vehicle
Luggage box
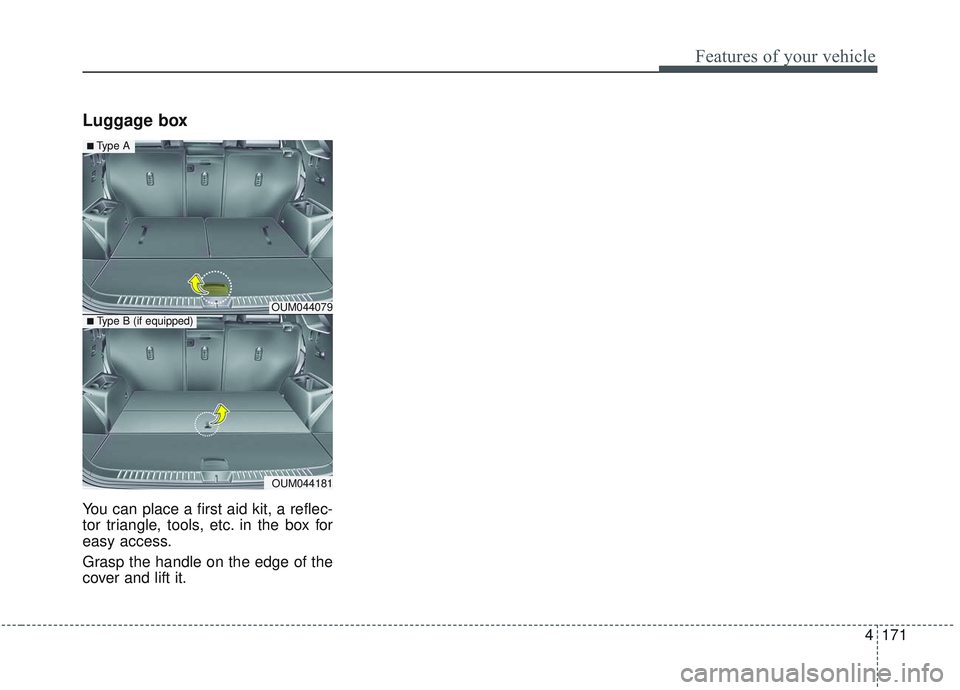
You can place a first aid kit, a reflec-
tor triangle, tools, etc. in the box for
easy access.
Grasp the handle on the edge of the
cover and lift it.
OUM044079
OUM044181
■Type A
■ Type B (if equipped)
Page 445 of 573

Fuses . . . . . . . . . . . . . . . . . . . . . . . . . . . . . . . . . . . . \
7-51
• Inner panel fuse replacement . . . . . . . . . . . . . . . . . . . 7-53
• Engine compartment fuse replacement. . . . . . . . . . . 7-55
• Fuse/relay panel description. . . . . . . . . . . . . . . . . . . . 7-58
Light bulbs . . . . . . . . . . . . . . . . . . . . . . . . . . . . . . . 7-69
• Bulb replacement precaution . . . . . . . . . . . . . . . . . . 7-69
• Light bulb position (Front). . . . . . . . . . . . . . . . . . . . . 7-71
• Light bulb position (Rear) . . . . . . . . . . . . . . . . . . . . . 7-72
• Light bulb position (Side) . . . . . . . . . . . . . . . . . . . . . . 7-73
• Headlamp (Low beam) bulb replacement(Headlamp Type A) . . . . . . . . . . . . . . . . . . . . . . . . . . 7-73
• Headlamp (High beam) bulb replacement (Headlamp Type A) . . . . . . . . . . . . . . . . . . . . . . . . . . 7-74
• Front turn signal lamp bulb replacement (Headlamp Type A) . . . . . . . . . . . . . . . . . . . . . . . . . . 7-76
• Position lamp (LED type) replacement (Headlamp Type A) . . . . . . . . . . . . . . . . . . . . . . . . . . 7-76
• Side marker (front) (LED type) bulb replacement . . 7-77
• Headlamp (LED type) replacement (Headlamp Type B) . . . . . . . . . . . . . . . . . . . . . . . . . . 7-77
• Side repeater lamp (LED type) bulb replacement . . 7-78
• Front fog lamp bulb replacement . . . . . . . . . . . . . . . 7-78
• Stop and tail lamp (Bulb type) bulb replacement . . 7-79
• Rear turn signal lamp (Bulb type) bulb replacement . . 7-80
• Side marker (rear) (Bulb type) bulb replacement . . 7-82 • Side marker (rear) (LED type) bulb replacement . . 7-83
• Tail lamp (inside) (Bulb type) bulb replacement . . . 7-83
• Back up lamp (Bulb type) bulb replacement . . . . . . 7-84
• Stop and tail lamp (LED type) bulb replacement . . 7-85
• High mounted stop lamp (LED type) bulb
replacement . . . . . . . . . . . . . . . . . . . . . . . . . . . . . . . . 7-85
• License plate lamp bulb replacement . . . . . . . . . . . . 7-86
• Map lamp (Bulb type) bulb replacement . . . . . . . . . 7-86
• Map lamp (LED type) bulb replacement . . . . . . . . . 7-87
• Room lamp bulb replacement . . . . . . . . . . . . . . . . . . 7-87
• Personal lamp (LED type) bulb replacement . . . . . . 7-88
• Glove box lamp replacement . . . . . . . . . . . . . . . . . . . 7-88
• Luggage lamp (Bulb type) bulb replacement . . . . . . 7-89
• Luggage lamp (LED type) bulb replacement . . . . . . 7-89
• Vanity mirror lamp (Bulb type) bulb replacement . . 7-90
• Vanity mirror lamp (LED type) bulb replacement . . 7-90
Appearance care . . . . . . . . . . . . . . . . . . . . . . . . . . . 7-91
• Exterior care . . . . . . . . . . . . . . . . . . . . . . . . . . . . . . . . 7-91
• Interior care . . . . . . . . . . . . . . . . . . . . . . . . . . . . . . . . . 7-96
Emission control system . . . . . . . . . . . . . . . . . . . 7-100
• Crankcase emission control system . . . . . . . . . . . . . 7-100
• Evaporative emission control (including ORVR: Onboard Refueling Vapor Recovery) system . . . . 7-100
• Exhaust emission control system . . . . . . . . . . . . . . . 7-101
7
Page 532 of 573
789
Maintenance
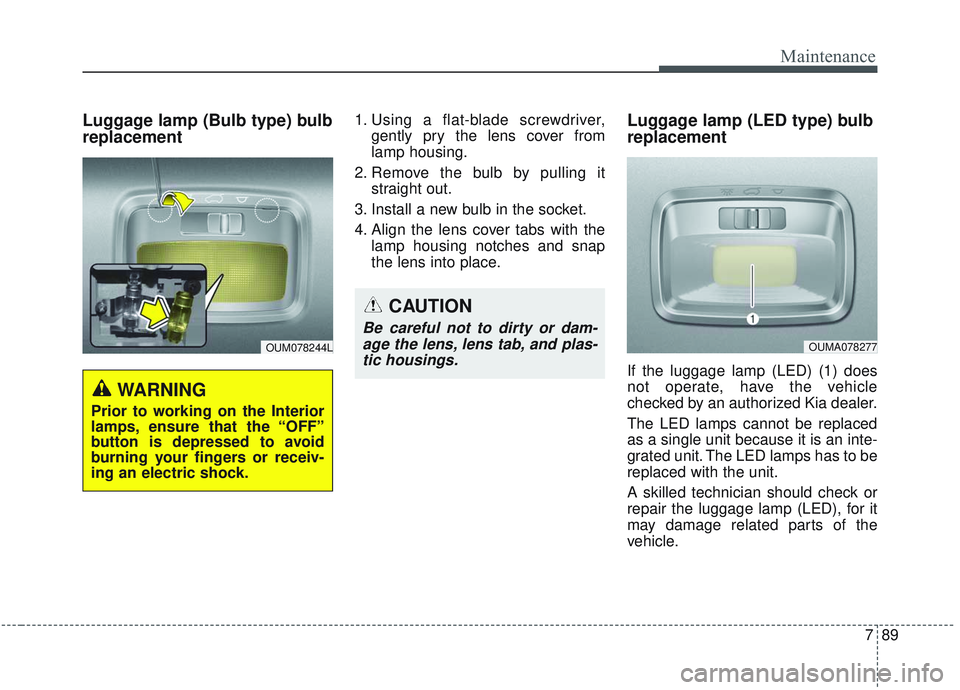
Luggage lamp (Bulb type) bulb
replacement1. Using a flat-blade screwdriver,gently pry the lens cover from
lamp housing.
2. Remove the bulb by pulling it straight out.
3. Install a new bulb in the socket.
4. Align the lens cover tabs with the lamp housing notches and snap
the lens into place.Luggage lamp (LED type) bulb
replacement
If the luggage lamp (LED) (1) does
not operate, have the vehicle
checked by an authorized Kia dealer.
The LED lamps cannot be replaced
as a single unit because it is an inte-
grated unit. The LED lamps has to be
replaced with the unit.
A skilled technician should check or
repair the luggage lamp (LED), for it
may damage related parts of the
vehicle.
WARNING
Prior to working on the Interior
lamps, ensure that the “OFF”
button is depressed to avoid
burning your fingers or receiv-
ing an electric shock.
OUM078244L
CAUTION
Be careful not to dirty or dam-age the lens, lens tab, and plas-tic housings.
OUMA078277