2019 KIA SORENTO reset
[x] Cancel search: resetPage 90 of 573

• Tilting the sunroof . . . . . . . . . . . . . . . . . . . . . . . . . . . 4-55
• Closing the sunroof . . . . . . . . . . . . . . . . . . . . . . . . . . . 4-55
• Resetting the sunroof . . . . . . . . . . . . . . . . . . . . . . . . . 4-56
Steering wheel . . . . . . . . . . . . . . . . . . . . . . . . . . . . . 4-57
• Electric Power Steering (EPS) . . . . . . . . . . . . . . . . . . 4-57
• Tilt and telescopic steering . . . . . . . . . . . . . . . . . . . . . 4-58
• Heated steering wheel . . . . . . . . . . . . . . . . . . . . . . . . . 4-59
• Horn . . . . . . . . . . . . . . . . . . . . . . . . . . . . . . . . . . . . \
. . . 4-60
Mirrors . . . . . . . . . . . . . . . . . . . . . . . . . . . . . . . . . . 4-61\
• Inside rearview mirror . . . . . . . . . . . . . . . . . . . . . . . . 4-61
• Outside rearview mirror. . . . . . . . . . . . . . . . . . . . . . . 4-71
Instrument cluster . . . . . . . . . . . . . . . . . . . . . . . . . 4-75
• Instrument cluster control . . . . . . . . . . . . . . . . . . . . . 4-76
• LCD display control . . . . . . . . . . . . . . . . . . . . . . . . . . 4-76
• Gauges . . . . . . . . . . . . . . . . . . . . . . . . . . . . . . . . . . . . \
. 4-77
• Transmission shift indicator . . . . . . . . . . . . . . . . . . . . 4-80
LCD display . . . . . . . . . . . . . . . . . . . . . . . . . . . . . . 4-82
• LCD modes. . . . . . . . . . . . . . . . . . . . . . . . . . . . . . . . . . 4-82\
Trip modes (Trip computer) . . . . . . . . . . . . . . . . . 4-83
• Trip modes . . . . . . . . . . . . . . . . . . . . . . . . . . . . . . . . . . 4-83\
• Fuel economy . . . . . . . . . . . . . . . . . . . . . . . . . . . . . . . . 4-83
• Accumulated driving information mode . . . . . . . . . . 4-85
• One time driving information mode . . . . . . . . . . . . . 4-85
• Digital speedometer . . . . . . . . . . . . . . . . . . . . . . . . . . . 4-86
• Smart shift . . . . . . . . . . . . . . . . . . . . . . . . . . . . . . . . . . 4-86\
• Turn by turn mode . . . . . . . . . . . . . . . . . . . . . . . . . . . 4-86
• Assist mode . . . . . . . . . . . . . . . . . . . . . . . . . . . . . . . . . . 4-87\
• Distance to empty . . . . . . . . . . . . . . . . . . . . . . . . . . . . 4-89
• User settings mode. . . . . . . . . . . . . . . . . . . . . . . . . . . . 4-89
• Warning messages . . . . . . . . . . . . . . . . . . . . . . . . . . . . 4-94
Warning and indicator lights . . . . . . . . . . . . . . . . 4-99
• Warning lights . . . . . . . . . . . . . . . . . . . . . . . . . . . . . . . 4-99
• Indicator lights. . . . . . . . . . . . . . . . . . . . . . . . . . . . . . 4-106
Rear parking assist system . . . . . . . . . . . . . . . . . 4-111
• Operation of the rear parking assist system . . . . . . 4-111
• Non-operational conditions of rear parking assist
system . . . . . . . . . . . . . . . . . . . . . . . . . . . . . . . . . . . . \
4-112
• Rear parking assist system precautions . . . . . . . . . 4-113
Parking assist system . . . . . . . . . . . . . . . . . . . . . . 4-115
• Operation of the parking assist system . . . . . . . . . . 4-115
• Non-operational conditions of parking assist system . . . . . . . . . . . . . . . . . . . . . . . . . . . . . . . . . . . . \
4-117
Rearview camera . . . . . . . . . . . . . . . . . . . . . . . . . 4-120
360° camera monitoring system . . . . . . . . . . . . . 4-121
• Automatic car wash entry support guidelines . . . . 4-122
Lighting . . . . . . . . . . . . . . . . . . . . . . . . . . . . . . . . . 4-123
• Battery saver function. . . . . . . . . . . . . . . . . . . . . . . . 4-123
• Daytime running light . . . . . . . . . . . . . . . . . . . . . . . . 4-123
• Lighting control . . . . . . . . . . . . . . . . . . . . . . . . . . . . . 4-123
• High beam operation. . . . . . . . . . . . . . . . . . . . . . . . . 4-125
4
Page 91 of 573

• High beam assist . . . . . . . . . . . . . . . . . . . . . . . . . . . . 4-126
• Turn signals and lane change signals . . . . . . . . . . . 4-128
• Front fog light . . . . . . . . . . . . . . . . . . . . . . . . . . . . . . 4-129
• Check headlight . . . . . . . . . . . . . . . . . . . . . . . . . . . . 4-129
• Headlight leveling device . . . . . . . . . . . . . . . . . . . . . 4-129
• Dynamic Bending Light (DBL) . . . . . . . . . . . . . . . . 4-130
Wipers and washers . . . . . . . . . . . . . . . . . . . . . . . 4-131
• Windshield wipers . . . . . . . . . . . . . . . . . . . . . . . . . . . 4-131
• Front windshield washers . . . . . . . . . . . . . . . . . . . . . 4-133
• Rear window wiper and washer switch. . . . . . . . . . 4-134
Interior lights . . . . . . . . . . . . . . . . . . . . . . . . . . . . 4-136
• Automatic turn off function . . . . . . . . . . . . . . . . . . . 4-136
• Room lamp . . . . . . . . . . . . . . . . . . . . . . . . . . . . . . . . . 4-136
• Map lamp . . . . . . . . . . . . . . . . . . . . . . . . . . . . . . . . . . 4-13\
7
• Luggage lamp. . . . . . . . . . . . . . . . . . . . . . . . . . . . . . . 4-138
• Vanity mirror lamp . . . . . . . . . . . . . . . . . . . . . . . . . . 4-138
• Glove box lamp . . . . . . . . . . . . . . . . . . . . . . . . . . . . . 4-138
Welcome system . . . . . . . . . . . . . . . . . . . . . . . . . . 4-139
• Headlight (Headlamp) escort function . . . . . . . . . . 4-139
• Interior light . . . . . . . . . . . . . . . . . . . . . . . . . . . . . . . 4-139
• Pocket lamp . . . . . . . . . . . . . . . . . . . . . . . . . . . . . . . . 4-139
Defroster . . . . . . . . . . . . . . . . . . . . . . . . . . . . . . . . 4-140
• Rear window defroster . . . . . . . . . . . . . . . . . . . . . . . 4-140
Manual climate control system . . . . . . . . . . . . . . 4-141
• Heating and air conditioning . . . . . . . . . . . . . . . . . . 4-142
• 3rd row air conditioning . . . . . . . . . . . . . . . . . . . . . . 4-147
• System operation . . . . . . . . . . . . . . . . . . . . . . . . . . . . 4-148
• Climate control air filter . . . . . . . . . . . . . . . . . . . . . . 4-150
• Checking the amount of air conditioner refrigerant and compressor lubricant . . . . . . . . . . . . . . . . . . . . . . . 4-151
Automatic climate control system . . . . . . . . . . . 4-152
• Automatic heating and air conditioning . . . . . . . . . 4-153
• Manual heating and air conditioning . . . . . . . . . . . 4-154
• To cancel or reset the automatic ventilation . . . . . . 4-159
• 3rd row air conditioning . . . . . . . . . . . . . . . . . . . . . . 4-160
• System operation . . . . . . . . . . . . . . . . . . . . . . . . . . . . 4-160
• Climate control air filter . . . . . . . . . . . . . . . . . . . . . . 4-162
• Checking the amount of air conditioner refrigerant and compressor lubricant . . . . . . . . . . . . . . . . . . . . . . . 4-163
Windshield defrosting and defogging . . . . . . . . . 4-164
• Manual climate control system . . . . . . . . . . . . . . . . 4-164
• Automatic climate control system . . . . . . . . . . . . . . 4-165
• Defogging logic. . . . . . . . . . . . . . . . . . . . . . . . . . . . . . 4-166
Storage compartments . . . . . . . . . . . . . . . . . . . . . 4-169
• Center console storage . . . . . . . . . . . . . . . . . . . . . . . 4-169
• Glove box . . . . . . . . . . . . . . . . . . . . . . . . . . . . . . . . . . 4-16\
9
• Sunglass holder . . . . . . . . . . . . . . . . . . . . . . . . . . . . . 4-170
• Luggage box . . . . . . . . . . . . . . . . . . . . . . . . . . . . . . . . 4-171
4
Page 121 of 573
433
Features of your vehicle
However, if the resistance is weak
such as from an object that is thin or
soft, or the liftgate is near the latched
position, the automatic stop and
reversal may not detect the resist-
ance.
If the automatic reversal feature
operates continuously more than
twice during opening or closing oper-
ation, the power liftgate may stop at
that position. At this time, close the
liftgate manually and operate the lift-
gate automatically again.How to reset the power liftgate
If the battery has been discharged or
disconnected, or if the related fuse has
been replaced or disconnected, for the
power liftgate to operate normally,
reset the power liftgate as follows:
1. Put the automatic shift lever in P(Park).
2. While pressing the liftgate close button, press the liftgate handle
switch for more than 3 seconds.
(the chime will sound)
3. Close the liftgate manually.
If the power liftgate does not work
properly after the above procedure,
have the system checked by an
authorized Kia dealer.
✽ ✽ NOTICE
If the power liftgate does not operate
normally, first check the following
condition before using the power
liftgate.
Make sure the automatic shift lever
is in P (Park) or the manual shift
lever is in N (Neutral).
WARNING
Never place any object or part
of your body in the path of the
power liftgate as it is operating.
Doing so could result in person-
al injury.
Page 130 of 573
Features of your vehicle
42
4
Auto up/down window (if equipped)
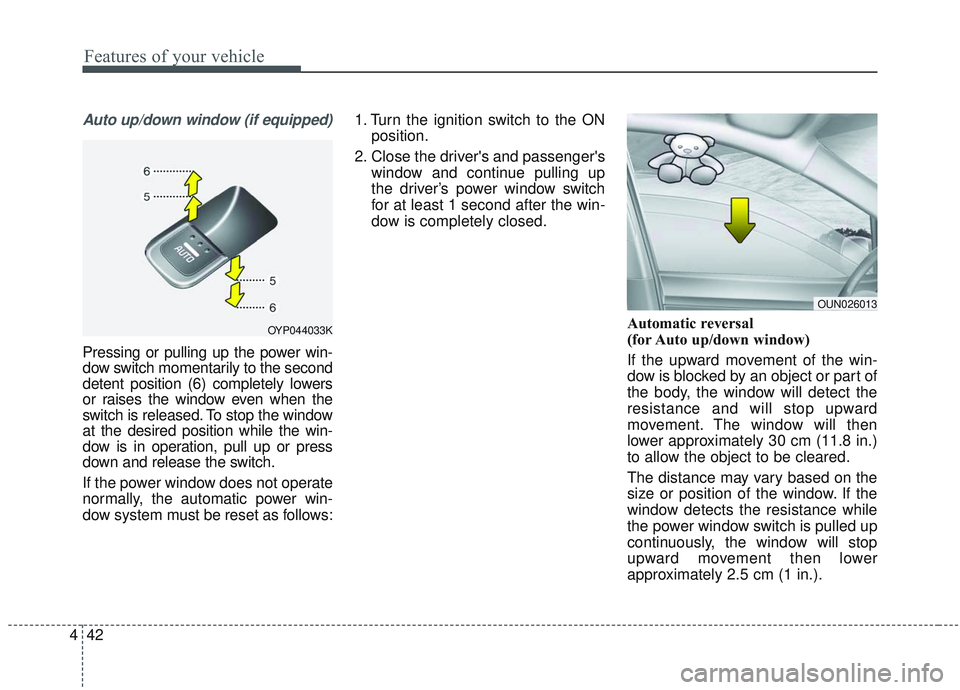
Pressing or pulling up the power win-
dow switch momentarily to the second
detent position (6) completely lowers
or raises the window even when the
switch is released. To stop the window
at the desired position while the win-
dow is in operation, pull up or press
down and release the switch.
If the power window does not operate
normally, the automatic power win-
dow system must be reset as follows: 1. Turn the ignition switch to the ON
position.
2. Close the driver's and passenger's window and continue pulling up
the driver’s power window switch
for at least 1 second after the win-
dow is completely closed.
Automatic reversal
(for Auto up/down window)
If the upward movement of the win-
dow is blocked by an object or part of
the body, the window will detect the
resistance and will stop upward
movement. The window will then
lower approximately 30 cm (11.8 in.)
to allow the object to be cleared.
The distance may vary based on the
size or position of the window. If the
window detects the resistance while
the power window switch is pulled up
continuously, the window will stop
upward movement then lower
approximately 2.5 cm (1 in.).
OYP044033K
OUN026013
Page 131 of 573
443
Features of your vehicle
And if the power window switch is
pulled up continuously again within 5
seconds after the window is lowered
by the automatic window reversal
feature, the automatic window rever-
sal will not operate.
The automatic reverse feature for the
driver’s window is only active when
the “auto up” feature is used by fully
pulling up the switch. The automatic
reverse feature will not operate if the
window is raised using the halfway
position on the power window switch.
Always check for obstructions before
raising any window to avoid injuries
or vehicle damage. If an object less
than 0.16 in. (4 mm) in diameter is
caught between the window glass
and the upper window channel, the
automatic reverse window may not
detect the resistance and will not
stop and reverse direction.Power window lock button
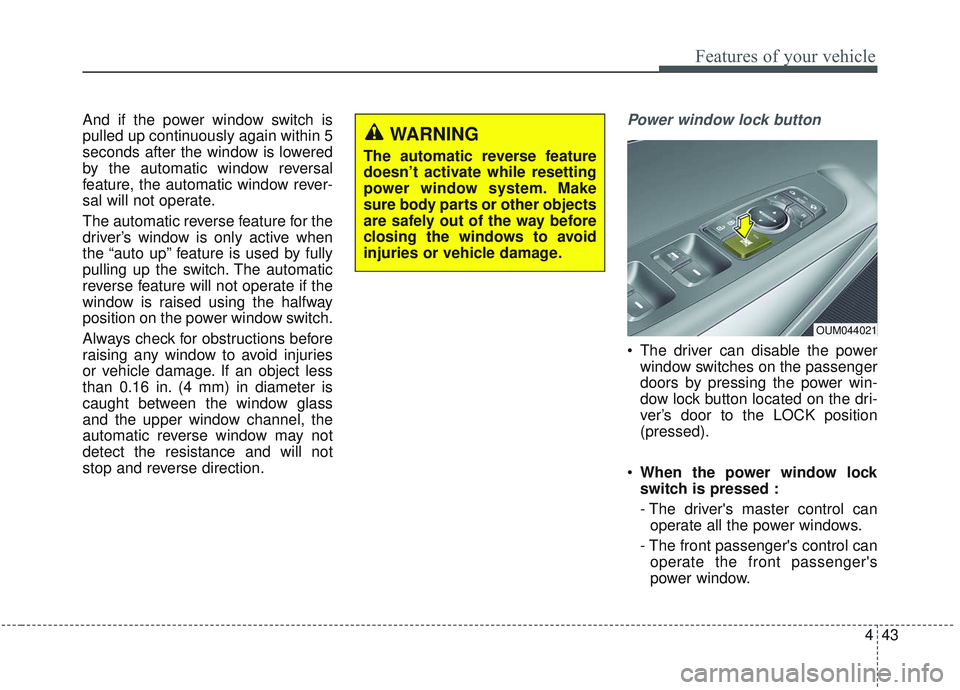
The driver can disable the powerwindow switches on the passenger
doors by pressing the power win-
dow lock button located on the dri-
ver’s door to the LOCK position
(pressed).
When the power window lock
switch is pressed :
- The driver's master control can
operate all the power windows.
- The front passenger's control can operate the front passenger's
power window.
OUM044021
WARNING
The automatic reverse feature
doesn’t activate while resetting
power window system. Make
sure body parts or other objects
are safely out of the way before
closing the windows to avoid
injuries or vehicle damage.
Page 144 of 573
Features of your vehicle
56
4
Resetting the sunroof
Whenever the vehicle battery is dis-
connected or discharged, you must
reset your sunroof system as follows:
1. Turn the ignition switch to the ON
position.
2. Close the sunshade and sunroof completely if opened.
3. Release the sunroof control lever.
4. Push the sunroof control lever for- ward in the direction of close for
about (5 ~10 seconds) until the sun-
roof operates as follows: SUN-
SHADE OPENS → GLASS TILTS
UP →SOUND OF MOTOR’S
‘CLICK’ and then release the button.
[Do not release the button on
movement. (initialization of reset
will fail)] 5. Push the sunroof control lever for-
ward in the direction of close for
about (1 ~2 seconds), until the sun-
roof operates as follows: GLASS
OPEN →GLASS/SUNSHADE
CLOSE and then release the but-
ton. [Do not release the button on
movement. (initialization failed)]
When this is complete, the sunroof
system has been reset and one
touch open and close should be
restored.
✽ ✽ NOTICE
If you do not reset the sunroof, it
may not work properly.
Page 164 of 573
Features of your vehicle
76
4
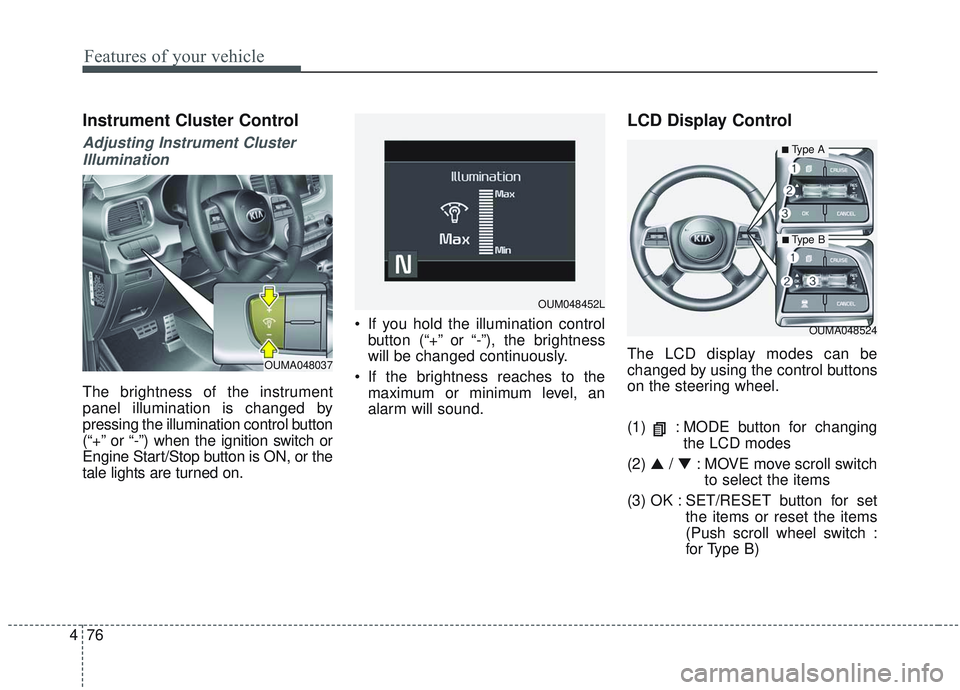
Instrument Cluster Control
Adjusting Instrument Cluster
Illumination
The brightness of the instrument
panel illumination is changed by
pressing the illumination control button
(“+” or “-”) when the ignition switch or
Engine Start/Stop button is ON, or the
tale lights are turned on. If you hold the illumination control
button (“+” or “-”), the brightness
will be changed continuously.
If the brightness reaches to the maximum or minimum level, an
alarm will sound.
LCD Display Control
The LCD display modes can be
changed by using the control buttons
on the steering wheel.
(1) : MODE button for changing the LCD modes
(2) ▲ / ▼ : MOVE move scroll switch
to select the items
(3) OK : SET/RESET button for set the items or reset the items
(Push scroll wheel switch :
for Type B)
OUMA048524
OUM048452L
OUMA048037
■Type A
■ Type B
Page 171 of 573

483
Features of your vehicle
The trip computer is a microcomput-
er-controlled driver information sys-
tem that displays information related
to driving.
✽ ✽NOTICE
Some driving information stored in
the trip computer (for example
Average Vehicle Speed) resets if the
battery is disconnected.
Trip Modes Fuel Economy
Average Fuel Economy (1)
The average fuel economy is cal-
culated by the total driving dis-
tance and fuel consumption since
the last average fuel economy
reset.
- Fuel economy range: 0.0 ~ 99.9km/L, L/100km or MPG
The average fuel economy can be reset both manually and automati-
cally.
TRIP MODES (TRIP COMPUTER)
To change the trip mode, scroll the
MOVE scroll switch (▲/▼) in the trip
computer mode.
OUMA048527C
* : if equipped
Accumulated Info
Digital speedometer
Drive Info
Fuel Economy
Smart shift*