2019 KIA SORENTO instrument panel
[x] Cancel search: instrument panelPage 232 of 573
Features of your vehicle
144
4
MAX A/C selection
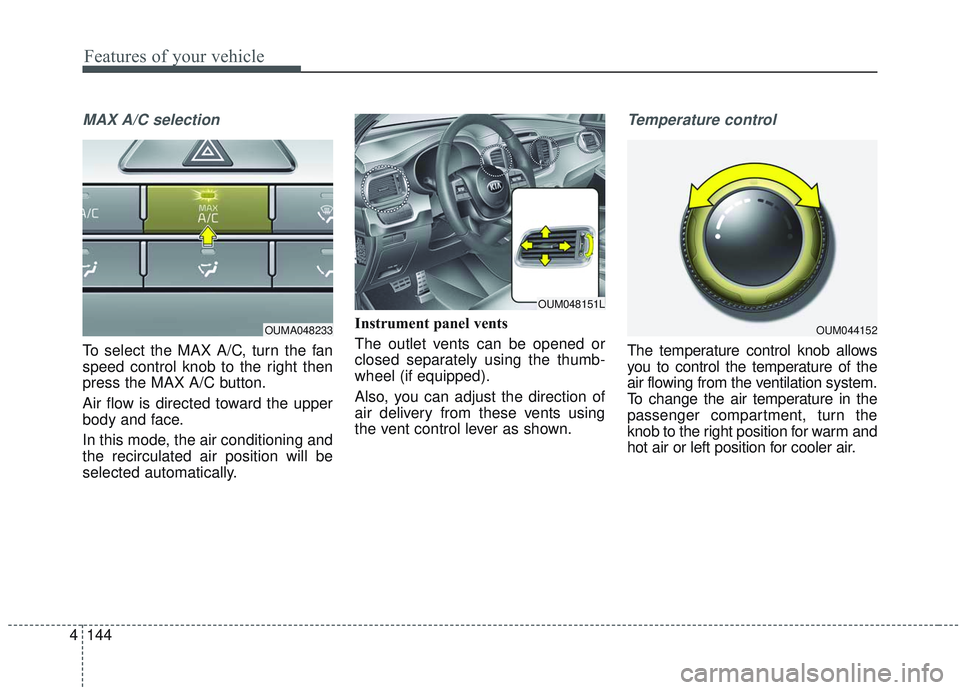
To select the MAX A/C, turn the fan
speed control knob to the right then
press the MAX A/C button.
Air flow is directed toward the upper
body and face.
In this mode, the air conditioning and
the recirculated air position will be
selected automatically. Instrument panel vents
The outlet vents can be opened or
closed separately using the thumb-
wheel (if equipped).
Also, you can adjust the direction of
air delivery from these vents using
the vent control lever as shown.
Temperature control
The temperature control knob allows
you to control the temperature of the
air flowing from the ventilation system.
To change the air temperature in the
passenger compartment, turn the
knob to the right position for warm and
hot air or left position for cooler air.
OUMA048233OUM044152
OUM048151L
Page 242 of 573

Features of your vehicle
154
4
✽ ✽
NOTICE
Never place anything over the sensor
located on the instrument panel to
ensure better control of the heating
and cooling system.
Manual heating and air condi-
tioning
The heating and cooling system can
be controlled manually by pressing
buttons or turning knob(s) other than
the AUTO button. In this case, the
system works sequentially according
to the order of buttons or knob(s)
selected.
1. Start the engine.
2. Set the mode to the desired posi-
tion.
For improving the effectiveness of
heating and cooling;
- Heating:
- Cooling:
3. Set the temperature control to the desired position.
4. Set the air intake control to the outside (fresh) air position.
5. Set the fan speed control to the desired speed.
6. If air conditioning is desired, turn the air conditioning system on.
Press the AUTO button in order to
convert to full automatic control of
the system.
Mode selection
The mode selection button controls
the direction of the air flow through
the ventilation system.
The air flow outlet port is converted
as follows:
- VENT \b B/L \b FLOOR \b MIX
OUM044075
OUMA048160
Page 244 of 573
Features of your vehicle
156
4
Instrument panel vents
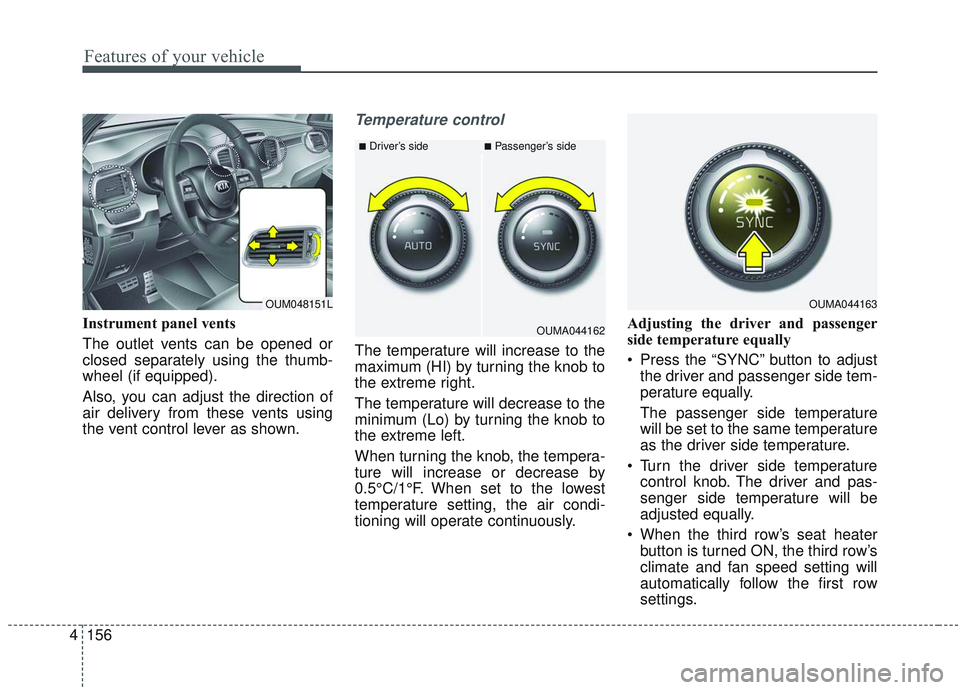
The outlet vents can be opened or
closed separately using the thumb-
wheel (if equipped).
Also, you can adjust the direction of
air delivery from these vents using
the vent control lever as shown.
Temperature control
The temperature will increase to the
maximum (HI) by turning the knob to
the extreme right.
The temperature will decrease to the
minimum (Lo) by turning the knob to
the extreme left.
When turning the knob, the tempera-
ture will increase or decrease by
0.5°C/1°F. When set to the lowest
temperature setting, the air condi-
tioning will operate continuously. Adjusting the driver and passenger
side temperature equally
Press the “SYNC” button to adjust
the driver and passenger side tem-
perature equally.
The passenger side temperature
will be set to the same temperature
as the driver side temperature.
Turn the driver side temperature control knob. The driver and pas-
senger side temperature will be
adjusted equally.
When the third row’s seat heater button is turned ON, the third row’s
climate and fan speed setting will
automatically follow the first row
settings.
OUM048151L
■Driver’s side■Passenger’s side
OUMA044162
OUMA044163
Page 370 of 573

593
Driving your vehicle
LKA SYSTEM operation
To activate/deactivate the LKA SYS-
TEM:
With the ignition switch in the ON
position, press the LKA SYSTEM
button located on the instrument
panel on the lower left hand side of
the driver.
The indicator in the cluster display
will initially illuminate white.
When the indicator (white) activated
in the previous ignition cycle, the
system turns on without any control.If you press the LKA SYSTEM button
again, the indicator on the cluster
display will go off.
The color of indicator will change
depend on the condition of LKA
SYSTEM.
- White : Sensor does not detect the
lane marker or vehicle
speed is less than 64 km/h
(40 mph).
- Green : S ensor detects the lane
marker and system is able
to control the steering.
LKA SYSTEM activation
To see the LKA SYSTEM screen on the LCD display in the cluster,
Tab to the Assist mode ( ).
For further details, refer to [menu settings] in chapter 4, [crash pad].
After LKA SYSTEM is activated, if both lane markers are detected,
vehicle speed is over 64 km/h (40
mph) and all the activation condi-
tions are satisfied, a green steering
wheel indicator will illuminate and
the steering wheel will be controlled.
OUMA058031
WARNING
The Lane Keeping Assist
System is a system to help pre-
vent the driver from leaving the
lane. However, the driver should
not solely rely on the system
but always check the road con-
ditions when driving.
Page 406 of 573

5129
Driving your vehicle
Turn signals when towing a trailer
When you tow a trailer, your vehicle
has to have a different turn signal
flasher and extra wiring. The green
arrows on your instrument panel will
flash whenever you signal a turn or
lane change. Properly connected,
the trailer lights will also flash to alert
other drivers you’re about to turn,
change lanes, or stop.
When towing a trailer, the green
arrows on your instrument panel will
flash for turns even if the bulbs on the
trailer are burned out. Thus, you may
think drivers behind you are seeing
your signals when, in fact, they are
not. It’s important to check occasion-
ally to be sure the trailer bulbs are still
working. You must also check the
lights every time you disconnect and
then reconnect the wires.
Do not connect a trailer lighting sys-
tem directly to your vehicle’s lighting
system. Use only an approved trailer
wiring harness.
An authorized Kia dealer can assist
you in installing the wiring harness.
Driving on grades
Reduce speed and shift to a lower
gear before you start down a long or
steep downgrade. If you don’t shift
down, you might have to use your
brakes so much that they would get
hot and no longer operate efficiently.
On a long uphill grade, shift down
and reduce your speed to around 70
km/h (45 mph) to reduce the possi-
bility of engine and transmission
overheating.
If your trailer weighs more than the
maximum trailer weight without trail-
er brakes and you have an automat-
ic transmission, you should drive in D
(Drive) when towing a trailer.
Operating your vehicle in D (Drive)
when towing a trailer will minimize
heat build up and extend the life of
your transmission.CAUTION
Always use an approved trailerwiring harness. Failure to usean approved trailer wiring har-ness could result in damage tothe vehicle electrical system.
Page 497 of 573

Maintenance
54
7
3. Pull the suspected fuse straight
out. Use the removal tool provided
on the engine compartment fuse
panel cover.
4. Check the removed fuse; replace it if it is blown.
Spare fuses are provided in theengine compartment fuse panel.
5. Push in a new fuse of the same rating, and make sure it fits tightly
in the clips.
If it fits loosely, consult an authorized
Kia dealer.
If you do not have a spare, use a fuse of the same rating from a circuityou may not need for operating thevehicle, such as the power outletfuse.
If the head lamp, turn signal lamp,
stop signal lamp, fog lamp, DRL, tail
lamp, HMSL do not work and the
fuses are OK, check the fuse panel
in the engine compartment. If a fuse
is blown, it must be replaced.
✽ ✽ NOTICE
If the headlamp, fog lamp, turn sig-
nal lamp, or tail lamp malfunction
even without any problem to the
lamps, have the vehicle checked by
an authorized Kia dealer for assis-
tance.
Fuse switch
Always, put the fuse switch at the ON
position.
If you move the switch to the OFF
position, some items such as audio
and digital clock must be reset and
transmitter (or smart key) may not
work properly. When the switch is
Off, the caution indicator will be dis-
played on the instrument cluster.
Always place the fuse switch in the
ON position while driving the vehicle.
OUM074016
OUMA074017
Page 561 of 573
Index
4I
Child restraint system . . . . . . . . . . . . . . . . . . . . . . . . . . 3-38Using a child restraint system . . . . . . . . . . . . . . . . . 3-39
Placing a passenger seat belt into the auto lock mode . . . . . . . . . . . . . . . . . . . . . . . . . . . . . . . . . . . . \
3-40
Securing a child restraint seat with tether anchor system. . . . . . . . . . . . . . . . . . . . . . . . . . . . . 3-43
Securing a child restraint seat with child seat lower anchor system. . . . . . . . . . . . . . . . . . . . . . . . . . . . . 3-44
Child-protector rear door lock . . . . . . . . . . . . . . . . . . . 4-25
Climate control air filter . . . . . . . . . . . . . . . . . . . . . . . . 7-29 Filter inspection . . . . . . . . . . . . . . . . . . . . . . . . . . . . 7-29
Closing the sunroof. . . . . . . . . . . . . . . . . . . . . . . . . . . . 4-55
Coat hook . . . . . . . . . . . . . . . . . . . . . . . . . . . . . . . . . . 4-18\
2
Combined instrument, see instrument cluster . . . . . . . 4-75
Consumer assistance . . . . . . . . . . . . . . . . . . . . . . . . . . . 8-12
Coolant . . . . . . . . . . . . . . . . . . . . . . . . . . . . . . . . . . . . \
. 7-21
Cooling fluid, see engine coolant . . . . . . . . . . . . . . . . . 7-21
Crankcase emission control system . . . . . . . . . . . . . . 7-100
Cruise control system . . . . . . . . . . . . . . . . . . . . . . . . . . 5-63 To set cruise control speed . . . . . . . . . . . . . . . . . . . . 5-63
To increase cruise control set speed. . . . . . . . . . . . . 5-64
To decrease the cruising speed. . . . . . . . . . . . . . . . . 5-65
To temporarily accelerate with the cruise control on5-65
To cancel cruise control . . . . . . . . . . . . . . . . . . . . . . 5-65
To resume cruising speed at more than approximately 30 km/h (20mph) . . . . . . . . . . . . . . . . . . . . . . . . . . 5-66
To turn cruise control off . . . . . . . . . . . . . . . . . . . . . 5-66 Cup holder . . . . . . . . . . . . . . . . . . . . . . . . . . . . . . . . . 4-172
Curtain air bag . . . . . . . . . . . . . . . . . . . . . . . . . . . . . . . 3-63
Dashboard illumination, see instrument panel
illumination . . . . . . . . . . . . . . . . . . . . . . . . . . . . . . 4-76
Dashboard, see instrument cluster . . . . . . . . . . . . . . . . 4-75
Day/Night rearview mirror . . . . . . . . . . . . . . . . . . . . . . 4-61
Daytime running light. . . . . . . . . . . . . . . . . . . . . . . . . 4-123
Defogging (Windshield) . . . . . . . . . . . . . . . . . . . . . . . 4-164
Defroster (Rear window) . . . . . . . . . . . . . . . . . . . . . . 4-140
Defrosting (Windshield) . . . . . . . . . . . . . . . . . . . . . . . 4-164
Digital speedometer . . . . . . . . . . . . . . . . . . . . . . . . . . . 4-86
Dimensions . . . . . . . . . . . . . . . . . . . . . . . . . . . . . . . . . . . 8-\
2
Display illumination, see instrument panel illumination . . . . . . . . . . . . . . . . . . . . . . . . . . . . . . . 4-76
Displays, see instrument cluster . . . . . . . . . . . . . . . . . . 4-75
Distance to empty . . . . . . . . . . . . . . . . . . . . . . . . . . . . . 4-89
Do not use methanol . . . . . . . . . . . . . . . . . . . . . . . . . . . . 1-4
Door lock button . . . . . . . . . . . . . . . . . . . . . . . . . . . . . . 4-23
Door locks. . . . . . . . . . . . . . . . . . . . . . . . . . . . . . . . . . . 4-\
22 From outside the vehicle . . . . . . . . . . . . . . . . . . . . . 4-22
From inside the vehicle . . . . . . . . . . . . . . . . . . . . . . 4-23
Door lock button . . . . . . . . . . . . . . . . . . . . . . . . . . . 4-23
Central door lock switch . . . . . . . . . . . . . . . . . . . . . 4-24
Child-protector rear door lock . . . . . . . . . . . . . . . . . 4-25
Drinks holders, see cup holders . . . . . . . . . . . . . . . . . 4-172
D
Page 565 of 573
Index
8I
Heated steering wheel. . . . . . . . . . . . . . . . . . . . . . . . . . 4-58
High - beam operation . . . . . . . . . . . . . . . . . . . . . . . . 4-125
High beam assist . . . . . . . . . . . . . . . . . . . . . . . . . . . . . 4-126
High mounted stop lamp (LED type) bulb replacement . . . . . . . . . . . . . . . . . . . . . . . . . . . . . . . 7-88
Highway driving . . . . . . . . . . . . . . . . . . . . . . . . . . . . . 5-121
Hill-start Assist Control (HAC) . . . . . . . . . . . . . . . . . . 5-47
Hitches . . . . . . . . . . . . . . . . . . . . . . . . . . . . . . . . . . . . \
5-127
Hood . . . . . . . . . . . . . . . . . . . . . . . . . . . . . . . . . . . . \
. . . 4-45 Opening the hood . . . . . . . . . . . . . . . . . . . . . . . . . . . 4-45
Closing the hood . . . . . . . . . . . . . . . . . . . . . . . . . . . 4-46
Hood open warning . . . . . . . . . . . . . . . . . . . . . . . . . 4-45
Horn . . . . . . . . . . . . . . . . . . . . . . . . . . . . . . . . . . . . \
. . . 4-60
How to use this manual . . . . . . . . . . . . . . . . . . . . . . . . . 1-2
Icy road warning . . . . . . . . . . . . . . . . . . . . . . . . . . . . . . 4-81
If you do decide to pull a trailer . . . . . . . . . . . . . . . . . 5-132
Immobilizer system (Folding key) . . . . . . . . . . . . . . . . . 4-9
Immobilizer system (Smart key) . . . . . . . . . . . . . . . . . 4-17
Indicator lights . . . . . . . . . . . . . . . . . . . . . . . . . . . . . . 4-106
Inside rearview mirror . . . . . . . . . . . . . . . . . . . . . . . . . 4-61
Instrument cluster . . . . . . . . . . . . . . . . . . . . . . . . . . . . . 4-75 Instrument cluster control . . . . . . . . . . . . . . . . . . . . 4-76
LCD display control . . . . . . . . . . . . . . . . . . . . . . . . . 4-76
Gauges . . . . . . . . . . . . . . . . . . . . . . . . . . . . . . . . . . . 4-\
77 Warning lights . . . . . . . . . . . . . . . . . . . . . . . . . . . . . 4-99
Indicator lights . . . . . . . . . . . . . . . . . . . . . . . . . . . . 4-106
Instrument panel overview . . . . . . . . . . . . . . . . . . . . . . . 2-5
Interior care. . . . . . . . . . . . . . . . . . . . . . . . . . . . . . . . . . 7-96\
Interior features. . . . . . . . . . . . . . . . . . . . . . . . . . . . . . 4-172 Cup holder . . . . . . . . . . . . . . . . . . . . . . . . . . . . . . . 4-172
Seat warmer . . . . . . . . . . . . . . . . . . . . . . . . . . . . . . 4-173
Seat cooler . . . . . . . . . . . . . . . . . . . . . . . . . . . . . . . 4-174
Sunvisor . . . . . . . . . . . . . . . . . . . . . . . . . . . . . . . . . 4-175
Power outlet . . . . . . . . . . . . . . . . . . . . . . . . . . . . . . 4-175
Coat hook . . . . . . . . . . . . . . . . . . . . . . . . . . . . . . . . 4-182
Floor mat anchor(s) . . . . . . . . . . . . . . . . . . . . . . . . 4-182
USB charger . . . . . . . . . . . . . . . . . . . . . . . . . . . . . . 4-178
Luggage net (Holder) . . . . . . . . . . . . . . . . . . . . . . 4-183
Side curtain. . . . . . . . . . . . . . . . . . . . . . . . . . . . . . . 4-183
Wireless smart phone charging system . . . . . . . . . 4-179
AC inverter . . . . . . . . . . . . . . . . . . . . . . . . . . . . . . . 4-176
Interior light . . . . . . . . . . . . . . . . . . . . . . . . . . . . . . . . 4-136 Automatic turn off function . . . . . . . . . . . . . . . . . . 4-136
Map lamp . . . . . . . . . . . . . . . . . . . . . . . . . . . . . . . . 4-137
Room lamp . . . . . . . . . . . . . . . . . . . . . . . . . . . . . . . 4-136
Luggage lamp . . . . . . . . . . . . . . . . . . . . . . . . . . . . . 4-138
Glove box lamp . . . . . . . . . . . . . . . . . . . . . . . . . . . 4-138
Vanity mirror lamp . . . . . . . . . . . . . . . . . . . . . . . . . 4-138
Interior overview . . . . . . . . . . . . . . . . . . . . . . . . . . . . . . 2-4
I