2019 KIA SORENTO instrument panel
[x] Cancel search: instrument panelPage 71 of 573
Safety features of your vehicle
54
3
Main components of the occu-
pant detection system
A detection device located within the front passenger seat cushion.
An electronic system which deter- mines whether the passenger air
bag systems should be activated
or deactivated.
A indicator light located on the instrument panel which illuminates
the words PASSENGER AIR BAG
“OFF” indicating the front passen-
ger air bag system is deactivated.
The instrument panel air bag warn- ing light is interconnected with the
occupant detection system. If the front passenger seat is occu-
pied by a person that the system
determines to be of appropriate size,
and he/she sits properly (sitting
upright with the seatback in an
upright position, centered on the
seat cushion with their seat belt on,
legs comfortably extended and their
feet on the floor), the PASSENGER
AIR BAG “OFF” indicator will turn off
and the front passenger's air bag will
be able to inflate, if necessary, in
frontal crashes.
You will find the PASSENGER AIR
BAG “OFF” indicator on the center
facia panel. This system detects the
conditions 1~4 in the following table
and activates or deactivates the front
passenger air bag based on these
conditions. Always be sure that you and all vehi-
cle occupants are seated and
restrained properly (sitting upright
with the seat in an upright position,
centered on the seat cushion, with
the person’s legs comfortably
extended, feet on the floor, and wear-
ing the safety belt properly) for the
most effective protection by the air
bag and the safety belt.
The ODS (Occupant Detection
System) may not function properly if
the passenger takes actions which
can defeat the detection system.
These include:
(1) Failing to sit in an upright posi- tion.
(2) Leaning against the door or cen- ter console.
(3) Sitting towards the sides or the front of the seat.
(4) Putting legs on the dashboard or resting them on other locations
which reduce the passenger
weight on the front seat.
(5) Improperly wearing the safety
belt.
(6) Reclining the seat back.
Page 75 of 573
Safety features of your vehicle
58
3
Even though your vehicle is
equipped with the occupant detec-
tion system, never install a child
restraint system in the front pas-
senger's seat. A deploying air bag
can forcefully strike a child result-
ing in serious injuries or death. Any
child age 12 and under should ride
in the rear seat. Children too large
for child restraints should use the
available lap/shoulder belts. No
matter what type of crash, children
of all ages are safer when
restrained in the rear seat.
If the PASSENGER AIR BAG “OFF” indicator is illuminated when
the front passenger's seat is occu-
pied by an adult and he/she sits
properly (sitting upright with the
seatback in an upright position,
centered on the seat cushion with
their seat belt on, legs comfortably
extended and their feet on the
floor), have that person sit in the
rear seat. Any child age 12 and under should
ride in the rear seat. Children too
large for child restraints should use
the available lap/shoulder belts. No
matter what type of crash, children of
all ages are safer when restrained in
the rear seat.
If the occupant detection system is
not working properly, the SRS air
bag warning light on the instrument
panel will illuminate because the
passenger's front air bag is connect-
ed with the occupant detection sys-
tem. If there is a malfunction of the
occupant detection system, the PAS-
SENGER AIR BAG “OFF” indicator
will not illuminate and the passen-
ger's front air bag will inflate in frontal
impact crashes even if there is no
occupant in the front passenger's
seat.
WARNING
- Replacement/modifications
The front passenger seat, dash-
board or door should not be
replaced except by an authorized
Kia dealer using original Kia parts
designed for this vehicle and
model. Any other such replace-
ment or modification could
adversely affect the operation of
the occupant detection system
and your advanced air bags.
Page 78 of 573
361
Safety features of your vehicle
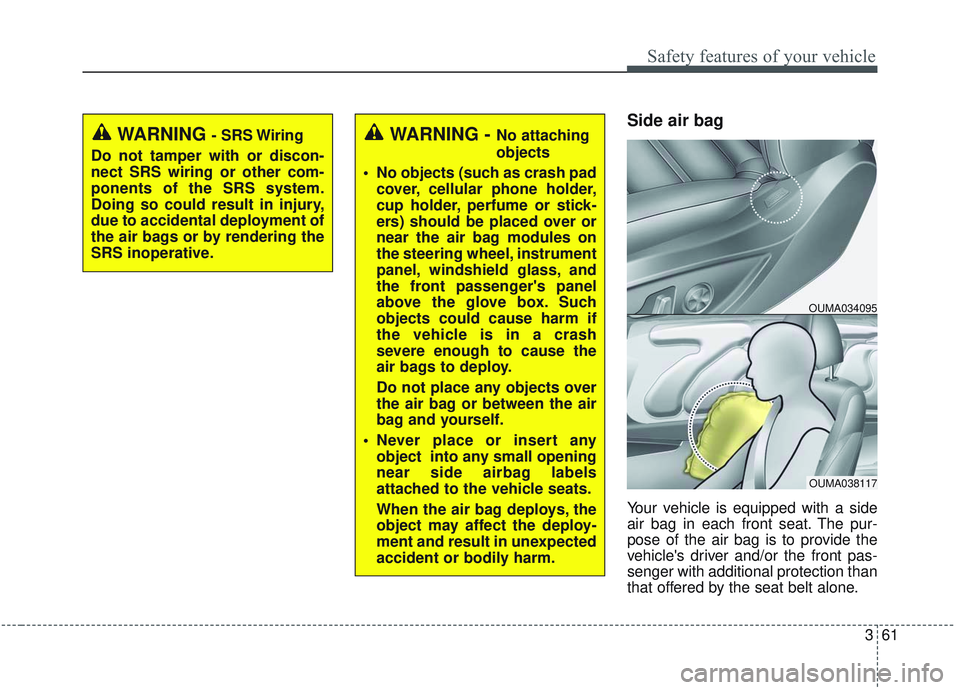
Side air bag
Your vehicle is equipped with a side
air bag in each front seat. The pur-
pose of the air bag is to provide the
vehicle's driver and/or the front pas-
senger with additional protection than
that offered by the seat belt alone.
WARNING - No attaching
objects
No objects (such as crash pad cover, cellular phone holder,
cup holder, perfume or stick-
ers) should be placed over or
near the air bag modules on
the steering wheel, instrument
panel, windshield glass, and
the front passenger's panel
above the glove box. Such
objects could cause harm if
the vehicle is in a crash
severe enough to cause the
air bags to deploy.
Do not place any objects over
the air bag or between the air
bag and yourself.
Never place or insert any object into any small opening
near side airbag labels
attached to the vehicle seats.
When the air bag deploys, the
object may affect the deploy-
ment and result in unexpected
accident or bodily harm.
OUMA038117
OUMA034095
WARNING- SRS Wiring
Do not tamper with or discon-
nect SRS wiring or other com-
ponents of the SRS system.
Doing so could result in injury,
due to accidental deployment of
the air bags or by rendering the
SRS inoperative.
Page 146 of 573
Features of your vehicle
58
4
(Continued)
• When you operate the steering
wheel in low temperature, abnor-
mal noise may occur. If tempera-
ture rises, the noise will likely dis-
appear. This is a normal condition.
• When the charging system warning light comes on due to the low volt-
age (When the alternator or bat-
tery) does not operate normally or
malfunctions), the steering wheel
may require increased steering
effort.Tilt and telescopic steering
Tilt and telescopic steering allows
you to adjust the steering wheel
before you drive. You can also raise it
to give your legs more room when
you exit and enter the vehicle.
The steering wheel should be posi-
tioned so that it is comfortable for
you to drive, while permitting you to
see the instrument panel warning
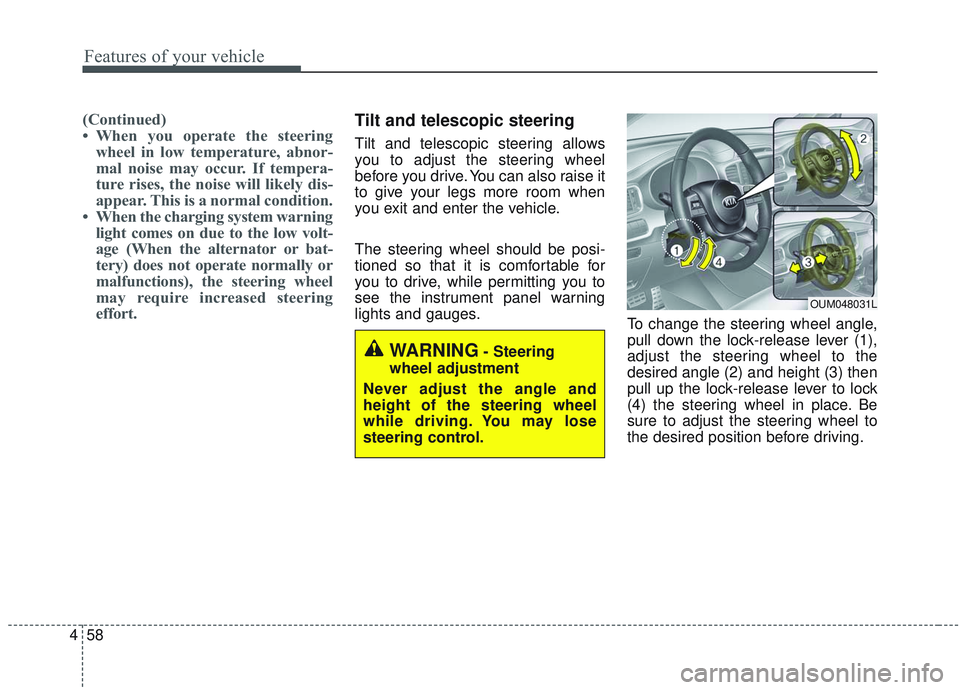
lights and gauges. To change the steering wheel angle,
pull down the lock-release lever (1),
adjust the steering wheel to the
desired angle (2) and height (3) then
pull up the lock-release lever to lock
(4) the steering wheel in place. Be
sure to adjust the steering wheel to
the desired position before driving.
OUM048031L
WARNING- Steering
wheel adjustment
Never adjust the angle and
height of the steering wheel
while driving. You may lose
steering control.
Page 164 of 573
Features of your vehicle
76
4
Instrument Cluster Control
Adjusting Instrument Cluster
Illumination
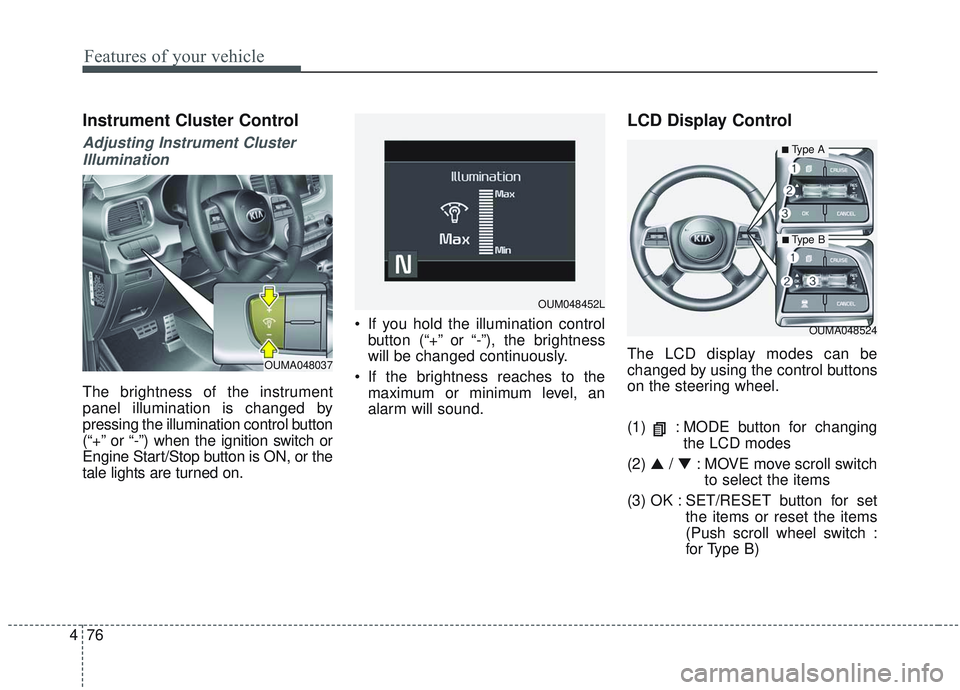
The brightness of the instrument
panel illumination is changed by
pressing the illumination control button
(“+” or “-”) when the ignition switch or
Engine Start/Stop button is ON, or the
tale lights are turned on. If you hold the illumination control
button (“+” or “-”), the brightness
will be changed continuously.
If the brightness reaches to the maximum or minimum level, an
alarm will sound.
LCD Display Control
The LCD display modes can be
changed by using the control buttons
on the steering wheel.
(1) : MODE button for changing the LCD modes
(2) ▲ / ▼ : MOVE move scroll switch
to select the items
(3) OK : SET/RESET button for set the items or reset the items
(Push scroll wheel switch :
for Type B)
OUMA048524
OUM048452L
OUMA048037
■Type A
■ Type B
Page 212 of 573

Features of your vehicle
124
4
Parking & Tail light ( )
When the light switch is in the park-
ing light position, the tail, license and
instrument panel lights will turn ON.
Headlight position ( )
When the light switch is in the head-
light position, the head, tail, license
lights will turn ON.
✽ ✽
NOTICE
The ignition switch must be in the ON
position to turn on the headlights.
Auto light position (if equipped)
When the lights are in the “Auto”
position, It will operate when the igni-
tion is in “ON” or the engine is run-
ning. To change to the Auto function,
Select the light switch to “AUTO”,
and the light will turn on or off
depending on the ambient light
detected by the sensor (1). Once the
light switch is positioned to the auto
light position, at first, the wiper will
turn on and then, after 5 seconds the
head lamp will turn on automatically.
If headlights came on due to wind-
shield wipers coming on the head
lamp will turn off 60 seconds after
the wipers are turned off.
OUMA046054OUMA046056OUMA046057
Page 216 of 573

Features of your vehicle
128
4
Turn signals and lane change
signals
The ignition switch must be on for the
turn signals to function. To turn on
the turn signals, move the lever up or
down (A). The green arrow indicators
on the instrument panel indicate
which turn signal is operating. They
will self-cancel after a turn is com-
pleted. If the indicator continues to
flash after a turn, manually return the
lever to the OFF position. To signal a lane change, move the
turn signal lever slightly and hold it in
position (B). The lever will return to
the OFF position when released.
If an indicator stays on and does not
flash or if it flashes abnormally, one of
the turn signal bulbs may be burned
out and will require replacement.
One touch turn signal
When changing lanes, move the lane
change switch to the direction you
want briefly. The lane change switch
will move back to the original position
but the turn signal will flash three
times. This function assists the driver
when changing lanes without press-
ing down on the lane change signal.
Depending on the vehicle, the driver
may select or deselect the one touch
turn signal function. For more details,
please refer to "vehicle settings" in
chapter 4.
✽ ✽
NOTICE
If an indicator flash is abnormally
quick or slow, a bulb may be burned
out or have a poor electrical connec-
tion in the circuit.
OUM044060
Page 228 of 573
Features of your vehicle
140
4
If you want to defrost and defog the
front windshield, refer to “Windshield
defrosting and defogging” in this sec-
tion.
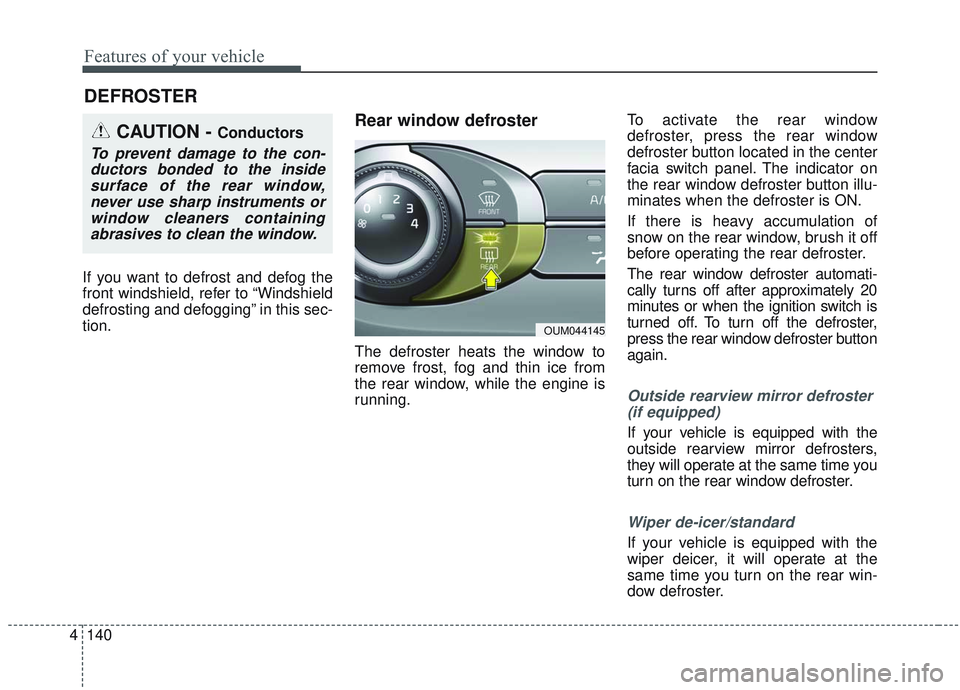
Rear window defroster
The defroster heats the window to
remove frost, fog and thin ice from
the rear window, while the engine is
running. To activate the rear window
defroster, press the rear window
defroster button located in the center
facia switch panel. The indicator on
the rear window defroster button illu-
minates when the defroster is ON.
If there is heavy accumulation of
snow on the rear window, brush it off
before operating the rear defroster.
The rear window defroster automati-
cally turns off after approximately 20
minutes or when the ignition switch is
turned off. To turn off the defroster,
press the rear window defroster button
again.
Outside rearview mirror defroster
(if equipped)
If your vehicle is equipped with the
outside rearview mirror defrosters,
they will operate at the same time you
turn on the rear window defroster.
Wiper de-icer/standard
If your vehicle is equipped with the
wiper deicer, it will operate at the
same time you turn on the rear win-
dow defroster.
DEFROSTER
CAUTION - Conductors
To prevent damage to the con-ductors bonded to the insidesurface of the rear window,never use sharp instruments orwindow cleaners containingabrasives to clean the window.
OUM044145