Page 246 of 593

Features of your vehicle
142
4
Turn signals and lane change
signals
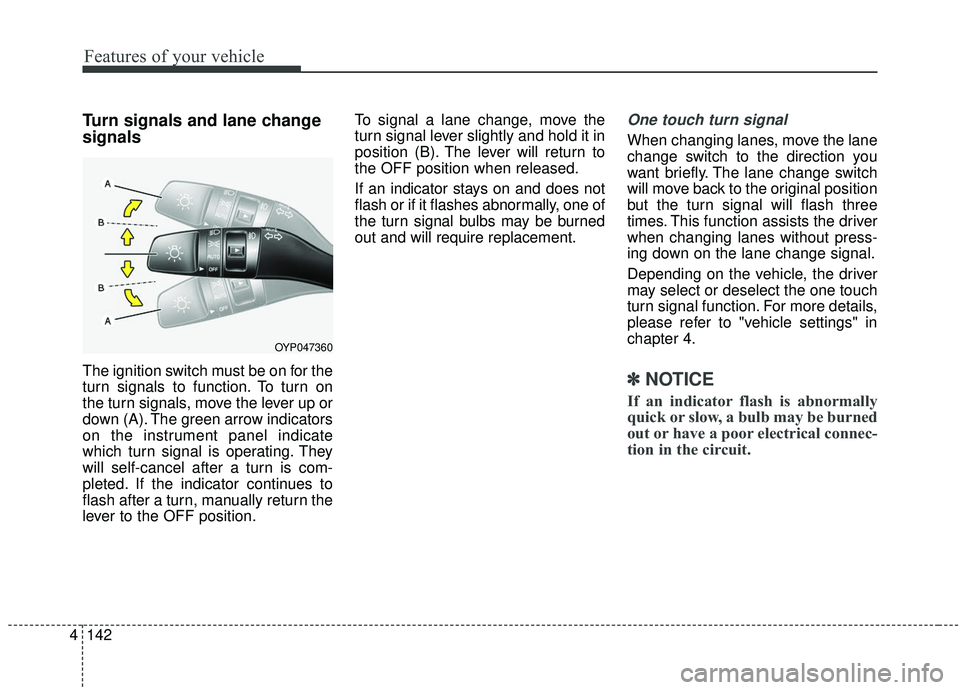
The ignition switch must be on for the
turn signals to function. To turn on
the turn signals, move the lever up or
down (A). The green arrow indicators
on the instrument panel indicate
which turn signal is operating. They
will self-cancel after a turn is com-
pleted. If the indicator continues to
flash after a turn, manually return the
lever to the OFF position. To signal a lane change, move the
turn signal lever slightly and hold it in
position (B). The lever will return to
the OFF position when released.
If an indicator stays on and does not
flash or if it flashes abnormally, one of
the turn signal bulbs may be burned
out and will require replacement.
One touch turn signal
When changing lanes, move the lane
change switch to the direction you
want briefly. The lane change switch
will move back to the original position
but the turn signal will flash three
times. This function assists the driver
when changing lanes without press-
ing down on the lane change signal.
Depending on the vehicle, the driver
may select or deselect the one touch
turn signal function. For more details,
please refer to "vehicle settings" in
chapter 4.
✽ ✽
NOTICE
If an indicator flash is abnormally
quick or slow, a bulb may be burned
out or have a poor electrical connec-
tion in the circuit.
OYP047360
Page 431 of 593

5117
Driving your vehicle
Following distance
Stay at least twice as far behind the
vehicle ahead as you would when
driving your vehicle without a trailer.
This can help you avoid situations
that require heavy braking and sud-
den turns.
Passing
You’ll need more passing distance
up ahead when you’re towing a trail-
er. And, because of the increased
vehicle length, you’ll need to go
much farther beyond the passed
vehicle before you can return to your
lane. Due to the added load to the
engine when going uphill the vehicle
may also take longer to pass than it
would on flat ground.
Backing up
Hold the bottom of the steering
wheel with one hand. Then, to move
the trailer to the left, just move your
hand to the left. To move the trailer to
the right, move your hand to the
right. Always back up slowly and, if
possible, have someone guide you.
Making turns
When you’re turning with a trailer,
make wider turns than normal. Do
this so your trailer won’t strike soft
shoulders, curbs, road signs, trees,
or other objects near the edge of the
road. Avoid jerky or sudden maneu-
vers. Signal well in advance before
turning or lane changes.
Turn signals when towing a trailer
When you tow a trailer, your vehicle
has to have a different turn signal
flasher and extra wiring. The green
arrows on your instrument panel will
flash whenever you signal a turn or
lane change. Properly connected,
the trailer lights will also flash to alert
other drivers you’re about to turn,
change lanes, or stop.
When towing a trailer, the green
arrows on your instrument panel will
flash for turns even if the bulbs on the
trailer are burned out. Thus, you may
think drivers behind you are seeing
your signals when, in fact, they are
not. It’s important to check occasion-
ally to be sure the trailer bulbs are still
working. You must also check the
lights every time you disconnect and
then reconnect the wires.
Do not connect a trailer lighting sys-
tem directly to your vehicle’s lighting
system. Use only an approved trailer
wiring harness.
An authorized Kia dealer can assist
you in installing the wiring harness.
Page 534 of 593
767
Maintenance
Light bulb position (Front)(1) Headlamp (Low) (Bulb type)
(2) Headlamp (High) (Bulb type)
(3) Front turn signal lamp (Bulb type)or Front turn signal lamp /
Position lamp (if equipped) (Bulb
type)
(4) Position lamp (if equipped) (LED type) or Dummy (if equipped)
(5) Side marker (Bulb type)
(6) Headlamp (Low/High) (LED type)
(7) Headlamp (Low Assist) (LED
type)
(8) Front turn signal lamp (Bulb type)
(9) P osition lamp (LED type) or
Position lamp / Day time running
lamp (if equipped) (LED type)
(10) Side marker (LED type)
(11) Front fog lamp (Bulb type)
(12) Front fog lamp (Bulb type)
(13) Front fog lamp (LED type)
OYP078104N
OYP078105N
■ Head lamp – Type B
■Head lamp – Type A
OYP078106N
OYP078107N
OYP078108N
■Fog lamp - Type A
■Fog lamp - Type B
■Fog lamp - Type C
Page 535 of 593
Maintenance
68
7
Light bulb position (Rear)(1) Stop and tail lamp (Bulb type)
(2) Tail lamp (Bulb type)
(3) Back up lamp (Bulb type)
(4) Rear turn signal lamp (Bulb type)
(5) Side marker (Bulb type)
(6,7,8,9) Stop and tail lamp (LED
type)
(10) Side marker (LED type)
(11) License plate lamp (Bulb type)
(12) High mounted stop lamp (LED type)
OYP078109N
OYP078110N
■Rear combination lamp - Type B
■Rear combination lamp - Type A
OYP078111N
OYP078112N
■High mounted stop lamp
■License plate lamp
Page 539 of 593

Maintenance
72
7
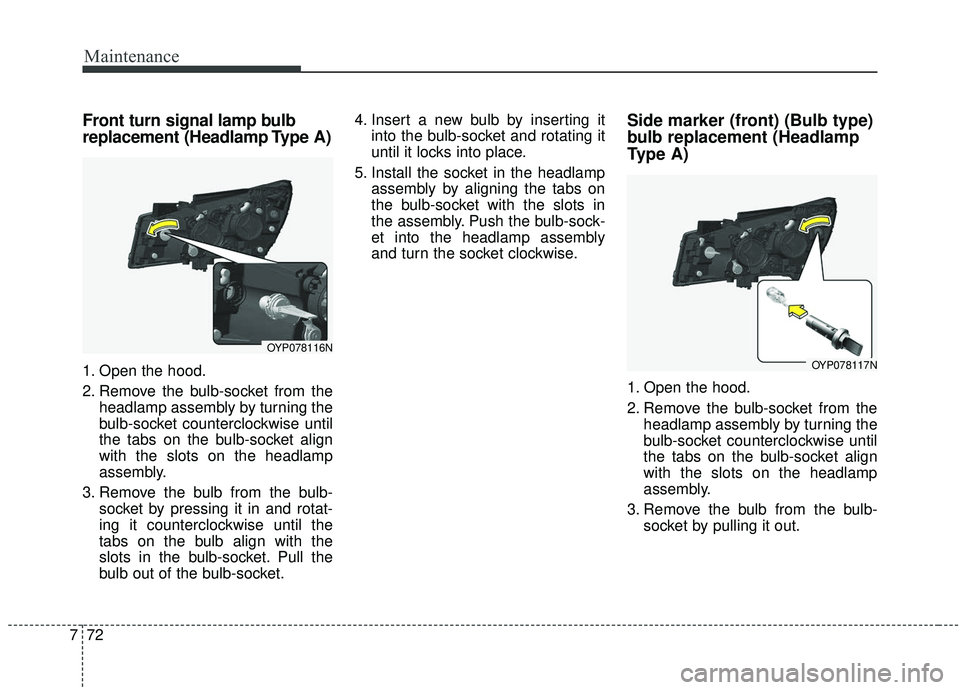
Front turn signal lamp bulb
replacement (Headlamp Type A)
1. Open the hood.
2. Remove the bulb-socket from the
headlamp assembly by turning the
bulb-socket counterclockwise until
the tabs on the bulb-socket align
with the slots on the headlamp
assembly.
3. Remove the bulb from the bulb- socket by pressing it in and rotat-
ing it counterclockwise until the
tabs on the bulb align with the
slots in the bulb-socket. Pull the
bulb out of the bulb-socket. 4. Insert a new bulb by inserting it
into the bulb-socket and rotating it
until it locks into place.
5. Install the socket in the headlamp assembly by aligning the tabs on
the bulb-socket with the slots in
the assembly. Push the bulb-sock-
et into the headlamp assembly
and turn the socket clockwise.
Side marker (front) (Bulb type)
bulb replacement (Headlamp
Type A)
1. Open the hood.
2. Remove the bulb-socket from theheadlamp assembly by turning the
bulb-socket counterclockwise until
the tabs on the bulb-socket align
with the slots on the headlamp
assembly.
3. Remove the bulb from the bulb- socket by pulling it out.
OYP078116N
OYP078117N
Page 541 of 593

Maintenance
74
7
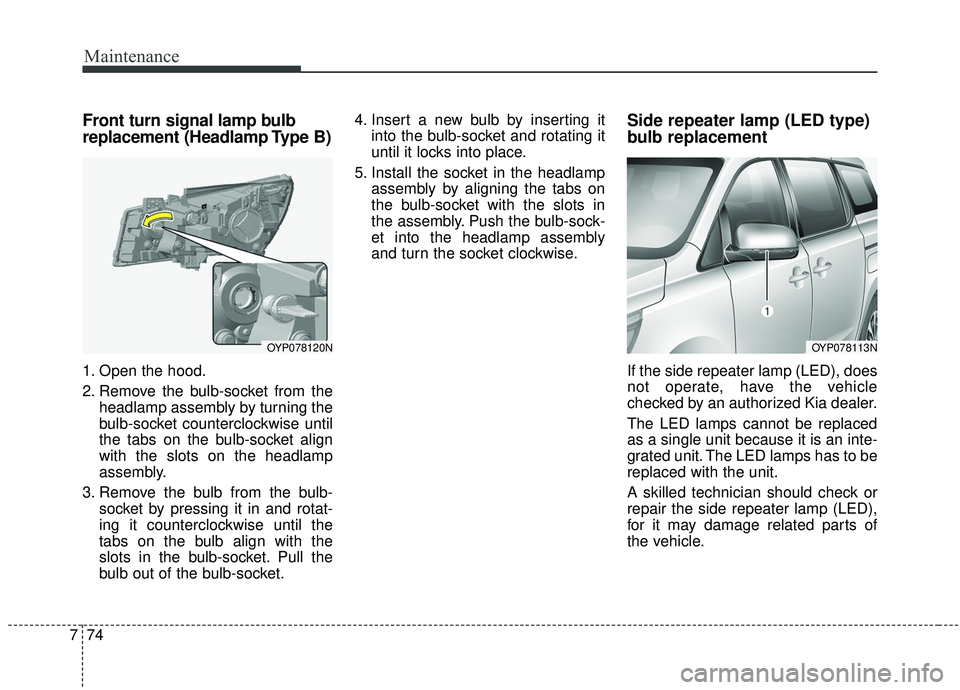
Front turn signal lamp bulb
replacement (Headlamp Type B)
1. Open the hood.
2. Remove the bulb-socket from the
headlamp assembly by turning the
bulb-socket counterclockwise until
the tabs on the bulb-socket align
with the slots on the headlamp
assembly.
3. Remove the bulb from the bulb- socket by pressing it in and rotat-
ing it counterclockwise until the
tabs on the bulb align with the
slots in the bulb-socket. Pull the
bulb out of the bulb-socket. 4. Insert a new bulb by inserting it
into the bulb-socket and rotating it
until it locks into place.
5. Install the socket in the headlamp assembly by aligning the tabs on
the bulb-socket with the slots in
the assembly. Push the bulb-sock-
et into the headlamp assembly
and turn the socket clockwise.
Side repeater lamp (LED type)
bulb replacement
If the side repeater lamp (LED), does
not operate, have the vehicle
checked by an authorized Kia dealer.
The LED lamps cannot be replaced
as a single unit because it is an inte-
grated unit. The LED lamps has to be
replaced with the unit.
A skilled technician should check or
repair the side repeater lamp (LED),
for it may damage related parts of
the vehicle.
OYP078120NOYP078113N
Page 544 of 593
777
Maintenance
Rear turn signal lamp (Bulb
type) bulb replacement (Rear
combination lamp Type A)
1. Open the liftgate.
2. Remove the service cover.3. Loosen the light assembly retain-
ing screws with a cross-tip screw-
driver.
4. Remove the rear combination lamp assembly from the body of
the vehicle.
5. Disconnect the rear combination lamp connector.
6. Remove the socket from theassembly by turning the socket
counterclockwise until the tabs on
the socket align with the slots on
the assembly.
7. Remove the bulb from the socket by pressing it in and rotating it
counter clockwise until the tabs on
the bulb align with the slots in the
socket. Pull the bulb out of the
socket.
8. Insert a new bulb by inserting it into the socket and rotating it until
it locks into place.
OYP074021K
OYP074022K
OYP078125N
Page 549 of 593
Maintenance
82
7
Rear turn signal lamp (Bulb
type) bulb replacement (Rear
combination lamp Type B)
1. Open the liftgate.
2. Remove the service cover. 3. Loosen the light assembly retain-
ing screws with a cross-tip screw-
driver.
4. Remove the rear combination lamp assembly from the body of
the vehicle.
5. Disconnect the rear combination lamp connector.
6. Remove the socket from theassembly by turning the socket
counterclockwise until the tabs on
the socket align with the slots on
the assembly.
7. Remove the bulb from the socket by pressing it in and rotating it
counter clockwise until the tabs on
the bulb align with the slots in the
socket. Pull the bulb out of the
socket.
8. Insert a new bulb by inserting it into the socket and rotating it until
it locks into place.
OYP074021K
OYP074022K
OYP078131N