Page 9 of 593

Introduction
61
As with other vehicles of this type,
failure to operate this vehicle correct-
ly may result in loss of control, an
accident or vehicle rollover.
Specific design characteristics (high-
er ground clearance, track, etc.) give
this vehicle a higher center of gravity
than other types of vehicles. In other
words they are not designed for cor-
nering at the same speeds as con-
ventional 2-wheel drive vehicles.
Avoid sharp turns or abrupt maneu-
vers. Again, failure to operate this
vehicle correctly may result in loss of
control, an accident or vehicle
rollover.Be sure to read the
“Reducing the risk of a rollover”
driving guidelines, in section 5 of
this manual. No special break-in period is need-
ed. By following a few simple precau-
tions for the first 1,000 km (600
miles) you may add to the perform-
ance, economy and life of your vehi-
cle.
Do not race the engine.
While driving, keep your engine
speed (rpm, or revolutions per
minute) between 2,000 rpm and
4,000 rpm.
Do not maintain a single speed for long periods of time, either fast or
slow. Varying engine speed is
needed to properly break-in the
engine.
Avoid hard stops, except in emer- gencies, to allow the brakes to seat
properly.
Don't tow a trailer during the first 2,000 km (1,200 miles) of opera-
tion.
VEHICLE BREAK-IN
PROCESS
VEHICLE HANDLING
INSTRUCTIONS
Page 30 of 593
Safety features of your vehicle
14
3
Adjusting the height up and down
To raise the headrest, pull it up to the
desired position (1). To lower the
headrest, push and hold the release
button (2) on the headrest support
and lower the headrest to the desired
position (3).
✽ ✽
NOTICE
If you recline the seatback towards
the front with the headrest and seat
cushion raised, the headrest may
come in contact with the sunvisor or
other parts of the vehicle.
OYP034010
OYFH034205
WARNING- Headrest
removal/adjustment
Do not operate the vehicle with the headrests removed.
Headrests can provide critical
neck and head support in a
crash.
Do not adjust the headrest height while the vehicle is in
motion. Driver may lose con-
trol of the vehicle.
Page 36 of 593

Safety features of your vehicle
20
3
1.Lift the armrest up , lower the head-
rests to the lowest position and
slide the seat inside. (if necessary).
2.Pull the walk-in strap (1) or recline lever (2) on the 2nd row seat when
the passenger gets in or out of the
3rd row seat.
3.Push the 2nd row seat to forward. After getting out, push the 2nd row
seat to the original position until it
clicks into place.
Make sure that the seat is locked in
place. In the walk-in position, the
front and back sliding function is
not fixed.Leg support (2nd row seat for SXL package)
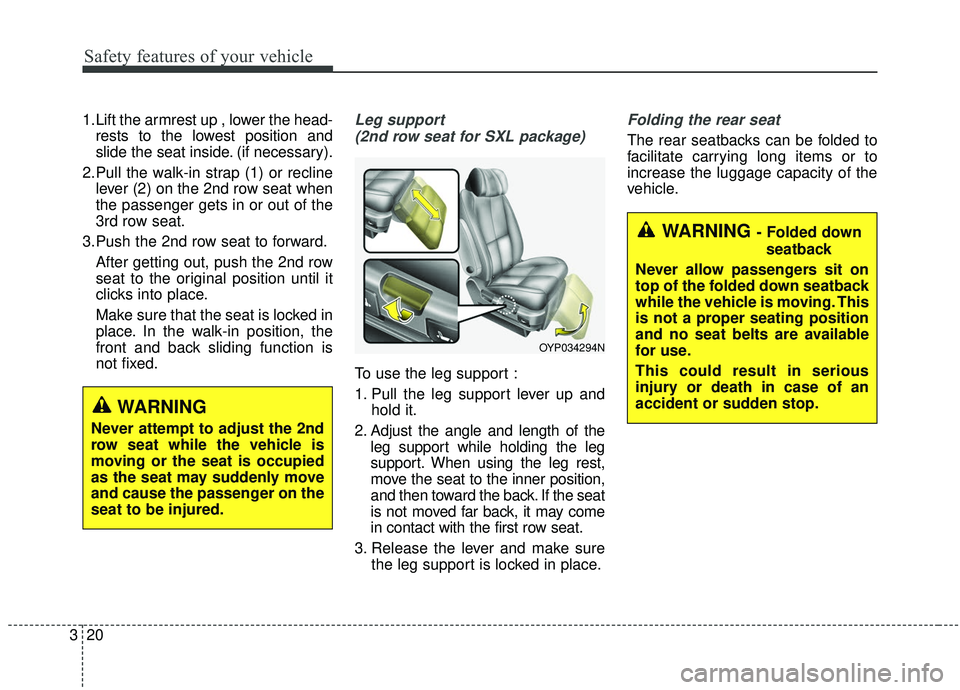
To use the leg support :
1. Pull the leg support lever up and hold it.
2. Adjust the angle and length of the leg support while holding the leg
support. When using the leg rest,
move the seat to the inner position,
and then toward the back. If the seat
is not moved far back, it may come
in contact with the first row seat.
3. Release the lever and make sure the leg support is locked in place.
Folding the rear seat
The rear seatbacks can be folded to
facilitate carrying long items or to
increase the luggage capacity of the
vehicle.
OYP034294N
WARNING
Never attempt to adjust the 2nd
row seat while the vehicle is
moving or the seat is occupied
as the seat may suddenly move
and cause the passenger on the
seat to be injured.
WARNING - Folded down
seatback
Never allow passengers sit on
top of the folded down seatback
while the vehicle is moving. This
is not a proper seating position
and no seat belts are available
for use.
This could result in serious
injury or death in case of an
accident or sudden stop.
Page 38 of 593
Safety features of your vehicle
22
3
4. Pull on the seatback folding lever
or strap, then fold the seat toward
the front of the vehicle. When you
return the seatback to its upright
position, always be sure it has
locked into position by pushing on
the top of the seatback.
5. To use the rear seat, lift and pull the seatback backward by pulling
on the folding lever or strap.
Pull the seatback firmly until it
clicks into place. Make sure the
seatback is locked in place.
6. Return the rear seat belt to the proper position.
Removing the tumble seat
(for 8 passenger vehicle)
1. Insert the seat belt in the belt assembly cover.
2. Insert the seat belt buckle in the seat cushion pocket.
OYP034216NOYP034218N
OYP037219N
■2nd row seat ■2nd row center seat (for 8 passenger vehicle)
OYP034220N
OYP034267N
Page 42 of 593
Safety features of your vehicle
26
3
Stowing the rear seat
- 3rd row seat
The rear seat can be folded and
stowed in the luggage compartment
to provide additional cargo space. To stow the rear seat:
1. Lower the headrest to the lowest
position. To stow easily, adjust the
seatback to upright position. (if
necessary)
2. Pull up the seat by using the stow-ing lever.
3. Stow the seat by pushing down firmly.
OYP034240N
OYP037241
OYP034242N
Page 43 of 593
327
Safety features of your vehicle
Make sure there is no body or object
around the seat and be careful not to
injure your hands or body under the
seat or in the moving parts when
stowing or reinstalling the seat.To use the rear seat:
1. Lift the seat by pulling up the stow-ing lever.CAUTION- To stow 3rd
row seat
Do not stow the 3rd row seatwhen the seat back is foldeddown. It may damage the 3rdseat mechanism.
OYP037304
OYP037286
Page 61 of 593
345
Safety features of your vehicle
2.To retract the rear center seatbelt,insert the tongue plate or similar
small rigid device into the web
release hole (C). Pull up on the
seat belt web (A) and allow the
webbing to retract automatically.
3. Insert the tongue plate into theholder (1) in seat belt and then
insert the mini tongue into the hole
on the belt assembly cover.
Stowing the rear seat belt
OYP034264N
OYP034265N/Q
OYP034266N
OYP034267N
OYP034212N
■2nd row seat (for 2nd row center seat, if equipped)
■ 3rd row
Page 62 of 593
Safety features of your vehicle
46
3
The rear seat belt buckles can be
stowed in the pocket between the
rear seatback and cushion when not
in use.
Routing the seat belt webbing
through the rear seat belt guides will
help keep the belts from being
trapped behind or under the seats.
After inserting the seat belt, tighten
the belt webbing by pulling it up.
Pre-tensioner seat belt
Your vehicle is equipped with driver's
and front passenger's pre-tensioner
seat belts (retractor pretensioner and
EFD (Emergency Fastening
Device)). The pre-tensioner seat
belts may be activated, when a
frontal collision is severe enough,
together with the air bags.
CAUTION
Remove the seat belt from the
guides before using. If you pullon the seat belt when it is storedin the guides, it may damage theguides and/or belt webbing.
OYP034214N
OXMA033101