Page 250 of 593

Features of your vehicle
146
4
Front windshield washers
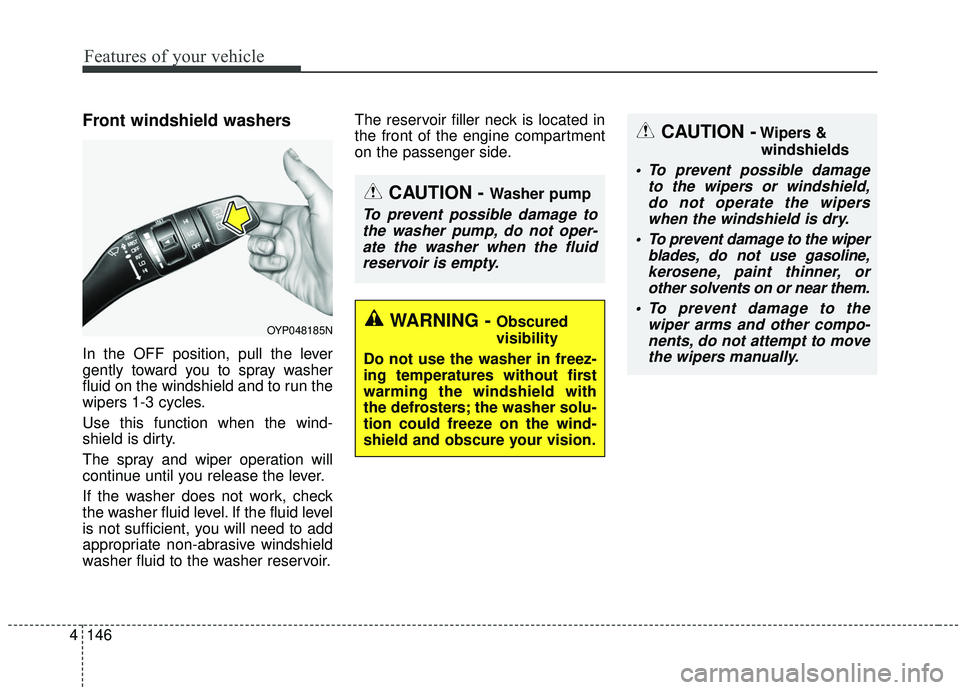
In the OFF position, pull the lever
gently toward you to spray washer
fluid on the windshield and to run the
wipers 1-3 cycles.
Use this function when the wind-
shield is dirty.
The spray and wiper operation will
continue until you release the lever.
If the washer does not work, check
the washer fluid level. If the fluid level
is not sufficient, you will need to add
appropriate non-abrasive windshield
washer fluid to the washer reservoir. The reservoir filler neck is located in
the front of the engine compartment
on the passenger side.
OYP048185N
CAUTION - Washer pump
To prevent possible damage to
the washer pump, do not oper-ate the washer when the fluidreservoir is empty.
CAUTION -Wipers &
windshields
To prevent possible damage to the wipers or windshield,do not operate the wiperswhen the windshield is dry.
To prevent damage to the wiper blades, do not use gasoline,kerosene, paint thinner, orother solvents on or near them.
To prevent damage to the wiper arms and other compo-nents, do not attempt to movethe wipers manually.
WARNING - Obscured
visibility
Do not use the washer in freez-
ing temperatures without first
warming the windshield with
the defrosters; the washer solu-
tion could freeze on the wind-
shield and obscure your vision.
Page 258 of 593
Features of your vehicle
154
4
Mode selection
The mode selection button controls
the direction of the air flow through
the ventilation system.
Air can be directed to the floor, dash-
board outlets, or windshield. Six
symbols are used to represent MAX
A/C, Face, Bi-Level, Floor, Floor-
Defrost and Defrost air position.
The MAX A/C mode is used to cool
the inside of the vehicle faster. Face-Level (B, D)
Air flow is directed toward the upper
body and face. Additionally, each
outlet can be controlled to direct the
air discharged from the outlet.
Bi-Level (A, B, C, D, E)
Air flow is directed towards the face
and the floor. Floor-Level (A, C, D, E)
Most of the air flow is directed to the
floor, with a small amount of the air
being directed to the windshield and
side window defrosters. Floor/Defrost-Level
(A, C, D, E)
Most of the air flow is directed to the
floor and the windshield with a small
amount directed to the side window
defrosters.
OYP044204K
Page 275 of 593
4171
Features of your vehicle
Mode selection
The mode selection button controls
the direction of the air flow through
the ventilation system.
The air flow outlet port is converted
as follows:
Refer to the illustration in the
“Manual climate control system”.Face-Level
Air flow is directed toward the upper
body and face. Additionally, each
outlet can be controlled to direct the
air discharged from the outlet.
Bi-Level
Air flow is directed towards the face
and the floor. Floor-Level
Most of the air flow is directed to the
floor, with a small amount of the air
being directed to the windshield and
side window defrosters.
Floor/Defrost-Level
Most of the air flow is directed to the
floor and the windshield with a small
amount directed to the side window
defrosters.
OYP044224K
■Type A■Type B
Page 294 of 593

Features of your vehicle
190
4
This indicator illuminates
when the auto defogging
system senses the mois-
ture of inside the wind-
shield and operates.
If more moisture is in the vehicle,
higher steps operate as follow. For
example if auto defogging does not
defog inside the windshield at step 1
Outside air position, it tries to defog
again at step 2 Blowing air toward
the windshield.
Step 1 : Outside air position
Step 2 :Blowing air toward the wind-
shield
Step 3 : Increasing air flow toward the windshield
Step 4 : Operating the air conditioning
Step 5 : M aximizing the air condi-
tioning To cancel or reset the Auto Defogging
System
Press the front windshield defroster
button for 3 seconds when the igni-
tion switch is in the ON position.
When the ADS system is canceled,
[ADS OFF] symbol will blink 3 times
per 1 sec and the position [ADS
OFF] will be displayed on the A/C
display. (A TYPE)
When the ADS system is canceled,
Indicator on the button will blink 3
times per 0.5 sec. (B TYPE)
When the ADS system is reset, [ADS
OFF] symbol will blink 6 times per
0.5sec and the position [ADS OFF]
will be disappeared on the A/C dis-
play. (A TYPE)
When the ADS system is reset,
Indicator on the button will blink 6
times per 0.25 sec. (B TYPE)
✽ ✽
NOTICE
If the A/C off or recirculated air
position is manually selected while
the auto defogging system is on, the
auto defogging indicator will blink 3
times to give notice that manual
operation is canceled.
Do not remove the sensor cover
located on the upper end of the pas-
senger side windshield glass.
Damage to the system parts could
occur and may not be covered by
your vehicle warranty.
Page 301 of 593

4197
Features of your vehicle
Air ventilation seat (if equipped)
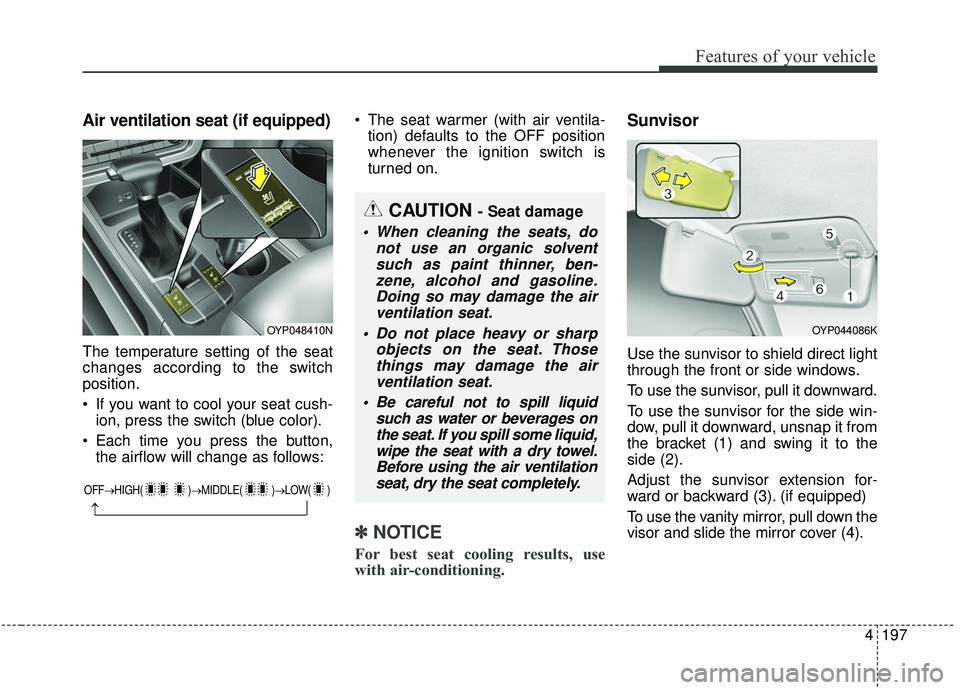
The temperature setting of the seat
changes according to the switch
position.
If you want to cool your seat cush-ion, press the switch (blue color).
Each time you press the button, the airflow will change as follows: The seat warmer (with air ventila-
tion) defaults to the OFF position
whenever the ignition switch is
turned on.
✽ ✽ NOTICE
For best seat cooling results, use
with air-conditioning.
Sunvisor
Use the sunvisor to shield direct light
through the front or side windows.
To use the sunvisor, pull it downward.
To use the sunvisor for the side win-
dow, pull it downward, unsnap it from
the bracket (1) and swing it to the
side (2).
Adjust the sunvisor extension for-
ward or backward (3). (if equipped)
To use the vanity mirror, pull down the
visor and slide the mirror cover (4).
OYP048410N
OFF→ HIGH( )→ MIDDLE( )→LOW( )
→
CAUTION - Seat damage
When cleaning the seats, do
not use an organic solventsuch as paint thinner, ben-zene, alcohol and gasoline.Doing so may damage the airventilation seat.
Do not place heavy or sharp objects on the seat. Thosethings may damage the airventilation seat.
Be careful not to spill liquid such as water or beverages onthe seat. If you spill some liquid,wipe the seat with a dry towel.Before using the air ventilationseat, dry the seat completely.
OYP044086K
Page 311 of 593
4207
Features of your vehicle
To avoid injury or damage to the side
curtain and door moldings, lower
side curtain by the handle all the way
back to the stowed position. Do not
release handle after disengaging
from the hooks on the door.Luggage net holder
(if equipped)
To keep items from shifting in the
cargo area, you can use the holders
located in the cargo area to attach
the luggage net.
If necessary, we recommend that
you contact an authorized Kia dealer.
OUM044089
CAUTION
To prevent damage to the vehi-cle, care should be taken whencarrying fragile or bulky objectsin the luggage compartment.
WARNING - Luggage net
To avoid eye injury, DO NOT
overstretch the luggage net.
ALWAYS keep your face and
body out of the luggage net’s
recoil path. DO NOT use the lug-
gage net when the strap has vis-
ible signs of wear or damage.
Page 316 of 593

control system . . . . . . . . . . . . . . . . . . . . . . . . . . . . . . 5-75
. . . . . . . . . . . . . . . 5-75
. . . . . . . . . . . . . . . . . . . . . . 5-76
Active ECO system. . . . . . . . . . . . . . . . . . . . . . . . . 5-82
. . . . . . . . . . . . . . . . . . . . . . . . . 5-82
. . . . . . . . . . . . . . . . . . 5-82
. . . . . . . . . . . . . 5-82
Drive mode integrated control system . . . . . . . . 5-83
. . . . . . . . . . . . . . . . . . . . . . . . . . . . . . . . 5-83
Blind-spot Collision Warning (BCW). . . . . . . . . . 5-85
. . . . . . . . . . . . 5-86
. . . 5-88
. . . . . . . . . . . . . . . . . . . . . . 5-92
Driver Attention Warning (DAW). . . . . . . . . . . . . 5-94
. . . . . . . . . . . . . . . . . . . 5-94
. . . . . . . . . . . . . . . . . . . . . . . . . . 5-96
. . . . . . . . . . . . . . . . . . . . . . . . . . . . . . 5-96
. . . . . . . . . . . . . . . . . . . . . . . . . . . 5-96
Lane Departure Warning (LDW) system. . . . . . . 5-98
. . . . . . . . . . . . . . . . . . . . . . . . . . . . . . 5-99
. . . . . . . . . . . . . . . . . . . . . . . . . . . 5-100
. . . . . . . . . . . . . . 5-101
Economical operation . . . . . . . . . . . . . . . . . . . . . 5-103
Special driving conditions . . . . . . . . . . . . . . . . . . 5-105
. . . . . . . . . . . . . . . . . 5-105
. . . . . . . . . . . . . . . . 5-105
. . . . . . . . . . . . . . . . . . . . . . . . . . 5-106
. . . . . . . . . . . . . . . . . . . . . . . . . . . 5-107
. . . . . . . . . . . . . . . . . . . . . . . . . . . . . 5-107
. . . . . . . . . . . . . . . . . . . . . . . . . . . 5-108
. . . . . . . . . . . . . . . . . . . . . . 5-109
. . . . . . . . . . . . . . . . . . . . . . . . . . . . . 5-109
. . . . . . . . . . . . . . . . . . . . . . . . . . . . 5-109
Winter driving . . . . . . . . . . . . . . . . . . . . . . . . . . . 5-111
. . . . . . . . . . . . . . . . . . . . . . 5-111
. . . . . . . . . 5-112
. . . . . . . . . . . . . . . . . . . . . 5-112
. . . . . . 5-112
. . . . . . . . . . . . . . . . . . . 5-112
5-113
. . . . . . . . . . . . 5-113
. . . 5-113
. . . . . . . . . . . . . . . . . . 5-113
Trailer towing . . . . . . . . . . . . . . . . . . . . . . . . . . . . 5-114
. . . . . . . . . . . . . . . . . . . . . . . . . . . . . . . . . . . . \
5-115
. . . . . . . . . . . . . . . . . . . . . . . . . . . . . . . 5-115
5
Page 344 of 593

Driving your vehicle
30
5
Emergency braking
If there is a problem with the brake
pedal while driving, emergency brak-
ing is possible by pulling up and
holding the EPB switch. Braking is
possible only while you are holding
the EPB switch.
✽ ✽
NOTICE
During emergency braking by the
EPB, the parking brake warning
light will illuminate to indicate that
the system is operating.
If you notice a continuous noise or
burning smell when the EPB is used
for emergency braking, have your
vehicle checked by an authorized Kia
dealer.
When the EPB (electronic parking
brake) is not released
If the EPB does not release normal-
ly, take your vehicle to an authorized
Kia dealer by loading the vehicle on
a flatbed tow truck and have the sys-
tem checked.
AUTO HOLD (if equipped)
The Auto Hold maintains the vehicle
in a standstill even though the brake
pedal is not depressed after the driv-
er brings the vehicle to a complete
stop by depressing the brake pedal.
WARNING
Do not operate the electronic
parking brake while the vehicle
is moving except in an emer-
gency situation. Applying the
electronic parking brake while
the vehicle is moving at normal
speeds can cause a sudden
loss of control of the vehicle. If
you must use the electronic
parking brake to stop the vehi-
cle, use great caution in apply-
ing the brake.