2019 KIA SEDONA fuel type
[x] Cancel search: fuel typePage 7 of 593

Introduction
41
Other fuels
Using fuels that contain Silicone (Si),
MMT (Manganese, Mn), Ferrocene
(Fe), and Other metalic additives,
may cause vehicle and engine dam-
age or cause misfiring, poor acceler-
ation, engine stalling, catalyst melt-
ing, clogging, abnormal corrosion,
life cycle reduction, etc.
Also, the Malfunction Indicator Lamp
(MIL) may illuminate.
✽ ✽
NOTICE
Damage to the fuel system or per-
formance problem caused by the use
of these fuels may not be covered by
your New Vehicle Limited
Warranty.
Use of MTBE
Kia recommends avoiding fuels con-
taining MTBE (Methyl Tertiary Butyl
Ether) over 15.0% vol. (Oxygen
Content 2.7% weight) in your vehicle.
Fuel containing MTBE over 15.0%
vol. (Oxygen Content 2.7% weight)
may reduce vehicle performance and
produce vapor lock or hard starting.
✽ ✽
NOTICE
Your New Vehicle Limited
Warranty may not cover damage to
the fuel system and any perform-
ance problems that are caused by
the use of fuels containing methanol
or fuels containing MTBE (Methyl
Tertiary Butyl Ether) over 15.0%
vol. (Oxygen Content 2.7% weight.)
Gasoline containing MMT
Some gasoline contains harmful man-
ganese-based fuel additives Such as
MMT (Methylcyclopentadienyl
Manganese Tricarbonyl).
Kia does not recommend the use of
gasoline containing MMT. This type
of fuel can reduce vehicle perform-
ance and affect your emission con-
trol system. The malfunction indica-
tor lamp on the cluster may come on.
Do not use methanol
Fuels containing methanol (wood
alcohol) should not be used in your
vehicle. This type of fuel can reduce
vehicle performance and damage
components of the fuel system,
engine control system and emission
control system.
✽ ✽
NOTICE
Your New Vehicle Limited
Warranty may not cover damage to
the fuel system and any perform-
ance problems that are caused by
the use of fuels containing methanol.
Page 167 of 593
463
Features of your vehicle
Make sure to refuel your vehicle
according to the “Fuel requirements”
suggested in chapter 1.
If the fuel filler cap requires replace-
ment, use only a genuine Kia cap or
the equivalent specified for your vehi-
cle. An incorrect fuel filler cap can
result in a serious malfunction of the
fuel system or emission control sys-
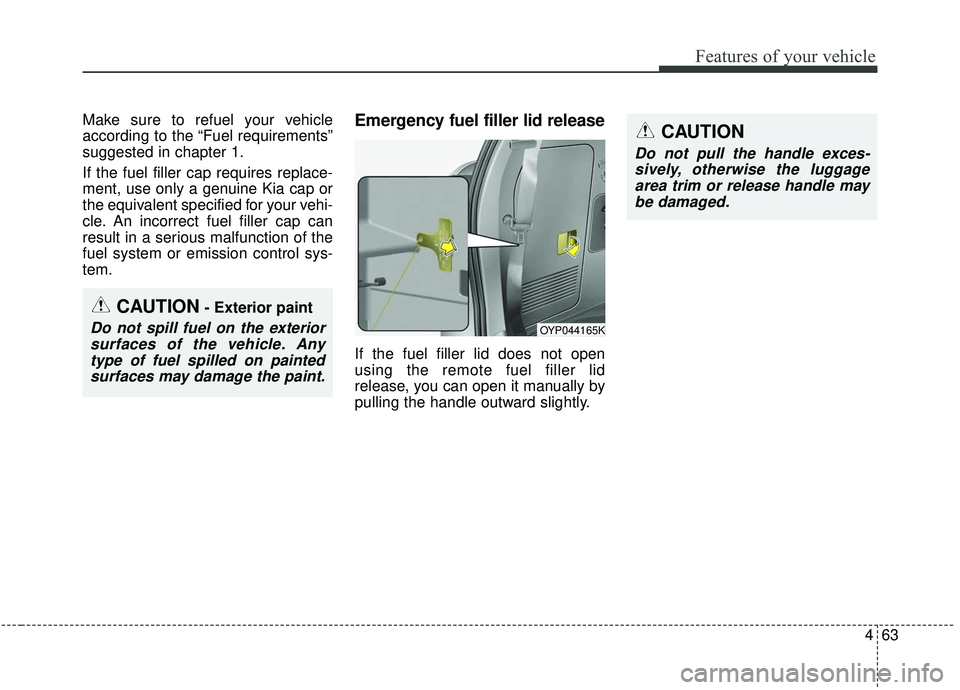
tem.Emergency fuel filler lid release
If the fuel filler lid does not open
using the remote fuel filler lid
release, you can open it manually by
pulling the handle outward slightly.
CAUTION
Do not pull the handle exces-sively, otherwise the luggagearea trim or release handle maybe damaged.
OYP044165K
CAUTION- Exterior paint
Do not spill fuel on the exteriorsurfaces of the vehicle. Anytype of fuel spilled on paintedsurfaces may damage the paint.
Page 193 of 593
489
Features of your vehicle
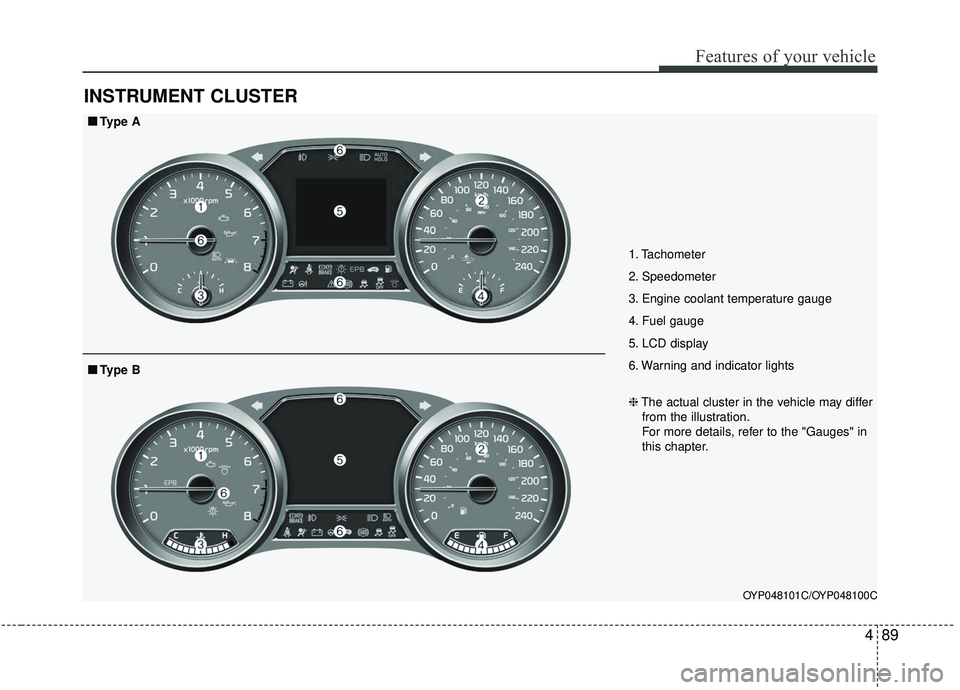
INSTRUMENT CLUSTER
1. Tachometer
2. Speedometer
3. Engine coolant temperature gauge
4. Fuel gauge
5. LCD display
6. Warning and indicator lights
OYP048101C/OYP048100C
■ ■Type A
❈The actual cluster in the vehicle may differ
from the illustration.
For more details, refer to the "Gauges" in
this chapter.
■ ■ Type B
Page 196 of 593
Features of your vehicle
92
4
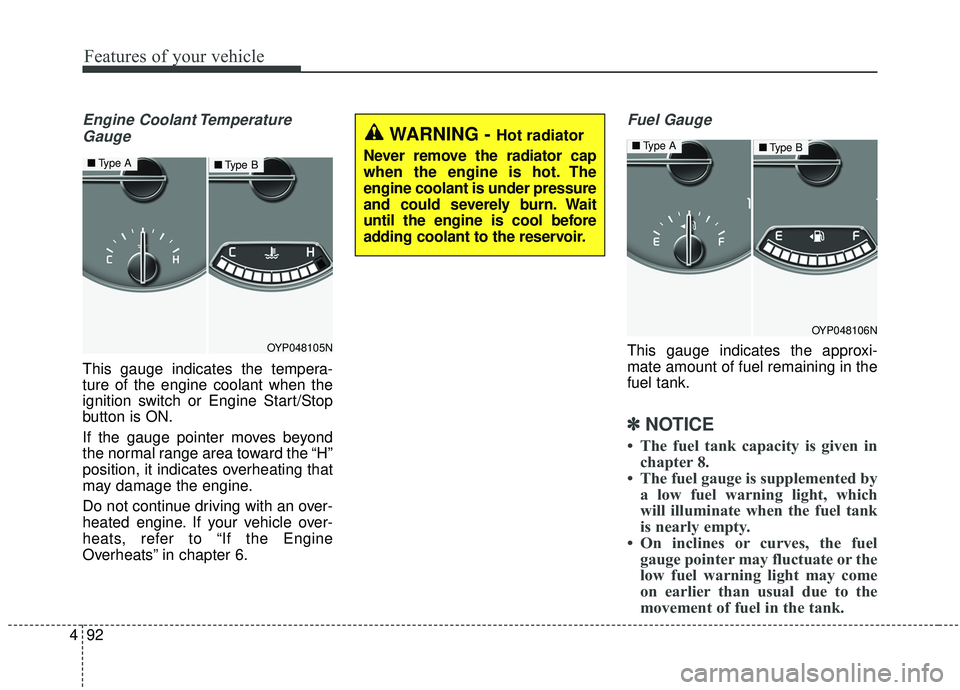
Engine Coolant Temperature
Gauge
This gauge indicates the tempera-
ture of the engine coolant when the
ignition switch or Engine Start/Stop
button is ON.
If the gauge pointer moves beyond
the normal range area toward the “H”
position, it indicates overheating that
may damage the engine.
Do not continue driving with an over-
heated engine. If your vehicle over-
heats, refer to “If the Engine
Overheats” in chapter 6.
Fuel Gauge
This gauge indicates the approxi-
mate amount of fuel remaining in the
fuel tank.
✽ ✽ NOTICE
• The fuel tank capacity is given in
chapter 8.
• The fuel gauge is supplemented by a low fuel warning light, which
will illuminate when the fuel tank
is nearly empty.
• On inclines or curves, the fuel gauge pointer may fluctuate or the
low fuel warning light may come
on earlier than usual due to the
movement of fuel in the tank.
OYP048105N
■ Type A■Type B
WARNING - Hot radiator
Never remove the radiator cap
when the engine is hot. The
engine coolant is under pressure
and could severely burn. Wait
until the engine is cool before
adding coolant to the reservoir.
OYP048106N
■ Type A■Type B
Page 197 of 593

493
Features of your vehicle
✽ ✽NOTICE
Fuel display may not be accurate if
you are filling in sloping places.
Odometer
The odometer Indicates the total dis-
tance that the vehicle has been driv-
en and should be used to determine
when periodic maintenance should
be performed.
- Odometer range : 0 ~ 159999 kilo-
meters or 0 ~ 999999 miles.
Outside Temperature Gauge
This gauge indicates the current out-
side air temperatures by 1°C (1°F).
- Temperature range : -40°C ~ 85°C(-40°F ~ 211°F)
WARNING - Fuel gauge
Stop and obtain additional fuel
as soon as possible after the
warning light comes on or when
the gauge indicator comes
close to the E level. Running out
of fuel can expose vehicle occu-
pants to danger.
CAUTION- Low fuel
Avoid driving with an extremely low fuel level. Running out offuel could cause the engine tomisfire damaging the catalyticconverter.
OYP048384C
OYP048383C
■Type A
■ Type B
OYP048386C
OYP048385C
■Type A
■ Type B
Page 429 of 593
5115
Driving your vehicle
Remember that trailering is different
than just driving your vehicle by itself.
Trailering means changes in han-
dling, durability, and fuel economy.
Successful, safe trailering requires
correct equipment, and it has to be
used properly.
This section contains many time-test-
ed, important trailering tips and safe-
ty rules. Many of these are important
for your safety and that of your pas-
sengers. Please read this section
carefully before you pull a trailer.
Load-pulling components such as
the engine, transaxle, wheel assem-
blies, and tires are forced to work
harder against the load of the added
weight. The engine is required to
operate at relatively higher speeds
and under greater loads. This addi-
tional burden generates extra heat.
The trailer also adds considerably to
wind resistance, increasing the
pulling requirements.Hitches
It's important to have the correct
hitch equipment. Crosswinds, large
trucks going by, and rough roads are
a few reasons why you’ll need the
right hitch. Here are some rules to
follow:
Will you have to make any holes inthe body of your vehicle when you
install a trailer hitch? If you do, then
be sure to seal the holes later
when you remove the hitch.
If you don’t seal them, deadly car-
bon monoxide (CO) from your
exhaust can get into your vehicle,
as well as dirt and water.
The bumpers on your vehicle are not intended for hitches. Do not
attach rental hitches or other
bumper-type hitches to them. Use
only a frame-mounted hitch that
does not attach to the bumper.
Kia trailer hitch accessory is avail- able at an authorized Kia dealer.
Safety chains
You should always attach chains
between your vehicle and your trail-
er. Cross the safety chains under the
tongue of the trailer so that the
tongue will not drop to the road if it
becomes separated from the hitch.
Instructions about safety chains may
be provided by the hitch manufactur-
er or by the trailer manufacturer.
Follow the manufacturer’s recom-
mendation for attaching safety
chains. Always leave just enough
slack so you can turn with your trail-
er. And, never allow safety chains to
drag on the ground.
Page 479 of 593
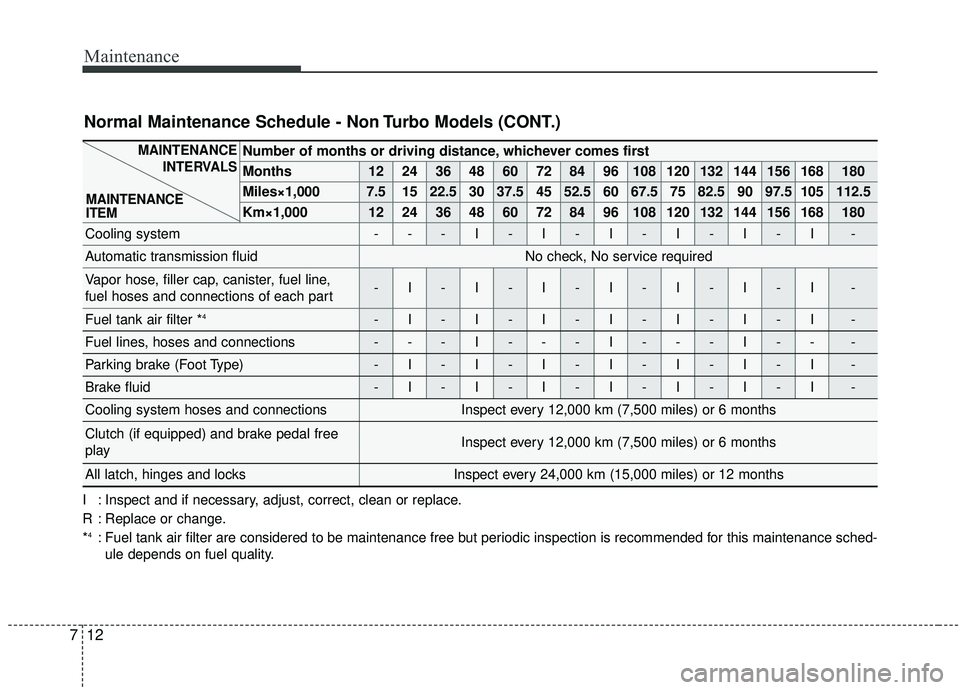
Maintenance
12
7
Number of months or driving distance, whichever comes first
Months1224364860728496108120132144156168180
Miles×1,0007.51522.530 37.5 45 52.5 60 67.5 75 82.5 90 97.5 105 112.5
Km×1,00012 24 36 48 60 72 84 96 108 120 132 144 156 168 180
Cooling system---I-I-I-I-I-I-
Automatic transmission fluidNo check, No service required
Vapor hose, filler cap, canister, fuel line,
fuel hoses and connections of each part-I-I-I-I-I-I-I-
Fuel tank air filter *4-I-I-I-I-I-I-I-
Fuel lines, hoses and connections---I---I---I---
Parking brake (Foot Type)-I-I-I-I-I-I-I-
Brake fluid-I-I-I-I-I-I-I-
Cooling system hoses and connectionsInspect every 12,000 km (7,500 miles) or 6 months
Clutch (if equipped) and brake pedal free
playInspect every 12,000 km (7,500 miles) or 6 months
All latch, hinges and locksInspect every 24,000 km (15,000 miles) or 12 months
MAINTENANCE
INTERVALS
MAINTENANCE
ITEM
Normal Maintenance Schedule - Non Turbo Models (CONT.)
I : Inspect and if necessary, adjust, correct, clean or replace.
R : Replace or change.
*
4: Fuel tank air filter are considered to be maintenance free but periodic inspection is recommended for this maintenance sched- ule depends on fuel quality.
Page 584 of 593

I7
Index
Front fog lamp bulb replacement . . . . . . . . . . . . . . . . . 7-75
Front fog light . . . . . . . . . . . . . . . . . . . . . . . . . . . . . . . 4-143
Front seat adjustment - power . . . . . . . . . . . . . . . . . . . . 3-8
Front seat adjustment-manual. . . . . . . . . . . . . . . . . . . . . 3-7
Front turn signal lamp bulb replacement (Headlamp Type A) . . . . . . . . . . . . . . . . . . . . . . . . . 7-72
Front turn signal lamp bulb replacement (Headlamp Type B) . . . . . . . . . . . . . . . . . . . . . . . . . 7-74
Fuel economy . . . . . . . . . . . . . . . . . . . . . . . . . . . . . . . . 4-96
Fuel filler lid . . . . . . . . . . . . . . . . . . . . . . . . . . . . . . . . . 4-60 Closing the fuel filler lid . . . . . . . . . . . . . . . . . . . . . 4-60
Emergency fuel filler lid release . . . . . . . . . . . . . . . 4-63
Opening the fuel filler lid. . . . . . . . . . . . . . . . . . . . . 4-60
Fuel gauge. . . . . . . . . . . . . . . . . . . . . . . . . . . . . . . . . . . 4-\
92
Fuel requirements . . . . . . . . . . . . . . . . . . . . . . . . . . . . . . 1-2 Do not use methanol . . . . . . . . . . . . . . . . . . . . . . . . . 1-4
Fuel additives . . . . . . . . . . . . . . . . . . . . . . . . . . . . . . . 1-5
Gasoline containing alcohol and methanol . . . . . . . . 1-3
Operation in foreign countries . . . . . . . . . . . . . . . . . . 1-5
Fuses . . . . . . . . . . . . . . . . . . . . . . . . . . . . . . . . . . . . \
. . . 7-53 Engine compartment fuse replacement . . . . . . . . . . 7-57
Fuse switch . . . . . . . . . . . . . . . . . . . . . . . . . . . . . . . . 7-56
Fuse/relay panel description. . . . . . . . . . . . . . . . . . . 7-59
Inner panel fuse replacement . . . . . . . . . . . . . . . . . 7-55
Main fuse . . . . . . . . . . . . . . . . . . . . . . . . . . . . . . . . . 7-58 Gauges . . . . . . . . . . . . . . . . . . . . . . . . . . . . . . . . . . . . \
. 4-91
Glove box . . . . . . . . . . . . . . . . . . . . . . . . . . . . . . . . . . 4-19\
3
Glove box lamp. . . . . . . . . . . . . . . . . . . . . . . . . . . . . . 4-149
Glove box lamp replacement . . . . . . . . . . . . . . . . . . . . 7-86
Gross vehicle weight. . . . . . . . . . . . . . . . . . . . . . . . . . . . 8-5
Hazard warning flasher . . . . . . . . . . . . . . . . . . . . . . . . . . 6-2
Hazardous driving conditions . . . . . . . . . . . . . . . . . . . 5-105
Headlamp (High beam) bulb replacement
(Headlamp Type A) . . . . . . . . . . . . . . . . . . . . . . . . . 7-70
Headlamp (LED type) replacement (Headlamp Type B) . . . . . . . . . . . . . . . . . . . . . . . . . 7-73
Headlamp (Low beam) bulb replacement (Headlamp Type A) . . . . . . . . . . . . . . . . . . . . . . . . . 7-69
Headlight (Headlamp) escort function . . . . . . . . . . . . 4-136
Headlight leveling device . . . . . . . . . . . . . . . . . . . . . . 4-143
Headlight position. . . . . . . . . . . . . . . . . . . . . . . . . . . . 4-137
Headrest (Front) . . . . . . . . . . . . . . . . . . . . . . . . . . . . . . 3-13
Heated steering wheel. . . . . . . . . . . . . . . . . . . . . . . . . . 4-72
High - beam operation . . . . . . . . . . . . . . . . . . . . . . . . 4-137
High beam assist . . . . . . . . . . . . . . . . . . . . . . . . . . . . . 4-138
High mounted stop lamp (LED type) bulb replacement . . . . . . . . . . . . . . . . . . . . . . . . . . . . . . . 7-84G
H