2019 KIA SEDONA warning lights
[x] Cancel search: warning lightsPage 87 of 593
371
Safety features of your vehicle
✽ ✽NOTICE
Do not modify or replace the front
passenger seat. Don't place anything
on or attach anything such as a blan-
ket, front seat cover or after market
seat heater to the front passenger
seat. This can adversely affect the
occupant detection system.
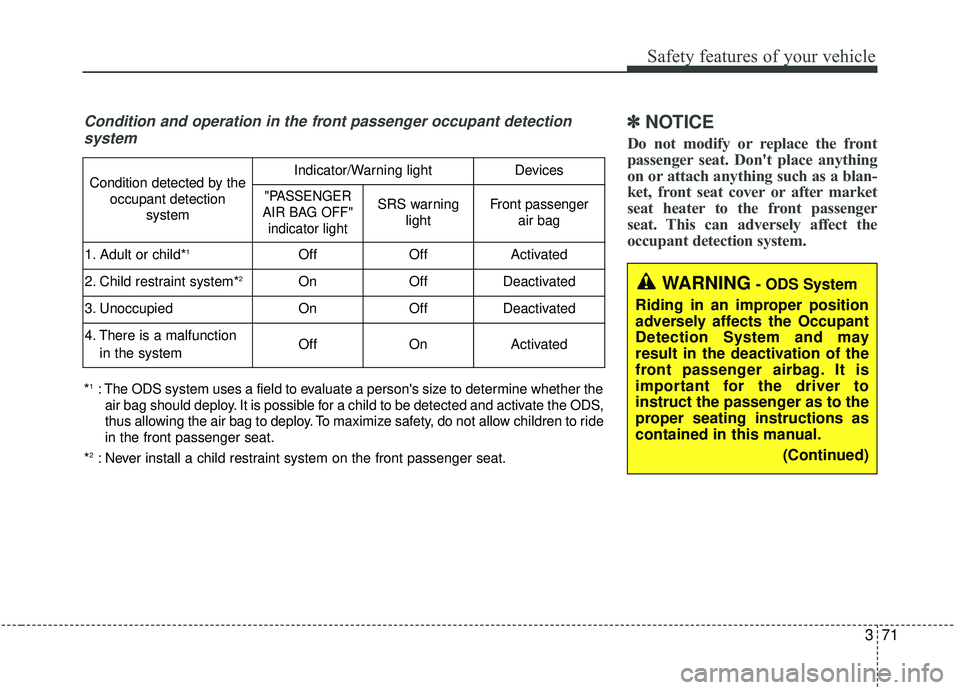
Condition and operation in the front passenger occupant detection
system
*1: The ODS system uses a field to evaluate a person's size to determine whether the
air bag should deploy. It is possible for a child to be detected and activate the ODS,
thus allowing the air bag to deploy. To maximize safety, do not allow children to ride
in the front passenger seat.
*
2: Never install a child restraint system on the front passenger seat.
Condition detected by the occupant detection systemIndicator/Warning lightDevices
"PASSENGER
AIR BAG OFF" indicator lightSRS warning lightFront passenger air bag
1. Adult or child*1OffOffActivated
2. Child restraint system*2OnOffDeactivated
3. Unoccupied OnOffDeactivated
4. There is a malfunction
in the systemOffOnActivated
WARNING- ODS System
Riding in an improper position
adversely affects the Occupant
Detection System and may
result in the deactivation of the
front passenger airbag. It is
important for the driver to
instruct the passenger as to the
proper seating instructions as
contained in this manual. (Continued)
Page 106 of 593

Fuel filler lid . . . . . . . . . . . . . . . . . . . . . . . . . . . . . . 4-60
• Opening the fuel filler lid . . . . . . . . . . . . . . . . . . . . . . 4-60
• Closing the fuel filler lid . . . . . . . . . . . . . . . . . . . . . . . 4-60
• Emergency fuel filler lid release . . . . . . . . . . . . . . . . 4-63
Sunroof . . . . . . . . . . . . . . . . . . . . . . . . . . . . . . . . . . 4-64\
• Sliding the sunroof . . . . . . . . . . . . . . . . . . . . . . . . . . . 4-65
• Tilting the sunroof (for front sunroof) . . . . . . . . . . . 4-67
• Sunshade. . . . . . . . . . . . . . . . . . . . . . . . . . . . . . . . \
. . . . 4-67
• Resetting the sunroof . . . . . . . . . . . . . . . . . . . . . . . . . 4-68
• Rear sunroof lock . . . . . . . . . . . . . . . . . . . . . . . . . . . . 4-68
• Sunroof open warning. . . . . . . . . . . . . . . . . . . . . . . . . 4-69
Steering wheel . . . . . . . . . . . . . . . . . . . . . . . . . . . . . 4-70
• Power steering . . . . . . . . . . . . . . . . . . . . . . . . . . . . . . . 4-70
• Electric power steering . . . . . . . . . . . . . . . . . . . . . . . . 4-70
• Tilt and telescopic steering . . . . . . . . . . . . . . . . . . . . . 4-71
• Heated steering wheel . . . . . . . . . . . . . . . . . . . . . . . . . 4-72
• Horn . . . . . . . . . . . . . . . . . . . . . . . . . . . . . . . . . . . . \
. . . 4-73
Mirrors . . . . . . . . . . . . . . . . . . . . . . . . . . . . . . . . . . 4-74\
• Inside rearview mirror . . . . . . . . . . . . . . . . . . . . . . . . 4-74
• Outside rearview mirror. . . . . . . . . . . . . . . . . . . . . . . 4-84
Instrument cluster . . . . . . . . . . . . . . . . . . . . . . . . . 4-89
• Instrument cluster control . . . . . . . . . . . . . . . . . . . . . 4-90
• LCD display control . . . . . . . . . . . . . . . . . . . . . . . . . . 4-90
• Gauges . . . . . . . . . . . . . . . . . . . . . . . . . . . . . . . . . . . . \
. 4-91
• Transaxle Shift Indicator . . . . . . . . . . . . . . . . . . . . . . 4-94
LCD display . . . . . . . . . . . . . . . . . . . . . . . . . . . . . . 4-95
• LCD modes. . . . . . . . . . . . . . . . . . . . . . . . . . . . . . . . . . 4-95\
Trip modes (Trip computer) . . . . . . . . . . . . . . . . . 4-96
• Trip modes . . . . . . . . . . . . . . . . . . . . . . . . . . . . . . . . . . 4-96\
• Fuel economy . . . . . . . . . . . . . . . . . . . . . . . . . . . . . . . . 4-96
• Accumulated driving information mode . . . . . . . . . . 4-98
• One time driving information mode . . . . . . . . . . . . . 4-98
• Digital speedometer . . . . . . . . . . . . . . . . . . . . . . . . . . . 4-99
• Smart shift . . . . . . . . . . . . . . . . . . . . . . . . . . . . . . . . . . 4-99\
• Turn by turn mode . . . . . . . . . . . . . . . . . . . . . . . . . . . 4-99
• Assist mode. . . . . . . . . . . . . . . . . . . . . . . . . . . . . . . . . 4-100
• Distance to empty . . . . . . . . . . . . . . . . . . . . . . . . . . . 4-102
• User settings mode. . . . . . . . . . . . . . . . . . . . . . . . . . . 4-103
• Warning messages . . . . . . . . . . . . . . . . . . . . . . . . . . . 4-107
Warning and indicator lights . . . . . . . . . . . . . . . 4-113
• Warning lights . . . . . . . . . . . . . . . . . . . . . . . . . . . . . . 4-113
• Indicator lights. . . . . . . . . . . . . . . . . . . . . . . . . . . . . . 4-120
Parking distance warning-reverse . . . . . . . . . . . 4-125
• Operation of the parking distance warning-reverse . 4-125
• Non-operational conditions of the parking distance
warning-reverse . . . . . . . . . . . . . . . . . . . . . . . . . . . . 4-126
• Parking distance warning-reverse precautions . . . 4-127
• Self-diagnosis . . . . . . . . . . . . . . . . . . . . . . . . . . . . . . . 4-128
4
Page 107 of 593
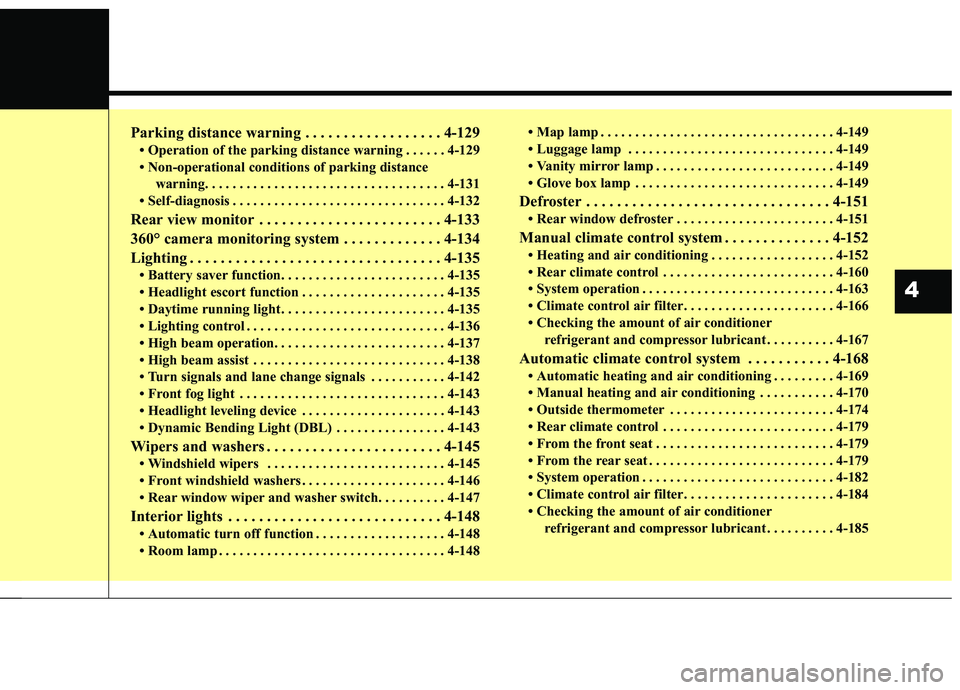
Parking distance warning . . . . . . . . . . . . . . . . . . 4-129
• Operation of the parking distance warning . . . . . . 4-129
• Non-operational conditions of parking distance warning. . . . . . . . . . . . . . . . . . . . . . . . . . . . . . . . . . . 4-\
131
• Self-diagnosis . . . . . . . . . . . . . . . . . . . . . . . . . . . . . . . 4-132
Rear view monitor . . . . . . . . . . . . . . . . . . . . . . . . 4-133
360° camera monitoring system . . . . . . . . . . . . . 4-134
Lighting . . . . . . . . . . . . . . . . . . . . . . . . . . . . . . . . . 4-135
• Battery saver function. . . . . . . . . . . . . . . . . . . . . . . . 4-135
• Headlight escort function . . . . . . . . . . . . . . . . . . . . . 4-135
• Daytime running light . . . . . . . . . . . . . . . . . . . . . . . . 4-135
• Lighting control . . . . . . . . . . . . . . . . . . . . . . . . . . . . . 4-136
• High beam operation. . . . . . . . . . . . . . . . . . . . . . . . . 4-137
• High beam assist . . . . . . . . . . . . . . . . . . . . . . . . . . . . 4-138
• Turn signals and lane change signals . . . . . . . . . . . 4-142
• Front fog light . . . . . . . . . . . . . . . . . . . . . . . . . . . . . . 4-143
• Headlight leveling device . . . . . . . . . . . . . . . . . . . . . 4-143
• Dynamic Bending Light (DBL) . . . . . . . . . . . . . . . . 4-143
Wipers and washers . . . . . . . . . . . . . . . . . . . . . . . 4-145
• Windshield wipers . . . . . . . . . . . . . . . . . . . . . . . . . . 4-145
• Front windshield washers . . . . . . . . . . . . . . . . . . . . . 4-146
• Rear window wiper and washer switch. . . . . . . . . . 4-147
Interior lights . . . . . . . . . . . . . . . . . . . . . . . . . . . . 4-148
• Automatic turn off function . . . . . . . . . . . . . . . . . . . 4-148
• Room lamp . . . . . . . . . . . . . . . . . . . . . . . . . . . . . . . . . 4-148 • Map lamp . . . . . . . . . . . . . . . . . . . . . . . . . . . . . . . . . . 4-14\
9
• Luggage lamp . . . . . . . . . . . . . . . . . . . . . . . . . . . . . . 4-149
• Vanity mirror lamp . . . . . . . . . . . . . . . . . . . . . . . . . . 4-149
• Glove box lamp . . . . . . . . . . . . . . . . . . . . . . . . . . . . . 4-149
Defroster . . . . . . . . . . . . . . . . . . . . . . . . . . . . . . . . 4-151
• Rear window defroster . . . . . . . . . . . . . . . . . . . . . . . 4-151
Manual climate control system . . . . . . . . . . . . . . 4-152
• Heating and air conditioning . . . . . . . . . . . . . . . . . . 4-152
• Rear climate control . . . . . . . . . . . . . . . . . . . . . . . . . 4-160
• System operation . . . . . . . . . . . . . . . . . . . . . . . . . . . . 4-163
• Climate control air filter. . . . . . . . . . . . . . . . . . . . . . 4-166
• Checking the amount of air conditioner
refrigerant and compressor lubricant . . . . . . . . . . 4-167
Automatic climate control system . . . . . . . . . . . 4-168
• Automatic heating and air conditioning . . . . . . . . . 4-169
• Manual heating and air conditioning . . . . . . . . . . . 4-170
• Outside thermometer . . . . . . . . . . . . . . . . . . . . . . . . 4-174
• Rear climate control . . . . . . . . . . . . . . . . . . . . . . . . . 4-179
• From the front seat . . . . . . . . . . . . . . . . . . . . . . . . . . 4-179
• From the rear seat . . . . . . . . . . . . . . . . . . . . . . . . . . . 4-179
• System operation . . . . . . . . . . . . . . . . . . . . . . . . . . . . 4-182
• Climate control air filter. . . . . . . . . . . . . . . . . . . . . . 4-184
• Checking the amount of air conditionerrefrigerant and compressor lubricant . . . . . . . . . . 4-185
4
Page 111 of 593
47
Features of your vehicle
1. Close all doors, engine hood andliftgate.
2. Press the lock button(1).
3. All doors and liftgate will lock. The hazard warning lights will blink
once.
4. If the lock button is pressed once more within 4 seconds, the hazard
warning lights will blink and the
horn will sound once.
5. Make sure that doors are locked by checking the door lock button inside
or pulling the outside door handle.Door Unlock (2)
1. Press the unlock button(2).
2. The driver's door will unlock. Thehazard warning lights will blink two
times.
3. Press the unlock button(2) twice within 4 seconds and all doors and
liftgate will unlock. The hazard
warning lights will blink two times.
✽ ✽NOTICE
You can activate or deactivate the
Two Turn Unlock function. Refer to
“User settings” in this chapter.
Left power sliding door opening
or closing (if equipped) (3)
When the power door ON/OFF but-
ton is ON (not depressed):
The left sliding door is opened or
closed automatically if the button is
pressed and held.
When the left sliding door is closed
and more than one door is locked, and
the button is pressed for more than
one second all doors will be unlocked.
Page 119 of 593
415
Features of your vehicle
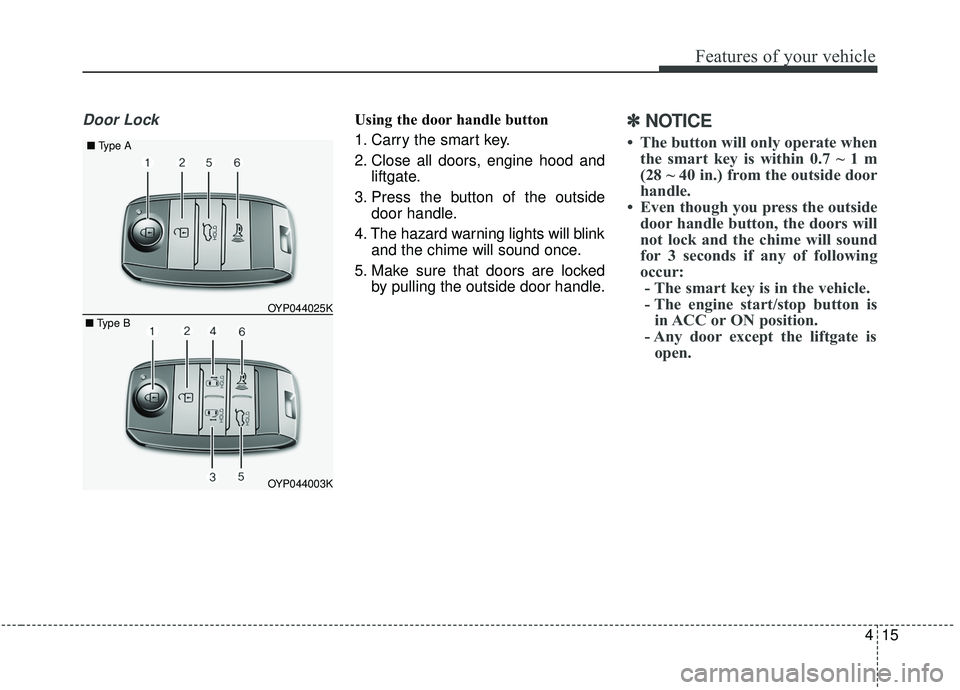
Door LockUsing the door handle button
1. Carry the smart key.
2. Close all doors, engine hood andliftgate.
3. Press the button of the outside door handle.
4. The hazard warning lights will blink and the chime will sound once.
5. Make sure that doors are locked by pulling the outside door handle.✽ ✽NOTICE
• The button will only operate when
the smart key is within 0.7 ~ 1 m
(28 ~ 40 in.) from the outside door
handle.
• Even though you press the outside door handle button, the doors will
not lock and the chime will sound
for 3 seconds if any of following
occur:- The smart key is in the vehicle.
- The engine start/stop button is in ACC or ON position.
- Any door except the liftgate is open.
OYP044003K
OYP044025K
■
Type A
■ Type B
Page 120 of 593
Features of your vehicle
16
4
Using the button on the smart key
1 Close all doors, engine hood and
liftgate.
2. Press the lock button (1).
3. The hazard warning lights will blink and the chime will sound once.
4. Make sure that doors are locked by pulling the outside door handle.Unlocking
Using the door handle button
1. Carry the smart key.
2. Press the button of the driver'soutside door handle.
3. The driver’s door will unlock. The hazard warning lights will blink and
the chime will sound two times.
4. Press the button twice within 4 seconds and all doors and the lift-
gate will unlock and the hazard
warning lights will blink and the
chime will sound two times.
✽ ✽NOTICE
• The button will only operate when
the smart key is within 0.7 ~ 1 m
(28 ~ 40 in.) from the outside door
handle.
• When the smart key is recognized in the area of 0.7 ~ 1 m (28 ~ 40 in.)
from the front outside door handle,
other people can also open the
doors.
• After unlocking the driver’s door or all doors, the door(s) will lock
automatically unless the door is
opened.
Page 121 of 593
417
Features of your vehicle
Using the button on the smart key
1. Press the unlock button (2) of thesmart key.
2. The driver’s door will unlock. The hazard warning lights will blink and
the chime will sound two times.
3. Press the unlock button (2) twice within 4 seconds and all doors and
the liftgate will unlock. The hazard
warning lights will blink and the
chime will sound two times.
✽ ✽NOTICE
After pressing the button, the doors
will lock automatically unless any
door is opened within 30 seconds.
✽ ✽NOTICE
You can activate or deactivate the
Two Turn Unlock function. Refer to
“User settings” in this chapter.
Left or Right power sliding door
opening or closing (if equipped)
This function will be operated when
the power door ON/OFF button is
ON (not depressed).
Using the power sliding door handle
1. Carry the smart key.
2. Pull the power sliding door handle once.
3. The power sliding door will be opened or closed automatically. At
this time, the hazard warning
lights will blink and the chime will
sound two times.
Using the button on the smart key
1. Press and hold the power sliding door open (or close) button (3), (4)
more than 1 second.
❈ For detailed information refer to
the “Power sliding door and power
liftgate” in this chapter.
Liftgate unlocking
Using the liftgate handle button
1. Carry the smart key.
2. Press the liftgate handle button.
3. When all doors are locked, the
hazard warning lights will blink two
times.
Once the liftgate is opened and
then closed, the liftgate will lock
automatically.
✽ ✽NOTICE
The button will only operate when
the smart key is within 0.7 ~ 1 m (28
~ 40 in.) from the liftgate handle.
Page 122 of 593
Features of your vehicle
18
4
Using the button on the smart key
1. Press the liftgate unlock button (5)
for more than 1 second.
2. When all doors are locked, the hazard warning lights will blink two
times.
For Power Liftgate Only:
The Power Liftgate will open if the
button is pressed for more than 1
second. Also, once the liftgate is
opened and then closed, the liftgate
will be locked again automatically.
If the power liftgate is switched ‘Off’
using the button in the overhead con-
sole, the liftgate unlock button will
operate to unlock the liftgate as
described above.
❈ For detailed information refer to
the “Power sliding door and power
liftgate”in this chapter.Panic
1. Press the panic button (6) for more
than 1 second.
2. The horn sounds and hazard warning light flash for about 27
seconds.
✽ ✽NOTICE
To stop the horn and lights, press
any button on the smart key.
Start-up
You can start the engine without
inserting the key.
❈ For detailed information refer to
the “Engine start/stop button” in
chapter 5.
Loss of the smart key
A maximum of 2 smart keys can be
registered to a single vehicle.
If you happen to lose your smart key,
you will not be able to start the
engine. You should immediately take
the vehicle and remaining key to your
authorized Kia dealer(tow the vehi-
cle, if necessary) to protect it from
potential theft.