2019 KIA SEDONA fuse
[x] Cancel search: fusePage 14 of 593
Your vehicle at a glance
42
INTERIOR OVERVIEW
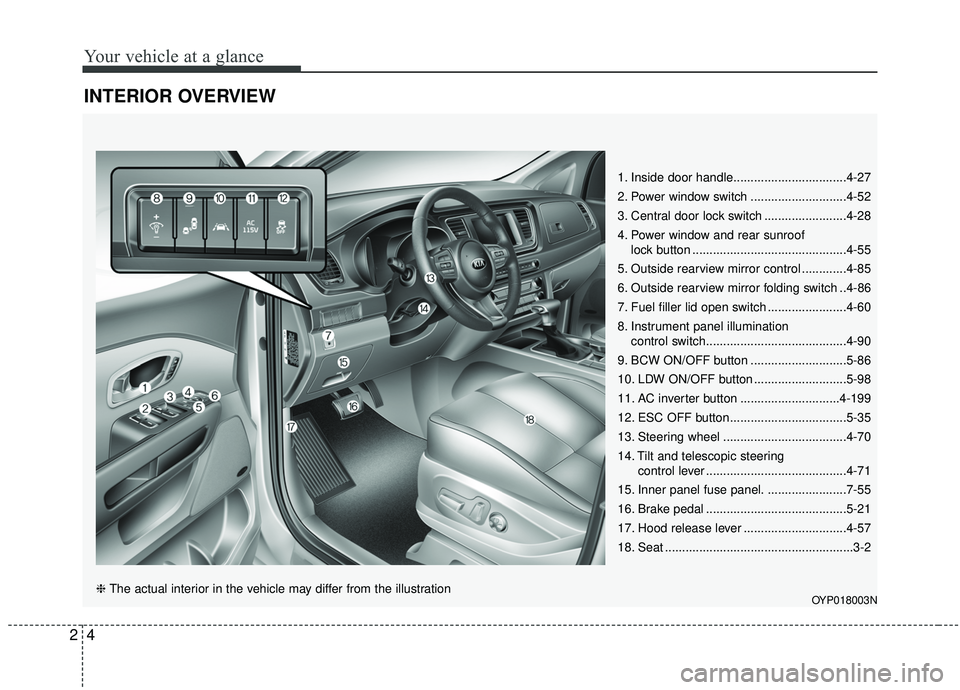
1. Inside door handle.................................4-27
2. Power window switch ............................4-52
3. Central door lock switch ........................4-28
4. Power window and rear sunrooflock button .............................................4-55
5. Outside rearview mirror control .............4-85
6. Outside rearview mirror folding switch ..4-86
7. Fuel filler lid open switch .......................4-60
8. Instrument panel illumination control switch.........................................4-90
9. BCW ON/OFF button ............................5-86
10. LDW ON/OFF button ...........................5-98
11. AC inverter button .............................4-199
12. ESC OFF button..................................5-35
13. Steering wheel ....................................4-70
14. Tilt and telescopic steering control lever .........................................4-71
15. Inner panel fuse panel. .......................7-55
16. Brake pedal .........................................5-21
17. Hood release lever ..............................4-57
18. Seat .......................................................3-2
OYP018003N❈ The actual interior in the vehicle may differ from the illustration
Page 16 of 593

Your vehicle at a glance
62
ENGINE COMPARTMENT
OYP078001N
❈The actual engine compartment in the vehicle may differ from the illustration. 1. Engine coolant reservoir ...................7-22
2. Engine oil filler cap ...........................7-20
3. Brake fluid reservoir ..........................7-25
4. Air cleaner.........................................7-28
5. Fuse box ...........................................7-53
6. Positive battery terminal ...................7-36
7. Negative battery terminal..................7-36
8. Engine oil dipstick .............................7-20
9. Windshield washer fluid reservoir .....7-27
10. Radiator cap ...................................7-24
11. Power steering reservoir
(if equipped) ....................................7-26
■ ■Gasoline Engine (Lambda 3.3L)
Page 84 of 593
Safety features of your vehicle
68
3
If an air bag deploys, there may be
a loud noise followed by a fine dust
released in the vehicle. These con-
ditions are normal and are not haz-
ardous - the air bags are packed in
this fine powder. The dust generat-
ed during air bag deployment may
cause skin or eye irritation as well
as aggravate asthma for some per-
sons. Always wash all exposed
skin areas thoroughly with cold
water and a mild soap after an
accident in which the air bags were
deployed.
The SRS can function only when the ignition switch is in the ON
position. If the SRS air bag warning
light does not illuminate, or contin-
uously remains on after illuminat-
ing for about 6 seconds when the
ignition switch is turned to the ON
position, or after the engine is
started, comes on while driving,
the SRS is not working properly. If
this occurs, have your vehicle
immediately inspected by an
authorized Kia dealer.✽ ✽ NOTICE
Before you replace a fuse or discon-
nect a battery terminal, turn the
ignition switch to the LOCK posi-
tion and remove the ignition switch.
Never remove or replace the air bag
related fuse(s) when the ignition
switch is in the ON position. Failure
to heed this warning will cause the
SRS air bag warning light to illumi-
nate.
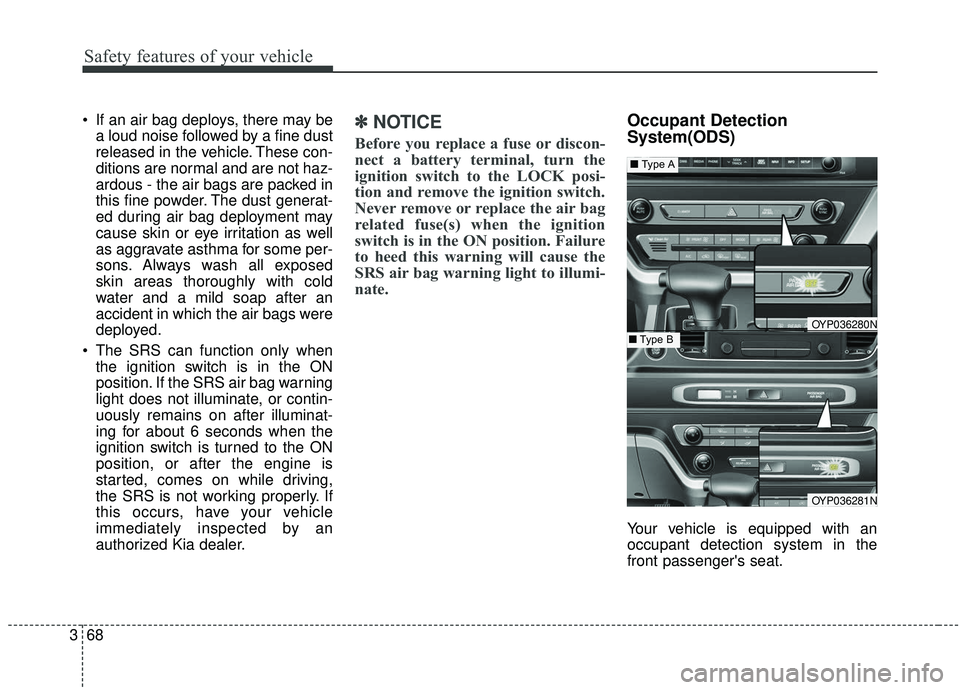
Occupant Detection
System(ODS)
Your vehicle is equipped with an
occupant detection system in the
front passenger's seat.
OYP036280N
OYP036281N
■ Type A
■Type B
Page 141 of 593
437
Features of your vehicle
How to reset the power sliding
door and power liftgate
If the battery has been discharged or
disconnected, the related fuse has
been replaced or disconnected, and
the power sliding door or power lift-
gate doesn't work properly, the
power sliding door and power liftgate
must be reset as follows:
For power sliding door
1. Put the shift lever in the P (Park).
2. Close the fuel filler lid.
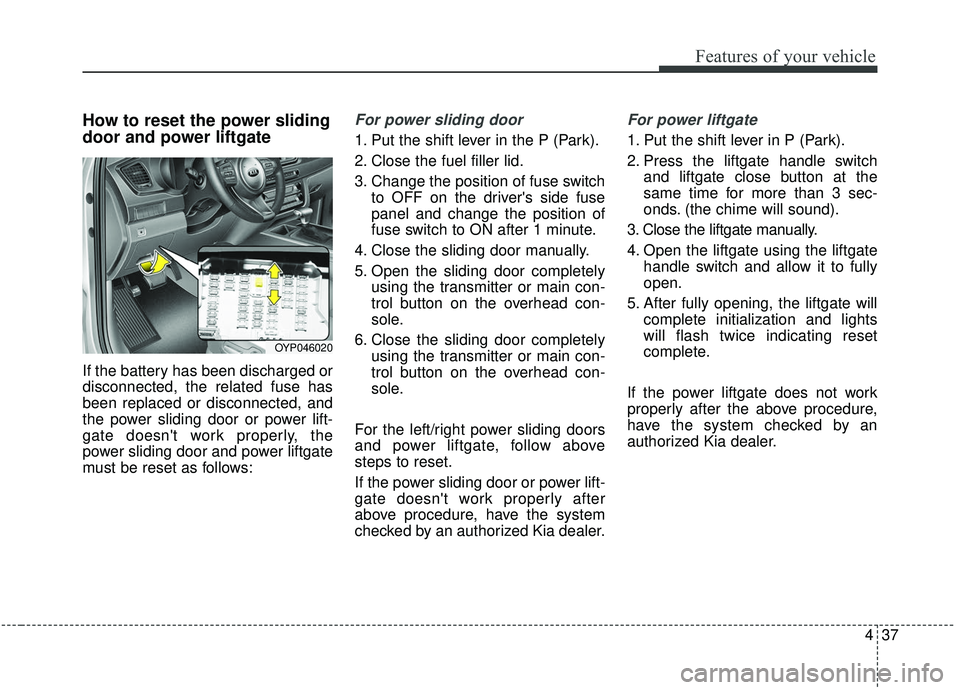
3. Change the position of fuse switchto OFF on the driver's side fuse
panel and change the position of
fuse switch to ON after 1 minute.
4. Close the sliding door manually.
5. Open the sliding door completely using the transmitter or main con-
trol button on the overhead con-
sole.
6. Close the sliding door completely using the transmitter or main con-
trol button on the overhead con-
sole.
For the left/right power sliding doors
and power liftgate, follow above
steps to reset.
If the power sliding door or power lift-
gate doesn't work properly after
above procedure, have the system
checked by an authorized Kia dealer.
For power liftgate
1. Put the shift lever in P (Park).
2. Press the liftgate handle switch and liftgate close button at the
same time for more than 3 sec-
onds. (the chime will sound).
3. Close the liftgate manually.
4. Open the liftgate using the liftgate handle switch and allow it to fully
open.
5. After fully opening, the liftgate will complete initialization and lights
will flash twice indicating reset
complete.
If the power liftgate does not work
properly after the above procedure,
have the system checked by an
authorized Kia dealer.
OYP046020
Page 160 of 593

Features of your vehicle
56
4
When the power window and rear
sunroof lock switch is pressed:
The driver's master control can
operate all the power windows.
The front passenger's control can operate the front passen-
ger's power window.
The rear passenger's control cannot operate the rear passen-
ger's power window.
The rear sunroof control cannot operate the rear sunroof. But
The front master sunroof control
can operate both front and rear
sunroofs (if equipped). Always double check to make sure
all arms, hands, head and other
obstructions are safely out of the way
before closing a window.CAUTION- Opening/clos-
ing Window
To prevent possible damage tothe power window system, donot open or close two windowsor more at the same time. Thiswill also ensure the longevity ofthe fuse.
WARNING- Power win-
dows
Do not allow children to play with the power windows. Keep
the power window lock button
(on the driver's door) in the
LOCK (pressed) position.
Do not extend a face or arms outside through the window
opening while driving.
Page 172 of 593
Features of your vehicle
68
4
Resetting the sunroof
Whenever the vehicle battery is dis-
connected or discharged, you must
reset your sunroof system as follows:
1.Turn the ignition switch to the ON
position.
2.Close the sunshade and sunroof completely if opened.
3.Release the sunroof control lever.
4.Push the sunroof control lever for- ward in the direction of close (about
10~15 seconds) until the sunroof
moves a little. Then, release the
lever. 5.Push the sunroof control lever for-
ward in the direction of close, until
the sunroof operates as follows
again:
The sunroof glass slide open →
The sunroof glass slide close
Then, release the lever.
When this is complete, the sunroof
system has been reset.
Rear sunroof lock
When the power window lock switch
is pressed, the rear sunroof control
cannot operate the rear sunroof. But
The front master sunroof control can
operate both front and rear sunroofs
(if equipped).
CAUTION
If the sunroof is not reset when the vehicle battery is discon-nected or discharged, or relatedfuse is blown, the sunroof mayoperate improperly.
Page 205 of 593

4101
Features of your vehicle
From the point at which the remain-
ing distance to drive amounts to
1,500 km (900 mi.) or the remaining
period amounts to 3 days, Service
Required message automatically
displays and remained on LCD
screen for a number of seconds
every time the engine start/stop but-
ton is ON.
With Service Required in place,
Service Required Alarm message
pops up when an aggregated
amount of miles/time driven reaches
a certain point.
With Service Required mode, press
OK button for more than 1 second.
The values will return to initial setting
values.❈
See User Settings
Mode in this chapter for further
information about Service Required
Setting.
❈ Service Required Setting
Battery Cable Disconnection, Fuse
Switch OFF, or Service Required
Setting values (an amount of
miles/time driven) can be randomly
changed. In such cases, re-enter
Service Required Setting values.Master Warning Mode
This warning light informs the driv- er of the following situations
- Forward Collision-Avoidance (if equipped) blockage
- Forward Collision-Avoidance (if equipped) malfunction
- Blind-Spot Collision Warning (if equipped) malfunction
- Blind-Spot Collision Warning (if equipped) blockage
- LED headlamp (if equipped) mal- function
- High Beam Assist (if equipped) malfunction
- Low engine oil
- Smart Cruise Control with Stop &Go (if equipped) blockage
- Smart Cruise Control with Stop & Go (if equipped) malfunction
Page 213 of 593
4109
Features of your vehicle
Press start button again (for smart key system)
This warning message illuminates if you can not operate the Engine
Start/Stop Button when there is a
problem with the Engine Start/Stop
Button system.
It means that you could start the engine by pressing the Engine
Start/ Stop Button once more.
If the warning illuminates each time you press the Engine
Start/Stop Button, have your vehi-
cle inspected by an authorized Kia
dealer.
Press start button with key
(for smart key system)
This warning message illuminates if you press the Engine Start/Stop
Button while the warning message
“Key not detected” is illuminating.
At this time, the immobilizer indica- tor light blinks.
Check fuse BRAKE SWITCH
(for smart key system)
This warning message illuminates if the brake switch fuse is discon-
nected.
It means that you should replace the fuse with a new one. If that is
not possible, you can start the
engine by pressing the Engine
Start/Stop Button for 10 seconds in
the ACC position.
Shift to P or N to start engine
(for smart key system)
This warning message illuminates if you try to start the engine with
the shift lever not in the P (Park) or
N (Neutral) position.
✽ ✽ NOTICE
You can start the engine with the
shift lever in the N (Neutral) position.
But, for your safety, we recommend
that you start the engine with the
shift lever in the P (Park) position.