Page 504 of 593
737
Maintenance
✽ ✽NOTICE
If you connect unauthorized elec-
tronic devices to the battery, the bat-
tery may be discharged. Never use
unauthorized devices.
Battery recharging
Your vehicle has a maintenance-free,
calcium-based battery.
If the battery becomes discharged
in a short time (because, for exam-
ple, the headlights or interior lights
were left on while the vehicle was
not in use), recharge it by slow
charging (trickle) for 10 hours.
If the battery gradually discharges because of high electric load while
the vehicle is being used, recharge
it at 20-30A for two hours.
Recharging Battery
When recharging the battery,
observe the following precautions:
The battery must be removed fromthe vehicle and placed in an area
with good ventilation.
Do not allow cigarettes, sparks, or flame near the battery.
Watch the battery during charging, and stop or reduce the charging
rate if the battery cells begin
gassing (boiling) violently or if the
temperature of the electrolyte of
any cell exceeds 49°C (120°F).
Wear eye protection when check- ing the battery during charging.
Disconnect the battery charger in the following order.
1. Turn off the battery charger main switch.
2. Unhook the negative clamp from the negative battery terminal.
3. Unhook the positive clamp from the positive battery terminal.WARNING- Risk of elec-
trocution
Never touch the electrical igni-
tion system while the vehicle is
running. This system works
with high voltage which can
shock you.
Page 506 of 593
739
Maintenance
TIRES AND WHEELS
Tire care
For proper maintenance, safety, and
maximum fuel economy, you must
always maintain recommended tire
inflation pressures and stay within
the load limits and weight distribution
recommended for your vehicle.
Recommended cold tire infla-
tion pressures
All tire pressures (including the
spare) should be checked when the
tires are cold. “Cold Tires” means the
vehicle has not been driven for at
least three hours or driven less than
1.6 km (one mile).
Recommended pressures must be
maintained for the best ride, vehicle
handling, and minimum tire wear.
For recommended inflation pressure,
refer to “Tire and wheels” in chapter
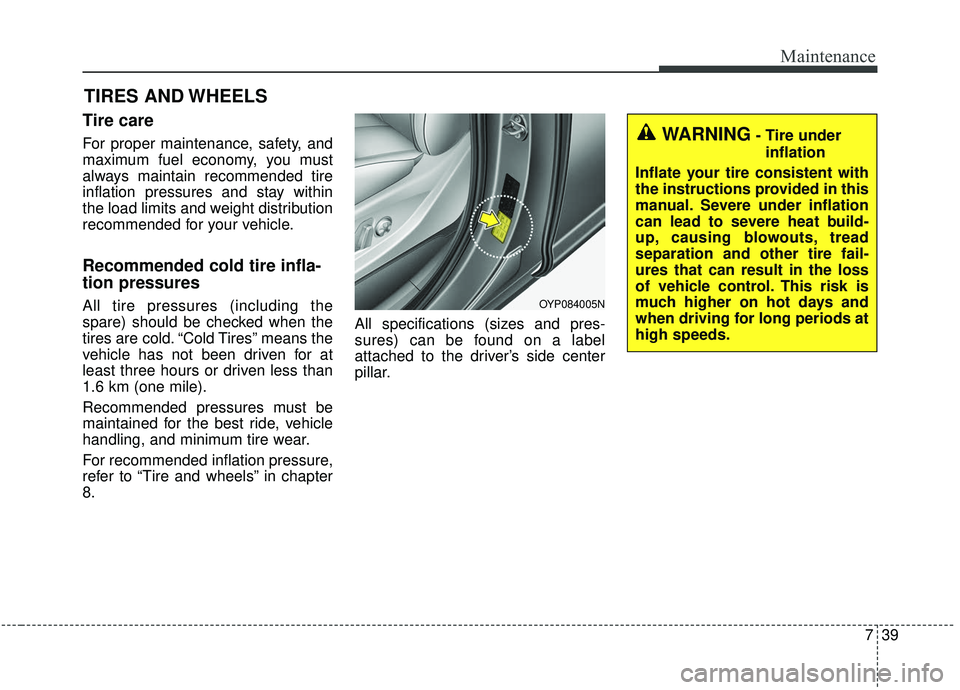
8.All specifications (sizes and pres-
sures) can be found on a label
attached to the driver’s side center
pillar.OYP084005N
WARNING- Tire under
inflation
Inflate your tire consistent with
the instructions provided in this
manual. Severe under inflation
can lead to severe heat build-
up, causing blowouts, tread
separation and other tire fail-
ures that can result in the loss
of vehicle control. This risk is
much higher on hot days and
when driving for long periods at
high speeds.
Page 509 of 593
Maintenance
42
7
Disc brake pads should be inspected
for wear whenever tires are rotated.
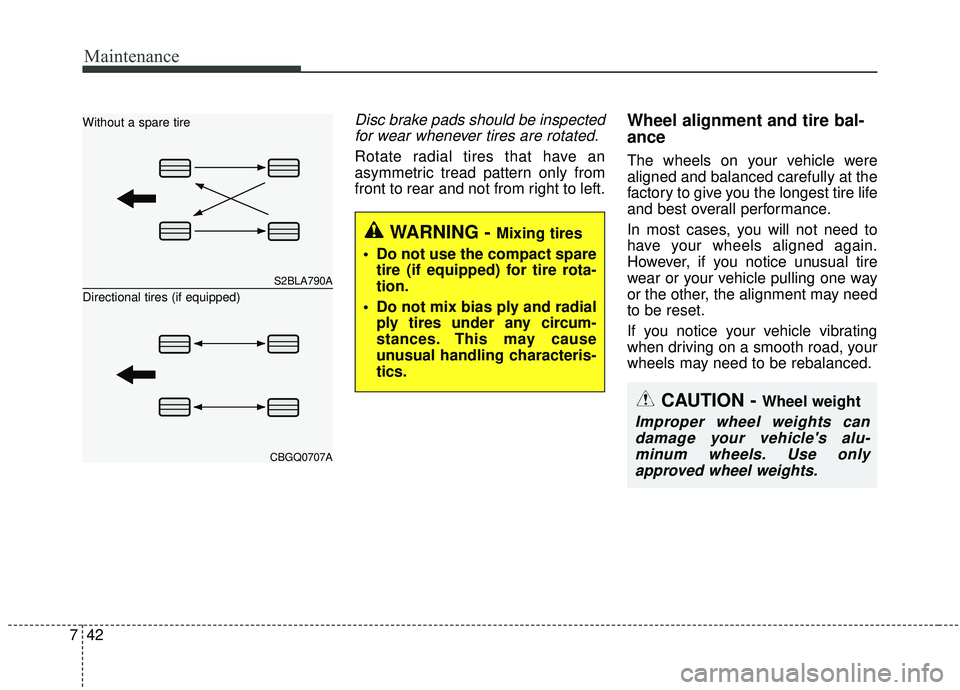
Rotate radial tires that have an
asymmetric tread pattern only from
front to rear and not from right to left.
Wheel alignment and tire bal-
ance
The wheels on your vehicle were
aligned and balanced carefully at the
factory to give you the longest tire life
and best overall performance.
In most cases, you will not need to
have your wheels aligned again.
However, if you notice unusual tire
wear or your vehicle pulling one way
or the other, the alignment may need
to be reset.
If you notice your vehicle vibrating
when driving on a smooth road, your
wheels may need to be rebalanced.
S2BLA790A
CBGQ0707A
Without a spare tire
Directional tires (if equipped)
WARNING - Mixing tires
Do not use the compact spare tire (if equipped) for tire rota-
tion.
Do not mix bias ply and radial ply tires under any circum-
stances. This may cause
unusual handling characteris-
tics.
CAUTION - Wheel weight
Improper wheel weights candamage your vehicle's alu-minum wheels. Use onlyapproved wheel weights.
Page 513 of 593
Maintenance
46
7
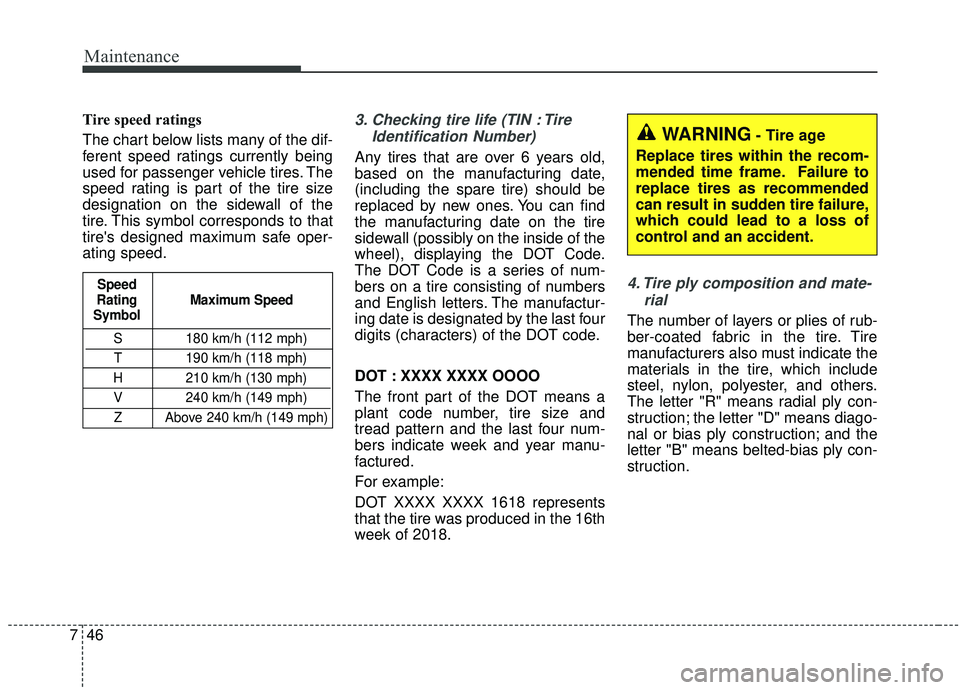
Tire speed ratings
The chart below lists many of the dif-
ferent speed ratings currently being
used for passenger vehicle tires. The
speed rating is part of the tire size
designation on the sidewall of the
tire. This symbol corresponds to that
tire's designed maximum safe oper-
ating speed.3. Checking tire life (TIN : Tire
Identification Number)
Any tires that are over 6 years old,
based on the manufacturing date,
(including the spare tire) should be
replaced by new ones. You can find
the manufacturing date on the tire
sidewall (possibly on the inside of the
wheel), displaying the DOT Code.
The DOT Code is a series of num-
bers on a tire consisting of numbers
and English letters. The manufactur-
ing date is designated by the last four
digits (characters) of the DOT code.
DOT : XXXX XXXX OOOO
The front part of the DOT means a
plant code number, tire size and
tread pattern and the last four num-
bers indicate week and year manu-
factured.
For example:
DOT XXXX XXXX 1618 represents
that the tire was produced in the 16th
week of 2018.
4. Tire ply composition and mate-rial
The number of layers or plies of rub-
ber-coated fabric in the tire. Tire
manufacturers also must indicate the
materials in the tire, which include
steel, nylon, polyester, and others.
The letter "R" means radial ply con-
struction; the letter "D" means diago-
nal or bias ply construction; and the
letter "B" means belted-bias ply con-
struction.
S 180 km/h (112 mph)
T 190 km/h (118 mph)
H 210 km/h (130 mph) V 240 km/h (149 mph)Z Above 240 km/h (149 mph)
Maximum Speed
Speed
Rating
Symbol
WARNING- Tire age
Replace tires within the recom-
mended time frame. Failure to
replace tires as recommended
can result in sudden tire failure,
which could lead to a loss of
control and an accident.
Page 520 of 593
753
Maintenance
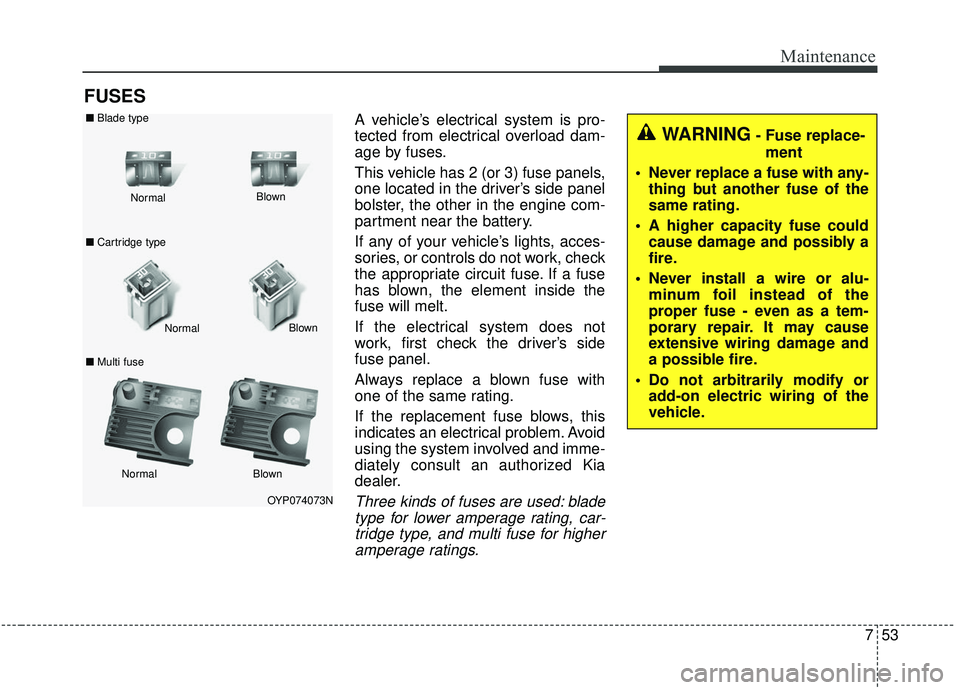
FUSES
A vehicle’s electrical system is pro-
tected from electrical overload dam-
age by fuses.
This vehicle has 2 (or 3) fuse panels,
one located in the driver’s side panel
bolster, the other in the engine com-
partment near the battery.
If any of your vehicle’s lights, acces-
sories, or controls do not work, check
the appropriate circuit fuse. If a fuse
has blown, the element inside the
fuse will melt.
If the electrical system does not
work, first check the driver’s side
fuse panel.
Always replace a blown fuse with
one of the same rating.
If the replacement fuse blows, this
indicates an electrical problem. Avoid
using the system involved and imme-
diately consult an authorized Kia
dealer.
Three kinds of fuses are used: bladetype for lower amperage rating, car-tridge type, and multi fuse for higheramperage ratings.
WARNING- Fuse replace-
ment
Never replace a fuse with any- thing but another fuse of the
same rating.
A higher capacity fuse could cause damage and possibly a
fire.
Never install a wire or alu- minum foil instead of the
proper fuse - even as a tem-
porary repair. It may cause
extensive wiring damage and
a possible fire.
Do not arbitrarily modify or add-on electric wiring of the
vehicle.
OYP074073N
Normal
Normal
■
Blade type
■ Cartridge type
■ Multi fuse Blown
Blown
Normal Blown
Page 521 of 593

Maintenance
54
7
✽ ✽
NOTICE
• When replacing a fuse, turn the
ignition “OFF” and turn off
switches of all electrical devices
then remove battery (-) terminal.
• The actual fuse/relay panel label may differ from equipped items.
CAUTION
Do not use a screwdriver or any
other metal object to removefuses because it may cause ashort circuit and damage thesystem.
WARNING- Electrical Fire
Always ensure replacements
fuses and relays are securely
fastened when installed. Failure
to do so can result in a vehicle
fire.
CAUTION
When replacing a blown fuse or relay, make sure the newfuse or relay fits tightly intothe clips. Failure to tightlyinstall the fuse or relay maycause damage to the wiringand electric systems.
Do not remove fuses, relays and terminals fastened withbolts or nuts. The fuses, relaysand terminals may not be fas-tened correctly which maycause vehicle damage.
CAUTION
Do not input any other objects except fuses or relays intofuse/relay terminals such as ascrewdriver or wiring. It maycause contact failure and sys-tem malfunction.
Do not plug in screwdrivers or aftermarket wiring into the ter-minal originally designed forfuse and relays only. The elec-trical system and wiring of thevehicle interior may be dam-aged or burned due to contactfailure.
If you directly connect the wire on the taillight or replacethe bulb which is over the reg-ulated capacity to install trail-ers etc., the inner junctionblock can get burned.
Page 522 of 593
755
Maintenance
✽ ✽NOTICE- Remodeling
Prohibited
Do not rewire your vehicle in any
way as doing so may affect the per-
formance of several safety features
in your vehicle. Rewiring your vehi-
cle may also void your warranty and
cause you to be responsible for any
subsequent vehicle damage which
may result.
✽ ✽ NOTICE- Window tinting pre-
caution
Window tint (especially metallic
film) might cause communication
errors or poor radio reception, and
malfunctioning automatic lighting
system due to reflections from the
mirror tint inside the vehicle. The
solution used might also leak into
the electronic components, causing
malfunctions or damage.
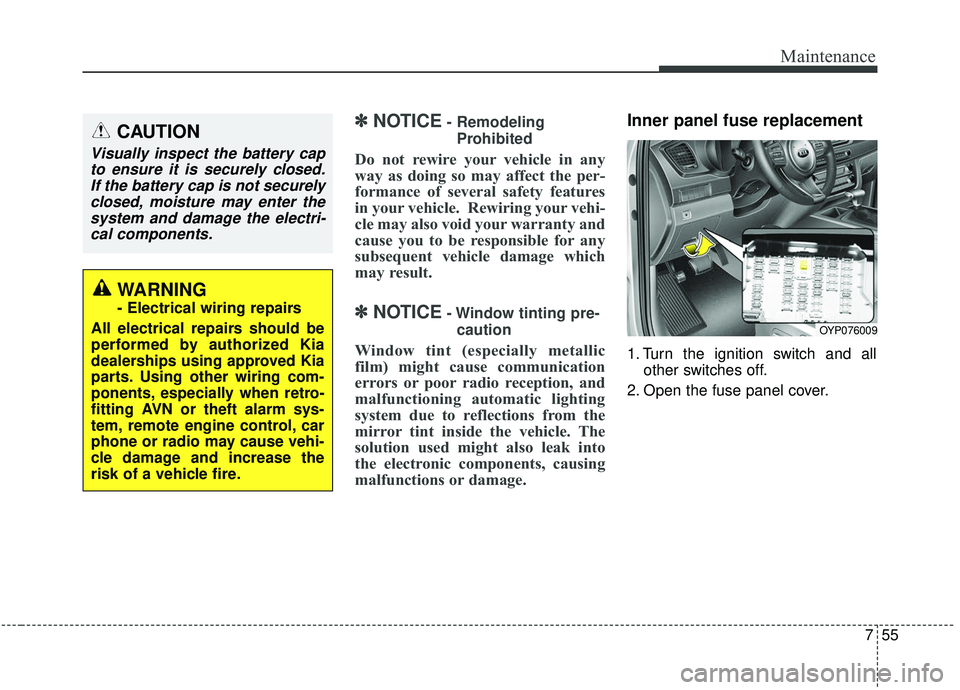
Inner panel fuse replacement
1. Turn the ignition switch and all other switches off.
2. Open the fuse panel cover.
CAUTION
Visually inspect the battery cap to ensure it is securely closed.If the battery cap is not securelyclosed, moisture may enter thesystem and damage the electri-cal components.
WARNING
- Electrical wiring repairs
All electrical repairs should be
performed by authorized Kia
dealerships using approved Kia
parts. Using other wiring com-
ponents, especially when retro-
fitting AVN or theft alarm sys-
tem, remote engine control, car
phone or radio may cause vehi-
cle damage and increase the
risk of a vehicle fire.
OYP076009
Page 528 of 593

761
Maintenance
Fuse Name Fuse ratingCircuit Protected
MULTIMEDIA 15A USB Charger #1/#2, A/V & Navigation Head Unit S/ROOF FRT 20A Front Sunroof Motor AMP 25A AMP IG1 20A PCB BLOCK (Fuse - ABS3, TCU, MDPS, CRUISE)
SMART KEY2 7.5A Smart Key Control Module
INTERIOR LAMP 10A Portable Lamp, Overhead Console Lamp, Cargo Lamp, Front Vinity Lamp Switch LH/RH, Glove Box
Lamp, Key Warning Switch
START 7.5A With IMMO./Smart Key : Transmission Range Switch, W/O IMMO. : PCB Block (B/Alarm Relay)
S/ROOF RR 25A Rear Sunroof Motor
DOOR LOCK 20A Tail Gate Relay, Door Lock/Unlock Relay, Sliding Door Lock/Unlock Relay
FOG LAMP REAR 10A -
MODULE1 10A Audio, A/V & Navigation Head Unit, Around View Unit, BCM, Overhead Console Lamp, MTS Module,
Digital Clock, USB Charger #1/#2
AIR BAG 15A SRS Control Module, Passenger Occupant Detection Sensor
A/CON2 7.5A A/C Control Module, Blower Resistor (Manual)
HEATED MIRROR 10A Passenger Power Outside Mirror, A/C Control Module BRAKE SWITCH 7.5A Smart Key Control Module, Stop Lamp Switch S/HEATER RR 25A Rear Seat Heater Control Module
P/WINDOW LH 25ADriver Safety Window Module, Driver Door Module, Rear Power Window Switch LH, Rear Safety Power
Window Switch LH, Rear Safety Power Window Module LH
MODULE7 7.5A Key Inter Lock Solenoid, Fuel Lid Switch, ATM Lever Switch, Rear A/C Control Switch, Electro Chromic Mirror
POWER OUTLET1 20A Front Power Outlet P/SEAT (DRV) 30A Driver Manual Switch, Driver Lumbar Support Switch, Driver IMS Control Module
P/WINDOW RH 25APassenger Safety Window Module, Passenger Power Window Motor, Passenger Door Module, Rear Power
Window Switch RH, Rear Safety Power Window Switch RH, Rear Safety Power Window Module RH
S/HEATER FRT 20A Heater Control Module, Passenger Ventilation Seat Control Module