Page 159 of 593

455
Features of your vehicle
And if the power window switch is
pulled up continuously again within 5
seconds after the window is lowered
by the automatic window reversal
feature, the automatic window rever-
sal will not operate.
The automatic reverse feature for the
driver’s window is only active when
the “auto up” feature is used by fully
pulling up the switch. The automatic
reverse feature will not operate if the
window is raised using the halfway
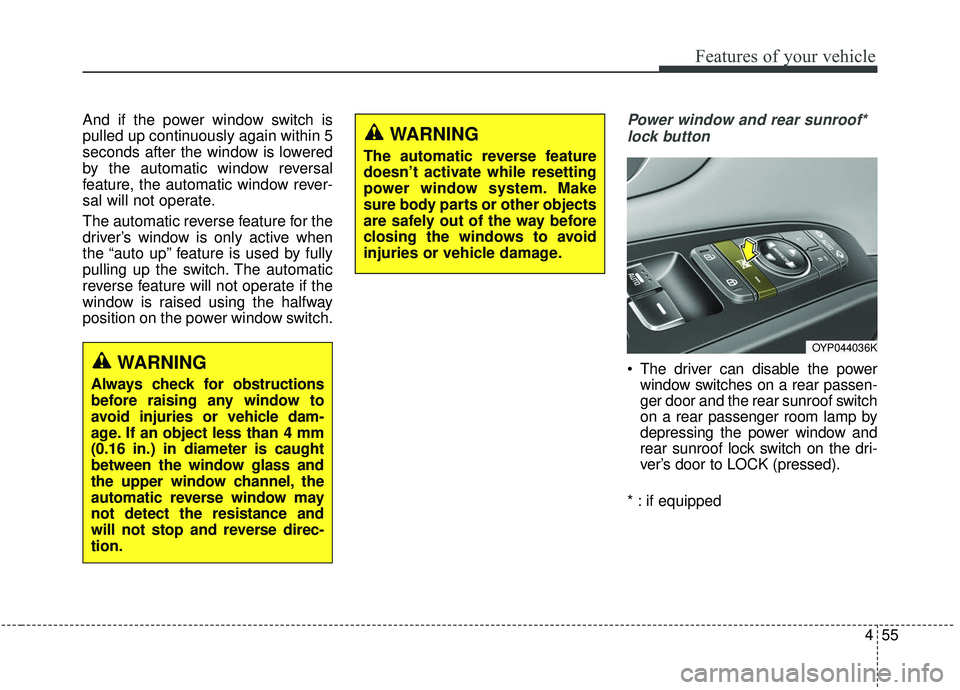
position on the power window switch.Power window and rear sunroof*lock button
The driver can disable the power window switches on a rear passen-
ger door and the rear sunroof switch
on a rear passenger room lamp by
depressing the power window and
rear sunroof lock switch on the dri-
ver’s door to LOCK (pressed).
* : if equipped
WARNING
The automatic reverse feature
doesn’t activate while resetting
power window system. Make
sure body parts or other objects
are safely out of the way before
closing the windows to avoid
injuries or vehicle damage.
WARNING
Always check for obstructions
before raising any window to
avoid injuries or vehicle dam-
age. If an object less than 4 mm
(0.16 in.) in diameter is caught
between the window glass and
the upper window channel, the
automatic reverse window may
not detect the resistance and
will not stop and reverse direc-
tion.
OYP044036K
Page 160 of 593

Features of your vehicle
56
4
When the power window and rear
sunroof lock switch is pressed:
The driver's master control can
operate all the power windows.
The front passenger's control can operate the front passen-
ger's power window.
The rear passenger's control cannot operate the rear passen-
ger's power window.
The rear sunroof control cannot operate the rear sunroof. But
The front master sunroof control
can operate both front and rear
sunroofs (if equipped). Always double check to make sure
all arms, hands, head and other
obstructions are safely out of the way
before closing a window.CAUTION- Opening/clos-
ing Window
To prevent possible damage tothe power window system, donot open or close two windowsor more at the same time. Thiswill also ensure the longevity ofthe fuse.
WARNING- Power win-
dows
Do not allow children to play with the power windows. Keep
the power window lock button
(on the driver's door) in the
LOCK (pressed) position.
Do not extend a face or arms outside through the window
opening while driving.
Page 172 of 593

Features of your vehicle
68
4
Resetting the sunroof
Whenever the vehicle battery is dis-
connected or discharged, you must
reset your sunroof system as follows:
1.Turn the ignition switch to the ON
position.
2.Close the sunshade and sunroof completely if opened.
3.Release the sunroof control lever.
4.Push the sunroof control lever for- ward in the direction of close (about
10~15 seconds) until the sunroof
moves a little. Then, release the
lever. 5.Push the sunroof control lever for-
ward in the direction of close, until
the sunroof operates as follows
again:
The sunroof glass slide open →
The sunroof glass slide close
Then, release the lever.
When this is complete, the sunroof
system has been reset.
Rear sunroof lock
When the power window lock switch
is pressed, the rear sunroof control
cannot operate the rear sunroof. But
The front master sunroof control can
operate both front and rear sunroofs
(if equipped).
CAUTION
If the sunroof is not reset when the vehicle battery is discon-nected or discharged, or relatedfuse is blown, the sunroof mayoperate improperly.
Page 178 of 593

Features of your vehicle
74
4
MIRRORS
Inside rearview mirror
Adjust the rearview mirror so that the
center view through the rear window
is seen. Make this adjustment before
you start driving.
Do not place objects in the rear seat or
cargo area which would interfere with
your vision through the rear window.
Day/night rearview mirror
(if equipped)
Make this adjustment before you
start driving and while the day/night
lever is in the day position.
Pull the day/night lever toward you to
reduce the glare from the headlights
of the vehicles behind you during
night driving.
Remember that you lose somerearview clarity in the night position. Electric chromatic mirror (ECM)
(if equipped)
The electric rearview mirror automat-
ically controls the glare from the
headlights of the vehicles behind you
in nighttime or low light driving condi-
tions. The sensor (3) mounted in the
mirror senses the light level around
the vehicle, and automatically con-
trols the headlight glare from the
vehicles behind you.
When the engine is running, the
glare is automatically controlled by
the sensor mounted in the rearview
mirror.
Whenever the shift lever is shifted
into reverse (R), the mirror will auto-
matically go to the brightest setting in
order to improve the drivers view
behind the vehicle.
WARNING- Mirror adjustment
Do not adjust the rearview mirror
while the vehicle is moving. This
could result in loss of control.
WARNING
Do not modify the inside mirror
and don’t install a wide mirror. It
could result in injury, during an
accident or deployment of the
air bag.
OAM049023
Day
Night
Page 181 of 593

477
Features of your vehicle
Automatic-dimming function
Your mirror will automatically dim
upon detecting glare from the vehi-
cles traveling behind you. The auto-
dimming function can be controlled
by the Dimming ON/OFF Button:
1. Pressing the button turns theauto-dimming function OFF which
is indicated by the green Status
Indicator LED turning off.
2. Pressing the button again turns the auto-dimming function ON
which is indicated by the green
Status Indicator LED turning on.
✽ ✽NOTICE
The mirror defaults to the ON posi-
tion each time the vehicle is started.
Z-Nav™ Compass Display
The NVS
®Mirror in your vehicle is
also equipped with a Z-NAV™
Compass that shows the vehicle
Compass heading in the Display
Window using the 8 basic cardinal
headings (N, NE, E, SE, etc.).
❈ Z-Nav™ is a registered trademark
of Gentex Corporation.
Compass function
The Compass can be turned ON and
OFF and will remember the last state
when the ignition is cycled. To turn
the display feature ON/OFF:
1. Press and release the button to
turn the display feature OFF.
2. Press and release the button
again to turn the display back ON.
Additional options can be set with
press and hold sequences of the
button and are detailed below.
There is a difference between mag-
netic north and true north. The com-
pass in the mirror can compensate
for this difference when it knows the
Magnetic Zone in which it is operat-
ing. This is set either by the dealer or
by the user. The operating Zone
Numbers for North America are
shown in the figure on the following
section.
Page 241 of 593

4137
Features of your vehicle
Auto light position (if equipped)
When the light switch is in the AUTO
light position, the taillights and head-
lights will turn ON or OFF automati-
cally depending on the amount of
light outside the vehicle.
When the light switch is positioned at
an auto light position, at first, the
wiper will turn on and then, after 5
seconds the head lamp will turn on
automatically.
If the head lamp has been turned on
due to this function of the vehicle, the
head lamp will turn off 60 seconds
after the wiper has been turned off.
Headlights On with Wipers(Available With Auto lights Only)
- When the light switch is in the AUTO light position, the headlights
will turn ON automatically the next
5 seconds with wiper is ON.
If this feature allows headlights to turn
On, the headlights will be turned off on
the next 60 seconds with wiper is off.
Never place anything over the sen- sor (1) located on the instrument
panel. This will ensure better auto-
light system control.
Don’t clean the sensor using a win- dow cleaner. The cleaner may
leave a light film which could inter-
fere with sensor operation.
If your vehicle has window tint or other types of metallic coating on
the front windshield, the Auto light
system may not work properly.
High beam operation
To turn on the high beam headlights,
push the lever away from you. The
lever will return to its original posi-
tion.
The high beam indicator will light
when the headlight high beams are
switched on.
To prevent the battery from being
discharged, do not leave the lights
on for a prolonged time while the
engine is not running.
OYP047359OYP047363N
Page 245 of 593

4141
Features of your vehicle
(Continued) Do not disassemble a front view camera temporarily fortinted window or attachingany types of coatings andaccesorsories. If you disas-semble the camera andassemble it again, take yourvehicle to an authorized Kiadealer and have the systemchecked to need a calibration.
When you replace or reinstall the windshield glass, frontview camera, take your vehicleto an authorized Kia dealerand have the system checked.
Be careful that water doesn’t get into the High Beam Assistunit and do not remove ordamage related parts of theHigh Beam Assist system.
Do not place objects on the crash pad that reflect lightsuch as mirrors, white paper,etc. The system may malfunc-tion if sunlight is reflected.
(Continued)(Continued) At times, the High Beam Assist may not work properly.The system is for your con-venience only. It is the respon-sibility of the driver for safedriving practices and alwayscheck the road conditions foryour safety.
When the system does not operate normally, change thelamp position manuallybetween the high beam andlow beam.(Continued)
When a vehicle suddenly appears from a curve.
When the vehicle is tilted from a flat tire or being towed.
When the LDW (Lane Departure Warning) systemwarning light illuminates (ifequipped) and etc.
� � When front visibility is poor
When the lamp of the on-com- ing or front vehicle is coveredwith dust, snow or water.
When the light from the on- coming or front vehicle is notdetected because of exhaustfume, smoke, fog, snow, etc.
When the front window is cov- ered with foreign matters.
When it is hard to see because of fog, heavy rain or snow andetc.
(Continued)
Page 249 of 593

4145
Features of your vehicle
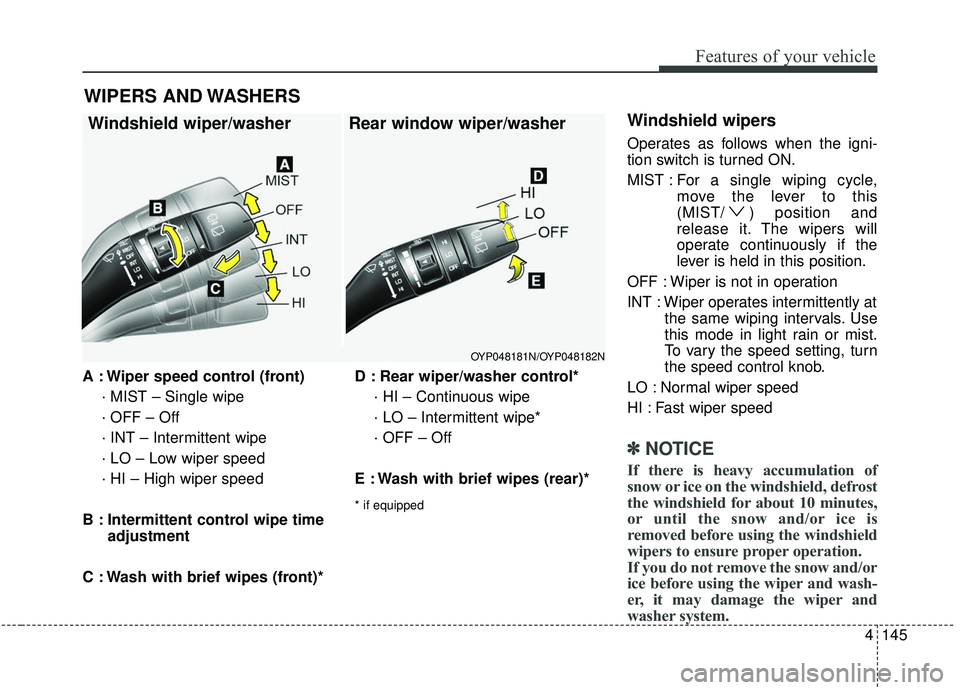
A : Wiper speed control (front)· MIST – Single wipe
· OFF – Off
· INT – Intermittent wipe
· LO – Low wiper speed
· HI – High wiper speed
B : Intermittent control wipe time adjustment
C : Wash with brief wipes (front)* D : Rear wiper/washer control*
· HI – Continuous wipe
· LO – Intermittent wipe*
· OFF – Off
E : Wash with brief wipes (rear)*
* if equipped
Windshield wipers
Operates as follows when the igni-
tion switch is turned ON.
MIST : For a single wiping cycle,
move the lever to this
(MIST/ ) position and
release it. The wipers will
operate continuously if the
lever is held in this position.
OFF : Wiper is not in operation
INT : Wiper operates intermittently at the same wiping intervals. Use
this mode in light rain or mist.
To vary the speed setting, turn
the speed control knob.
LO : Normal wiper speed
HI : Fast wiper speed
✽ ✽ NOTICE
If there is heavy accumulation of
snow or ice on the windshield, defrost
the windshield for about 10 minutes,
or until the snow and/or ice is
removed before using the windshield
wipers to ensure proper operation.
If you do not remove the snow and/or
ice before using the wiper and wash-
er, it may damage the wiper and
washer system.
WIPERS AND WASHERS
Windshield wiper/washer Rear window wiper/washer
OYP048181N/OYP048182N