2019 KIA RIO HATCHBACK child lock
[x] Cancel search: child lockPage 34 of 503
317
Safety features of your vehicle
To raise the height adjuster, pull it up
(1). To lower it, push it down (3) while
pressing the height adjuster button (2).
Release the button to lock the anchor
into position. Try sliding the height
adjuster to make sure that it has
locked into position. Never position the
shoulder belt across your neck or face.
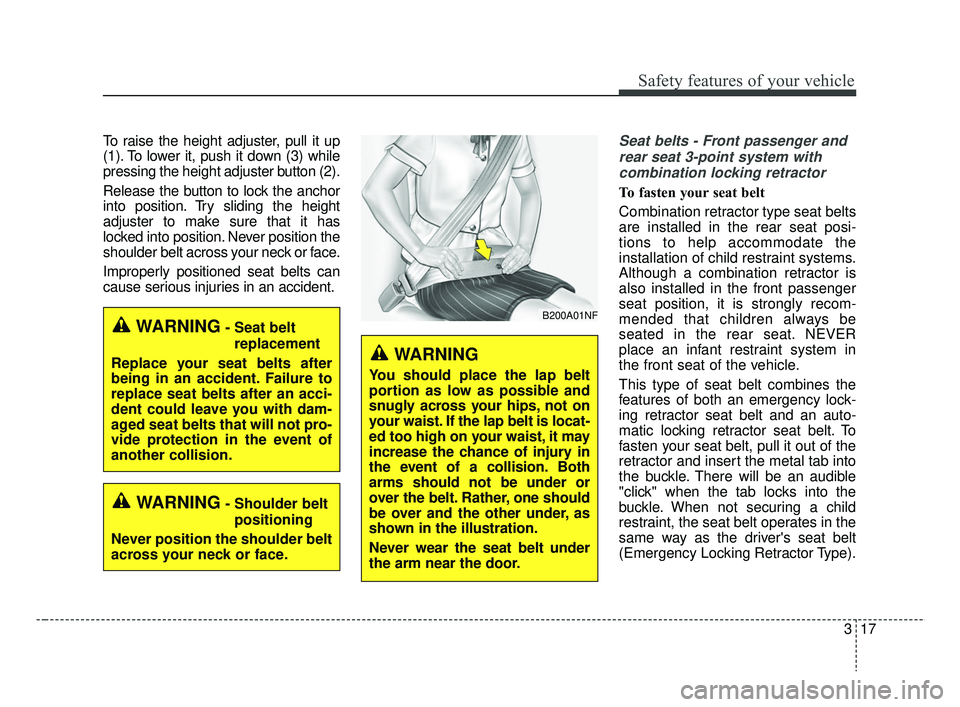
Improperly positioned seat belts can
cause serious injuries in an accident.Seat belts - Front passenger andrear seat 3-point system withcombination locking retractor
To fasten your seat belt
Combination retractor type seat belts
are installed in the rear seat posi-
tions to help accommodate the
installation of child restraint systems.
Although a combination retractor is
also installed in the front passenger
seat position, it is strongly recom-
mended that children always be
seated in the rear seat. NEVER
place an infant restraint system in
the front seat of the vehicle.
This type of seat belt combines the
features of both an emergency lock-
ing retractor seat belt and an auto-
matic locking retractor seat belt. To
fasten your seat belt, pull it out of the
retractor and insert the metal tab into
the buckle. There will be an audible
"click" when the tab locks into the
buckle. When not securing a child
restraint, the seat belt operates in the
same way as the driver's seat belt
(Emergency Locking Retractor Type).
WARNING- Seat belt replacement
Replace your seat belts after
being in an accident. Failure to
replace seat belts after an acci-
dent could leave you with dam-
aged seat belts that will not pro-
vide protection in the event of
another collision.
WARNING- Shoulder belt positioning
Never position the shoulder belt
across your neck or face.
B200A01NF
WARNING
You should place the lap belt
portion as low as possible and
snugly across your hips, not on
your waist. If the lap belt is locat-
ed too high on your waist, it may
increase the chance of injury in
the event of a collision. Both
arms should not be under or
over the belt. Rather, one should
be over and the other under, as
shown in the illustration.
Never wear the seat belt under
the arm near the door.
SC CAN (ENG) 3.QXP 7/18/2018 5:55 PM Page 17
Page 35 of 503
Safety features of your vehicle
18
3
It automatically adjusts to the proper
length only after the lap belt portion
of the seat belt is adjusted manually
so that it fits snugly around your hips.
When the seat belt is fully extended
from the retractor to allow the instal-
lation of a child restraint system, the
seat belt operation changes to allow
the belt to retract, but not to extend
(Automatic Locking Retractor Type).
Refer to “Using a child restraint sys-
tem” in this section.
To convert from the automatic lock-
ing feature to the emergency locking
operation mode, allow the unbuckled
seat belt to fully retract.
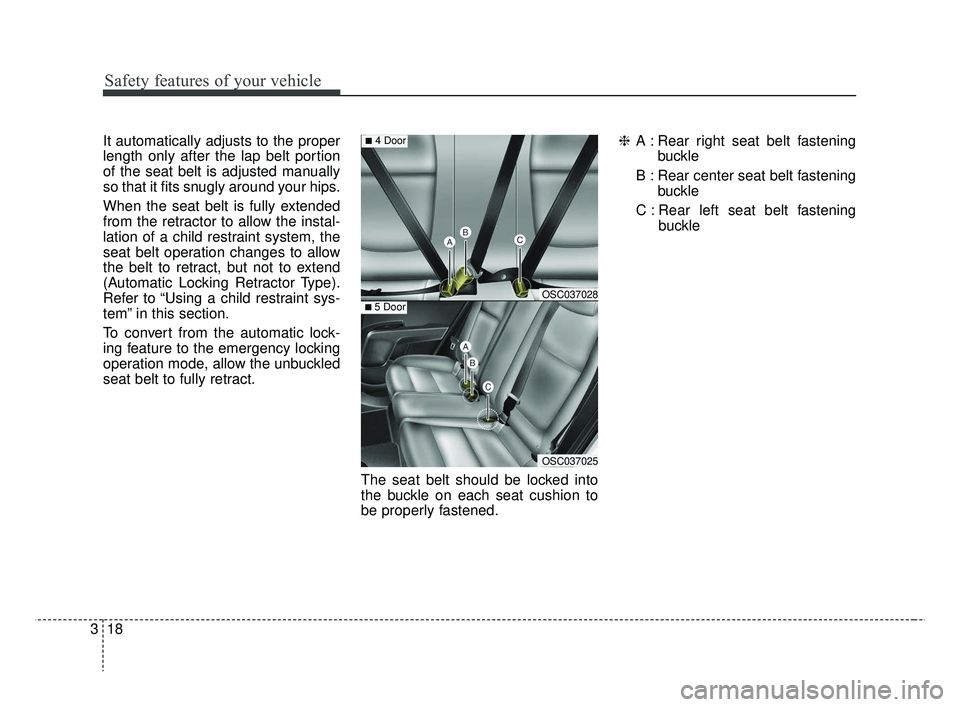
The seat belt should be locked into
the buckle on each seat cushion to
be properly fastened.❈
A : Rear right seat belt fastening
buckle
B : Rear center seat belt fastening buckle
C : Rear left seat belt fastening buckle
OSC037028
OSC037025
■5 Door
■4 Door
SC CAN (ENG) 3.QXP 7/18/2018 5:55 PM Page 18
Page 44 of 503
327
Safety features of your vehicle
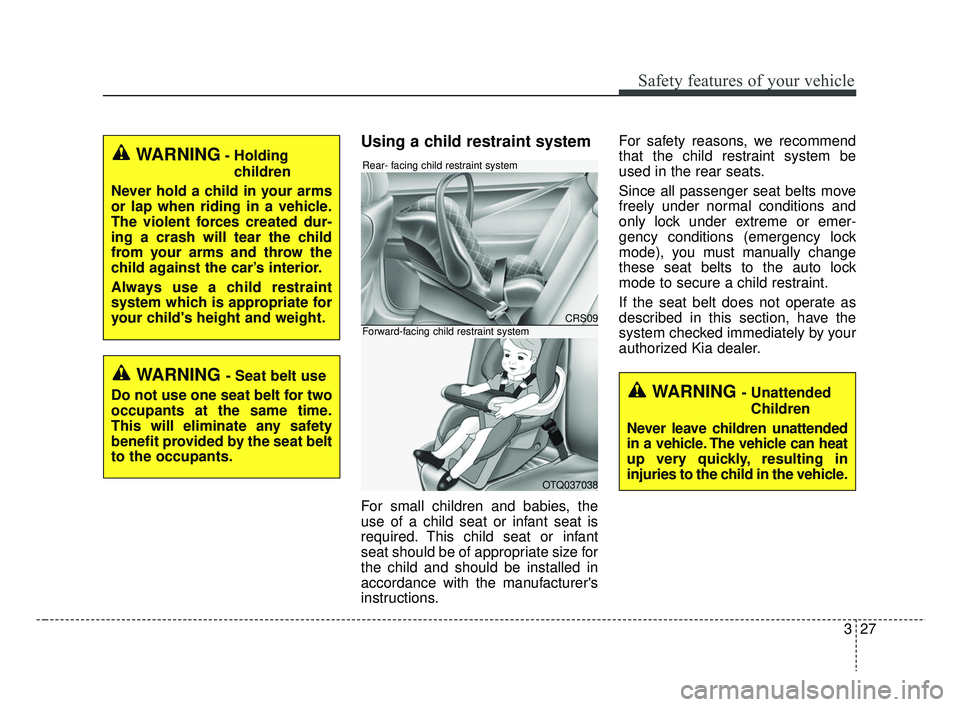
Using a child restraint system
For small children and babies, the
use of a child seat or infant seat is
required. This child seat or infant
seat should be of appropriate size for
the child and should be installed in
accordance with the manufacturer's
instructions.For safety reasons, we recommend
that the child restraint system be
used in the rear seats.
Since all passenger seat belts move
freely under normal conditions and
only lock under extreme or emer-
gency conditions (emergency lock
mode), you must manually change
these seat belts to the auto lock
mode to secure a child restraint.
If the seat belt does not operate as
described in this section, have the
system checked immediately by your
authorized Kia dealer.
WARNING- Holding
children
Never hold a child in your arms
or lap when riding in a vehicle.
The violent forces created dur-
ing a crash will tear the child
from your arms and throw the
child against the car’s interior.
Always use a child restraint
system which is appropriate for
your child's height and weight.
WARNING - Seat belt use
Do not use one seat belt for two
occupants at the same time.
This will eliminate any safety
benefit provided by the seat belt
to the occupants.
CRS09
OTQ037038
Rear- facing child restraint system
Forward-facing child restraint system
WARNING - Unattended Children
Never leave children unattended
in a vehicle. The vehicle can heat
up very quickly, resulting in
injuries to the child in the vehicle.
SC CAN (ENG) 3.QXP 7/18/2018 5:56 PM Page 27
Page 45 of 503
Safety features of your vehicle
28
3
✽ ✽
NOTICE
If the vehicle headrest prevents
proper installation of a child seat (as
described in the child seat system
manual), the headrest of the respec-
tive seating position shall be read-
justed or entirely removed.
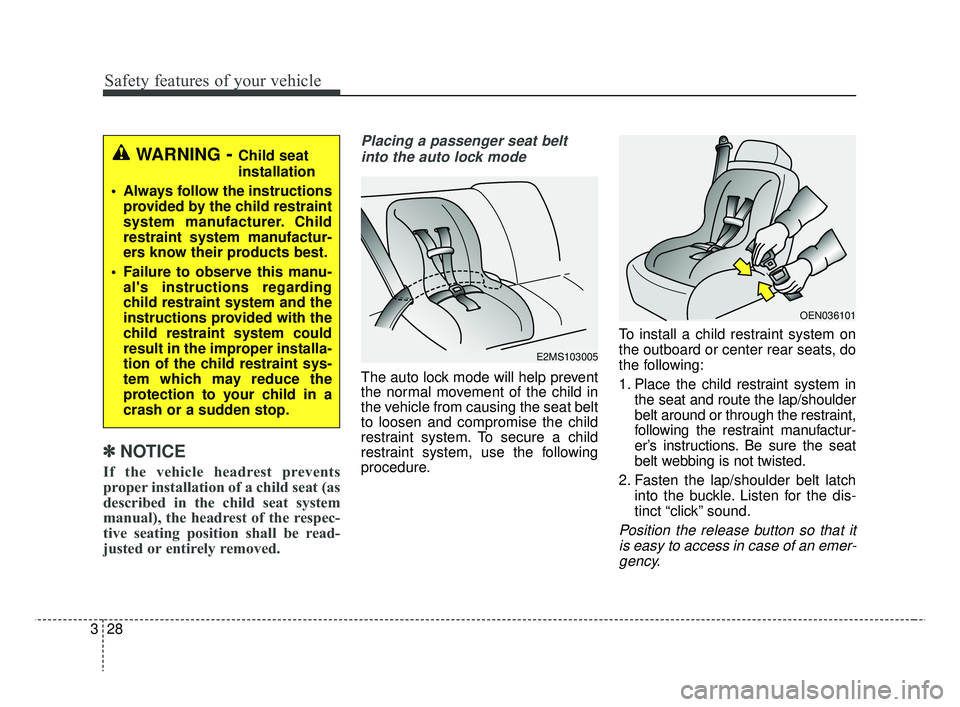
Placing a passenger seat belt
into the auto lock mode
The auto lock mode will help prevent
the normal movement of the child in
the vehicle from causing the seat belt
to loosen and compromise the child
restraint system. To secure a child
restraint system, use the following
procedure. To install a child restraint system on
the outboard or center rear seats, do
the following:
1. Place the child restraint system in
the seat and route the lap/shoulder
belt around or through the restraint,
following the restraint manufactur-
er’s instructions. Be sure the seat
belt webbing is not twisted.
2. Fasten the lap/shoulder belt latch into the buckle. Listen for the dis-
tinct “click” sound.
Position the release button so that itis easy to access in case of an emer-gency.
WARNING- Child seat
installation
Always follow the instructions provided by the child restraint
system manufacturer. Child
restraint system manufactur-
ers know their products best.
Failure to observe this manu- al's instructions regarding
child restraint system and the
instructions provided with the
child restraint system could
result in the improper installa-
tion of the child restraint sys-
tem which may reduce the
protection to your child in a
crash or a sudden stop.
E2MS103005
OEN036101
SC CAN (ENG) 3.QXP 7/18/2018 5:56 PM Page 28
Page 46 of 503
329
Safety features of your vehicle
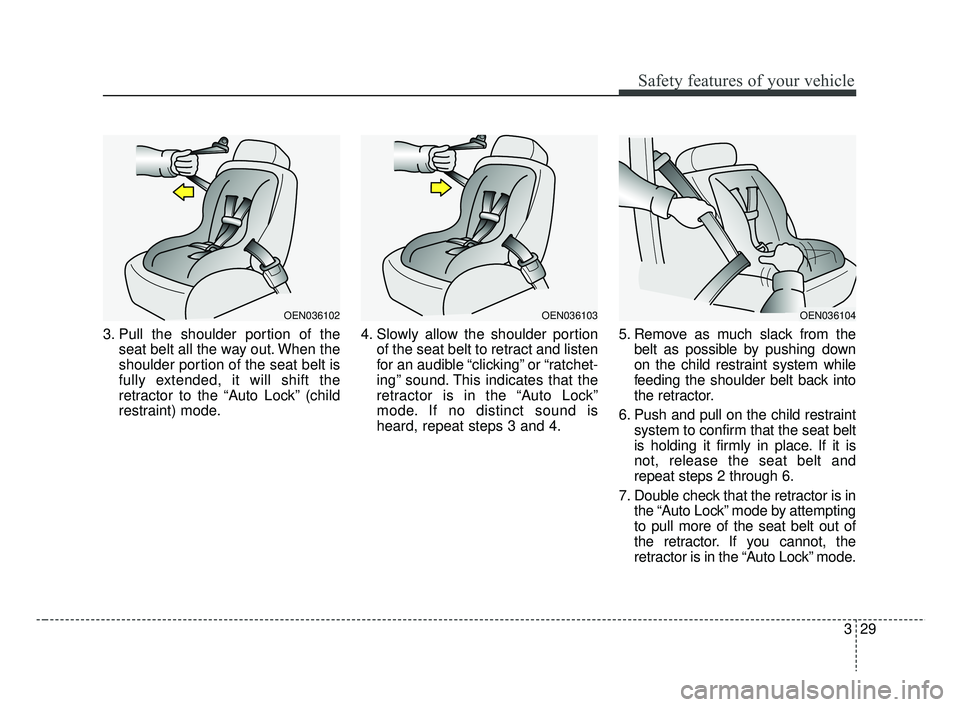
3. Pull the shoulder portion of theseat belt all the way out. When the
shoulder portion of the seat belt is
fully extended, it will shift the
retractor to the “Auto Lock” (child
restraint) mode. 4. Slowly allow the shoulder portion
of the seat belt to retract and listen
for an audible “clicking” or “ratchet-
ing” sound. This indicates that the
retractor is in the “Auto Lock”
mode. If no distinct sound is
heard, repeat steps 3 and 4. 5. Remove as much slack from the
belt as possible by pushing down
on the child restraint system while
feeding the shoulder belt back into
the retractor.
6. Push and pull on the child restraint system to confirm that the seat belt
is holding it firmly in place. If it is
not, release the seat belt and
repeat steps 2 through 6.
7. Double check that the retractor is in the “Auto Lock” mode by attempting
to pull more of the seat belt out of
the retractor. If you cannot, the
retractor is in the “Auto Lock” mode.
OEN036102OEN036103OEN036104
SC CAN (ENG) 3.QXP 7/18/2018 5:56 PM Page 29
Page 47 of 503
Safety features of your vehicle
30
3
The lap/shoulder belt automatically
returns to the “emergency lock
mode” whenever the belt is allowed
to retract fully.
Therefore, the preceding seven
steps must be followed each time a
child restraint is installed.
To remove the child restraint, press
the release button on the buckle and
then pull the lap/shoulder belt out of
the restraint and allow the seat belt
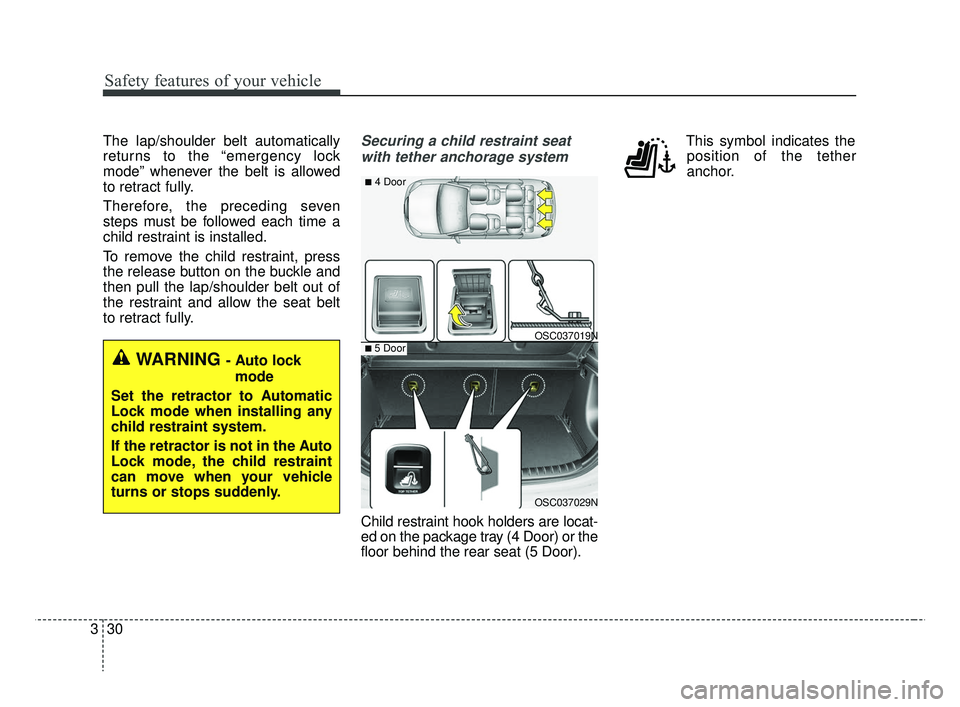
to retract fully.Securing a child restraint seat
with tether anchorage system
Child restraint hook holders are locat-
ed on the package tray (4 Door) or the
floor behind the rear seat (5 Door). This symbol indicates the
position of the tether
anchor.
WARNING - Auto lock
mode
Set the retractor to Automatic
Lock mode when installing any
child restraint system.
If the retractor is not in the Auto
Lock mode, the child restraint
can move when your vehicle
turns or stops suddenly.
OSC037019N
OSC037029N
■4 Door
■5 Door
SC CAN (ENG) 3.QXP 7/18/2018 5:56 PM Page 30
Page 49 of 503
Safety features of your vehicle
32
3
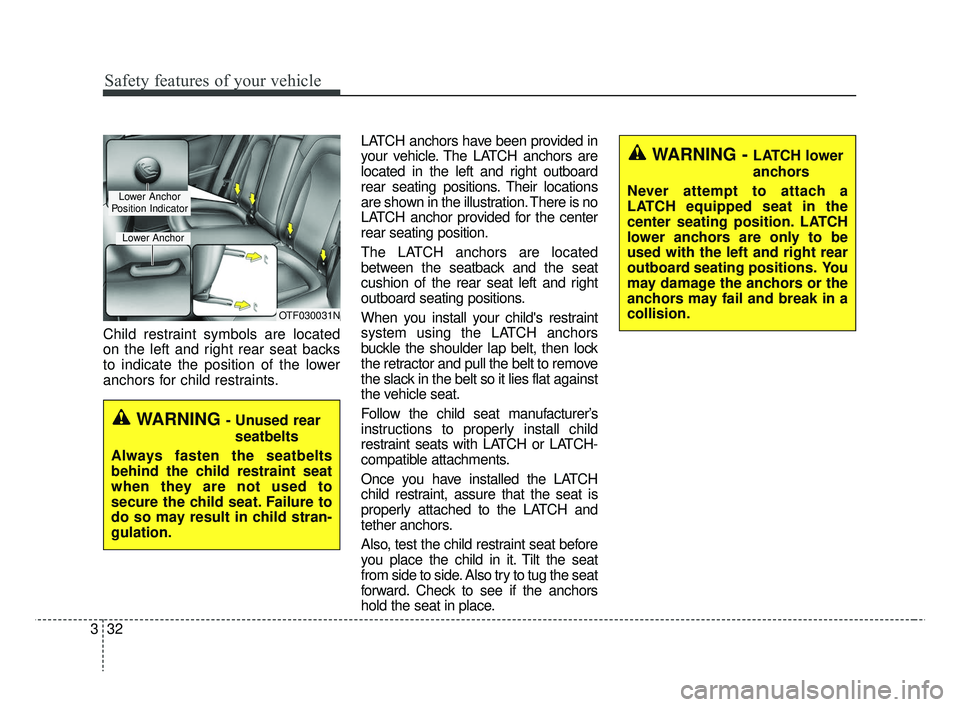
Child restraint symbols are located
on the left and right rear seat backs
to indicate the position of the lower
anchors for child restraints. LATCH anchors have been provided in
your vehicle. The LATCH anchors are
located in the left and right outboard
rear seating positions. Their locations
are shown in the illustration. There is no
LATCH anchor provided for the center
rear seating position.
The LATCH anchors are located
between the seatback and the seat
cushion of the rear seat left and right
outboard seating positions.
When you install your child's restraint
system using the LATCH anchors
buckle the shoulder lap belt, then lock
the retractor and pull the belt to remove
the slack in the belt so it lies flat against
the vehicle seat.
Follow the child seat manufacturer’s
instructions to properly install child
restraint seats with LATCH or LATCH-
compatible attachments.
Once you have installed the LATCH
child restraint, assure that the seat is
properly attached to the LATCH and
tether anchors.
Also, test the child restraint seat before
you place the child in it. Tilt the seat
from side to side. Also try to tug the seat
forward. Check to see if the anchors
hold the seat in place.
OTF030031N
Lower Anchor
Position Indicator
Lower Anchor
WARNING - Unused rear seatbelts
Always fasten the seatbelts
behind the child restraint seat
when they are not used to
secure the child seat. Failure to
do so may result in child stran-
gulation.
WARNING - LATCH lower
anchors
Never attempt to attach a
LATCH equipped seat in the
center seating position. LATCH
lower anchors are only to be
used with the left and right rear
outboard seating positions. You
may damage the anchors or the
anchors may fail and break in a
collision.
SC CAN (ENG) 3.QXP 7/18/2018 5:56 PM Page 32
Page 79 of 503
Features of your vehicle
Keys . . . . . . . . . . . . . . . . . . . . . . . . . . . . . . . . . . . . \
. . 4-4
• Record your key number . . . . . . . . . . . . . . . . . . . . . . . 4-4
• Key operations . . . . . . . . . . . . . . . . . . . . . . . . . . . . . . . . 4-4
Smart key . . . . . . . . . . . . . . . . . . . . . . . . . . . . . . . . . 4-6
• Smart key functions . . . . . . . . . . . . . . . . . . . . . . . . . . . 4-6
• Smart key precautions . . . . . . . . . . . . . . . . . . . . . . . . . 4-8
Remote keyless entry . . . . . . . . . . . . . . . . . . . . . . . 4-10
• Remote keyless entry system operations . . . . . . . . . . 4-10
• Transmitter precautions . . . . . . . . . . . . . . . . . . . . . . . 4-11
• Battery replacement . . . . . . . . . . . . . . . . . . . . . . . . . . 4-12
• Immobilizer system . . . . . . . . . . . . . . . . . . . . . . . . . . . 4-14
• Limp home (override) procedure . . . . . . . . . . . . . . . 4-15
Theft-alarm system . . . . . . . . . . . . . . . . . . . . . . . . 4-16
• Armed stage . . . . . . . . . . . . . . . . . . . . . . . . . . . . . . . . . 4-16
• Theft-alarm stage . . . . . . . . . . . . . . . . . . . . . . . . . . . . 4-17
• Disarmed stage. . . . . . . . . . . . . . . . . . . . . . . . . . . . . . . 4-18
Door locks . . . . . . . . . . . . . . . . . . . . . . . . . . . . . . . . 4-19
• Operating door locks from outside the vehicle. . . . . 4-19
• Operating door locks from inside the vehicle . . . . . . 4-20
• Impact sensing door unlock system . . . . . . . . . . . . . . 4-22
• Auto door lock/unlock feature . . . . . . . . . . . . . . . . . . 4-22
• Speed sensing door lock system . . . . . . . . . . . . . . . . . 4-22
• Child-protector rear door lock. . . . . . . . . . . . . . . . . . 4-22
Trunk (for 4 door) . . . . . . . . . . . . . . . . . . . . . . . . . 4-24
• Opening the trunk . . . . . . . . . . . . . . . . . . . . . . . . . . . . 4-24
• Closing the trunk . . . . . . . . . . . . . . . . . . . . . . . . . . . . . 4-24
• Emergency trunk safety release . . . . . . . . . . . . . . . . . 4-25
Smart trunk (for 4 door) . . . . . . . . . . . . . . . . . . . . 4-26
Tailgate (for 5 door) . . . . . . . . . . . . . . . . . . . . . . . . 4-30
• Opening the tailgate . . . . . . . . . . . . . . . . . . . . . . . . . . 4-30
• Closing the tailgate . . . . . . . . . . . . . . . . . . . . . . . . . . . 4-30
• Emergency tailgate safety release . . . . . . . . . . . . . . . 4-31
Windows . . . . . . . . . . . . . . . . . . . . . . . . . . . . . . . . . 4-33
• Power windows . . . . . . . . . . . . . . . . . . . . . . . . . . . . . . 4-34
• Manual windows . . . . . . . . . . . . . . . . . . . . . . . . . . . . . 4-38
Hood. . . . . . . . . . . . . . . . . . . . . . . . . . . . . . . . . . . . \
. 4-39
• Opening the hood . . . . . . . . . . . . . . . . . . . . . . . . . . . . 4-39
• Closing the hood . . . . . . . . . . . . . . . . . . . . . . . . . . . . . 4-40
• Hood open warning . . . . . . . . . . . . . . . . . . . . . . . . . . . 4-40
Fuel filler lid . . . . . . . . . . . . . . . . . . . . . . . . . . . . . . 4-42
• Opening the fuel filler lid . . . . . . . . . . . . . . . . . . . . . . 4-42
• Closing the fuel filler lid . . . . . . . . . . . . . . . . . . . . . . . 4-42
Sunroof . . . . . . . . . . . . . . . . . . . . . . . . . . . . . . . . . . 4-45\
• Sunroof open warning. . . . . . . . . . . . . . . . . . . . . . . . . 4-46
• Sliding the sunroof . . . . . . . . . . . . . . . . . . . . . . . . . . . 4-47
• Tilting the sunroof . . . . . . . . . . . . . . . . . . . . . . . . . . . . 4-48
• Sunshade. . . . . . . . . . . . . . . . . . . . . . . . . . . . . . . . \
. . . . 4-49
• Resetting the sunroof . . . . . . . . . . . . . . . . . . . . . . . . . 4-49
4
SC CAN (ENG) 4.QXP 7/18/2018 5:45 PM Page 1