2019 KIA RIO HATCHBACK change time
[x] Cancel search: change timePage 1 of 503

Kia, THE COMPANY
Thank you for becoming the owner of a new Kia vehicle.
As a global car manufacturer focused on building high-quality vehi-
cles with exceptional value, Kia Motors is dedicated to providing you
with a customer service experience that exceeds your expectations.
All information contained in this Owner’s Manual was accurate at the
time of publication. However, Kia reserves the right to make changes
at any time so that our policy of continual product improvement can
be carried out.
This manual applies to all trims of this vehicle and includes images,
descriptions, and explanations of optional as well as standard equip-
ment. As a result, some material in this manual may not be applicable
to your specific Kia vehicle. Some images are shown for illustration
only and may show features that differ from those on your vehicle.Drive safely and enjoy your Kia!
SC CAN (ENG) FOREWORD.QXP 7/18/2018 5:31 PM Page 1
Page 2 of 503
i
Thank you for choosing a Kia vehicle.
When you require service, remember that your Kia dealer
knows your vehicle best. Your dealer has factory-trained tech-
nicians, recommended special tools and genuine Kia replace-
ment parts. It is dedicated to your complete customer satisfac-
tion.
Because subsequent owners require this important information
as well, this publication should remain with the vehicle if it is
sold.
This manual will familiarize you with operational, mainte-
nance and safety information about your new vehicle. It is sup-
plemented by a Warranty and Consumer Information manual
that provides important information on all warranties regarding
your vehicle.
We urge you to read these publications carefully and follow the
recommendations to help assure enjoyable and safe operation
of your new vehicle.
Kia offers a great variety of options, components and features
for its various models. Therefore, some of the equipment
described in this manual, along with the various illustrations,
may not be applicable to your particular vehicle.
The information and specifications provided in this manual
were accurate at the time of printing. Kia reserves the right to
discontinue or change specifications or design at any time
without notice and without incurring any obligation. If you
have questions, always check with your Kia dealer.
We assure you of our continuing interest in your motoring
pleasure and satisfaction in your Kia vehicle.
© 2018 Kia Canada Inc.
All rights reserved. Reproduction by any means, electronic or
mechanical, including photocopying, recording, or by any
information storage and retrieval system or translation in
whole or part is not permitted without written authorization
from Kia Canada Inc..
Printed in Mexico
Foreword
SC CAN (ENG) FOREWORD.QXP 7/18/2018 5:31 PM Page 2
Page 23 of 503
Safety features of your vehicle
63
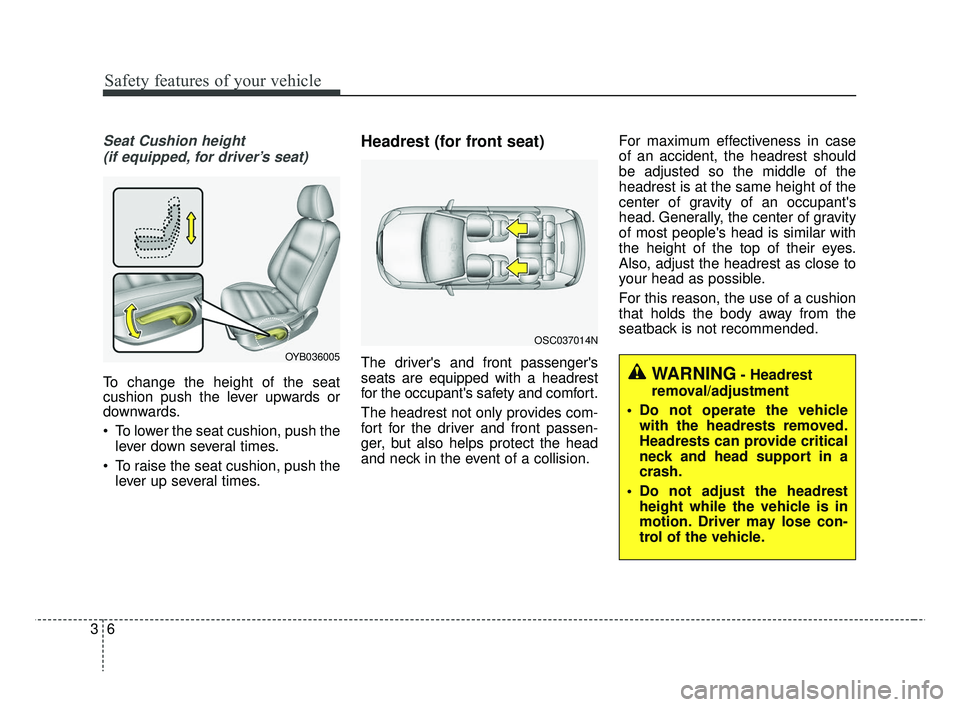
Seat Cushion height (if equipped, for driver’s seat)
To change the height of the seat
cushion push the lever upwards or
downwards.
To lower the seat cushion, push the lever down several times.
To raise the seat cushion, push the lever up several times.
Headrest (for front seat)
The driver's and front passenger's
seats are equipped with a headrest
for the occupant's safety and comfort.
The headrest not only provides com-
fort for the driver and front passen-
ger, but also helps protect the head
and neck in the event of a collision. For maximum effectiveness in case
of an accident, the headrest should
be adjusted so the middle of the
headrest is at the same height of the
center of gravity of an occupant's
head. Generally, the center of gravity
of most people's head is similar with
the height of the top of their eyes.
Also, adjust the headrest as close to
your head as possible.
For this reason, the use of a cushion
that holds the body away from the
seatback is not recommended.OYB036005
WARNING- Headrest
removal/adjustment
Do not operate the vehicle with the headrests removed.
Headrests can provide critical
neck and head support in a
crash.
Do not adjust the headrest height while the vehicle is in
motion. Driver may lose con-
trol of the vehicle.
OSC037014N
SC CAN (ENG) 3.QXP 7/18/2018 5:55 PM Page 6
Page 44 of 503
327
Safety features of your vehicle
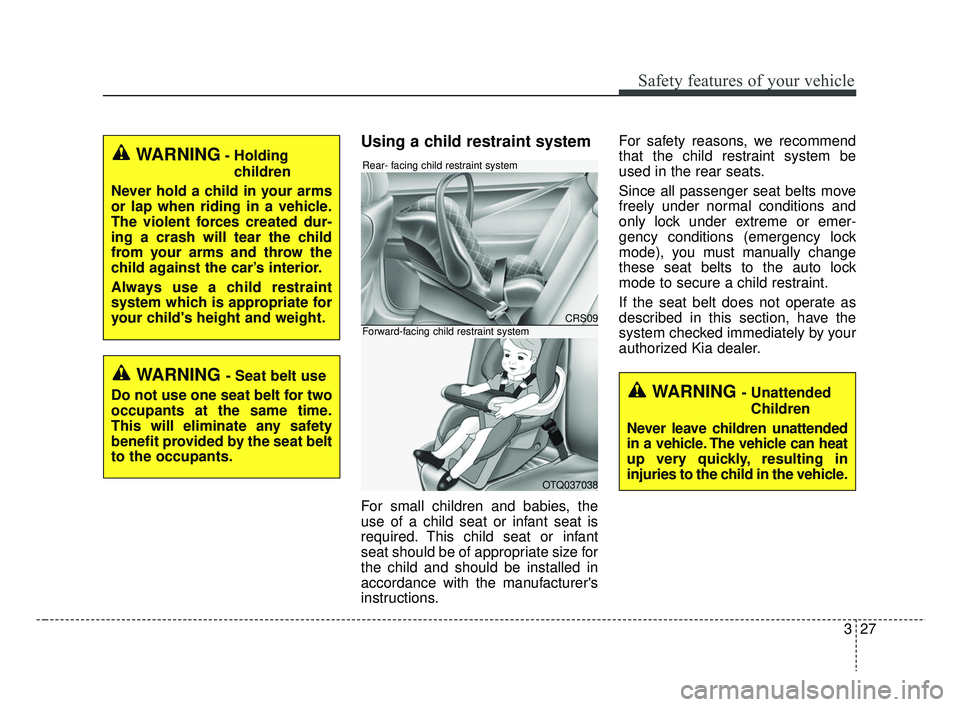
Using a child restraint system
For small children and babies, the
use of a child seat or infant seat is
required. This child seat or infant
seat should be of appropriate size for
the child and should be installed in
accordance with the manufacturer's
instructions.For safety reasons, we recommend
that the child restraint system be
used in the rear seats.
Since all passenger seat belts move
freely under normal conditions and
only lock under extreme or emer-
gency conditions (emergency lock
mode), you must manually change
these seat belts to the auto lock
mode to secure a child restraint.
If the seat belt does not operate as
described in this section, have the
system checked immediately by your
authorized Kia dealer.
WARNING- Holding
children
Never hold a child in your arms
or lap when riding in a vehicle.
The violent forces created dur-
ing a crash will tear the child
from your arms and throw the
child against the car’s interior.
Always use a child restraint
system which is appropriate for
your child's height and weight.
WARNING - Seat belt use
Do not use one seat belt for two
occupants at the same time.
This will eliminate any safety
benefit provided by the seat belt
to the occupants.
CRS09
OTQ037038
Rear- facing child restraint system
Forward-facing child restraint system
WARNING - Unattended Children
Never leave children unattended
in a vehicle. The vehicle can heat
up very quickly, resulting in
injuries to the child in the vehicle.
SC CAN (ENG) 3.QXP 7/18/2018 5:56 PM Page 27
Page 80 of 503
Steering wheel . . . . . . . . . . . . . . . . . . . . . . . . . . . . . 4-51
• Electric Power Steering (EPS) . . . . . . . . . . . . . . . . . . 4-51
• Tilt and telescopic steering . . . . . . . . . . . . . . . . . . . . . 4-52
• Horn . . . . . . . . . . . . . . . . . . . . . . . . . . . . . . . . . . . . \
. . . 4-52
• Heated steering wheel . . . . . . . . . . . . . . . . . . . . . . . . . 4-53
Mirrors . . . . . . . . . . . . . . . . . . . . . . . . . . . . . . . . . . 4-54\
• Inside rearview mirror . . . . . . . . . . . . . . . . . . . . . . . . 4-54
• Outside rearview mirror. . . . . . . . . . . . . . . . . . . . . . . 4-54
Instrument cluster . . . . . . . . . . . . . . . . . . . . . . . . . 4-57
• Instrument Cluster Control . . . . . . . . . . . . . . . . . . . . 4-58
• LCD window control . . . . . . . . . . . . . . . . . . . . . . . . . . 4-58
• Gauges . . . . . . . . . . . . . . . . . . . . . . . . . . . . . . . . . . . . \
. 4-59
• Transmission shift indicator . . . . . . . . . . . . . . . . . . . . 4-62
LCD windows . . . . . . . . . . . . . . . . . . . . . . . . . . . . . 4-64
• Over view . . . . . . . . . . . . . . . . . . . . . . . . . . . . . . . . . . . 4-\
64
• Trip information (Trip computer) . . . . . . . . . . . . . . . 4-64
• LCD modes (for type B cluster) . . . . . . . . . . . . . . . . . 4-69
• Service mode . . . . . . . . . . . . . . . . . . . . . . . . . . . . . . . . 4-70
• User settings mode (for type B cluster) . . . . . . . . . . . 4-70
Warning and indicator lights . . . . . . . . . . . . . . . . 4-79
• Warning lights . . . . . . . . . . . . . . . . . . . . . . . . . . . . . . . 4-79
• Indicator lights. . . . . . . . . . . . . . . . . . . . . . . . . . . . . . . 4-87
Rear view monitor . . . . . . . . . . . . . . . . . . . . . . . . . 4-91
• Rear view monitor . . . . . . . . . . . . . . . . . . . . . . . . . . . . 4-91
Lighting . . . . . . . . . . . . . . . . . . . . . . . . . . . . . . . . . . 4-92\
• Battery saver function. . . . . . . . . . . . . . . . . . . . . . . . . 4-92
• Headlight escort function . . . . . . . . . . . . . . . . . . . . . . 4-92
• Headlight welcome function . . . . . . . . . . . . . . . . . . . . 4-92
• Daytime running light . . . . . . . . . . . . . . . . . . . . . . . . . 4-93
• Lighting control . . . . . . . . . . . . . . . . . . . . . . . . . . . . . . 4-93
• High beam operation. . . . . . . . . . . . . . . . . . . . . . . . . . 4-95
• Turn signals and lane change signals . . . . . . . . . . . . 4-96
• Front fog light . . . . . . . . . . . . . . . . . . . . . . . . . . . . . . . 4-97
Wipers and washers . . . . . . . . . . . . . . . . . . . . . . . . 4-98
• Windshield wipers . . . . . . . . . . . . . . . . . . . . . . . . . . . . 4-99
• Windshield washers (front) . . . . . . . . . . . . . . . . . . . 4-100
• Rear window wiper and washer switch (for 5 door) . . . . . . . . . . . . . . . . . . . . . . . . . . . . . . . . 4-102
Interior light . . . . . . . . . . . . . . . . . . . . . . . . . . . . . 4-103
• Automatic turn off function . . . . . . . . . . . . . . . . . . . 4-103
• Map lamp . . . . . . . . . . . . . . . . . . . . . . . . . . . . . . . . . . 4-10\
3
• Room lamp . . . . . . . . . . . . . . . . . . . . . . . . . . . . . . . . . 4-104
• Luggage room lamp . . . . . . . . . . . . . . . . . . . . . . . . . 4-106
• Glove box lamp . . . . . . . . . . . . . . . . . . . . . . . . . . . . . 4-106
• Vanity mirror lamp . . . . . . . . . . . . . . . . . . . . . . . . . . 4-107
Defroster . . . . . . . . . . . . . . . . . . . . . . . . . . . . . . . . 4-108
• Rear window defroster . . . . . . . . . . . . . . . . . . . . . . . 4-108
4
SC CAN (ENG) 4.QXP 7/18/2018 5:45 PM Page 2
Page 93 of 503
415
Features of your vehicle
This device complies with Industry
Canada licence-exempt RSS stan-
dard(s).
Operation is subject to the following
two conditions:
(1) This device may not cause inter-ference, and
(2) This device must accept any interference, including interfer-
ence that may cause undesired
operation of the device.
✽ ✽NOTICE
Changes or modifications not
expressly approved by the party
responsible for compliance could
void the user's authority to operate
the equipment.
Limp home (override) procedure
When you turn the ignition switch to
the ON position, if the immobilizer
indicator ( ) goes off after blink-
ing 5 times, your transponder
equipped in the ignition key is out of
order. You cannot start the engine
without the limp home procedure. To
start the engine, you have to input
your password by using the ignition
switch. Your password is only avail-
able from an authorized Kia dealer-
ship. Contact an authorized dealer
for more information.
The following procedure is how to
input your password of “2345” as an
example.
1. Turn the ignition s witch to the ON
position. The immobilizer indicator
( ) will blink 5 times and go off
indicating the beginning of the limp
home procedure.
2. Turn the ignition switch to the ACC position. 3. To enter the first digit (in this
example “2”), turn the ignition
switch to the ON and ACC position
twice. Perform the same proce-
dure for the next digits between 3
seconds and 10 seconds (for
example, for “3”, turn the ignition
ON and ACC 3 times).
4. If all of the digits have been input successfully, you have to start the
engine within 30 seconds. If you
attempt to start the engine after 30
seconds, the engine will not start
and you will have to input your
password again.
After performing the limp home pro-
cedure, you have to see an author-
ized Kia dealer immediately to
inspect and repair your ignition key
or immobilizer system.
SC CAN (ENG) 4.QXP 7/18/2018 5:45 PM Page 15
Page 105 of 503
427
Features of your vehicle
1. Setting
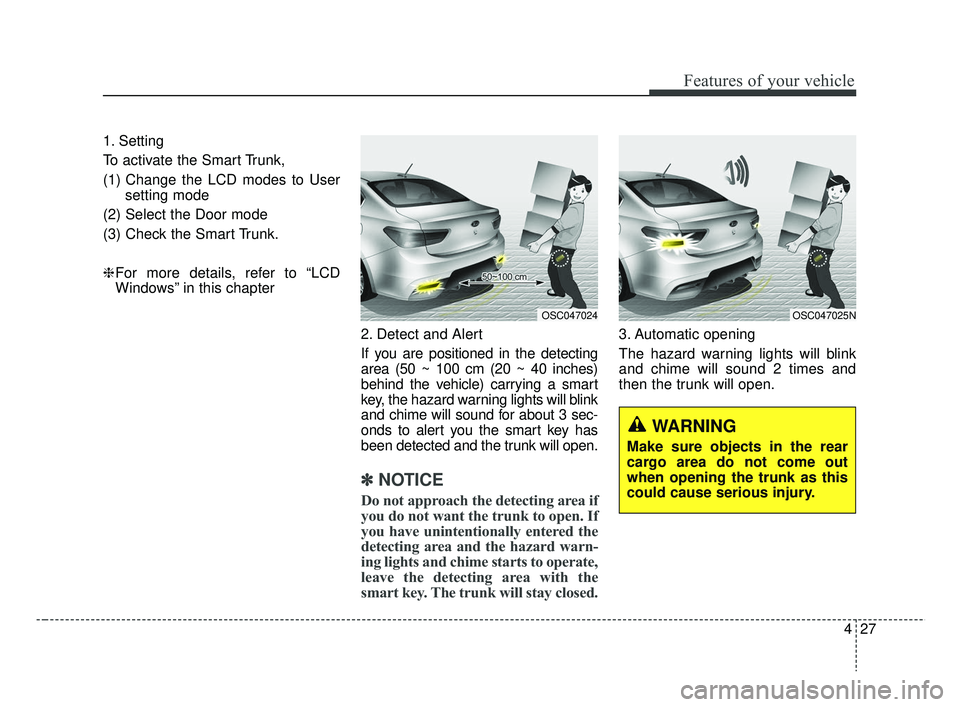
To activate the Smart Trunk,
(1) Change the LCD modes to Usersetting mode
(2) Select the Door mode
(3) Check the Smart Trunk.
❈ For more details, refer to “LCD
Windows” in this chapter
2. Detect and Alert
If you are positioned in the detecting
area (50 ~ 100 cm (20 ~ 40 inches)
behind the vehicle) carrying a smart
key, the hazard warning lights will blink
and chime will sound for about 3 sec-
onds to alert you the smart key has
been detected and the trunk will open.
✽ ✽NOTICE
Do not approach the detecting area if
you do not want the trunk to open. If
you have unintentionally entered the
detecting area and the hazard warn-
ing lights and chime starts to operate,
leave the detecting area with the
smart key. The trunk will stay closed.
3. Automatic opening
The hazard warning lights will blink
and chime will sound 2 times and
then the trunk will open.
OSC047024OSC047025N
WARNING
Make sure objects in the rear
cargo area do not come out
when opening the trunk as this
could cause serious injury.
SC CAN (ENG) 4.QXP 7/18/2018 5:46 PM Page 27
Page 130 of 503
Features of your vehicle
52
4
Tilt and telescopic steering
(if equipped)
Tilt steering allows you to adjust the
steering wheel before you drive. You
can also raise it to give your legs
more room when you exit and enter
the vehicle.
The steering wheel should be posi-
tioned so that it is comfortable for
you to drive, while permitting you to
see the instrument panel warning
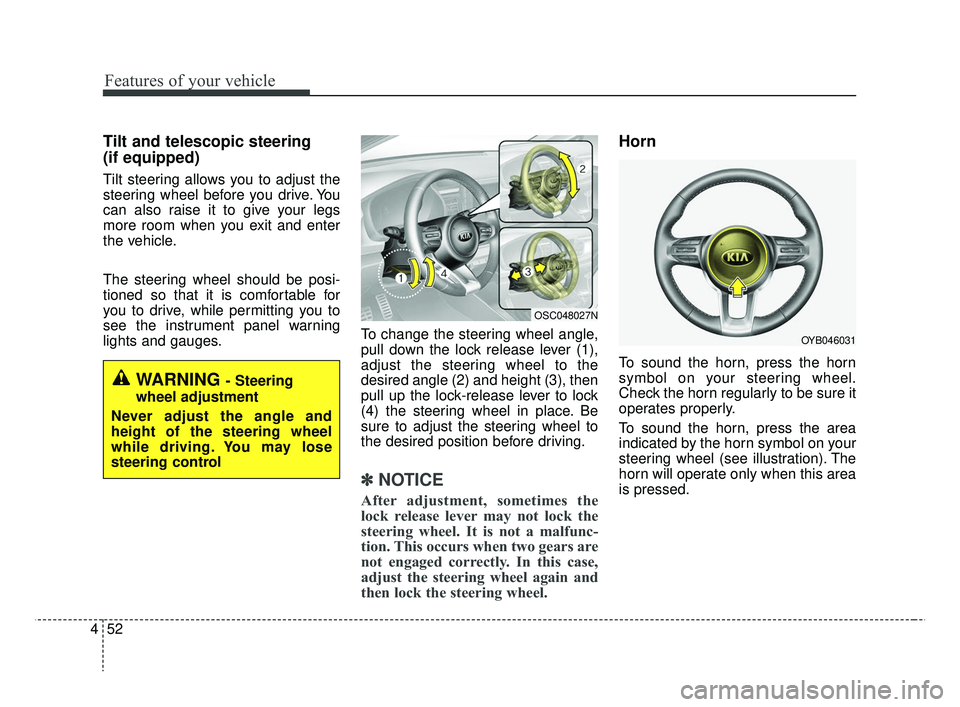
lights and gauges. To change the steering wheel angle,
pull down the lock release lever (1),
adjust the steering wheel to the
desired angle (2) and height (3), then
pull up the lock-release lever to lock
(4) the steering wheel in place. Be
sure to adjust the steering wheel to
the desired position before driving.
✽ ✽
NOTICE
After adjustment, sometimes the
lock release lever may not lock the
steering wheel. It is not a malfunc-
tion. This occurs when two gears are
not engaged correctly. In this case,
adjust the steering wheel again and
then lock the steering wheel.
Horn
To sound the horn, press the horn
symbol on your steering wheel.
Check the horn regularly to be sure it
operates properly.
To sound the horn, press the area
indicated by the horn symbol on your
steering wheel (see illustration). The
horn will operate only when this area
is pressed.
WARNING - Steering
wheel adjustment
Never adjust the angle and
height of the steering wheel
while driving. You may lose
steering control
OYB046031
OSC048027N
SC CAN (ENG) 4.QXP 7/18/2018 5:47 PM Page 52