2019 KIA OPTIMA HYBRID ECO mode
[x] Cancel search: ECO modePage 59 of 553

25
Your vehicle at a glance
INSTRUMENT PANEL OVERVIEW
1. Cruise control ......................................6-58Smart Cruise Control with Stop & Go .6-62
2. Driver’s front air bag ............................3-58
3. Horn.....................................................4-46
4. Instrument cluster ................................4-52
5. Wiper and washer control lever .........4-111
6. Engine start/stop button ........................6-7
7. Passenger’s front air bag ....................3-59
8. Glove box ..........................................4-137
9. Hazard warning flasher .........................7-2
10. Automatic climate control system ....4-118
11. Shift lever A/T ....................................6-12
12. Heated steering wheel button ...........4-45
13.Drive mode button (Hybrid vehicle) ....6-82
14. Seat warmer ....................................4-140 Air ventilation seat ...........................4-141
15. Electronic parking brake (EPB) switch .. 6-22
16. Auto Hold On/Off button ....................6-29
17. Center console storage box ............4-137
18.Power outlet......................................4-142
19. USB charger ....................................4-143
20. Active ECO button (Plug-in hybrid vehicle) ......................6-84
OJFHP018004N❈The actual shape may differ from the illustration.
Page 85 of 553

325
Safety features of your vehicle
Release the button to lock the
anchor into position. Try sliding the
height adjuster to make sure that it
has locked into position.
Improperly positioned seat belts can
cause serious injuries in an accident.Seat belts - Front passenger andrear seat 3-point system withcombination locking retractor
To fasten your seat belt:
Combination retractor type seat belts
are installed in the rear seat posi-
tions to help accommodate the
installation of child restraint systems.
Although a combination retractor is
also installed in the front passenger
seat position, it is strongly recom-
mended that children always be
seated in the rear seat. NEVER
place any infant restraint system in
the front seat of the vehicle.
This type of seat belt combines the
features of both an emergency lock-
ing retractor seat belt and an auto-
matic locking retractor seat belt. To
fasten your seat belt, pull it out of the
retractor and insert the metal tab into
the buckle. There will be an audible
"click" when the tab locks into the
buckle. When not securing a child
restraint, the seat belt operates in the
same way as the driver's seat belt
(Emergency Locking Retractor Type). It automatically adjusts to the proper
length only after the lap belt portion
of the seat belt is adjusted manually
so that it fits snugly around your hips.
When the seat belt is fully extended
from the retractor to allow the instal-
lation of a child restraint system, the
seat belt operation changes to allow
the belt to retract, but not to extend
(Automatic Locking Retractor Type).
Refer to “Using a child restraint sys-
tem” in this section.
✽ ✽
NOTICE
Although the combination retractor
provides the same level of protection
for seated passengers in either emer-
gency or automatic locking modes,
have the seated passengers use the
emergency locking feature for improv-
ed convenience. The automatic locking
function is intended to facilitate child
restraint installation. To convert from
the automatic locking feature to the
emergency locking operation mode,
allow the unbuckled seat belt to fully
retract.
WARNING- Shoulder belt
positioning
Never position the shoulder belt
across your neck or face.
WARNING- Seat belt replacement
Replace your seat belts after
being in an accident. Failure to
replace seat belts after an acci-
dent could leave you with dam-
aged seat belts that will not pro-
vide protection in the event of
another collision.
Page 98 of 553

Safety features of your vehicle
38
3
Securing a child restraint with
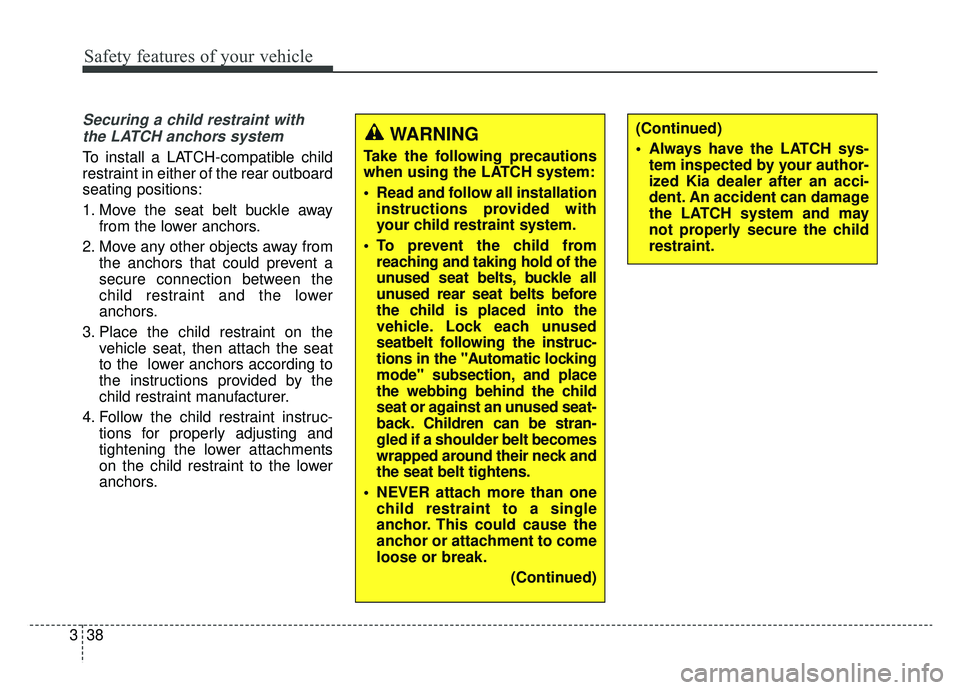
the LATCH anchors system
To install a LATCH-compatible child
restraint in either of the rear outboard
seating positions:
1. Move the seat belt buckle away from the lower anchors.
2. Move any other objects away from the anchors that could prevent a
secure connection between the
child restraint and the lower
anchors.
3. Place the child restraint on the vehicle seat, then attach the seat
to the lower anchors according to
the instructions provided by the
child restraint manufacturer.
4. Follow the child restraint instruc- tions for properly adjusting and
tightening the lower attachments
on the child restraint to the lower
anchors.
WARNING
Take the following precautions
when using the LATCH system:
Read and follow all installationinstructions provided with
your child restraint system.
To prevent the child from reaching and taking hold of the
unused seat belts, buckle all
unused rear seat belts before
the child is placed into the
vehicle. Lock each unused
seatbelt following the instruc-
tions in the "Automatic locking
mode" subsection, and place
the webbing behind the child
seat or against an unused seat-
back. Children can be stran-
gled if a shoulder belt becomes
wrapped around their neck and
the seat belt tightens.
NEVER attach more than one child restraint to a single
anchor. This could cause the
anchor or attachment to come
loose or break.
(Continued)
(Continued)
Always have the LATCH sys-tem inspected by your author-
ized Kia dealer after an acci-
dent. An accident can damage
the LATCH system and may
not properly secure the child
restraint.
Page 102 of 553

Safety features of your vehicle
42
3
4. Slowly allow the shoulder portion
of the seat belt to retract and listen
for an audible "clicking" or "ratchet-
ing" sound. This indicates that the
retractor is in the "Automatic
Locking" mode. If no distinct sound
is heard, repeat steps 3 and 4. 5. Remove as much slack from the
belt as possible by pushing down
on the child restraint system while
feeding the shoulder belt back into
the retractor.
6. Push and pull on the child restraint system to confirm that the seat
belt is holding it firmly in place. If it
is not, release the seat belt and
repeat steps 2 through 6.
7. Double check that the retractor is in the "Automatic Locking" mode
by attempting to pull more of the
seat belt out of the retractor. If you
cannot, the retractor is in the
"Automatic Locking" mode.
If your CRS manufacturer instructs or
recommends you to use a tether
anchor with the lap/shoulder belt,
refer to the previous pages for more
information.
✽ ✽ NOTICE
When the seat belt is allowed to
retract to its fully stowed position,
the retractor will automatically
switch from the "Automatic
Locking" mode to the emergency
lock mode for normal adult usage.
To remove the child restraint, press
the release button on the buckle and
then pull the lap/shoulder belt out of
the restraint and allow the seat belt
to retract fully.
WARNING - Auto lock
mode
Set the retractor to Automatic
Lock mode when installing any
child restraint system. If the
retractor is not in the Automatic
Locking mode, the child restraint
can move when your vehicle
turns or stops suddenly.
OEN036103
Page 112 of 553

Safety features of your vehicle
52
3
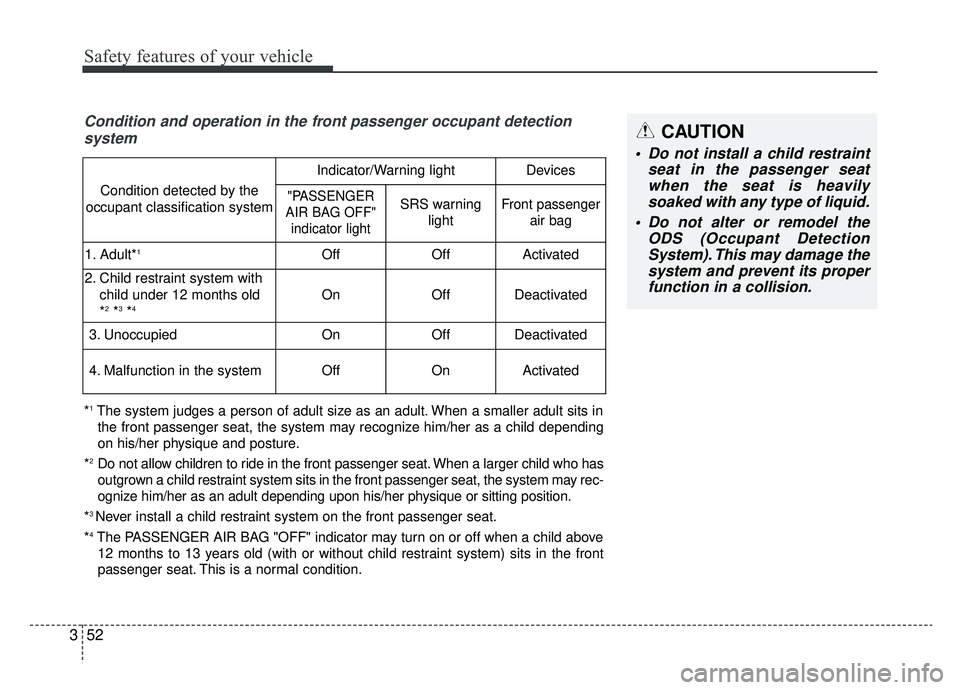
Condition and operation in the front passenger occupant detection
system
*1The system judges a person of adult size as an adult. When a smaller adult sits in
the front passenger seat, the system may recognize him/her as a child depending
on his/her physique and posture.
*
2Do not allow children to ride in the front passenger seat. When a larger child who has
outgrown a child restraint system sits in the front passenger seat, the system may rec-
ognize him/her as an adult depending upon his/her physique or sitting position.
*
3 Never install a child restraint system on the front passenger seat.
*
4The PASSENGER AIR BAG "OFF" indicator may turn on or off when a child above 12 months to 13 years old (with or without child restraint system) sits in the front
passenger seat. This is a normal condition.
Condition detected by the
occupant classification system
Indicator/Warning lightDevices
"PASSENGER
AIR BAG OFF" indicator lightSRS warning lightFront passenger air bag
1. Adult*1OffOffActivated
2. Child restraint system with
child under 12 months old
*
2*3*4OnOffDeactivated
3. Unoccupied OnOffDeactivated
4. Malfunction in the systemOffOnActivated
CAUTION
Do not install a child restraint seat in the passenger seatwhen the seat is heavilysoaked with any type of liquid.
Do not alter or remodel the ODS (Occupant DetectionSystem). This may damage thesystem and prevent its properfunction in a collision.
Page 119 of 553

359
Safety features of your vehicle
Your vehicle is equipped with an
Advanced Supplemental Restraint
(Air Bag) System and lap/shoulder
belts at both the driver and passen-
ger seating position.
The indication of the system's pres-
ence are the letters "AIRBAG" locat-
ed on the air bag pad cover on the
steering wheel and the passenger's
side front panel pad above the glove
box.The SRS consists of air bags
installed under the pad covers in the
center of the steering wheel and the
passenger's side front panel above
the glove box.
The purpose of the SRS is to provide
the vehicle's driver and/or the front
passenger with additional protection
than that offered by the seat belt sys-
tem alone in case of a frontal impact
of sufficient severity. The SRS uses
sensors to gather information about
the driver's and front passenger's
seat belt usage and impact severity.
The seat belt buckle sensor deter-
mines if the front passenger's seat
belt is fastened.
These sensors provide the ability to
control the SRS deployment based on
whether or not the seat belts are fas-
tened, and how severe the impact is.
The advanced SRS offers the ability
to control the air bag inflation with
two levels. A first stage level is pro-
vided for moderate-severity impacts.
A second stage level is provided for
more severe impacts.
The passenger’s front air bag is
designed to help reduce the injury of
children sitting close to the instru-
ment panel in low speed collisions.
However, children are safer if they
are restrained in the rear seat.
According to the impact severity and
seat belt usage, the SRSCM (SRS
Control Module) controls the air bag
inflation. Failure to properly wear
seat belts can increase the risk or
severity of injury in an accident.
OJF035039
■
Passenger’s front air bag
Page 149 of 553

419
Features of your vehicle
1. Setting
To activate the Smart Trunk, go to
User Settings Mode and select
Smart Trunk on the LCD display.
❈ For more details, refer to “LCD
Display” in this chapter.
2. Detect and Alert
If you are positioned in the detecting
area (20 ~ 40 inches (50 ~100 cm)
behind the vehicle) carrying a smart
key, the hazard warning lights will
blink and the chime will sound for
about 3 seconds to alert you the
smart key has been detected and the
trunk will open.✽ ✽NOTICE
Do not approach the detecting area
if you do not want the trunk to open.
If you have unintentionally entered
the detecting area and the hazard
warning lights and chime starts to
operate, leave the detecting area
with the smart key. The trunk will
stay closed.
OJFH046011N
Page 186 of 553

Features of your vehicle
56
4
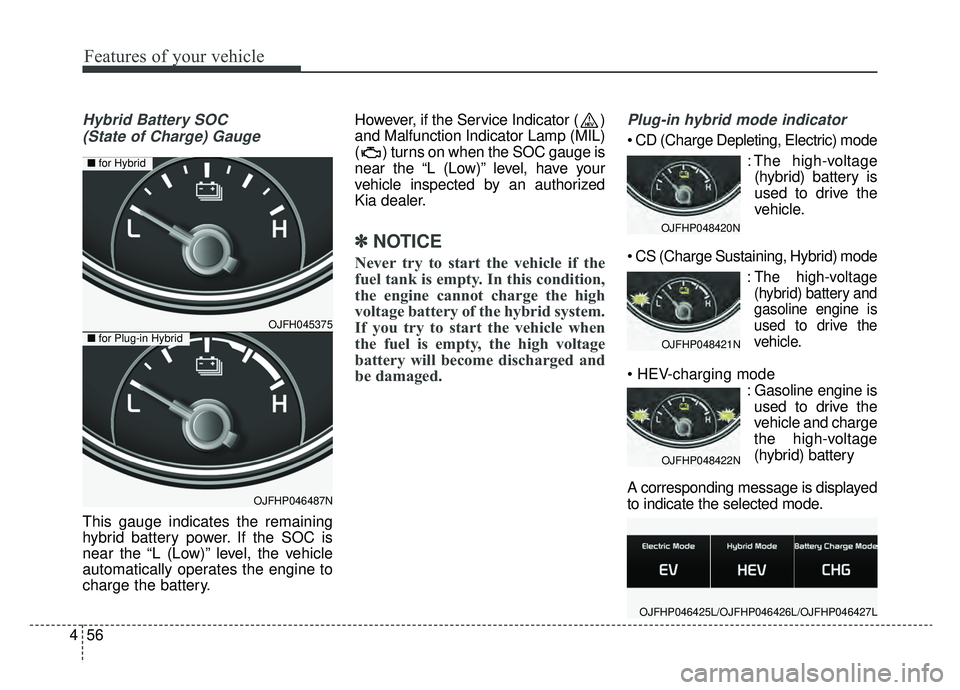
Hybrid Battery SOC
(State of Charge) Gauge
This gauge indicates the remaining
hybrid battery power. If the SOC is
near the “L (Low)” level, the vehicle
automatically operates the engine to
charge the battery. However, if the Service Indicator ( )
and Malfunction Indicator Lamp (MIL)
( ) turns on when the SOC gauge is
near the “L (Low)” level, have your
vehicle inspected by an authorized
Kia dealer.
✽ ✽
NOTICE
Never try to start the vehicle if the
fuel tank is empty. In this condition,
the engine cannot charge the high
voltage battery of the hybrid system.
If you try to start the vehicle when
the fuel is empty, the high voltage
battery will become discharged and
be damaged.
Plug-in hybrid mode indicator
: The high-voltage(hybrid) battery is
used to drive the
vehicle.
:The high-voltage
(hybrid) battery and
gasoline engine is
used to drive the
vehicle.
: Gasoline engine isused to drive the
vehicle and charge
the high-voltage
(hybrid) battery
A corresponding message is displayed
to indicate the selected mode.
OJFHP048420N
OJFHP048421N
OJFHP048422N
OJFHP046425L/OJFHP046426L/OJFHP046427L
OJFH045375
OJFHP046487N
■ for Hybrid
■for Plug-in Hybrid