2019 KIA K900 ignition
[x] Cancel search: ignitionPage 243 of 580
Features of your vehicle
150
4
To cancel or reset the Automatic
Ventilation
When the air conditioning system is
on, select Face Level mode and
while pressing the A/C button, press
the recirculated air position button
five times within three seconds.
When the automatic ventilation is
canceled, the indicator blinks 3
times. When the automatic ventila-
tion is activated, the indicator blinks
6 times.
If the battery is discharged or
detached, the automatic ventilation
will be reset. Adjust the feature
accordingly.
Smart ventilation (if equipped)
The smart ventilation system main-
tains pleasant/fresh air condition
inside the passenger compartment
by automatically detecting/controlling
the temperature and humidity when
you drive the vehicle with the climate
control system in the OFF position.
When the smart ventilation system
starts to operate, the message,
“SMART VENTILATION ON”
appears for 5 seconds. The driver can activate the smart
ventilation by placing the ignition
switch to the ON position and by
selecting on the audio display:
“AVN
→Climate →Menu →Smart
vent”
The smart ventilation system stops operating, when the OFF button of
the climate control system is
selected.
The smart ventilation system stops operating, when any button of the
climate control system is selected
for operation.
The smart ventilation system may not operate, when the vehicle is
driven at low speed.
Page 247 of 580
Features of your vehicle
154
4
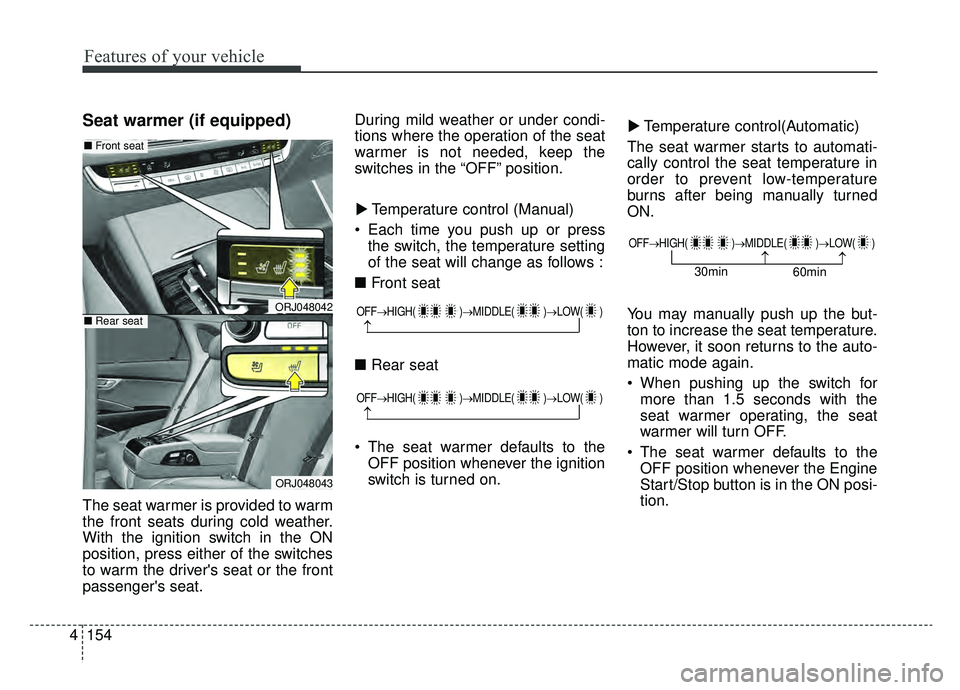
Seat warmer (if equipped)
The seat warmer is provided to warm
the front seats during cold weather.
With the ignition switch in the ON
position, press either of the switches
to warm the driver's seat or the front
passenger's seat. During mild weather or under condi-
tions where the operation of the seat
warmer is not needed, keep the
switches in the “OFF” position.
Temperature control (Manual)
Each time you push up or press the switch, the temperature setting
of the seat will change as follows :
■ Front seat
■ Rear seat
The seat warmer defaults to the OFF position whenever the ignition
switch is turned on. Temperature control(Automatic)
The seat warmer starts to automati-
cally control the seat temperature in
order to prevent low-temperature
burns after being manually turned
ON.
You may manually push up the but-
ton to increase the seat temperature.
However, it soon returns to the auto-
matic mode again.
When pushing up the switch for more than 1.5 seconds with the
seat warmer operating, the seat
warmer will turn OFF.
The seat warmer defaults to the OFF position whenever the Engine
Start/Stop button is in the ON posi-
tion.
▼
▼
OFF→
HIGH( )→ MIDDLE( )→LOW( )
→
OFF→HIGH( )→ MIDDLE( )→LOW( )
→
ORJ048042
ORJ048043
■Front seat
■Rear seat
OFF→ HIGH( )→ MIDDLE( )→LOW( )
→→30min
60min
Page 248 of 580
4155
Features of your vehicle
✽ ✽NOTICE
With the seat warmer switch in the
ON position, the heating system in
the seat turns off or on automatically
depending on the seat temperature.
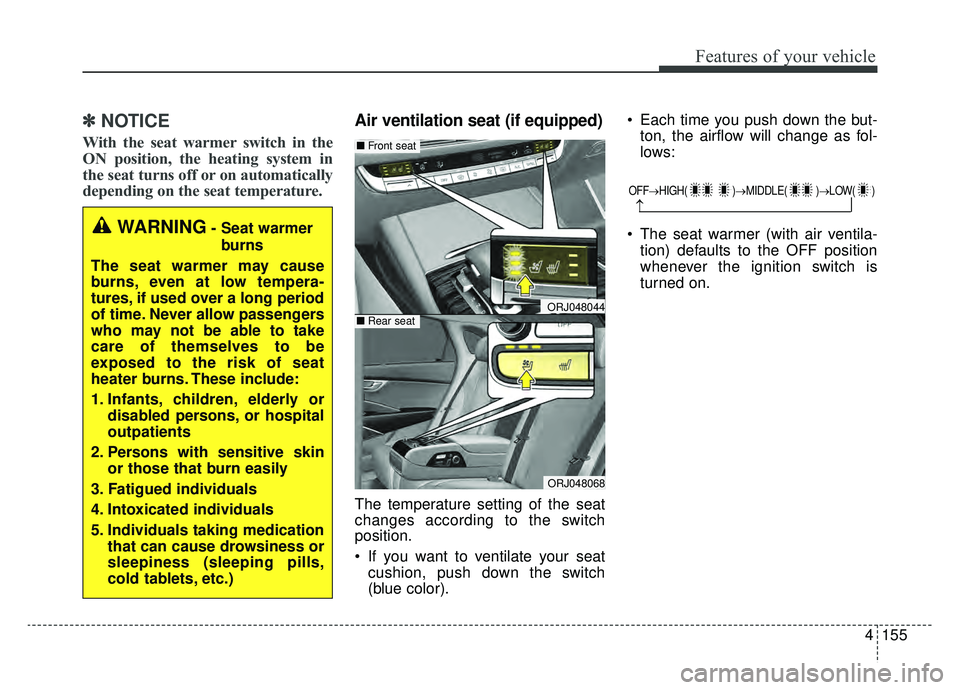
Air ventilation seat (if equipped)
The temperature setting of the seat
changes according to the switch
position.
If you want to ventilate your seat
cushion, push down the switch
(blue color). Each time you push down the but-
ton, the airflow will change as fol-
lows:
The seat warmer (with air ventila- tion) defaults to the OFF position
whenever the ignition switch is
turned on.
WARNING- Seat warmer
burns
The seat warmer may cause
burns, even at low tempera-
tures, if used over a long period
of time. Never allow passengers
who may not be able to take
care of themselves to be
exposed to the risk of seat
heater burns. These include:
1. Infants, children, elderly or disabled persons, or hospital
outpatients
2. Persons with sensitive skin or those that burn easily
3. Fatigued individuals
4. Intoxicated individuals
5. Individuals taking medication that can cause drowsiness or
sleepiness (sleeping pills,
cold tablets, etc.)
OFF→ HIGH( )→ MIDDLE( )→LOW( )
→
ORJ048044
ORJ048068
■Front seat
■Rear seat
Page 249 of 580
Features of your vehicle
156
4
Sunvisor
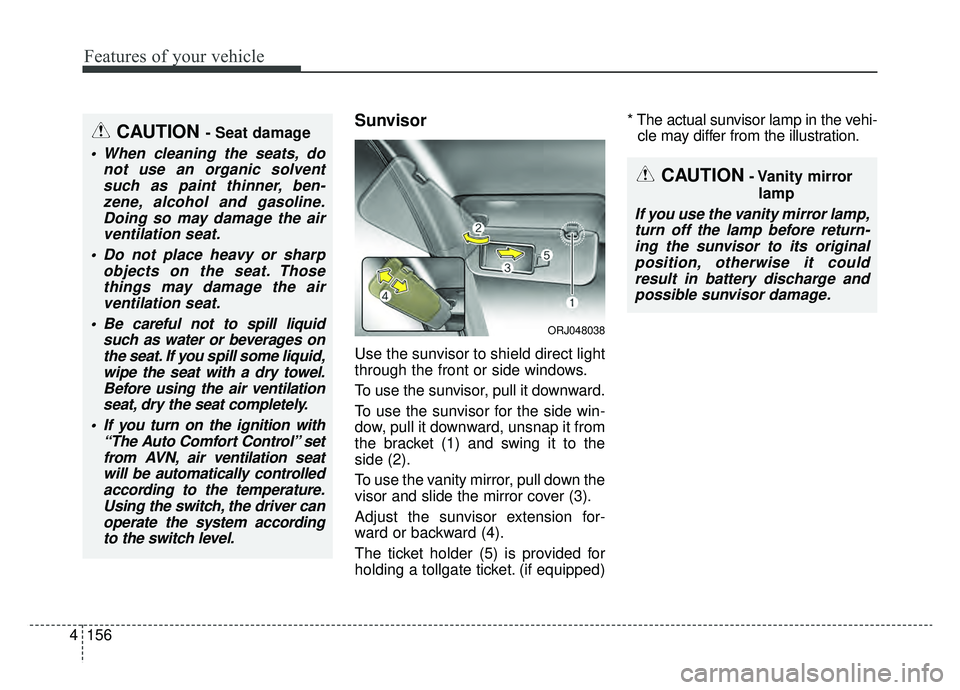
Use the sunvisor to shield direct light
through the front or side windows.
To use the sunvisor, pull it downward.
To use the sunvisor for the side win-
dow, pull it downward, unsnap it from
the bracket (1) and swing it to the
side (2).
To use the vanity mirror, pull down the
visor and slide the mirror cover (3).
Adjust the sunvisor extension for-
ward or backward (4).
The ticket holder (5) is provided for
holding a tollgate ticket. (if equipped) * The actual sunvisor lamp in the vehi-
cle may differ from the illustration.
CAUTION- Vanity mirror
lamp
If you use the vanity mirror lamp,turn off the lamp before return-ing the sunvisor to its originalposition, otherwise it couldresult in battery discharge andpossible sunvisor damage.
CAUTION - Seat damage
When cleaning the seats, do not use an organic solventsuch as paint thinner, ben-zene, alcohol and gasoline.Doing so may damage the airventilation seat.
Do not place heavy or sharp objects on the seat. Thosethings may damage the airventilation seat.
Be careful not to spill liquid such as water or beverages onthe seat. If you spill some liquid,wipe the seat with a dry towel.Before using the air ventilationseat, dry the seat completely.
If you turn on the ignition with “The Auto Comfort Control” setfrom AVN, air ventilation seatwill be automatically controlledaccording to the temperature.Using the switch, the driver canoperate the system accordingto the switch level.
ORJ048038
Page 252 of 580
4159
Features of your vehicle
Wireless smart phone charg-
ing system (if equipped)
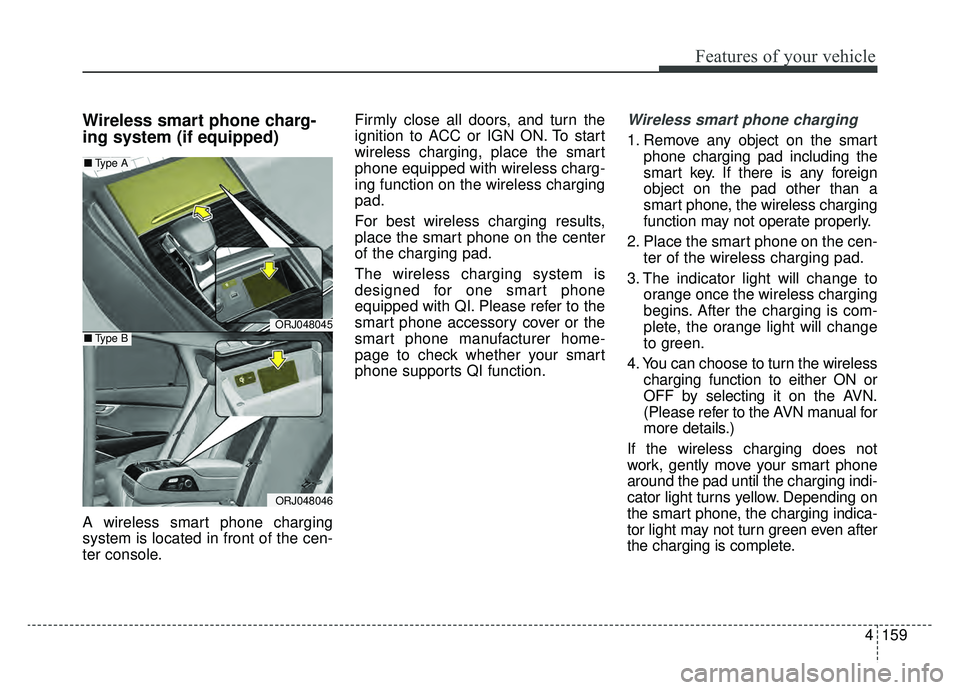
A wireless smart phone charging
system is located in front of the cen-
ter console.Firmly close all doors, and turn the
ignition to ACC or IGN ON. To start
wireless charging, place the smart
phone equipped with wireless charg-
ing function on the wireless charging
pad.
For best wireless charging results,
place the smart phone on the center
of the charging pad.
The wireless charging system is
designed for one smart phone
equipped with QI. Please refer to the
smart phone accessory cover or the
smart phone manufacturer home-
page to check whether your smart
phone supports QI function.
Wireless smart phone charging
1. Remove any object on the smart
phone charging pad including the
smart key. If there is any foreign
object on the pad other than a
smart phone, the wireless charging
function may not operate properly.
2. Place the smart phone on the cen- ter of the wireless charging pad.
3. The indicator light will change to orange once the wireless charging
begins. After the charging is com-
plete, the orange light will change
to green.
4. You can choose to turn the wireless charging function to either ON or
OFF by selecting it on the AVN.
(Please refer to the AVN manual for
more details.)
If the wireless charging does not
work, gently move your smart phone
around the pad until the charging indi-
cator light turns yellow. Depending on
the smart phone, the charging indica-
tor light may not turn green even after
the charging is complete.
ORJ048045
ORJ048046
■ Type A
■Type B
Page 254 of 580
4161
Features of your vehicle
✽ ✽NOTICE
• If it is not possible to close the tray
cover due to the size of your smart
phone or because the tray cover
has been broken, do not use the
wireless smart phone charging
function.
• Even if you're not charging your smart phone, keep the tray cover
closed at all times when it is left in
the tray. Driving with the tray
cover opened will increase the
chance of accidents and result in
injury as you're highly likely to get
distracted by the smart phone.
• When the interior temperature of the wireless charging system rises
above a set temperature, the wire-
less charging will cease to func-
tion. After the interior tempera-
ture drops below the threshold,
the wireless charging function will
resume.
• The wireless charging may not function properly when there is a
heavy accessory cover on the
smart phone.
• Charging a smart phone with a protection cover on may heat up. (Continued)(Continued)
• The wireless charging will stop
when the smart key is moved out
of the vehicle with the ignition in
ON.
• Charging may be temporarily interrupted when smart key detec-
tion is activated. (when turning on
ignition, opening or closing the
doors)
• The wireless charging will stop when the vehicle is turned OFF.
• The wireless charging will stop when the smart phone is not in
complete contact with the wireless
charging pad.
• Items equipped with magnetic components such as credit cards,
telephone cards, bank-books, or a
transportation ticket may become
damaged during wireless charg-
ing.
• Place the smart phone on the cen- ter of the charge pad for best
results. The smart phone may not
charge when placed near the rim
of the charging pad. When the
smart phone does get charged, it
may heat up excessively. (Continued)(Continued)
• For smart phones without built-in
wireless charging system, an
appropriate accessory has to be
equipped in order to use the vehi-
cle's wireless charging system.
• Cellphones that are not certified for wireless smart phone charging
standards (QI) may not be able to
charge.
• Self-protection features in some smart phones could slow down or
stop charging.
• In some cases, the wireless charg- ing indicator could not turn green
even when the phone is fully
charged.
• Smart phones of some manufac- turers may display messages on
weak current. This is due to the
particular characteristic of the
smart phone and does not imply a
malfunction on wireless charging
function. (Continued)
Page 270 of 580
55
Driving your vehicle
Before entering vehicle
• Be sure that all windows, outsidemirror(s), and outside lights are
clean.
Check the condition of the tires.
Check under the vehicle for any sign of leaks.
Be sure there are no obstacles behind you if you intend to back up.
Necessary inspections
Fluid levels, such as engine oil,
engine coolant, brake fluid, and
washer fluid should be checked on a
regular basis, at the exact interval
depending on the fluid. Further
details are provided in chapter 7,
“Maintenance”.
Before starting
Close and lock all doors.
Position the seat so that all con-trols are easily reached.
Buckle your seat belt.
Adjust the inside and outside rearview mirrors.
Be sure that all lights work.
Check all gauges.
Check the operation of warning lights when the ignition switch is
turned to the ON position.
Release the parking brake and make sure the brake warning light
goes out.
For safe operation, be sure you are
familiar with your vehicle and its
equipment.
BEFORE DRIVING
WARNING - Distracted driving
Focus on the road while driving.
The driver's primary responsi-
bility is in the safe and legal
operation of the vehicle. Use of
any handled devices, other
equipment or vehicle systems
that distract the driver should
not be used during vehicle
operation.
Page 280 of 580
515
Driving your vehicle
For extra power when passing anoth-
er vehicle or driving uphill, depress
the accelerator pedal further until
you feel the transmission downshift
to a lower gear.
To shift into D (Drive), depress the
brake pedal and press the
[UNLOCK] button on the shift lever.
Move the shift lever backward.
To shift into D (Drive) from N
(Neutral), you must depress the
brake pedal.
✽ ✽NOTICE
Always come to complete stop
before shifting into D (Drive).
- Parking in N (Neutral) gear
Follow the steps below when parking
and you want the vehicle to move
when pushed.
1.After parking your vehicle, step on
the brake pedal and press the [P]
button with the ignition button in
[ON] or while the engine is running.
2.If the parking brake is applied unlock the parking brake.
- For EPB (Electronic ParkingBrake) equipped vehicles, push
the brake pedal with the ignition
button in [ON] or while the engine
is running to disengage the park-
ing brake. If [AUTO HOLD] func-
tion is used while driving (If
[AUTO HOLD] indicator is on in
the cluster), press [AUTO HOLD]
switch and [AUTO HOLD] func-
tion will be turned off.
3.While pressing the brake pedal, turn the ignition button [OFF].
- For smart key equipped vehicles,the ignition switch can be [OFF]
only after pressing the [P] button. 4.Remove the cap-cover and insert a
tool (e.g. flathead screwdriver) into
the access hole while depressing
the brake pedal. Then, the gear will
change to the N (Neutral) position.
The tool should be inserted into the
access hole within 3 minutes after
turning OFF the engine.
✽ ✽ NOTICE
When moving the shift lever to
N(Neutral) position, a normal
mechanical sound will occur.
CAUTION
For EPB (Electronic Parking
Brake) equipped vehicles with[AUTO HOLD] function usedwhile driving, if the ignition but-ton has been turned [OFF], theelectronic parking brake will beengaged automatically.Therefore, [AUTO HOLD] functionshould be turned off before theignition button is turned off.