2019 KIA K900 seat adjustment
[x] Cancel search: seat adjustmentPage 37 of 580
Safety features of your vehicle
20
3
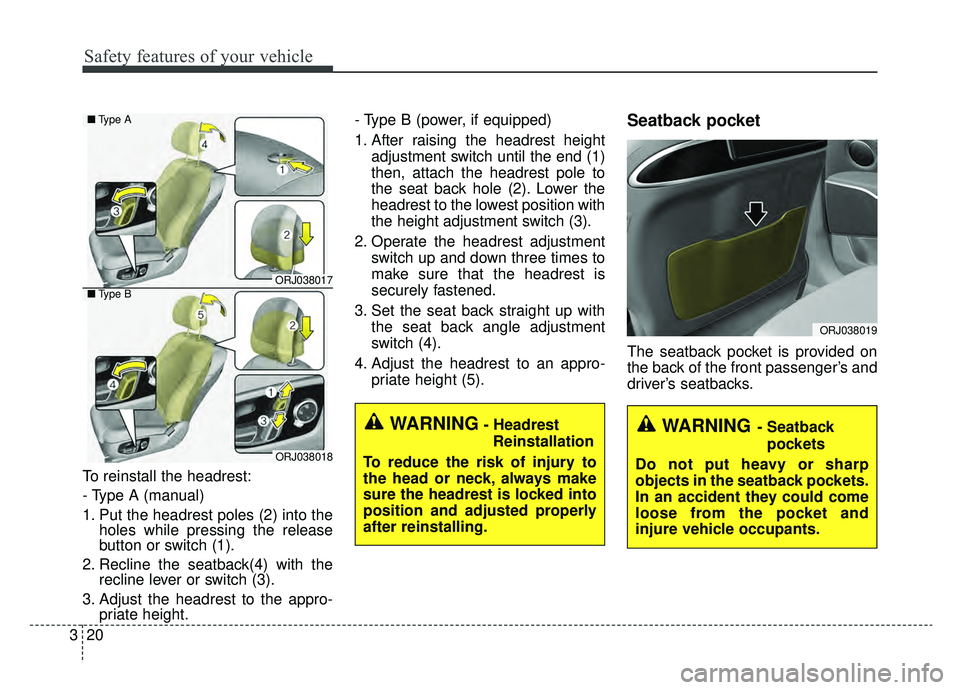
To reinstall the headrest:
- Type A (manual)
1. Put the headrest poles (2) into the
holes while pressing the release
button or switch (1).
2. Recline the seatback(4) with the recline lever or switch (3).
3. Adjust the headrest to the appro- priate height. - Type B (power, if equipped)
1. After raising the headrest height
adjustment switch until the end (1)
then, attach the headrest pole to
the seat back hole (2). Lower the
headrest to the lowest position with
the height adjustment switch (3).
2. Operate the headrest adjustment switch up and down three times to
make sure that the headrest is
securely fastened.
3. Set the seat back straight up with the seat back angle adjustment
switch (4).
4. Adjust the headrest to an appro- priate height (5).
Seatback pocket
The seatback pocket is provided on
the back of the front passenger’s and
driver’s seatbacks.
ORJ038019
WARNING- Seatback
pockets
Do not put heavy or sharp
objects in the seatback pockets.
In an accident they could come
loose from the pocket and
injure vehicle occupants.WARNING- Headrest Reinstallation
To reduce the risk of injury to
the head or neck, always make
sure the headrest is locked into
position and adjusted properly
after reinstalling.
ORJ038017
ORJ038018
■ Type B
■Type A
Page 38 of 580
321
Safety features of your vehicle
Rear seat adjustment
Headrest
The rear seat is equipped with head-
rests in all the seating positions for
the occupant's safety and comfort.
The headrest not only provides com-
fort for passengers, but also helps
protect the head and neck in the
event of a collision.For maximum effectiveness in case
of an accident, the headrest should
be adjusted so the middle of the
headrest is at the same height of the
center of gravity of an occupant's
head. Generally, the center of gravity
of most people's heads is similar with
the height as the top of their eyes.
Also, adjust the headrest as close to
your head as possible. For this rea-
son, the use of a cushion that holds
the body away from the seatback is
not recommended.
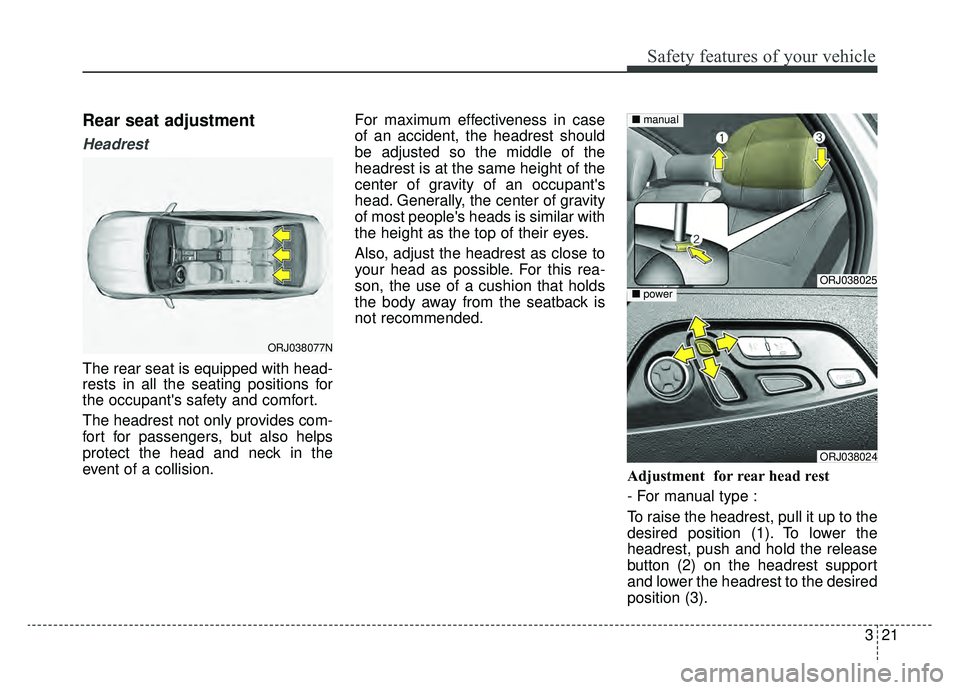
Adjustment for rear head rest
- For manual type :
To raise the headrest, pull it up to the
desired position (1). To lower the
headrest, push and hold the release
button (2) on the headrest support
and lower the headrest to the desired
position (3).
ORJ038077N
ORJ038025
ORJ038024
■power
■manual
Page 40 of 580
323
Safety features of your vehicle
Forward/Backward adjustmentand seatback angle adjustment (if equipped)
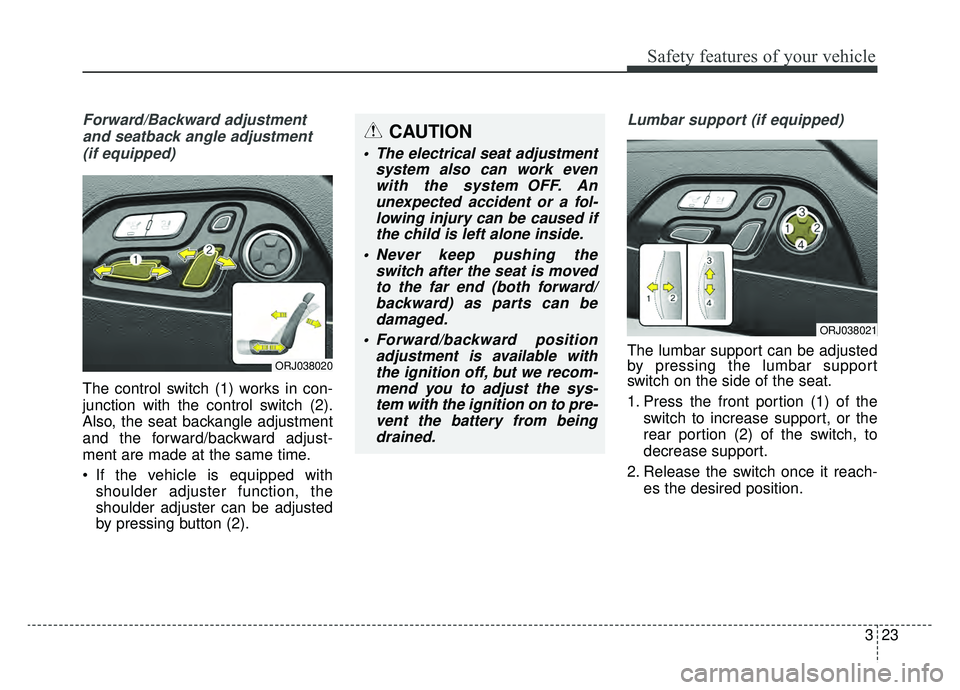
The control switch (1) works in con-
junction with the control switch (2).
Also, the seat backangle adjustment
and the forward/backward adjust-
ment are made at the same time.
If the vehicle is equipped with shoulder adjuster function, the
shoulder adjuster can be adjusted
by pressing button (2).
Lumbar support (if equipped)
The lumbar support can be adjusted
by pressing the lumbar support
switch on the side of the seat.
1. Press the front portion (1) of the
switch to increase support, or the
rear portion (2) of the switch, to
decrease support.
2. Release the switch once it reach- es the desired position.ORJ038020
CAUTION
The electrical seat adjustmentsystem also can work evenwith the system OFF. Anunexpected accident or a fol-lowing injury can be caused ifthe child is left alone inside.
Never keep pushing the switch after the seat is movedto the far end (both forward/backward) as parts can bedamaged.
Forward/backward position adjustment is available withthe ignition off, but we recom-mend you to adjust the sys-tem with the ignition on to pre-vent the battery from beingdrained.
ORJ038021
Page 42 of 580

325
Safety features of your vehicle
Relax mode
While pressing the switch (1), then
the front passenger seat will move as
follows, and the rear seat will move,
too.
The front passenger seat :
1. The seat and the seatback willmove forward. The headrest will
move downward.
2. Seat cushion will move downward.
3. The height of the seat will move downward. Once the adjustment is
completed, the signaling sound
will beep once.
The rear right passenger seat :
1. The head rest will move down- ward.
2. The seat will move forward, the seat cushion will move upward,
the bottom part of lumbar support
will come out.
Once the operation is completed, the
signaling sound will beep once.CAUTION
The rear relaxation seat system switches won’t work in the fol-lowing cases.
- When there is a person sitting in the passenger seat
- When there are heavy objects placed on the passenger seat
- When the door of the passen- ger seat is opened
- When the seat belt of the pas- senger seat is fastened
CAUTION
Relax mode buttons won’t workin the following cases:
- When there is a person sitting in the front passenger seat
- When there are heavy objects placed on the passenger seat
- When the door of the front passenger seat is opened
- When the seat belt of the pas- senger seat is fastened
- If the Relax mode button is pressed again during theRelax mode in operation, theseat will stop moving.
- If you operate the seat control button manually while Relaxmode is in operation, the auto-matic movement of the seatwill stop and be adjusted man-ually.
(Continued)
Page 43 of 580
Safety features of your vehicle
26
3
Relax mode return
Press switch (2), then the rear seats
will move as follows and the passen-
ger seat will move.
Rear right passenger seat :
1. The seat will move back to the far
end.
2. The seat cushion will move down to the far end, and the lumbar sup-
port will move backward.
3. The headrest will move downward.
The front passenger seat :
1. The seat will move backward, and the seat back will move backward,
and the seat cushion will move
downward.
2. The headrest will move down to the far end, and the seat height
will move upward.(Continued)
- When using the relax mode, do not place any object on thefront passenger's seat cush-ion, as the seat seat back willbe folded and objects placedon the front passenger seatmay be damaged.CAUTION
Return Mode Button will notwork in the following cases.
- When there is a person sitting in the passenger seat
- When there are heavy objects placed on the passenger seat
- When the door of the passen- ger seat is opened
- When the seat belt of the pas- senger seat is fastened
CAUTION
If you press the return modebutton again while the returnmode is in process, the seatmovement will stop.
If you manually operate the seat adjustment button whilethe return mode is in process,the automatic seat move willstop and be adjusted manually.
Page 46 of 580
329
Safety features of your vehicle
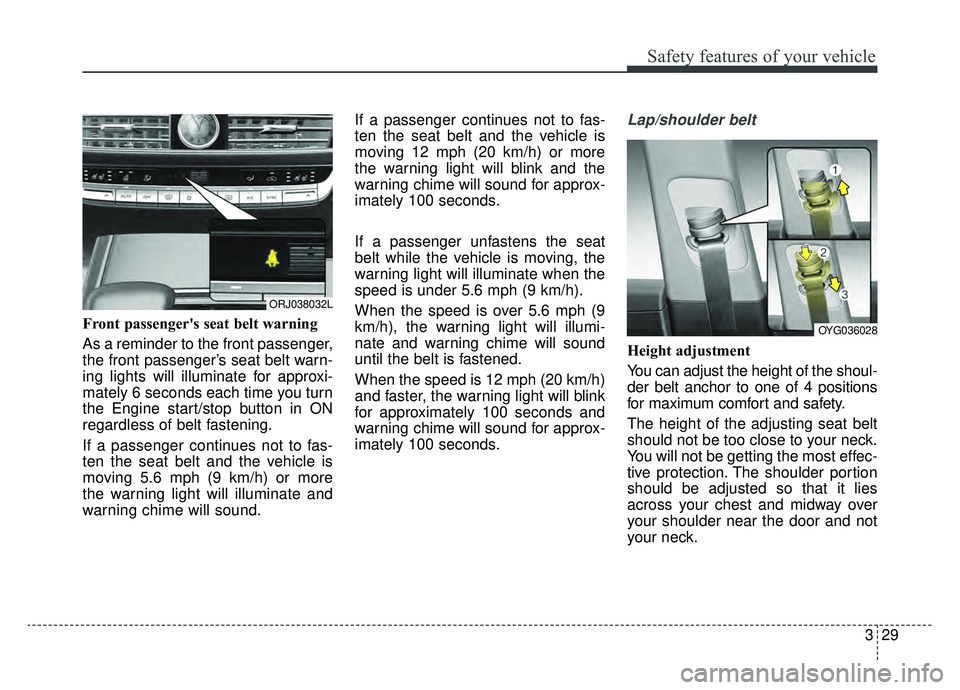
Front passenger's seat belt warning
As a reminder to the front passenger,
the front passenger’s seat belt warn-
ing lights will illuminate for approxi-
mately 6 seconds each time you turn
the Engine start/stop button in ON
regardless of belt fastening.
If a passenger continues not to fas-
ten the seat belt and the vehicle is
moving 5.6 mph (9 km/h) or more
the warning light will illuminate and
warning chime will sound.If a passenger continues not to fas-
ten the seat belt and the vehicle is
moving 12 mph (20 km/h) or more
the warning light will blink and the
warning chime will sound for approx-
imately 100 seconds.
If a passenger unfastens the seat
belt while the vehicle is moving, the
warning light will illuminate when the
speed is under 5.6 mph (9 km/h).
When the speed is over 5.6 mph (9
km/h), the warning light will illumi-
nate and warning chime will sound
until the belt is fastened.
When the speed is 12 mph (20 km/h)
and faster, the warning light will blink
for approximately 100 seconds and
warning chime will sound for approx-
imately 100 seconds.
Lap/shoulder belt
Height adjustment
You can adjust the height of the shoul-
der belt anchor to one of 4 positions
for maximum comfort and safety.
The height of the adjusting seat belt
should not be too close to your neck.
You will not be getting the most effec-
tive protection. The shoulder portion
should be adjusted so that it lies
across your chest and midway over
your shoulder near the door and not
your neck.
OYG036028
ORJ038032L
Page 151 of 580
Features of your vehicle
58
4
MIRRORS
Inside rearview mirror
Adjust the rearview mirror so that the
center view through the rear window
is seen. Make this adjustment before
you start driving.
Do not place objects in the rear seat
or cargo area which would interfere
with your vision through the rear win-
dow.
Electric chromic mirror (ECM)
with HomeLink®system
Your vehicle may be equipped with a
Gentex Automatic-Dimming Mirror
and an Integrated HomeLink
®
Wireless Control System.
During nighttime driving, this feature
will automatically detect and reduce
rearview mirror glare while the com-
pass indicates the direction the vehi-
cle is pointed. The HomeLink
®
Universal Transceiver allows you to
activate your garage door(s), electric
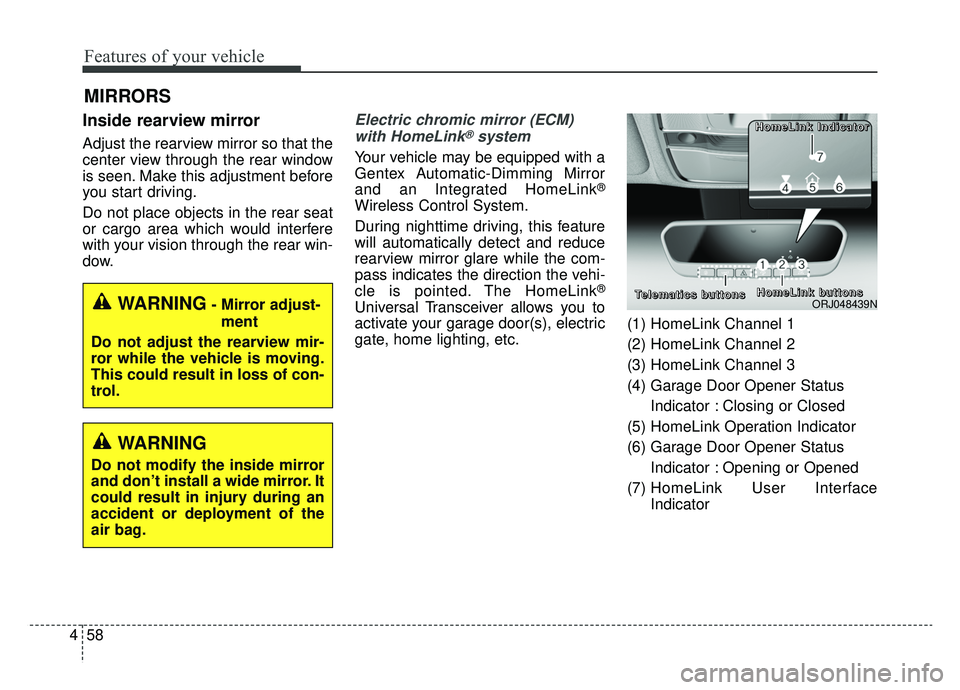
gate, home lighting, etc. (1) HomeLink Channel 1
(2) HomeLink Channel 2
(3) HomeLink Channel 3
(4) Garage Door Opener Status
Indicator : Closing or Closed
(5) HomeLink Operation Indicator
(6) Garage Door Opener Status Indicator : Opening or Opened
(7) HomeLink User Interface
IndicatorWARNING- Mirror adjust-
ment
Do not adjust the rearview mir-
ror while the vehicle is moving.
This could result in loss of con-
trol.
WARNING
Do not modify the inside mirror
and don’t install a wide mirror. It
could result in injury during an
accident or deployment of the
air bag.
ORJ048439N
H H
H H
o o
o o
m m
m m
e e
e e
L L
L L
i i
i i
n n
n n
k k
k k
b b
b b
u u
u u
t t
t t
t t
t t
o o
o o
n n
n n
s s
s s
T T
T T
e e
e e
l l
l l
e e
e e
m m
m m
a a
a a
t t
t t
i i
i i
c c
c c
s s
s s
b b
b b
u u
u u
t t
t t
t t
t t
o o
o o
n n
n n
s s
s s H H
H H
o o
o o
m m
m m
e e
e e
L L
L L
i i
i i
n n
n n
k k
k k
I I
I I
n n
n n
d d
d d
i i
i i
c c
c c
a a
a a
t t
t t
o o
o o
r r
r r
Page 549 of 580

795
Maintenance
Your vehicle is equipped with a cat-
alytic converter emission control
device.
Therefore, the following precautions
must be observed:
Use only UNLEADED FUEL forgasoline engines.
Do not operate the vehicle when there are signs of engine malfunc-
tion, such as misfire or a noticeable
loss of performance.
Do not misuse or abuse the engine. Examples of misuse are
coasting with the ignition off and
descending steep grades in gear
with the ignition off.
Do not operate the engine at high idle speed for extended periods (5
minutes or more).
Do not modify or tamper with any part of the engine or emission con-
trol system. All inspections and
adjustments must be made by an
authorized K900 Kia dealer.
Avoid driving with an extremely low fuel level. Running out of fuel could
cause the engine to misfire, dam-
aging the catalytic converter. Failure to observe these precautions
could result in damage to the catalyt-
ic converter and to your vehicle.
Additionally, such actions could void
your warranties.
Perchlorate Material-special handling
may apply, See www.dtsc.ca.gov/haz-
ardouswaste/ perchlorate.
Notice to California Vehicle Dismantlers:
Perchlorate containing materials,
such as air bag inflators, seatbelt
pretensioners and keyless remote
entry batteries, must be disposed of
according to Title 22 California Code
of Regulations Chapter 67384.10
(a).
CALIFORNIA
PERCHLORATE NOTICE