2019 JEEP WRANGLER UNLIMITED reset
[x] Cancel search: resetPage 211 of 348

Your authorized dealer will reset the oil
change indicator message after completing
the scheduled oil change.
Once A Month Or Before A Long Trip
• Check the engine oil level about five min-
utes after a fully warmed engine is shut off.
Checking the oil level while the vehicle is
on level ground will improve the accuracy of
the oil level reading. Add oil only when the
level is at or below the ADD or MIN mark.
• Check the windshield washer solvent and
add if required.
• Check tire pressure and look for unusual
wear or damage. Rotate tires at the first
sign of irregular wear, even if it occurs
before the oil indicator system turns on.• Inspect the battery and clean and tighten
the terminals as required.
• Check the fluid levels of coolant reservoir,
brake master cylinder and power steering
and fill as needed.
• Check all lights and other electrical items
for correct operation.
At Each Oil Change
• Change the engine oil filter.
• Inspect the brake hoses and lines.
CAUTION!
Failure to perform the required mainte-
nance items may result in damage to the
vehicle.Required Maintenance Intervals
Refer to the Maintenance Plan on the follow-
ing pages for the required maintenance inter-
vals.
Maintenance Plan
NOTE:
Once you have carried out the last interven-
tion in the table, continue with the scheduled
servicing, maintaining the frequency indi-
cated in the plan by marking each operation
with a dot or dedicated note. Simply restart-
ing the maintenance from the start of the
plan may cause the allowed interval to be
exceeded for some operations.
209
Page 227 of 348

light is on. If necessary, add fluid to bring
level within the designated marks on the side
of the reservoir of the brake master cylinder.
Be sure to clean the top of the master cylin-
der area before removing cap. With disc
brakes, fluid level can be expected to fall as
the brake pads wear. Brake fluid level should
be checked when pads are replaced. If the
brake fluid is abnormally low, check the sys-
tem for leaks.
Refer to “Fluids And Lubricants” in “Techni-
cal Specifications” for further information.
WARNING!
• Brake fluid is poisonous and highly cor-
rosive. In the event of accidental con-
tact, immediately wash the affected
parts with water and neutral soap. Then
rinse thoroughly. Call a doctor immedi-
ately if swallowed.
• Use only manufacturer's recommended
brake fluid. Refer to “Fluids And Lubri-
cants” in “Technical Specifications” for
further information. Using the wrong
type of brake fluid can severely damage
WARNING!
your brake system and/or impair its per-
formance. The proper type of brake fluid
for your vehicle is also identified on the
original factory installed hydraulic mas-
ter cylinder reservoir.
• To avoid contamination from foreign
matter or moisture, use only new brake
fluid or fluid that has been in a tightly
closed container. Keep the master cylin-
der reservoir cap secured at all times.
Brake fluid in a open container absorbs
moisture from the air resulting in a lower
boiling point. This may cause it to boil
unexpectedly during hard or prolonged
braking, resulting in sudden brake fail-
ure. This could result in a collision.
• Overfilling the brake fluid reservoir can
result in spilling brake fluid on hot en-
gine parts, causing the brake fluid to
catch fire. Brake fluid can also damage
painted and vinyl surfaces, care should
be taken to avoid its contact with these
surfaces.
• Do not allow petroleum based fluid to
contaminate the brake fluid. Brake seal
WARNING!
components could be damaged, causing
partial or complete brake failure. This
could result in a collision.
Automatic Transmission
Fluid Level Check
The fluid level is preset at the factory and
does not require adjustment under normal
operating conditions. Routine fluid level
checks are not required; therefore the trans-
mission has no dipstick. An authorized dealer
can check your transmission fluid level using
special service tools. If you notice fluid leak-
age or transmission malfunction, visit an au-
thorized dealer immediately to have the
transmission fluid level checked. Operating
the vehicle with an improper fluid level can
cause severe transmission damage.
CAUTION!
If a transmission fluid leak occurs, visit an
authorized dealer immediately. Severe
transmission damage may occur. An au-
225
Page 271 of 348

CAUTION!
Do NOT attach any object to the touchscreen,
doing so can result in damage to the touch-
screen.
Clock Setting
To start the clock setting procedure:
1. Press the “Settings” button on the face-
plate, then press the “Clock and Date”
button.
2. Press the “Set Time” button on the
touchscreen.
3. Press the “Up” or “Down” arrows to adjust
the hours or minutes, then select the
“AM” or “PM” button on the touchscreen.
You can also select 12hr or 24hr format by
pressing the desired button on the
touchscreen.
4. Once the time is set, press the “Done”
button on the touchscreen to exit the time
screen.NOTE:
In the Clock Setting Menu you can also select
“Display Clock”. Display Clock turns the
clock display in the status bar on or off.
Audio Setting
1. Press the “Settings” button on the
faceplate.
2. Scroll down and press the “Audio” button
on the touchscreen to open the Audio
menu.
3. The Audio Menu shows the following op-
tions for you to customize your audio
settings.
Equalizer
Press the “Equalizer” button on the touch-
screen to adjust the Bass, Mid and Treble.
Use the “+” or “-” button on the touchscreen
to adjust the equalizer to your desired set-
tings.
Balance/Fade
Press the “Balance/Fade” button on the
touchscreen to adjust the sound from thespeakers. Use the arrow buttons on the
touchscreen to adjust the sound level from
the front and rear or right and left side speak-
ers. Press the center “C” button on the touch-
screen to reset the balance and fade to the
factory setting.
Speed Adjusted Volume — If Equipped
Press the “Speed Adjusted Volume” button
on the touchscreen to select between OFF, 1,
2 or 3. This will decrease the radio volume
relative to a decrease in vehicle speed.
Loudness — If Equipped
Press the “Loudness” button on the touch-
screen to select the Loudness feature. When
this feature is activated it improves sound
quality at lower volumes.
Surround Sound — If Equipped
Press the “Surround Sound” button on the
touchscreen, select On or Off followed by
pressing the back arrow button on the touch-
screen. When this feature is activated, it
provides simulated surround sound mode.
269
Page 272 of 348

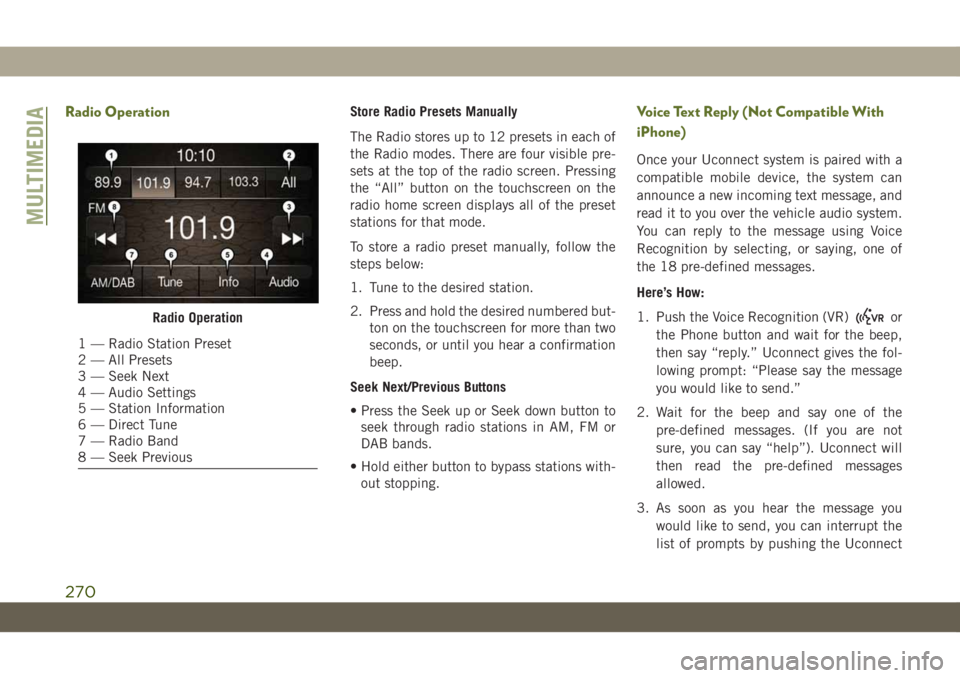
Radio OperationStore Radio Presets Manually
The Radio stores up to 12 presets in each of
the Radio modes. There are four visible pre-
sets at the top of the radio screen. Pressing
the “All” button on the touchscreen on the
radio home screen displays all of the preset
stations for that mode.
To store a radio preset manually, follow the
steps below:
1. Tune to the desired station.
2. Press and hold the desired numbered but-
ton on the touchscreen for more than two
seconds, or until you hear a confirmation
beep.
Seek Next/Previous Buttons
• Press the Seek up or Seek down button to
seek through radio stations in AM, FM or
DAB bands.
• Hold either button to bypass stations with-
out stopping.Voice Text Reply (Not Compatible With
iPhone)
Once your Uconnect system is paired with a
compatible mobile device, the system can
announce a new incoming text message, and
read it to you over the vehicle audio system.
You can reply to the message using Voice
Recognition by selecting, or saying, one of
the 18 pre-defined messages.
Here’s How:
1. Push the Voice Recognition (VR)
or
the Phone button and wait for the beep,
then say “reply.” Uconnect gives the fol-
lowing prompt: “Please say the message
you would like to send.”
2. Wait for the beep and say one of the
pre-defined messages. (If you are not
sure, you can say “help”). Uconnect will
then read the pre-defined messages
allowed.
3. As soon as you hear the message you
would like to send, you can interrupt the
list of prompts by pushing the UconnectRadio Operation
1 — Radio Station Preset
2 — All Presets
3 — Seek Next
4 — Audio Settings
5 — Station Information
6 — Direct Tune
7 — Radio Band
8 — Seek Previous
MULTIMEDIA
270
Page 276 of 348

Radio
Uconnect 4 With 7–inch Display Radio
1 — Radio Station Presets
2 — Toggle Between Presets
3 — Status Bar
4 — Main Category Bar
5 — Audio Settings6 — Seek Up
7 — Direct Tune To A Radio Station
8 — Seek Down
9 — Browse And Manage Presets
10 — Radio Bands
MULTIMEDIA
274
Page 277 of 348

WARNING!
ALWAYS drive safely with your hands on
the wheel. You have full responsibility and
assume all risks related to the use of the
Uconnect features and applications in this
vehicle. Only use Uconnect when it is safe
to do so. Failure to do so may result in an
accident involving serious injury or death.
• To access the Radio mode, press the “Ra-
dio” button on the touchscreen.
Selecting Radio Stations
• Press the desired radio band (AM, FM or
DAB) button on the touchscreen.
Seek Up/Seek Down
• Press the Seek up or down arrow buttons on
the touchscreen for less than two seconds
to seek through radio stations.
• Press and hold either arrow button on the
touchscreen for more than two seconds to
bypass stations without stopping. The radio
will stop at the next listenable station once
the arrow button on the touchscreen is
released.Direct Tune
• Tune directly to a radio station by pressing
the “Tune” button on the screen, and en-
tering the desired station number.
Store Radio Presets Manually
Your radio can store 36 total preset stations,
12 presets per band (AM, FM and DAB). They
are shown at the top of your radio screen. To
see the 12 preset stations per band, press the
arrow button on the touchscreen at the top
right of the screen to toggle between the two
sets of six presets.
To store a radio preset manually, follow the
steps below:
1. Tune to the desired station.
2. Press and hold the desired numbered but-
ton on the touchscreen for more than two
seconds or until you hear a confirmation
beep.
Android Auto — If Equipped
NOTE:
Feature availability depends on your carrier
and mobile phone manufacturer. Some
Android Auto features may or may not be
available in every region and/or language.
Android Auto is a feature of your Uconnect
system, and your Android 5.0 Lollipop, or
higher, powered smartphone with a data plan,
that allows you to project your smartphone
and a number of its apps onto the touch-
screen radio display. Android Auto automati-
cally brings you useful information, and orga-
nizes it into simple cards that appear just
when they are needed. Android Auto can be
used with Google's best-in-class speech tech-
nology, the steering wheel controls, the knobs
and buttons on your radio faceplate, and the
radio display’s touchscreen to control many
of your apps. To use Android Auto follow the
following steps:
1. Download the Android Auto app from the
Google Play store on your Android-
powered smartphone.
275
Page 282 of 348

Radio
Uconnect 4C/4C NAV With 8.4–inch Display Radio
1 — Radio Station Presets
2 — Toggle Between Presets
3 — Status Bar
4 — View Small Navigation Map
5 — Main Category Bar
6 — Audio Settings7 — Seek Up
8 — Direct Tune To A Radio Station
9 — Seek Down
10 — Browse And Manage Presets
11 — Radio Bands
MULTIMEDIA
280
Page 283 of 348

WARNING!
ALWAYS drive safely with your hands on
the wheel. You have full responsibility and
assume all risks related to the use of the
Uconnect features and applications in this
vehicle. Only use Uconnect when it is safe
to do so. Failure to do so may result in an
accident involving serious injury or death.
• To access the Radio mode, press the “Ra-
dio” button on the touchscreen.
Selecting Radio Stations
• Press the desired radio band (AM, FM or
DAB) button on the touchscreen.
Seek Up/Seek Down
• Press the Seek up or down arrow buttons on
the touchscreen for less than two seconds
to seek through radio stations.
• Press and hold either arrow button on the
touchscreen for more than two seconds to
bypass stations without stopping. The radio
will stop at the next listenable station once
the arrow button on the touchscreen is
released.Direct Tune
• Tune directly to a radio station by pressing
the “Tune” button on the screen, and en-
tering the desired station number.
Store Radio Presets Manually
Your radio can store 36 total preset stations,
12 presets per band (AM, FM and DAB). They
are shown at the top of your radio screen. To
see the 12 preset stations per band, press the
arrow button on the touchscreen at the top
right of the screen to toggle between the two
sets of six presets.
To store a radio preset manually, follow the
steps below:
1. Tune to the desired station.
2. Press and hold the desired numbered but-
ton on the touchscreen for more than two
seconds or until you hear a confirmation
beep.
Android Auto — If Equipped
NOTE:
Feature availability depends on your carrier
and mobile phone manufacturer. Some
Android Auto features may or may not be
available in every region and/or language.
Android Auto is a feature of your Uconnect
system, and your Android 5.0 Lollipop, or
higher, powered smartphone with a data plan,
that allows you to project your smartphone
and a number of its apps onto the touch-
screen radio display. Android Auto automati-
cally brings you useful information, and orga-
nizes it into simple cards that appear just
when they are needed. Android Auto can be
used with Google's best-in-class speech tech-
nology, the steering wheel controls, the knobs
and buttons on your radio faceplate, and the
radio display’s touchscreen to control many
of your apps. To use Android Auto follow
these steps:
1. Download the Android Auto app from the
Google Play store on your Android-
powered smartphone.
281