2019 JEEP WRANGLER UNLIMITED audio
[x] Cancel search: audioPage 57 of 348

If your vehicle is equipped with a Power
Sliding Top, the control switch can be found
on the front trim panel, to the right of the
passenger’s side sun visor.
NOTE:
• The Power Top is non-removable. If desired,
the rear quarter windows can be removed
and stored in provided storage bags. Refer
to “Quarter Window Removal” in your Own-
er’s Manual for further information.• The Power Top will not open in tempera-
tures below –4°F (-20°C). However, if it is
opened at a higher temperature, it can be
closed at temperatures above –40°F
(-40°C).
• The Power Top will not operate at vehicle
speeds above 60 mph (96 km/h).
NOTE:
A slight pause in audio may be heard when
opening and closing the Power Sliding Top as
a result of the Uconnect system switching
between Power Top Closed and Power Top
Open audio modes.
WARNING!
• Never leave children unattended in a
vehicle, or with access to an unlocked
vehicle. Never leave the key fob in or
near the vehicle, or in a location acces-
sible to children. Do not leave the igni-
tion of a vehicle equipped with Keyless
Enter-N-Go in the ACC or ON/RUN
mode. Occupants, particularly unat-
tended children, can become entrapped
by the power top while operating the
WARNING!
power top switch. Such entrapment may
result in serious injury or death.
• In a collision, there is a greater risk of
being thrown from a vehicle with an
open power top. You could also be seri-
ously injured or killed. Always fasten
your seat belt properly and make sure all
passengers are also properly secured.
• Do not allow small children to operate
the power top. Never allow your fingers,
other body parts, or any object, to proj-
ect through the power top opening. In-
jury may result.
Opening The Power Top
Express Mode
Push the open switch and release it within
one-half second. The power top will open
automatically to the open position. This is
called “Express Open”. During Express Open
operation, any movement of the switch will
stop the power top.
Power Sliding Top Control Switch
1 — Open Switch
2 — Close Switch
55
Page 65 of 348

• Push theuparrow button to scroll upward
through the main menus (Speedometer,
MPH/km/h, Vehicle Info, Terrain, Driver As-
sist, Fuel Economy, Trip A, Trip B,Stop/Start, Audio, Navigation, Stored Mes-
sages, Screen Setup and Speed Warning).
• Push thedownarrow button to scroll down-
ward through the main menu and sub-
menus (Speedometer, MPH/km/h, Vehicle
Info, Terrain, Driver Assist, Fuel Economy,
Trip A, Trip B, Stop/Start, Audio, Naviga-
tion, Stored Messages, Screen Setup and
Speed Warning).
• Push therightarrow button to access the
information screens or submenu screens of
a main menu item.
• Push theleftarrow button to access the
information screens or submenu screens of
a main menu item.
• Push theOKbutton to access/select the
information screens or submenu screens of
a main menu item. Push and hold theOK
button for two seconds to reset displayed/
selected features that can be reset.Oil Change Indicator System — If Equipped
Your vehicle is equipped with an engine oil
change indicator system. The “Oil Change
Due” message will display in the instrument
cluster display for five seconds after a singlechime has sounded, to indicate the next
scheduled oil change interval. The engine oil
change indicator system is duty cycle based,
which means the engine oil change interval
may fluctuate, dependent upon your personal
driving style.
Instrument Cluster Display Selectable Items
The instrument cluster display can be used to
view the following main menu items:
NOTE:
Depending on the vehicles options, feature
settings may vary.
• Speedometer • Stop/Start
• Vehicle Info • Audio
• Off Road • Messages
• Fuel Economy • Screen Setup
• Trip Info
NOTE:
Refer to your Owner’s Manual for further
information.
Instrument Cluster Display Control Buttons
1 — OK Button
2 — Up Arrow Button
3 — Right Arrow Button
4 — Down Arrow Button
5 — Left Arrow Button
63
Page 267 of 348

MULTIMEDIA
CYBERSECURITY...........267
UCONNECT 3 WITH 5–INCH DIS-
PLAY — IF EQUIPPED........268
Uconnect 3 With 5–inch Display At A
Glance.....................268
Clock Setting................269
Audio Setting................269
Radio Operation..............270
Voice Text Reply (Not Compatible With
iPhone)....................270
Apps — If Equipped............271
UCONNECT 4 WITH 7-INCH DIS-
PLAY.....................272
Uconnect 4 At A Glance.........272
Drag & Drop Menu Bar...........273
Radio.....................274
Android Auto — If Equipped.......275
Apple CarPlay Integration — If
Equipped...................276
Apps — If Equipped............277
UCONNECT 4C/4C NAV WITH
8.4-INCH DISPLAY..........278
Uconnect 4C/4C NAV At A Glance . . .278
Drag & Drop Menu Bar...........279
Radio.....................280
Android Auto — If Equipped.......281
Apple CarPlay Integration — If
Equipped...................285
Apps — If Equipped............287
UCONNECT SETTINGS.......288
TIPS CONTROLS AND GENERAL
INFORMATION.............288
Steering Wheel Audio Controls......288
Reception Conditions............289
Care And Maintenance...........289
Anti-Theft Protection............289
AUX/USB/MP3 CONTROL — IF
EQUIPPED.................289
NAVIGATION — IF EQUIPPED. . .292
Changing The Navigation Voice Prompt
Volume....................292
Finding Points Of Interest........294
Finding A Place By Spelling The
Name.....................294One-Step Voice Destination Entry. . . .294
Setting Your Home Location.......294
Home.....................294
Adding A Stop................296
Taking A Detour...............296
Map Update.................296
UCONNECT PHONE.........297
Uconnect Phone (Bluetooth Hands Free
Calling)....................297
Pairing (Wirelessly Connecting) Your Mobile
Phone To The Uconnect System.....300
Common Phone Commands
(Examples)..................304
Mute (Or Unmute) Microphone During
Call......................304
Transfer Ongoing Call Between Handset And
Vehicle....................304
Phonebook..................304
Voice Command Tips............304
Changing The Volume...........305
Using Do Not Disturb...........305
Incoming Text Messages.........305
MULTIMEDIA
265
Page 271 of 348

CAUTION!
Do NOT attach any object to the touchscreen,
doing so can result in damage to the touch-
screen.
Clock Setting
To start the clock setting procedure:
1. Press the “Settings” button on the face-
plate, then press the “Clock and Date”
button.
2. Press the “Set Time” button on the
touchscreen.
3. Press the “Up” or “Down” arrows to adjust
the hours or minutes, then select the
“AM” or “PM” button on the touchscreen.
You can also select 12hr or 24hr format by
pressing the desired button on the
touchscreen.
4. Once the time is set, press the “Done”
button on the touchscreen to exit the time
screen.NOTE:
In the Clock Setting Menu you can also select
“Display Clock”. Display Clock turns the
clock display in the status bar on or off.
Audio Setting
1. Press the “Settings” button on the
faceplate.
2. Scroll down and press the “Audio” button
on the touchscreen to open the Audio
menu.
3. The Audio Menu shows the following op-
tions for you to customize your audio
settings.
Equalizer
Press the “Equalizer” button on the touch-
screen to adjust the Bass, Mid and Treble.
Use the “+” or “-” button on the touchscreen
to adjust the equalizer to your desired set-
tings.
Balance/Fade
Press the “Balance/Fade” button on the
touchscreen to adjust the sound from thespeakers. Use the arrow buttons on the
touchscreen to adjust the sound level from
the front and rear or right and left side speak-
ers. Press the center “C” button on the touch-
screen to reset the balance and fade to the
factory setting.
Speed Adjusted Volume — If Equipped
Press the “Speed Adjusted Volume” button
on the touchscreen to select between OFF, 1,
2 or 3. This will decrease the radio volume
relative to a decrease in vehicle speed.
Loudness — If Equipped
Press the “Loudness” button on the touch-
screen to select the Loudness feature. When
this feature is activated it improves sound
quality at lower volumes.
Surround Sound — If Equipped
Press the “Surround Sound” button on the
touchscreen, select On or Off followed by
pressing the back arrow button on the touch-
screen. When this feature is activated, it
provides simulated surround sound mode.
269
Page 272 of 348

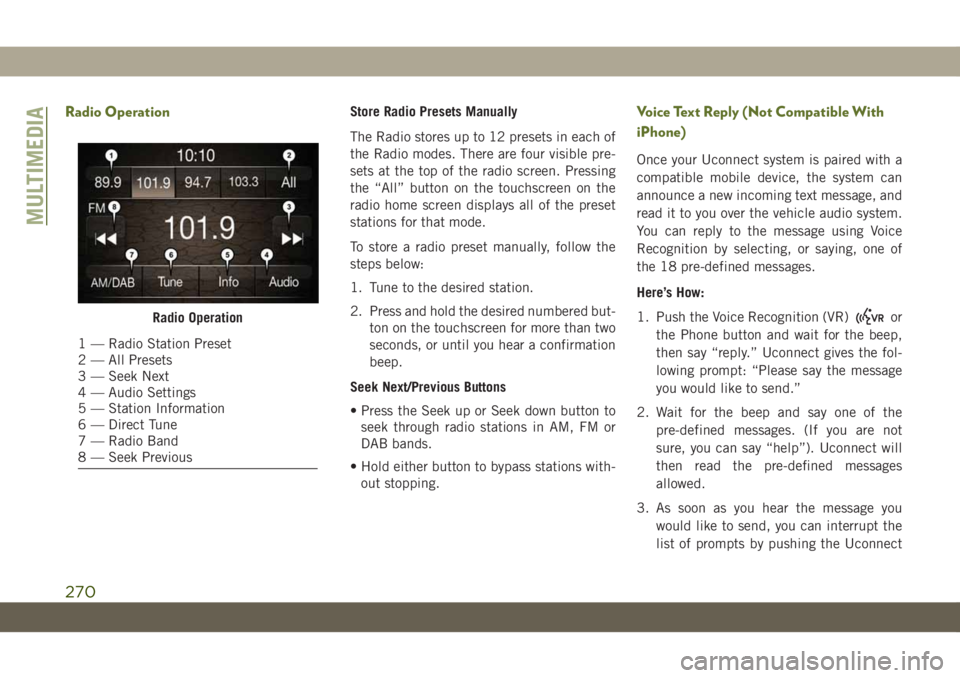
Radio OperationStore Radio Presets Manually
The Radio stores up to 12 presets in each of
the Radio modes. There are four visible pre-
sets at the top of the radio screen. Pressing
the “All” button on the touchscreen on the
radio home screen displays all of the preset
stations for that mode.
To store a radio preset manually, follow the
steps below:
1. Tune to the desired station.
2. Press and hold the desired numbered but-
ton on the touchscreen for more than two
seconds, or until you hear a confirmation
beep.
Seek Next/Previous Buttons
• Press the Seek up or Seek down button to
seek through radio stations in AM, FM or
DAB bands.
• Hold either button to bypass stations with-
out stopping.Voice Text Reply (Not Compatible With
iPhone)
Once your Uconnect system is paired with a
compatible mobile device, the system can
announce a new incoming text message, and
read it to you over the vehicle audio system.
You can reply to the message using Voice
Recognition by selecting, or saying, one of
the 18 pre-defined messages.
Here’s How:
1. Push the Voice Recognition (VR)
or
the Phone button and wait for the beep,
then say “reply.” Uconnect gives the fol-
lowing prompt: “Please say the message
you would like to send.”
2. Wait for the beep and say one of the
pre-defined messages. (If you are not
sure, you can say “help”). Uconnect will
then read the pre-defined messages
allowed.
3. As soon as you hear the message you
would like to send, you can interrupt the
list of prompts by pushing the UconnectRadio Operation
1 — Radio Station Preset
2 — All Presets
3 — Seek Next
4 — Audio Settings
5 — Station Information
6 — Direct Tune
7 — Radio Band
8 — Seek Previous
MULTIMEDIA
270
Page 274 of 348

UCONNECT 4 WITH 7-INCH
DISPLAY
Uconnect 4 At A Glance
CAUTION!
Do NOT attach any object to the touch-
screen, doing so can result in damage to
the screen.NOTE:
Uconnect screen images are for illustration
purposes only and may not reflect exact soft-
ware for your vehicle.
Setting The Time
1. For Uconnect 4, turn the unit on, and
then press the time display at the top of
the screen. Press “Yes.”
2. If the time is not displayed at the top of
the screen, press the “Settings” button on
the touchscreen. In the Settings screen,
press the “Clock & Date” button on the
touchscreen, then check or uncheck this
option.
3. Press “+” or “–” next to Set Time Hours
and Set Time Minutes to adjust the time.
4. If these features are not available, un-
check the Sync Time box.
5. Press “X” to save your settings and exit
out of the Clock Setting screen.Audio Settings
• Press the “Audio” button on the touch-
screen to activate the Audio settings screen
to adjust Balance\Fade, Equalizer, Speed
Adjusted Volume, Surround Sound, Loud-
ness, AUX Volume Offset, Auto Play, and
Radio Off With Door.
• You can return to the Radio screen by
pressing the “X” located at the top right.
Balance/Fade
• Press the “Balance/Fade” button on the
touchscreen to Balance audio between the
front speakers or fade the audio between
the rear and front speakers.
• Pressing the “Front,” “Rear,” “Left,” or
“Right” buttons on the touchscreen or
press and drag the Speaker Icon to adjust
the Balance/Fade.
Equalizer
• Press the “Equalizer” button on the touch-
screen to activate the Equalizer screen.
Uconnect 4 With 7–inch Display Radio
Screen
MULTIMEDIA
272
Page 275 of 348

• Press the “+” or “–” buttons on the touch-
screen, or press and drag over the level bar
for each of the equalizer bands. The level
value, which spans between plus or minus
nine, is displayed at the bottom of each of
the bands.
Speed Adjusted Volume
• Press the “Speed Adjusted Volume” button
on the touchscreen to activate the Speed
Adjusted Volume screen. The Speed Ad-
justed Volume is adjusted by pressing the
volume level indicator. This alters the auto-
matic adjustment of the audio volume with
variation to vehicle speed.
Loudness — If Equipped
• Press the “On” button on the touchscreen
to activate Loudness. Press “Off” to deac-
tivate this feature. When Loudness is On,
the sound quality at lower volumes
improves.
AUX Volume Offset
• Press the “AUX Volume Offset” button on
the touchscreen to activate the AUX Vol-
ume Offset screen. The AUX Volume Offset
is adjusted by pressing of the “+” and “–”buttons. This alters the AUX input audio
volume. The level value, which spans be-
tween plus or minus three, is displayed
above the adjustment bar.
Auto Play — If Equipped
• Press the “Auto Play” button on the touch-
screen to activate the Auto Play screen. The
Auto Play feature has two settings “On” and
“Off.” With Auto Play on, music begins
playing from a connected device, immedi-
ately after it is connected to the radio.
Auto On Radio — If Equipped
• The Radio automatically turns on when
vehicle is in run or will recall whether it was
on or off at last ignition off.
Radio Off With Door — If Equipped
• Press the “Radio Off With Door” button on
the touchscreen to activate the Radio Off
With Door screen. The Radio Off With Door
feature, when activated, keeps the radio on
until the driver or passenger door is opened,
or when the Radio Off Delay selected time
has expired.Drag & Drop Menu Bar
The Uconnect features and services in the
main menu bar are easily changed for your
convenience. Simply follow these steps:
1. Press the “Apps
” button to open the
App screen.
2. Press and hold, then drag the selected
App to replace an existing shortcut in the
main menu bar.
The new app shortcut, that was dragged down
onto the main menu bar, will now be an active
App/shortcut.
NOTE:
This feature is only available if the vehicle is
in PARK.
Uconnect 4 Main Menu
273
Page 276 of 348

Radio
Uconnect 4 With 7–inch Display Radio
1 — Radio Station Presets
2 — Toggle Between Presets
3 — Status Bar
4 — Main Category Bar
5 — Audio Settings6 — Seek Up
7 — Direct Tune To A Radio Station
8 — Seek Down
9 — Browse And Manage Presets
10 — Radio Bands
MULTIMEDIA
274