2019 JEEP WRANGLER UNLIMITED manual radio set
[x] Cancel search: manual radio setPage 95 of 348

WARNING!
The Blind Spot Monitoring system is only
an aid to help detect objects in the blind
spot zones. The BSM system is not de-
signed to detect pedestrians, bicyclists, or
animals. Even if your vehicle is equipped
with the BSM system, always check your
vehicle’s mirrors, glance over your shoul-
der, and use your turn signal before chang-
ing lanes. Failure to do so can result in
serious injury or death.
Rear Cross Path (RCP)
The Rear Cross Path (RCP) feature is in-
tended to aid the driver when backing out of
parking spaces where their vision of oncom-
ing vehicles may be blocked. Proceed slowly
and cautiously out of the parking space until
the rear end of the vehicle is exposed. The
RCP system will then have a clear view of the
cross traffic and if an oncoming vehicle is
detected, alert the driver.
RCP monitors the rear detection zones on
both sides of the vehicle, for objects that are
moving toward the side of the vehicle with a
minimum speed of approximately 3 mph(5 km/h), to objects moving a maximum of
approximately 20 mph (32 km/h), such as in
parking lot situations.
NOTE:
In a parking lot situation, oncoming vehicles
can be obscured by vehicles parked on either
side. If the sensors are blocked by other
structures or vehicles, the system will not be
able to alert the driver.
When RCP is on and the vehicle is in RE-
VERSE, the driver is alerted using both the
visual and audible alarms, including reduc-
ing the radio volume.WARNING!
Rear Cross Path Detection (RCP) is not a
back up aid system. It is intended to be
used to help a driver detect an oncoming
vehicle in a parking lot situation. Drivers
must be careful when backing up, even
when using RCP. Always check carefully
behind your vehicle, look behind you, and
be sure to check for pedestrians, animals,
other vehicles, obstructions, and blind
spots before backing up. Failure to do so
can result in serious injury or death.
Modes Of Operation
Three selectable modes of operation are
available in the Uconnect System. Refer to
“Uconnect Settings” in “Multimedia” in the
Owner’s Manual for further information.
Blind Spot Alert Lights Only
When operating in Blind Spot Alert mode, the
BSM system will provide a visual alert in the
appropriate side view mirror based on a de-
tected object. However, when the system is
operating in Rear Cross Path (RCP) mode, the
system will respond with both visual and
audible alerts when a detected object is pres-
ent. Whenever an audible alert is requested,
the radio is muted.
Blind Spot Alert Lights/Chime
When operating in Blind Spot Alert Lights/
Chime mode, the BSM system will provide a
visual alert in the appropriate side view mirror
based on a detected object. If the turn signal
is then activated, and it corresponds to an
alert present on that side of the vehicle, an
audible chime will also be sounded. When-
ever a turn signal and detected object are
present on the same side at the same time,
93
Page 272 of 348

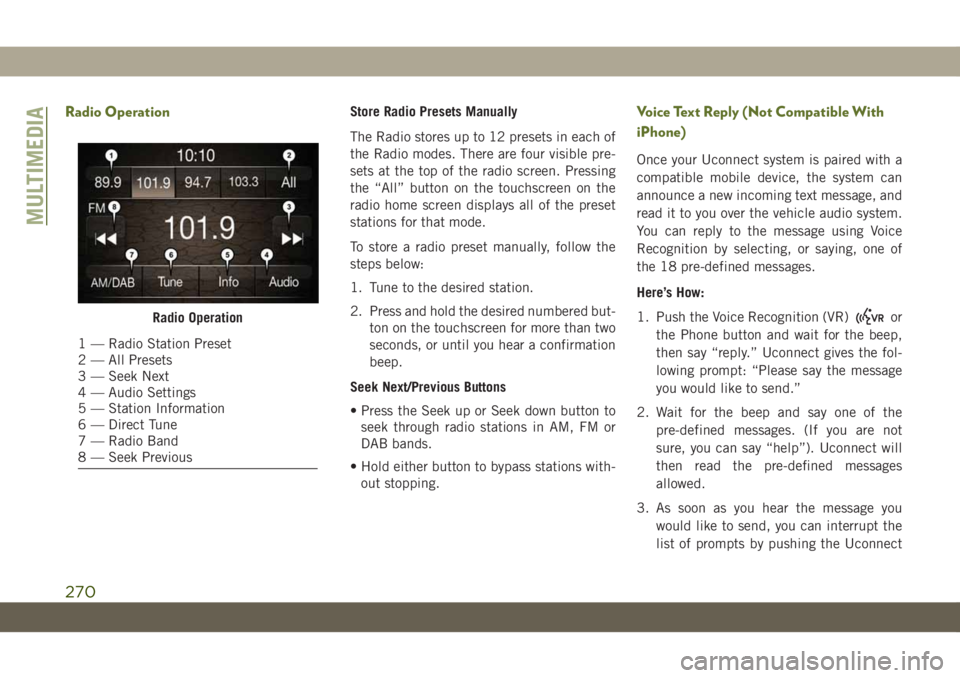
Radio OperationStore Radio Presets Manually
The Radio stores up to 12 presets in each of
the Radio modes. There are four visible pre-
sets at the top of the radio screen. Pressing
the “All” button on the touchscreen on the
radio home screen displays all of the preset
stations for that mode.
To store a radio preset manually, follow the
steps below:
1. Tune to the desired station.
2. Press and hold the desired numbered but-
ton on the touchscreen for more than two
seconds, or until you hear a confirmation
beep.
Seek Next/Previous Buttons
• Press the Seek up or Seek down button to
seek through radio stations in AM, FM or
DAB bands.
• Hold either button to bypass stations with-
out stopping.Voice Text Reply (Not Compatible With
iPhone)
Once your Uconnect system is paired with a
compatible mobile device, the system can
announce a new incoming text message, and
read it to you over the vehicle audio system.
You can reply to the message using Voice
Recognition by selecting, or saying, one of
the 18 pre-defined messages.
Here’s How:
1. Push the Voice Recognition (VR)
or
the Phone button and wait for the beep,
then say “reply.” Uconnect gives the fol-
lowing prompt: “Please say the message
you would like to send.”
2. Wait for the beep and say one of the
pre-defined messages. (If you are not
sure, you can say “help”). Uconnect will
then read the pre-defined messages
allowed.
3. As soon as you hear the message you
would like to send, you can interrupt the
list of prompts by pushing the UconnectRadio Operation
1 — Radio Station Preset
2 — All Presets
3 — Seek Next
4 — Audio Settings
5 — Station Information
6 — Direct Tune
7 — Radio Band
8 — Seek Previous
MULTIMEDIA
270
Page 277 of 348

WARNING!
ALWAYS drive safely with your hands on
the wheel. You have full responsibility and
assume all risks related to the use of the
Uconnect features and applications in this
vehicle. Only use Uconnect when it is safe
to do so. Failure to do so may result in an
accident involving serious injury or death.
• To access the Radio mode, press the “Ra-
dio” button on the touchscreen.
Selecting Radio Stations
• Press the desired radio band (AM, FM or
DAB) button on the touchscreen.
Seek Up/Seek Down
• Press the Seek up or down arrow buttons on
the touchscreen for less than two seconds
to seek through radio stations.
• Press and hold either arrow button on the
touchscreen for more than two seconds to
bypass stations without stopping. The radio
will stop at the next listenable station once
the arrow button on the touchscreen is
released.Direct Tune
• Tune directly to a radio station by pressing
the “Tune” button on the screen, and en-
tering the desired station number.
Store Radio Presets Manually
Your radio can store 36 total preset stations,
12 presets per band (AM, FM and DAB). They
are shown at the top of your radio screen. To
see the 12 preset stations per band, press the
arrow button on the touchscreen at the top
right of the screen to toggle between the two
sets of six presets.
To store a radio preset manually, follow the
steps below:
1. Tune to the desired station.
2. Press and hold the desired numbered but-
ton on the touchscreen for more than two
seconds or until you hear a confirmation
beep.
Android Auto — If Equipped
NOTE:
Feature availability depends on your carrier
and mobile phone manufacturer. Some
Android Auto features may or may not be
available in every region and/or language.
Android Auto is a feature of your Uconnect
system, and your Android 5.0 Lollipop, or
higher, powered smartphone with a data plan,
that allows you to project your smartphone
and a number of its apps onto the touch-
screen radio display. Android Auto automati-
cally brings you useful information, and orga-
nizes it into simple cards that appear just
when they are needed. Android Auto can be
used with Google's best-in-class speech tech-
nology, the steering wheel controls, the knobs
and buttons on your radio faceplate, and the
radio display’s touchscreen to control many
of your apps. To use Android Auto follow the
following steps:
1. Download the Android Auto app from the
Google Play store on your Android-
powered smartphone.
275
Page 280 of 348

• TuneIn
• Deezer
• Reuters
• Twitter
• Facebook Check-In
• Apple CarPlay
• Android Auto, and many more.
UCONNECT 4C/4C NAV
WITH 8.4-INCH DISPLAY
Uconnect 4C/4C NAV At A Glance
WARNING!
ALWAYS drive safely with your hands on
the wheel. You have full responsibility and
assume all risks related to the use of the
Uconnect features including DAB, and ap-
plications in this vehicle. Only use
Uconnect features and services when it is
safe to do so. Failure to do so may result in
an accident involving serious injury or
death.
CAUTION!
Do NOT attach any object to the touch-
screen, doing so can result in damage to
the screen.
NOTE:
Uconnect screen images are for illustration
purposes only and may not reflect exact soft-
ware for your vehicle.Setting The Time
• Model 4C NAV synchronizes time automati-
cally via GPS, so it should not require any
time adjustment. If you do need to set the
time manually, follow the instructions be-
low for Model 4C NAV.
• For Model 4C, turn the unit on, and then
press the time display at the top of the
screen. Press “Yes.”
• If the time is not displayed at the top of the
screen, press the “Settings” button on the
touchscreen. In the Settings screen, press
the “Clock” button on the touchscreen,
then check or uncheck this option.
• Press “+” or “–” next to Set Time Hours and
Set Time Minutes to adjust the time.
• If these features are not available, uncheck
the Sync Time box.
• Press “X” to save your settings and exit out
of the Clock Setting screen.
Uconnect 4/4C NAV Radio
MULTIMEDIA
278
Page 283 of 348

WARNING!
ALWAYS drive safely with your hands on
the wheel. You have full responsibility and
assume all risks related to the use of the
Uconnect features and applications in this
vehicle. Only use Uconnect when it is safe
to do so. Failure to do so may result in an
accident involving serious injury or death.
• To access the Radio mode, press the “Ra-
dio” button on the touchscreen.
Selecting Radio Stations
• Press the desired radio band (AM, FM or
DAB) button on the touchscreen.
Seek Up/Seek Down
• Press the Seek up or down arrow buttons on
the touchscreen for less than two seconds
to seek through radio stations.
• Press and hold either arrow button on the
touchscreen for more than two seconds to
bypass stations without stopping. The radio
will stop at the next listenable station once
the arrow button on the touchscreen is
released.Direct Tune
• Tune directly to a radio station by pressing
the “Tune” button on the screen, and en-
tering the desired station number.
Store Radio Presets Manually
Your radio can store 36 total preset stations,
12 presets per band (AM, FM and DAB). They
are shown at the top of your radio screen. To
see the 12 preset stations per band, press the
arrow button on the touchscreen at the top
right of the screen to toggle between the two
sets of six presets.
To store a radio preset manually, follow the
steps below:
1. Tune to the desired station.
2. Press and hold the desired numbered but-
ton on the touchscreen for more than two
seconds or until you hear a confirmation
beep.
Android Auto — If Equipped
NOTE:
Feature availability depends on your carrier
and mobile phone manufacturer. Some
Android Auto features may or may not be
available in every region and/or language.
Android Auto is a feature of your Uconnect
system, and your Android 5.0 Lollipop, or
higher, powered smartphone with a data plan,
that allows you to project your smartphone
and a number of its apps onto the touch-
screen radio display. Android Auto automati-
cally brings you useful information, and orga-
nizes it into simple cards that appear just
when they are needed. Android Auto can be
used with Google's best-in-class speech tech-
nology, the steering wheel controls, the knobs
and buttons on your radio faceplate, and the
radio display’s touchscreen to control many
of your apps. To use Android Auto follow
these steps:
1. Download the Android Auto app from the
Google Play store on your Android-
powered smartphone.
281
Page 287 of 348

Apple CarPlay Integration — If Equipped
NOTE:
Feature availability depends on your carrier
and mobile phone manufacturer. Some Apple
CarPlay features may or may not be available
in every region and/or language.
Uconnect works seamlessly with Apple Car-
Play, the smarter, more secure way to use
your iPhone in the car, and stay focused on
the road. Use your Uconnect Touchscreen
display, the vehicle's knobs and controls, and
your voice with Siri to get access to Apple
Music, Maps, Messages, and more.
To use CarPlay, make sure you are using
iPhone 5 or later, have Siri enabled in Set-
tings, that your iPhone is unlocked for the
very first connection only, and then use the
following procedure:
1. Connect your iPhone to one of the media
USB ports in your vehicle.
NOTE:
Be sure to use the factory-provided Light-
ning cable that came with your phone, as
aftermarket cables may not work.2. Once the device is connected, the system
displays the CarPlay home screen. Apple
CarPlay automatically launches, but if
not, refer to the Uconnect Owner’s Manual
Supplement for the procedure to enable
the feature “AutoShow.” You can also
launch it by pressing the CarPlay icon
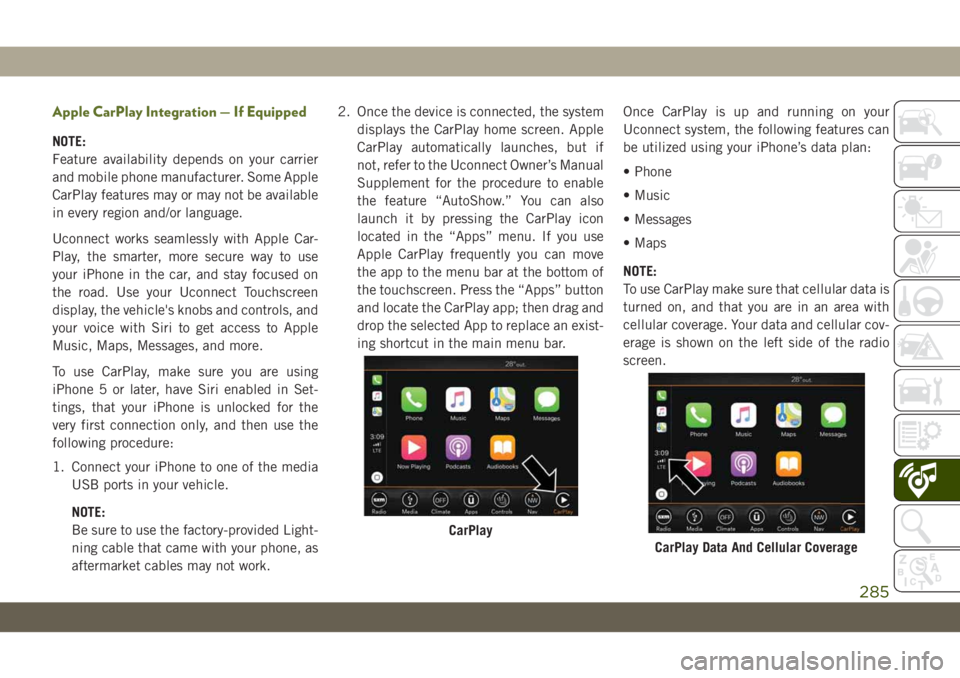
located in the “Apps” menu. If you use
Apple CarPlay frequently you can move
the app to the menu bar at the bottom of
the touchscreen. Press the “Apps” button
and locate the CarPlay app; then drag and
drop the selected App to replace an exist-
ing shortcut in the main menu bar.Once CarPlay is up and running on your
Uconnect system, the following features can
be utilized using your iPhone’s data plan:
• Phone
• Music
• Messages
• Maps
NOTE:
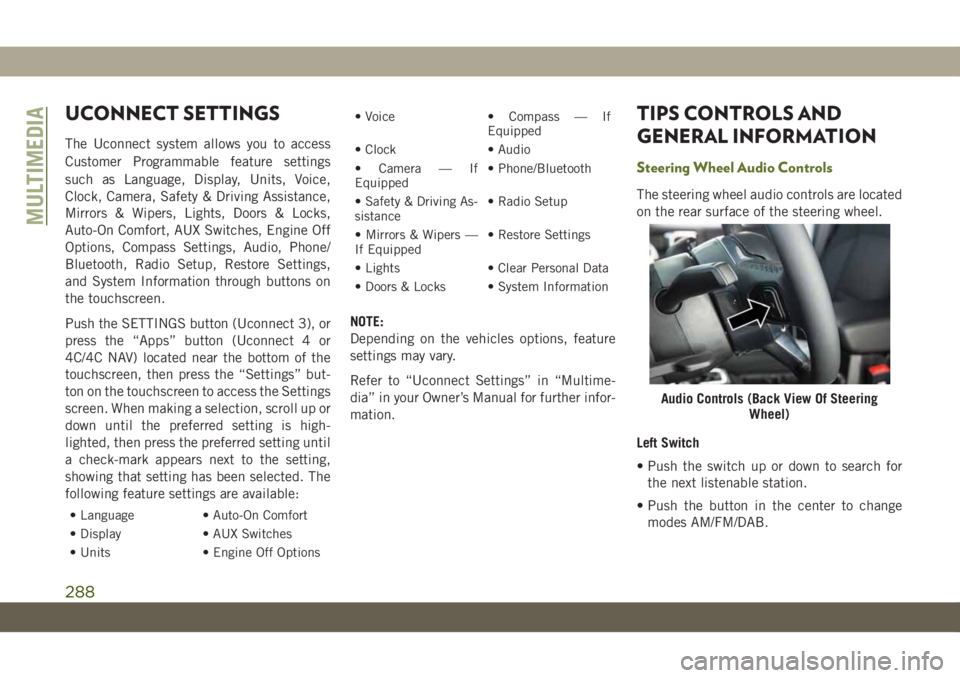
To use CarPlay make sure that cellular data is
turned on, and that you are in an area with
cellular coverage. Your data and cellular cov-
erage is shown on the left side of the radio
screen.
CarPlay
CarPlay Data And Cellular Coverage
285
Page 290 of 348

UCONNECT SETTINGS
The Uconnect system allows you to access
Customer Programmable feature settings
such as Language, Display, Units, Voice,
Clock, Camera, Safety & Driving Assistance,
Mirrors & Wipers, Lights, Doors & Locks,
Auto-On Comfort, AUX Switches, Engine Off
Options, Compass Settings, Audio, Phone/
Bluetooth, Radio Setup, Restore Settings,
and System Information through buttons on
the touchscreen.
Push the SETTINGS button (Uconnect 3), or
press the “Apps” button (Uconnect 4 or
4C/4C NAV) located near the bottom of the
touchscreen, then press the “Settings” but-
ton on the touchscreen to access the Settings
screen. When making a selection, scroll up or
down until the preferred setting is high-
lighted, then press the preferred setting until
a check-mark appears next to the setting,
showing that setting has been selected. The
following feature settings are available:
• Language • Auto-On Comfort
• Display • AUX Switches
• Units • Engine Off Options• Voice • Compass — If
Equipped
• Clock • Audio
• Camera — If
Equipped• Phone/Bluetooth
• Safety & Driving As-
sistance• Radio Setup
• Mirrors & Wipers —
If Equipped• Restore Settings
• Lights • Clear Personal Data
• Doors & Locks • System Information
NOTE:
Depending on the vehicles options, feature
settings may vary.
Refer to “Uconnect Settings” in “Multime-
dia” in your Owner’s Manual for further infor-
mation.
TIPS CONTROLS AND
GENERAL INFORMATION
Steering Wheel Audio Controls
The steering wheel audio controls are located
on the rear surface of the steering wheel.
Left Switch
• Push the switch up or down to search for
the next listenable station.
• Push the button in the center to change
modes AM/FM/DAB.
Audio Controls (Back View Of Steering
Wheel)
MULTIMEDIA
288
Page 341 of 348

Low Tire Pressure System..........94
Lug Nuts...................246
Maintenance..................54
Maintenance Free Battery.........221
Maintenance Schedule.......208, 213
Malfunction Indicator Light (Check
Engine)...................71
Manual Park Release............200
Memory Feature (Memory Seats)......26
Memory Seat..................26
Memory Seats And Radio..........26
Mirrors.....................35
Heated...................35
Modifications/Alterations
Vehicle....................3
Monitor, Tire Pressure System.......94
Mopar Accessories.............262
Navigation..................292
New Vehicle Break-In Period.......146
Occupant Restraints.............99
Octane Rating, Gasoline (Fuel) . .252, 259
Oil, Engine..................259
Capacity.................257
Dipstick..................220Filter....................259
Pressure Warning Light.........69
Recommendation............257
Viscosity.................257
Oil Pressure Light...............69
Onboard Diagnostic System.........78
Operating Precautions............78
Operator Manual
Owner's Manual...............2
Overheating, Engine............199
Paddle Shifters...............149
ParkSense System, Rear..........163
Passenger Airbag Disable.........111
Passive Entry..................18
Personalized Main Menu......273, 279
Pets......................136
Phonebook..................304
Phone (Uconnect)..............297
Pairing
..................300
Placard, Tire And Loading Information .226
Power
Inverter...................59
Windows..................46
Power Sliding Top...............54
Operation..................54
Pinch Protect...............54Power Steering Fluid............261
Pregnant Women And Seat Belts.....106
Preparation For Jacking..........191
Pretensioners
Seat Belts................106
Radial Ply Tires...............232
Radio
Presets...........270, 274, 280
Radio Operation........268, 272, 278
Radio Screens.............272, 278
Raising.....................47
Raising The Soft Top.............47
Rear Camera.................165
Rear Cross Path................93
Rear ParkSense System..........163
Rear Swing Gate...............57
Rear Wiper/Washer..............38
Recreational Towing.............171
Shifting Into Transfer Case Neutral
(N) .....................172
Shifting Out Of Transfer Case Neutral
(N) .....................173
Release, Hood.................56
Reminder, Seat Belt............100
Remote Control
Starting System..............16
339