2019 JEEP PATRIOT lock
[x] Cancel search: lockPage 146 of 332

WARNINGS PRESENT” is displayed will dis-
play each stored warning for each button push.
Push and release theMENUbutton to return to
the Main Menu.
Personal Settings (Customer-
Programmable Features)
This allows the driver to set and recall features
when the transmission is in PARK (automatic
transmission) or the vehicle is stopped (manual
transmission).
Push and release theDOWN
arrow button
until “Personal Settings” is displayed in the
EVIC then push theRIGHT
arrow button.
Use theRIGHT
arrow button to display one
of the following choices:
Language
When in this display, you may select different
languages for all display nomenclature, includ-
ing the trip functions. Pushing theDOWN
ar-
row button while in this display selects English,
Espanol, Deutsch, Italiano, Francais, or NL
depending on availability. As you continue, the
displayed information will be shown in the se-
lected language.Auto Lock Doors — If Equipped
When ON is selected, all doors lock automati-
cally when the speed of the vehicle reaches 15
MPH (24 km/h). Push and hold theRIGHT
arrow button when in this display until “ON”
or “OFF” appears to make your selection.
Auto Unlock On Exit
When ON is selected, all the vehicle’s doors will
unlock when the driver’s door is opened if the
vehicle is stopped (manual transmission) or the
vehicle is stopped and the transmission is in
PARK or NEUTRAL position (automatic trans-
mission). Push and hold theRIGHT
arrow
button when in this display until “ON” or “OFF”
appears to make your selection.
RKE Unlock
When Driver’s Door 1st is selected, only the
driver’s door will unlock on the first push of the
RKE Key Fob UNLOCK button and require a
second push to unlock the remaining locked
doors. When Remote Unlock All Doors is se-
lected, all of the doors will unlock at the first
push of the RKE Key Fob UNLOCK button.
Push and hold theRIGHT
arrow button
when in this display until “Driver’s Door 1st” or
“All Doors” appears to make your selection.Flash Lights with Lock
When ON is selected, the front and rear turn
signals will flash when the doors are locked or
unlocked using the RKE Key Fob. Push and
hold theRIGHT
arrow button when in this
display until “ON” or “OFF” appears to make
your selection.
Headlamp Off Delay
When this feature is selected, the driver can
choose to have the headlamps remain on for 0,
30, 60, or 90 seconds when exiting the vehicle.
Push and hold theRIGHT
arrow button
when in this display until 0, 30, 60, or 90
appears to make your selection.
Key Off Power Delay
When this feature is selected, the power win-
dow switches, radio, Uconnect phone, power
sunroof, and power outlets will remain active for
up to 10 minutes after the ignition switch has
been turned off. Opening either front vehicle
door will cancel this feature. Push and hold the
RIGHT
arrow button when in this display
until “Off,” “45 sec,” “5 min,” or “10 min.” ap-
pears to make your selection.
142
Page 147 of 332

Illuminated Approach
When this feature is selected, the headlights will
activate and remain on for up to 90 seconds
when the doors are unlocked using the RKE
Key Fob. Push and hold theRIGHT
arrow
button when in this display until “OFF,” “30 sec,”
“60 sec,” or “90 sec.” appears to make your
selection.
Hill Start Assist (HSA) — If Equipped
When “On” is selected, the HSA system is
active. Refer to “Electronic Brake Control Sys-
tem” in “Starting And Operating” for system
function and operating information. To make
your selection, push and release theRIGHT
arrow button until “On” or “Off” appears.
Display Units In
The EVIC, odometer, and Uconnect GPS sys-
tem units can be changed between US and
Metric.
Push and hold theRIGHT
arrow button
when in this display until “US” or “METRIC”
appears to make your selection.
Compass Variance
Compass Variance is the difference between
Magnetic North and Geographic North. To com-pensate for the differences, the variance should
be set for the zone where the vehicle is driven,
per the zone map. Once properly set, the com-
pass will automatically compensate for the dif-
ferences and provide the most accurate com-
pass heading.
NOTE:
Magnetic and battery powered devices,
(such as cell phones, iPod’s, radar detec-
tors, PDA’s, and laptops) should be kept
away from the top of the instrument panel.
This is where the compass module is lo-
cated and such devices may interfere and
cause false compass readings.1. Place the ignition in the ON position.
2. Push and hold theCOMPASSbutton for
approximately two seconds.
3. Push theDOWN
arrow button until
“Compass Variance” message and the last
variance zone number displays in the EVIC.
4. Push and release theRIGHT
arrow but-
ton until the proper variance zone is selected
according to the map.
5. Push and release theCOMPASSbutton to
exit.
NOTE:
The factory default Zone is 8. During pro-
gramming, the Zone value will wrap around
from Zone 15 to Zone 1.
Automatic Compass Calibration
When the vehicle is new, the compass may
appear erratic and the EVIC will display “CAL”
until the compass is calibrated. You may also
calibrate the compass by completing one or
more 360 degree turns (in an area free from
large metal or metallic objects) until the “CAL”
Compass Variance Map
143
Page 150 of 332

Once the audio device is connected and syn-
chronized to the vehicle’s iPod/USB/MP3 con-
trol system (iPod or external USB device may
take a few minutes to connect), the audio
device starts charging and is ready for use by
pushing radio switches, as described below.
NOTE:
If the audio device battery is completely
discharged, it may not communicate with
the iPod/USB/MP3 control system until a
minimum charge is attained. Leaving the
audio device connected to the iPod/USB/MP3 control system may charge it to the
required level.
Using This FeatureBy using an external USB device to connect to
the USB port:
•The audio device can be played on the
vehicle’s sound system, providing metadata
(artist, track title, album, etc.) information on
the radio display.
•The audio device can be controlled using the
radio buttons to Play, Browse, and List the
iPod contents.
•The audio device battery charges when
plugged into the USB/AUX connector (if sup-
ported by the specific audio device).
Controlling The iPod Or External
USB Device Using Radio Buttons
To enter the iPod/USB/MP3 control mode and
access a connected audio device, either push
the “AUX” button on the radio faceplate or push
the VR button and say"USB"or"Switch to
USB."Once in the iPod/USB/MP3 controlmode, audio tracks (if available from audio
device) start playing over the vehicle’s audio
system.
Play ModeWhen switched to iPod/USB/MP3 control mode,
the iPod or external USB device automatically
starts Play mode. In Play mode, the following
buttons on the radio faceplate may be used to
control the iPod or external USB device and
display data:
•Use theTUNEcontrol knob to select the next
or previous track.
•Turning it clockwise (forward) by one
click, while playing a track, skips to the
next track or push the VR button and say
"Next Track."
•Turning it counterclockwise (backward)
by one click, will jump to the previous
track in the list or push the VR button and
say"Previous Track."
•Jump backward in the current track by push-
ing and holding the <
AUX/USB Connector Ports
146
Page 151 of 332

•Jump forward in the current track by pushing
and holding theFF>> button.
•A single push backward <
tively, for five seconds.
•Use the <
jump to the previous or next track. Pushing
theSEEK>> button during play mode will
jump to the next track in the list, or push the
VR button and say"Next or Previous Track."
•While a track is playing, push theINFO
button to see the associated metadata (artist,
track title, album, etc.) for that track. Pushing
theINFObutton again jumps to the next
screen of data for that track. Once all screens
have been viewed, the lastINFObutton push
will go back to the play mode screen on the
radio.
•Pushing theREPEATbutton will change the
audio device mode to repeat the current
playing track or push the VR button and say
"Repeat ON"or"Repeat Off."
•Push theSCANbutton to use iPod/USB/MP3
device scan mode, which will play the first tenseconds of each track in the current list and
then forward to the next song. To stop SCAN
mode and start playing the desired track,
when it is playing the track, push theSCAN
button again. During Scan mode, pushing the
<
the previous and next tracks.
•RNDbutton (available on sales code RES
radio only): Pushing this button toggles be-
tween Shuffle ON and Shuffle OFF modes for
the iPod or external USB device, or push the
VR button and say"Shuffle ON"or"Shuffle
Off."If theRNDicon is showing on the radio
display, then the shuffle mode is ON.
List Or Browse ModeDuring Play mode, pushing any of the buttons
described below, will bring up List mode. List
mode enables scrolling through the list of
menus and tracks on the audio device.
TUNEcontrol knob: TheTUNEcontrol knob
functions in a similar manner as the scroll wheel
on the audio device or external USB device.
•Turning it clockwise (forward) and counter-
clockwise (backward) scrolls through thelists, displaying the track detail on the radio
display. Once the track to be played is high-
lighted on the radio display, push theTUNE
control knob to select and start playing the
track. Turning theTUNEcontrol knob fast will
scroll through the list faster. During fast
scroll, a slight delay in updating the informa-
tion on the radio display may be noticeable.
During all List modes, the iPod displays all lists
in “wrap-around” mode. So if the track is at the
bottom of the list, just turn the wheel backward
(counterclockwise) to get to the track faster.
In List mode, the radioPRESETbuttons are
used as shortcuts to the following lists on the
iPod or external USB device:
•Preset 1 – Playlists
•Preset 2 – Artists
•Preset 3 – Albums
•Preset 4 – Genres
•Preset 5 – Audiobooks
•Preset 6 – Podcasts
147
Page 157 of 332

fog on the inside, because of moisture
buildup inside the vehicle. Select the out-
side air position for maximum defogging.
•The A/C will engage automatically to pre-
vent fogging when the recirculation but-
ton is pushed and the mode control is set
to panel or panel / floor.
•The A/C can be deselected manually with-
out disturbing the mode control selection.
•When the ignition switch is turned to the
LOCK position, the recirculation feature
will be cancelled.
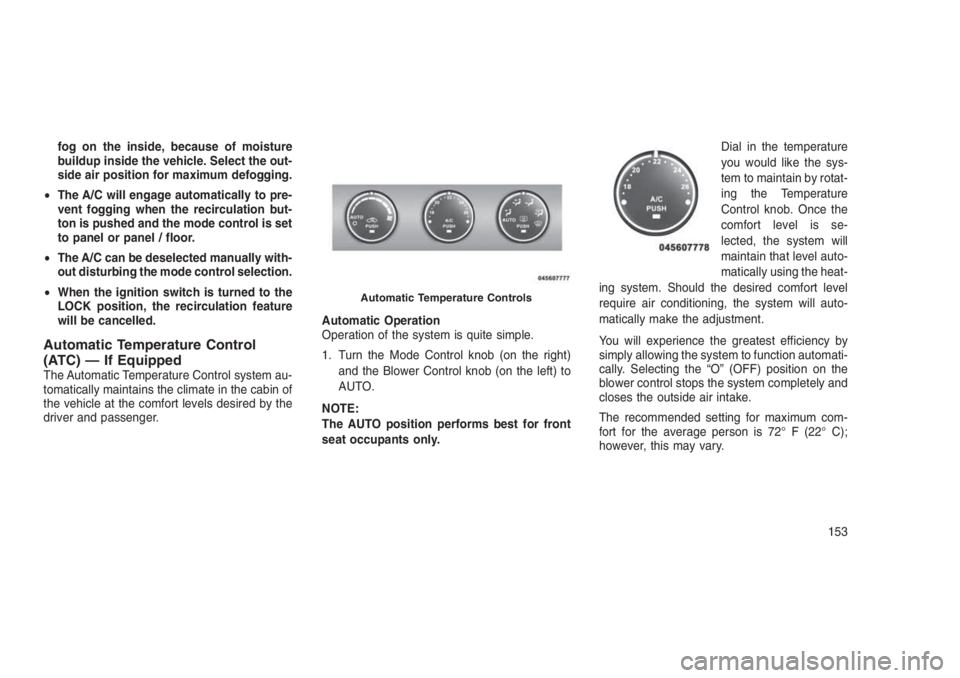
Automatic Temperature Control
(ATC) — If Equipped
The Automatic Temperature Control system au-
tomatically maintains the climate in the cabin of
the vehicle at the comfort levels desired by the
driver and passenger.Automatic Operation
Operation of the system is quite simple.
1. Turn the Mode Control knob (on the right)
and the Blower Control knob (on the left) to
AUTO.
NOTE:
The AUTO position performs best for front
seat occupants only.Dial in the temperature
you would like the sys-
tem to maintain by rotat-
ing the Temperature
Control knob. Once the
comfort level is se-
lected, the system will
maintain that level auto-
matically using the heat-
ing system. Should the desired comfort level
require air conditioning, the system will auto-
matically make the adjustment.
You will experience the greatest efficiency by
simply allowing the system to function automati-
cally. Selecting the “O” (OFF) position on the
blower control stops the system completely and
closes the outside air intake.
The recommended setting for maximum com-
fort for the average person is 72° F (22° C);
however, this may vary.
Automatic Temperature Controls
153
Page 161 of 332

•Air Conditioner Control
Push this button to turn
on the air conditioning
during manual opera-
tion only. When the air
conditioning is turned
on, cool dehumidified air
will flow through the out-
lets selected with the
Mode control dial. Push
this button a second time to turn OFF the air
conditioning. An LED in the button illuminates
when manual compressor operation is selected.
•Recirculation Control
The system will automatically con-
trol recirculation. However, pushing
the Recirculation Control button
will put the system in recirculation
mode. This can be used when out-
side conditions such as smoke, odors, dust, or
high humidity are present. Activating recircula-
tion will cause the LED in the control button to
illuminate.NOTE:
•When the ignition switch is turned to the
LOCK position, the recirculation feature
will be cancelled.
•In cold weather, use of the Recirculation
mode may lead to excessive window fog-
ging. The Recirculation mode is not al-
lowed in defrost mode in order to improve
window clearing. Recirculation will be
disabled automatically if these modes are
selected.
•Extended use of recirculation may cause
the windows to fog. If the interior of the
windows begins to fog, push the Recircu-
lation button to return to outside air.
Some temp/humidity conditions will
cause captured interior air to condense
on windows and hamper visibility. For
this reason, the system will not allow
Recirculation to be selected while in de-
frost mode. Attempting to use the recircu-
lation while in these modes will cause the
LED in the control button to blink and
then turn off.•Most of the time, when in Automatic Op-
eration, you can temporarily put the sys-
tem into Recirculation Mode by pushing
the Recirculation button. However, under
certain conditions, while in Automatic
Mode, the system is blowing air out the
defrost vents. When these conditions are
present, and the Recirculation button is
pushed, the indicator will flash and then
turn off. This tells you that you are unable
to go into Recirculation Mode at this time.
If you would like the system to go into
Recirculation Mode, you must first move
the Mode knob to Panel, Bi-Level and then
push the Recirculation button. This fea-
ture reduces the possibility of window
fogging.
Operating Tips
NOTE:
Refer to the chart at the end of this section
for suggested control settings for various
weather conditions.
157
Page 165 of 332

5
STARTING AND OPERATING
•STARTING PROCEDURES . . . . . . . . . . . . . . . . . . . . . . .165•Manual Transmission — If Equipped................165
•Automatic Transmission — If Equipped..............165
•Normal Starting.............................165
•Extreme Cold Weather (below −20°F or −29°C)...........166
•If Engine Fails To Start........................166
•After Starting..............................166
•MANUAL TRANSMISSION — IF EQUIPPED . . . . . . . . . . . . .166•Five-Speed Manual Transmission..................166
•Recommended Shift Speeds.....................167
•Downshifting..............................168
•AUTOMATIC TRANSMISSION — IF EQUIPPED . . . . . . . . . . .168•Key Ignition Park Interlock......................169
•Brake/Transmission Shift Interlock System............169
•Six-Speed Automatic Transmission — If Equipped........169
•Continuously Variable Automatic Transmission (CVT) — If
Equipped.................................173
•AUTOSTICK................................176•AutoStick (Six-Speed Automatic Transmission) — If Equipped .176
161
Page 166 of 332

•AutoStick (CVT) — If Equipped.....................177•FOUR-WHEEL DRIVE OPERATION — IF EQUIPPED . . . . . . . . . .178
•ON-ROAD DRIVING TIPS . . . . . . . . . . . . . . . . . .........179
•OFF-ROAD DRIVING TIPS..........................179
•When To Use Low (L Off-Road) With The 4WD Lock Lever Engaged —
If Equipped..................................179
•Driving In Snow, Mud And Sand.....................180
•Hill Climbing.................................181
•Driving Through Water...........................182
•After Driving Off-Road...........................183
•POWER STEERING . . . . . . . . . .....................184•Power Steering Fluid Check.......................184•PARKING BRAKE . ..............................185
•BRAKE SYSTEM . . . . . . . . . . . . . . . . . ..............186
•ELECTRONIC BRAKE CONTROL SYSTEM . . . . . . . . . ......187
•Electronic Brake Force Distribution (EBD)...............187
•Brake System Warning Light.......................187
•Anti-Lock Brake System (ABS)......................187
•Anti-Lock Brake Warning Light......................188
•Brake Assist System (BAS)........................189
•Hill Start Assist (HSA)...........................189
•Traction Control System (TCS)......................191
•Electronic Stability Control (ESC)....................191
•Electronic Roll Mitigation (ERM).....................194
•Hill Descent Control (HDC) — If Equipped...............195
•TIRES — GENERAL INFORMATION . . . . . . . . . . . . . . . . . . . .195•Tire Pressure................................195
162