Page 297 of 362

1. Connect your iPhone to one of the media
USB ports in your vehicle.
NOTE:
Be sure to use the factory-provided Light-
ning cable that came with your phone, as
aftermarket cables may not work.
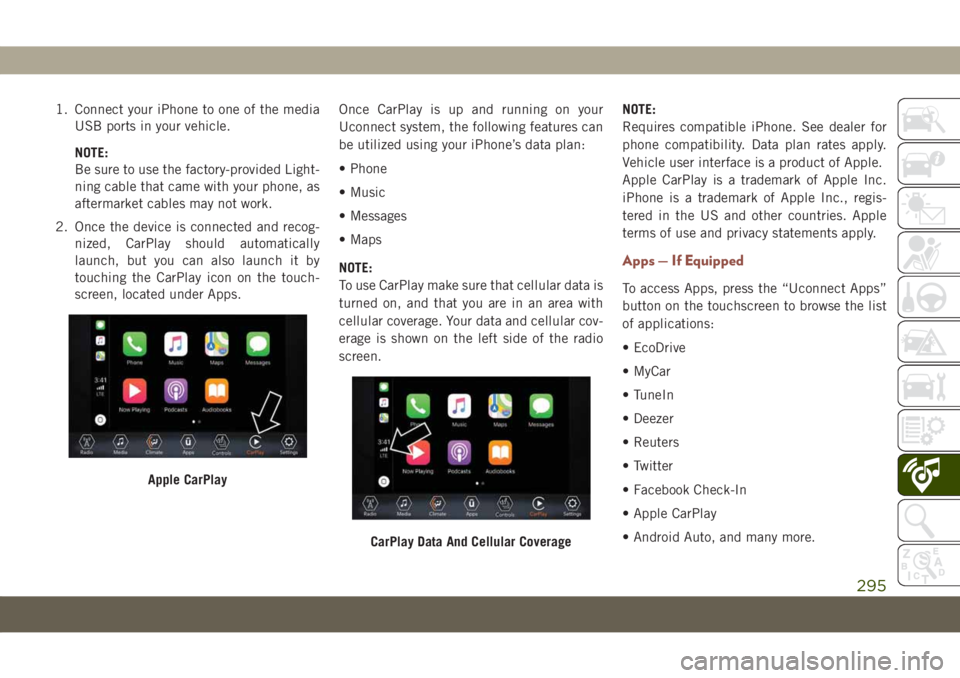
2. Once the device is connected and recog-
nized, CarPlay should automatically
launch, but you can also launch it by
touching the CarPlay icon on the touch-
screen, located under Apps.Once CarPlay is up and running on your
Uconnect system, the following features can
be utilized using your iPhone’s data plan:
• Phone
• Music
• Messages
• Maps
NOTE:
To use CarPlay make sure that cellular data is
turned on, and that you are in an area with
cellular coverage. Your data and cellular cov-
erage is shown on the left side of the radio
screen.NOTE:
Requires compatible iPhone. See dealer for
phone compatibility. Data plan rates apply.
Vehicle user interface is a product of Apple.
Apple CarPlay is a trademark of Apple Inc.
iPhone is a trademark of Apple Inc., regis-
tered in the US and other countries. Apple
terms of use and privacy statements apply.
Apps — If Equipped
To access Apps, press the “Uconnect Apps”
button on the touchscreen to browse the list
of applications:
• EcoDrive
• MyCar
• TuneIn
• Deezer
• Reuters
• Twitter
• Facebook Check-In
• Apple CarPlay
• Android Auto, and many more.
Apple CarPlay
CarPlay Data And Cellular Coverage
295
Page 298 of 362

UCONNECT 4C/4C NAV
WITH 8.4–INCH DISPLAY
Uconnect 4C/4C NAV At A Glance
WARNING!
ALWAYS drive safely with your hands on
the wheel. You have full responsibility and
assume all risks related to the use of the
Uconnect features and applications in this
vehicle. Only use Uconnect when it is safe
to do so. Failure to do so may result in an
accident involving serious injury or death.
CAUTION!
Do not attach any object to touchscreen,
doing so can result in damage to the
touchscreen.
Setting The Time
• Model Uconnect 4C/4C NAV synchronizes
time automatically via GPS, so it should not
require any time adjustment. If you do need
to set the time manually, follow the instruc-
tions below for Model Uconnect 4C/4C
NAV.
• For Uconnect 4C/4C NAV, turn the unit on,
and then press the time display at the top of
the screen. Press “Yes.”
• If the time is not displayed at the top of the
screen, press the “Settings” button on the
touchscreen. In the Settings screen, press
the “Clock” button on the touchscreen,
then check or uncheck this option.
• Press “+” or “–” next to Set Time Hours and
Set Time Minutes to adjust the time.
• If these features are not available, uncheck
the Sync Time box.• Press “X” to save your settings and exit out
of the Clock Setting screen.
Background Themes — If Equipped
• Screen background themes are selectable
from a pre-loaded list of themes. If you’d
like to set a theme, follow the instructions
below.
• Press the “Settings” button on the touch-
screen.
• Press the “Display” button on the touch-
screen.
• Then press “Theme” button on the touch-
screen and select a theme.
Audio Settings
• Press of the “Audio” button on the touch-
screen in radio or media mode to activate
the Audio settings screen to adjust
Balance\Fade, Equalizer, and Speed Ad-
justed Volume.
• You can return to the Radio screen by
pressing the “X” located at the top right.
Uconnect 4C/4C NAV Radio
MULTIMEDIA
296
Page 299 of 362

Balance/Fade
• Press the “Balance/Fade” button on the
touchscreen to Balance audio between the
front speakers or fade the audio between
the rear and front speakers.
• Pressing the “Front,” “Rear,” “Left,” or
“Right” buttons on the touchscreen or
press and drag the Speaker Icon to adjust
the Balance/Fade.
Equalizer
• Press the “Equalizer” button on the touch-
screen to activate the Equalizer screen.
• Press the “+” or “–” buttons on the touch-
screen, or press and drag over the level bar
for each of the equalizer bands. The level
value, which spans between plus or minus
nine, is displayed at the bottom of each of
the Bands.Speed Adjusted Volume
• Press the “Speed Adjusted Volume” button
on the touchscreen to activate the Speed
Adjusted Volume screen. The Speed Ad-
justed Volume is adjusted by pressing the
volume level indicator. This alters the auto-
matic adjustment of the audio volume with
variation to vehicle speed.
Drag & Drop Menu Bar
The Uconnect features and services in the
main menu bar are easily changed for your
convenience. Simply follow these steps:1. Press the “Apps
” button to open the
App screen.
2. Press and hold, then drag the selected
App to replace an existing shortcut in the
main menu bar.
The new app shortcut, that was dragged
down onto the main menu bar, will now
be an active App/shortcut.
NOTE:
This feature is only available if the vehicle is
in PARK.
Uconnect 4/4C NAV With 8.4–inch
Display Main Menu
297
Page 300 of 362
Radio
Uconnect 4C/4C NAV With 8.4–inch Display Radio
1 — Radio Station Presets
2 — Toggle Between Presets
3 — Status Bar
4 — View Small Navigation Map
5 — Main Category Bar
6 — Audio Settings7 — Seek Up
8 — Direct Tune To A Radio Station
9 — Seek Down
10 — Browse And Manage Presets
11 — Radio Bands
MULTIMEDIA
298
Page 301 of 362

WARNING!
ALWAYS drive safely with your hands on
the wheel. You have full responsibility and
assume all risks related to the use of the
Uconnect features and applications in this
vehicle. Only use Uconnect when it is safe
to do so. Failure to do so may result in an
accident involving serious injury or death.
• To access the Radio mode, press the “Ra-
dio” button on the touchscreen.
Selecting Radio Stations
• Press the desired radio band (AM, FM or
DAB) button on the touchscreen.
Seek Up/Seek Down
• Press the Seek up or down arrow buttons on
the touchscreen for less than two seconds
to seek through radio stations.
• Press and hold either arrow button on the
touchscreen for more than two seconds to
bypass stations without stopping. The radio
stops at the next listenable station once the
arrow button on the touchscreen is released.
Direct Tune
• Tune directly to a radio station by pressing
the “Tune” button on the screen, and en-
tering the desired station number.
Store Radio Presets Manually
Your radio can store 36 total preset stations,
12 presets per band (AM, FM and DAB). They
are shown at the top of your radio screen. To
see the 12 preset stations per band, press the
arrow button on the touchscreen at the top
right of the screen to toggle between the two
sets of six presets.
To store a radio preset manually, follow the
steps below:
1. Tune to the desired station.
2. Press and hold the desired numbered but-
ton on the touchscreen for more than two
seconds or until you hear a confirmation
beep.Media Hub — USB/Audio Jack (AUX) —
If Equipped
There are many ways to play music from
MP3 players or USB devices through your
vehicle's sound system. Press your Media
button on the touchscreen to begin.
Uconnect Media Hub
1 — USB Port
2 — AUX Port
299
Page 302 of 362

Audio Jack (AUX)
• The AUX allows a device to be plugged into
the radio and utilize the vehicle’s sound
system, using a 3.5 mm audio cable, to
amplify the source and play through the
vehicle speakers.
• Pressing the “AUX” button on the touch-
screen will change the mode to auxiliary
device if the audio jack is connected, allow-
ing the music from your device to be heard
through the vehicle's speakers. To activate
the AUX, plug in the audio jack.
• The functions of the device are controlled
using the device buttons. The volume may
be controlled using the radio or device.
• To route the audio cable out of the center
console, use the access cut out in the front
of the console.USB Port
• Connect your compatible device using a
USB cable into the USB Port. USB Memory
sticks with audio files can also be used.
Audio from the device can be played on the
vehicles sound system while providing
metadata (artist, track title, album, etc.)
information on the radio display.
• When connected, the compatible USB de-
vice can be controlled using the radio or
Steering Wheel Audio Controls to play, skip
to the next or previous track, browse, and
list the contents.
• The battery charges when plugged into the
USB port (if supported by the specific de-
vice).
NOTE:
When connecting your device for the first
time, the system may take several minutes to
read your music, depending on the number of
files. For example, the system will take ap-
proximately five minutes for every
1,000 songs loaded on the device. Also dur-
ing the reading process, the Shuffle and
Browse functions will be disabled.This process is needed to ensure the full use
of your features and only happens the first
time it is connected. After the first time, the
reading process of your device will take con-
siderably less time unless changes are made
or new songs are added to the playlist.
Bluetooth Streaming Audio
• If equipped with Uconnect Voice Com-
mand, your Bluetooth-equipped device
may also be able to stream music to your
vehicle's sound system. Your connected de-
vice must be Bluetooth-compatible and
paired with your system (see Uconnect
Phone for pairing instructions). You can
access the music from your connected
Bluetooth device by pressing the Bluetooth
button on the touchscreen while in Me-
dia mode.
MULTIMEDIA
300
Page 303 of 362

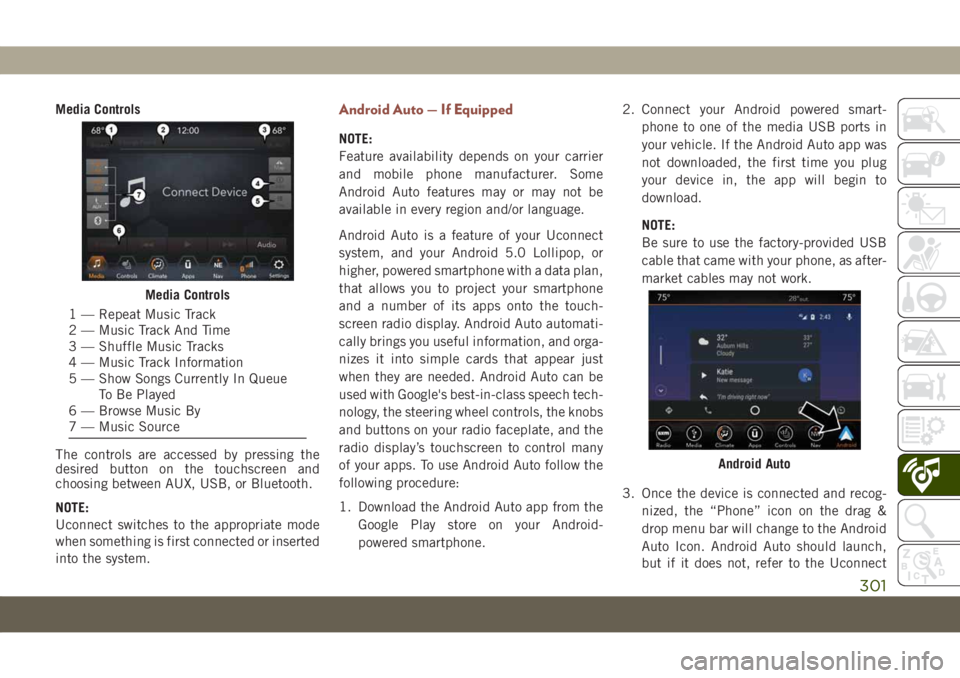
Media Controls
The controls are accessed by pressing the
desired button on the touchscreen and
choosing between AUX, USB, or Bluetooth.
NOTE:
Uconnect switches to the appropriate mode
when something is first connected or inserted
into the system.Android Auto — If Equipped
NOTE:
Feature availability depends on your carrier
and mobile phone manufacturer. Some
Android Auto features may or may not be
available in every region and/or language.
Android Auto is a feature of your Uconnect
system, and your Android 5.0 Lollipop, or
higher, powered smartphone with a data plan,
that allows you to project your smartphone
and a number of its apps onto the touch-
screen radio display. Android Auto automati-
cally brings you useful information, and orga-
nizes it into simple cards that appear just
when they are needed. Android Auto can be
used with Google's best-in-class speech tech-
nology, the steering wheel controls, the knobs
and buttons on your radio faceplate, and the
radio display’s touchscreen to control many
of your apps. To use Android Auto follow the
following procedure:
1. Download the Android Auto app from the
Google Play store on your Android-
powered smartphone.2. Connect your Android powered smart-
phone to one of the media USB ports in
your vehicle. If the Android Auto app was
not downloaded, the first time you plug
your device in, the app will begin to
download.
NOTE:
Be sure to use the factory-provided USB
cable that came with your phone, as after-
market cables may not work.
3. Once the device is connected and recog-
nized, the “Phone” icon on the drag &
drop menu bar will change to the Android
Auto Icon. Android Auto should launch,
but if it does not, refer to the Uconnect
Media Controls
1 — Repeat Music Track
2 — Music Track And Time
3 — Shuffle Music Tracks
4 — Music Track Information
5 — Show Songs Currently In Queue
To Be Played
6 — Browse Music By
7 — Music Source
Android Auto
301
Page 304 of 362

Owner’s Manual Supplement for the pro-
cedure to enable the feature “AutoShow”.
You can also launch it by touching the
Android Auto icon on the touchscreen.
Once Android Auto is up and running on your
Uconnect system, the following features can
be utilized using your smartphone’s data
plan:
• Google Maps for navigation
• Google Play Music, Spotify, iHeart Radio,
etc. for music
• Handsfree Calling, and Texting for commu-
nication
• Hundreds of compatible apps
NOTE:
To use Android Auto, make sure you are in an
area with cellular coverage. Android Auto
may use cellular data and your cellular cov-
erage is shown in the upper right corner of the
radio screen.NOTE:
Requires compatible smartphone running
Android 5.0 Lollipop or higher and download
app on Google Play. Android, Android Auto
and Google Play are trademarks of Google
Inc.
Maps
Push and hold the VR button on the steering
wheel or tap the microphone icon to ask
Google to take you to a desired destination by
voice. You can also touch the Navigation icon
in Android Auto to access Google Maps.NOTE:
If the VR button is not held, and is only
pushed, the built-in Uconnect VR prompts
you and any navigation command said
launches the built-in Uconnect navigation
system.
While using Android Auto, Google Maps pro-
vides voice-guided:
• Navigation
• Live traffic information
• Lane guidance
Google Maps Data And Cellular Coverage
Google Maps
MULTIMEDIA
302