2019 JEEP CHEROKEE ignition
[x] Cancel search: ignitionPage 251 of 344

CAUTION!
Proper operation of four-wheel drive ve-
hicles depends on tires of equal size, type
and circumference on each wheel. Any
difference in tire size can cause damage to
the power transfer unit. Tire rotation
schedule should be followed to balance
tire wear.
STORING THE VEHICLE
If the vehicle should remain stationary for
more than a month, observe the following
precautions:
• Park your vehicle in a covered, dry and
possibly airy location the windows open
slightly.• Check that the Electric Park Brake is not
engaged.
• Disconnect the negative (-) terminal from
the battery post and be sure that the battery
is fully charged. During storage check bat-
tery charge quarterly.
• If you do not disconnect the battery from
the electrical system, check the battery
charge every 30 days.
• Clean and protect the painted parts by
applying protective waxes.
• Clean and protect polished metal parts by
applying protective waxes.
• Apply talcum powder to the front and rear
wiper blades and leave raised from the
glass.
• Cover the vehicle with an appropriate cover
taking care not to damage the painted sur-
face by dragging across dirty surfaces. Do
not use plastic sheeting which will not allow
the evaporation of moisture present on the
surface of the vehicle.
• Inflate the tires at a pressure of +7.25 psi
(+0.5 bar) higher than recommended on
the tire placard and check it periodically.• Do not drain the engine cooling system.
• Whenever you leave the vehicle stationary
for two weeks or more, idle the engine for
approximately five minutes, with the air
conditioning system on and high fan speed.
This will ensure proper lubrication of the
system, thus minimizing the possibility of
damage to the compressor when the vehicle
is put back into operation.
NOTE:
When the vehicle has not been started or
driven for at least 30 days, an Extended Park
Start Procedure is required to start the ve-
hicle.
Refer to “Starting The Engine” in “Starting
And Operating” for further information.
CAUTION!
Before removal of the positive and nega-
tive terminals to the battery, wait at least a
minute with ignition switch in the OFF
position and close the driver’s door. When
reconnecting the positive and negative ter-
minals to the battery be sure the ignition
switch is in the OFF position and the
driver’s door is closed.
Four Wheel Drive (4WD) Tire Rotation
249
Page 275 of 344
• Press the “+” or “–” buttons on the touch-
screen, or press and drag over the level bar
for each of the equalizer bands. The level
value, which spans between plus or minus
nine, is displayed at the bottom of each of
the bands.
Speed Adjusted Volume
• Press the “Speed Adjusted Volume” button
on the touchscreen to activate the Speed
Adjusted Volume screen. The Speed Ad-
justed Volume is adjusted by pressing the
volume level indicator. This alters the auto-
matic adjustment of the audio volume with
variation to vehicle speed.
Loudness — If Equipped
• Press the “On” button on the touchscreen
to activate Loudness. Press “Off” to deac-
tivate this feature. When Loudness is On,
the sound quality at lower volumes
improves.
AUX Volume Offset
• Press the “AUX Volume Offset” button on
the touchscreen to activate the AUX Vol-
ume Offset screen. The AUX Volume Offset
is adjusted by pressing of the “+” and “–”buttons. This alters the AUX input audio
volume. The level value, which spans be-
tween plus or minus three, is displayed
above the adjustment bar.
Auto Play — If Equipped
• Press the “Auto Play” button on the touch-
screen to activate the Auto Play screen. The
Auto Play feature has two settings “On” and
“Off.” With Auto Play on, music begins
playing from a connected device, immedi-
ately after it is connected to the radio.
Auto On Radio — If Equipped
• The Radio automatically turns on when
vehicle is in run or will recall whether it was
on or off at last ignition off.
Radio Off With Door — If Equipped
• Press the “Radio Off With Door” button on
the touchscreen to activate the Radio Off
With Door screen. The Radio Off With Door
feature, when activated, keeps the radio on
until the driver or passenger door is opened,
or when the Radio Off Delay selected time
has expired.Drag & Drop Menu Bar
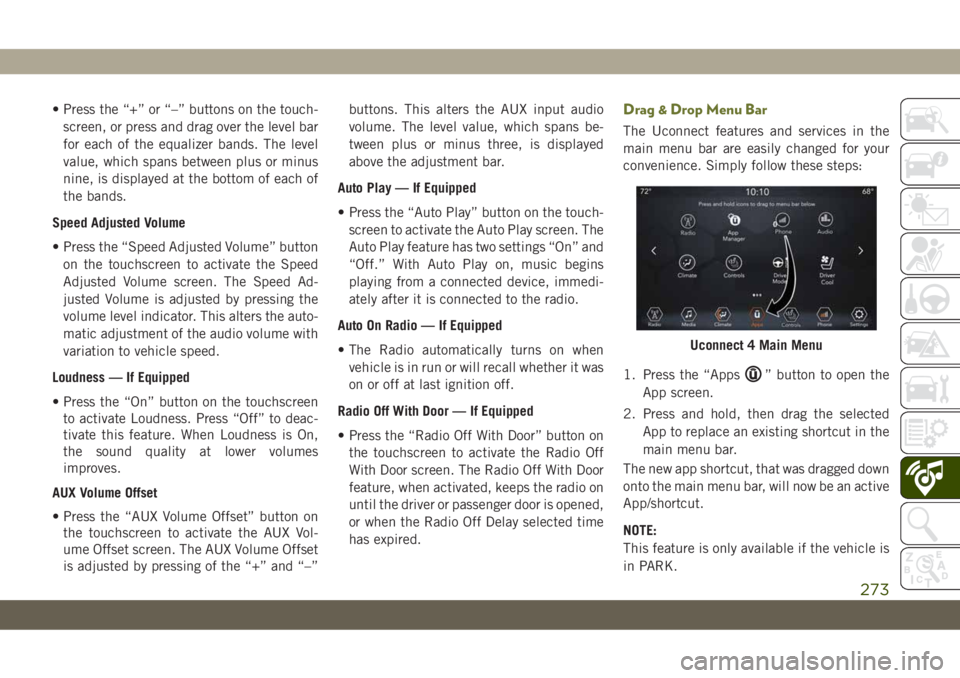
The Uconnect features and services in the
main menu bar are easily changed for your
convenience. Simply follow these steps:
1. Press the “Apps
” button to open the
App screen.
2. Press and hold, then drag the selected
App to replace an existing shortcut in the
main menu bar.
The new app shortcut, that was dragged down
onto the main menu bar, will now be an active
App/shortcut.
NOTE:
This feature is only available if the vehicle is
in PARK.
Uconnect 4 Main Menu
273
Page 300 of 344
The Uconnect Phone feature enables you to
place and receive hands-free mobile phone
calls. Drivers can also place mobile phone
calls using their voice or by using the buttons
on the touchscreen (see Voice Command sec-
tion).
The hands-free calling feature is made pos-
sible through Bluetooth technology — the
global standard that enables different elec-
tronic devices to connect to each other wire-
lessly.
If the Uconnect Phone Button
exists on
your steering wheel, you then have the
Uconnect Phone features.
NOTE:
• The Uconnect Phone requires a mobile
phone equipped with the Bluetooth Hands-
Free Profile, Version 1.0 or higher.
• Most mobile phones/devices are compat-
ible with the Uconnect system, however
some mobile phones/devices may not be
equipped with all of the required features
to utilize all of the Uconnect system fea-
tures.• For Uconnect Customer Care:
• Visit: DriveUconnect.eu
• Or visit an authorized dealer
Pairing (Wirelessly Connecting) Your
Mobile Phone To The Uconnect System
Mobile phone pairing is the process of estab-
lishing a wireless connection between a cel-
lular phone and the Uconnect system.
NOTE:
• To use the Uconnect Phone feature, you
first must determine if your mobile phone
and software are compatible with the
Uconnect system. Please visit
www.DriveUconnect.eu or an authorized
dealer for complete mobile phone compat-
ibility information.
• Mobile phone pairing is not available while
the vehicle is in motion.
• A maximum of ten mobile phones can be
paired to the Uconnect system.Start Pairing Procedure On The Radio
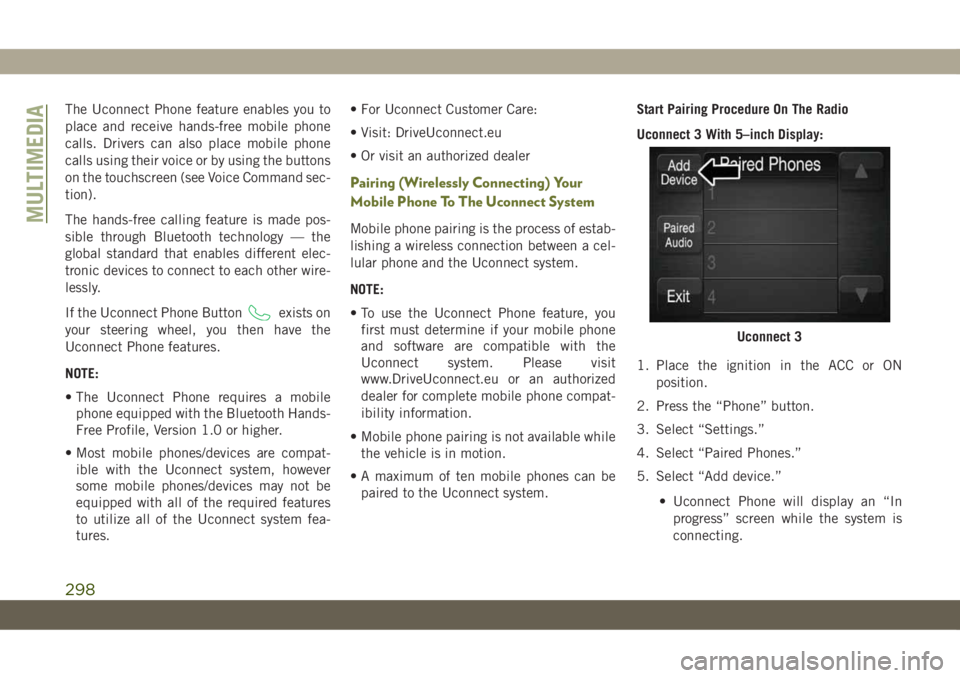
Uconnect 3 With 5–inch Display:
1. Place the ignition in the ACC or ON
position.
2. Press the “Phone” button.
3. Select “Settings.”
4. Select “Paired Phones.”
5. Select “Add device.”
• Uconnect Phone will display an “In
progress” screen while the system is
connecting.
Uconnect 3
MULTIMEDIA
298
Page 301 of 344
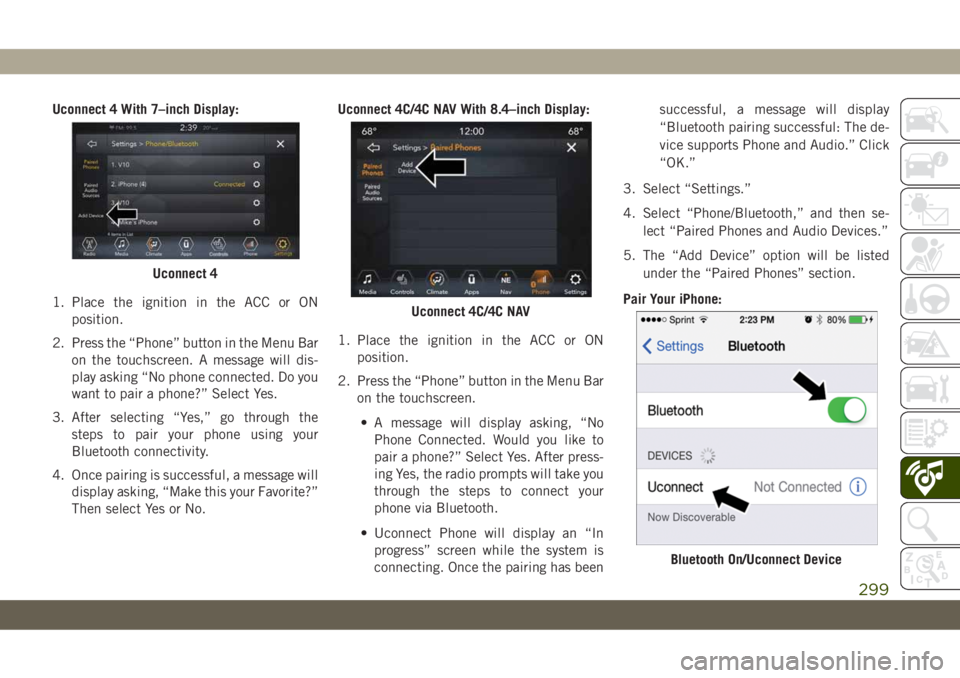
Uconnect 4 With 7–inch Display:
1. Place the ignition in the ACC or ON
position.
2. Press the “Phone” button in the Menu Bar
on the touchscreen. A message will dis-
play asking “No phone connected. Do you
want to pair a phone?” Select Yes.
3. After selecting “Yes,” go through the
steps to pair your phone using your
Bluetooth connectivity.
4. Once pairing is successful, a message will
display asking, “Make this your Favorite?”
Then select Yes or No.Uconnect 4C/4C NAV With 8.4–inch Display:
1. Place the ignition in the ACC or ON
position.
2. Press the “Phone” button in the Menu Bar
on the touchscreen.
• A message will display asking, “No
Phone Connected. Would you like to
pair a phone?” Select Yes. After press-
ing Yes, the radio prompts will take you
through the steps to connect your
phone via Bluetooth.
• Uconnect Phone will display an “In
progress” screen while the system is
connecting. Once the pairing has beensuccessful, a message will display
“Bluetooth pairing successful: The de-
vice supports Phone and Audio.” Click
“OK.”
3. Select “Settings.”
4. Select “Phone/Bluetooth,” and then se-
lect “Paired Phones and Audio Devices.”
5. The “Add Device” option will be listed
under the “Paired Phones” section.
Pair Your iPhone:
Uconnect 4
Uconnect 4C/4C NAV
Bluetooth On/Uconnect Device
299
Page 305 of 344
To activate Do Not Disturb, select “Pairing”
on the phone menu bar, and select “Do Not
Disturb” from the Settings menu. You can
also activate it using the “Do Not Disturb”
button at the top of every Phone screen.
Do Not Disturb can automatically reply with a
text message, a call or both, when declining
an incoming call and send it to voicemail.
Automatic reply messages can be:
• “I am driving right now, I will get back to
you shortly.”
• Create a custom auto reply message up to
160 characters.
While in Do Not Disturb, Conference Call can
be selected so you can still place a second
call without being interrupted by incoming
calls.
NOTE:
• Only the beginning of your custom message
will be seen on the touchscreen.
• Reply with text message is not compatible
with iPhones.• Auto reply with text message is only avail-
able on phones that supporting Bluetooth
MAP.
Incoming Text Messages
After pairing your Uconnect system with a
Bluetooth enabled mobile device with the
Message Access Profile (MAP), the Uconnect
system can announce a new incoming text
message and read it to you over the vehicle’s
audio system.
To listen to incoming text messages, or any
messages currently on the mobile phone,
select the “Messages” menu and press the
“Listen” button next to the message you want
to listen to.
NOTE:
Only incoming text messages received during
the current ignition cycle can be viewed/read.
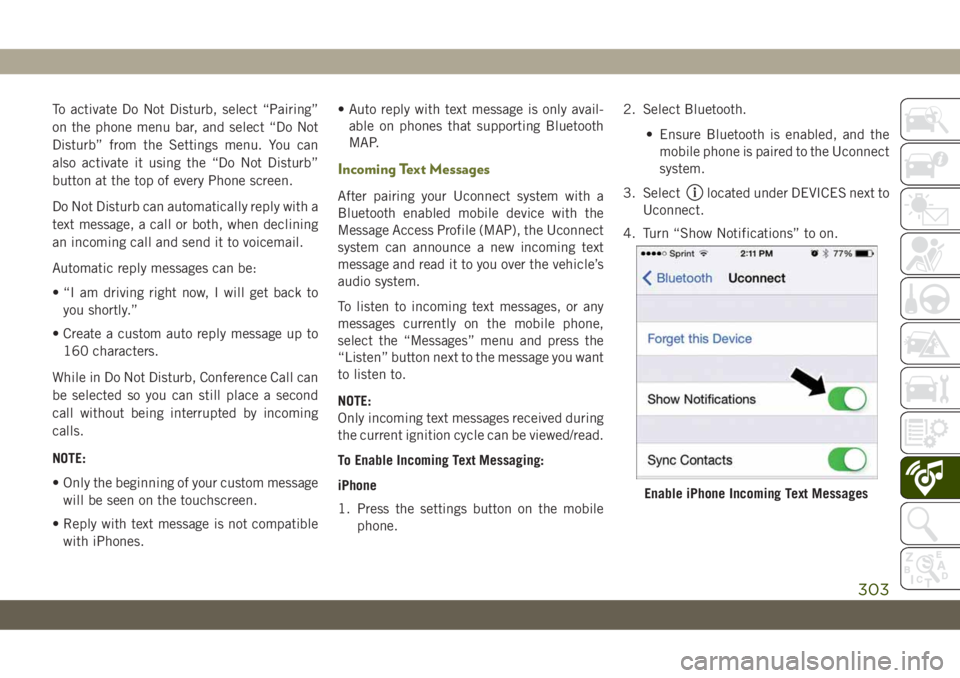
To Enable Incoming Text Messaging:
iPhone
1. Press the settings button on the mobile
phone.2. Select Bluetooth.
• Ensure Bluetooth is enabled, and the
mobile phone is paired to the Uconnect
system.
3. Selectlocated under DEVICES next to
Uconnect.
4. Turn “Show Notifications” to on.
Enable iPhone Incoming Text Messages
303
Page 306 of 344
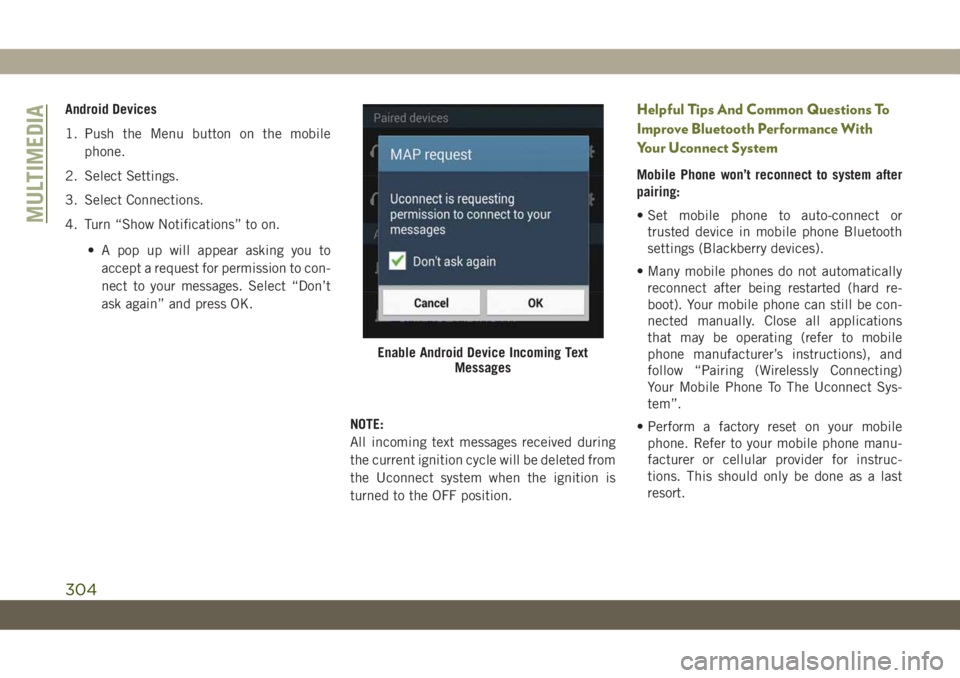
Android Devices
1. Push the Menu button on the mobile
phone.
2. Select Settings.
3. Select Connections.
4. Turn “Show Notifications” to on.
• A pop up will appear asking you to
accept a request for permission to con-
nect to your messages. Select “Don’t
ask again” and press OK.
NOTE:
All incoming text messages received during
the current ignition cycle will be deleted from
the Uconnect system when the ignition is
turned to the OFF position.Helpful Tips And Common Questions To
Improve Bluetooth Performance With
Your Uconnect System
Mobile Phone won’t reconnect to system after
pairing:
• Set mobile phone to auto-connect or
trusted device in mobile phone Bluetooth
settings (Blackberry devices).
• Many mobile phones do not automatically
reconnect after being restarted (hard re-
boot). Your mobile phone can still be con-
nected manually. Close all applications
that may be operating (refer to mobile
phone manufacturer’s instructions), and
follow “Pairing (Wirelessly Connecting)
Your Mobile Phone To The Uconnect Sys-
tem”.
• Perform a factory reset on your mobile
phone. Refer to your mobile phone manu-
facturer or cellular provider for instruc-
tions. This should only be done as a last
resort.
Enable Android Device Incoming Text
Messages
MULTIMEDIA
304
Page 337 of 344

Overheating...............212
Enhanced Accident Response
Feature...............117, 217
Ethanol....................255
Exhaust Gas Cautions...........136
Exhaust System...............136
Exterior Lights.............32, 138
Filters
Air Conditioning..............49
Engine Oil................262
Flashers
Hazard Warning.............184
Turn Signals.............73, 138
Flash-To-Pass.................34
Fluid, Brake.................265
Fluid Capacities...............260
Fluid Leaks..................138
Fluid Level Checks
Brake...................233
Engine Oil................231
Fluids And Lubricants...........262
Fob, Key....................13
Fog Lights.................36, 72
Fog Lights, Rear................36
Fold-Flat Seats................23
Folding Rear Seats..............23Forward Collision Warning..........91
Four Wheel Drive..............150
Freeing A Stuck Vehicle..........213
Fuel
Additives.................256
Consumption...............265
Ethanol..................255
Gasoline.................254
Light....................69
Materials Added.............256
Octane Rating...........254, 262
Requirements..............260
Specifications..............262
Tank Capacity.............
.260
Fueling.................173, 175
Fuses.....................185
Gasoline, Clean Air.............255
Gasoline, (Fuel)...............254
Gear Ranges..............145, 149
Gear Selector Override...........213
General Information.............288
Glass Cleaning................252
Hazard Warning Flashers..........184
Headlights...................33
Automatic.................34Automatic High Beam..........34
High Beam..............32, 34
High Beam/Low Beam Select
Switch...................34
On With Wipers..............35
Passing................32, 34
Switch...................33
Time Delay.................35
Head Restraint Removal...........28
Head Restraints................28
Head Rests...................28
Heated Seats..................26
Heated Steering Wheel............31
Hill Descent Control.............85
Hill Descent Control Indicator.......85
Hill Start Assist................79
Hood Prop...................53
Hood Release.................53
Ignition.....................15
Switch...................15
Instrument Cluster
Descriptions................73
Display...................62
Menu Items................63
Instrument Panel Lens Cleaning.....251
Interior Appearance Care..........251
335