2019 INFINITI QX50 ECO mode
[x] Cancel search: ECO modePage 6 of 288

Camera aiding sonar
function (models with
Around View®
Monitor) ............................... 7-19
Moving Object
Detection (MOD)
(if so equipped) .................. 7-23
8Information and settings
Information screen .............. 8-2
SiriusXM® Travel Link and
SiriusXM Traffic™ (if so
equipped) ............................... 8-4
INFINITI InTouch
TM
Services (if so
equipped) ............................. 8-11
Settings screen .................. 8-24
Fully customizable digital
environment ....................... 8-30
Driver Assistance settings
(if so equipped) .................. 8-33
9Navigation (if so equipped)
Safety information .............. 9-3
Map data authentication ... 9-3
Map operation ..................... 9-4
Setting destination ........... 9-14
Route guidance .................. 9-29
Viewing traffic
information ......................... 9-44
Viewing available traffic
information .......................... 9-45
Storing a
location/route ................... 9-48
Navigation settings ........... 9-56
General information for
navigation system ............. 9-59
10Voice recognition
INFINITI Voice
recognition ........................... 10-2
11Troubleshooting guide
Customer assistance ........ 11-2
System unit ......................... 11-3
Audio system ...................... 11-5
Bluetooth® Hands-Free
Phone System .................. 11-14
Monitor system ................ 11-18
Navigation (if so
equipped) ........................... 11-19
Voice recognition ............. 11-27
Page 18 of 288

2. Getting Started
STEERING-WHEEL SWITCHES
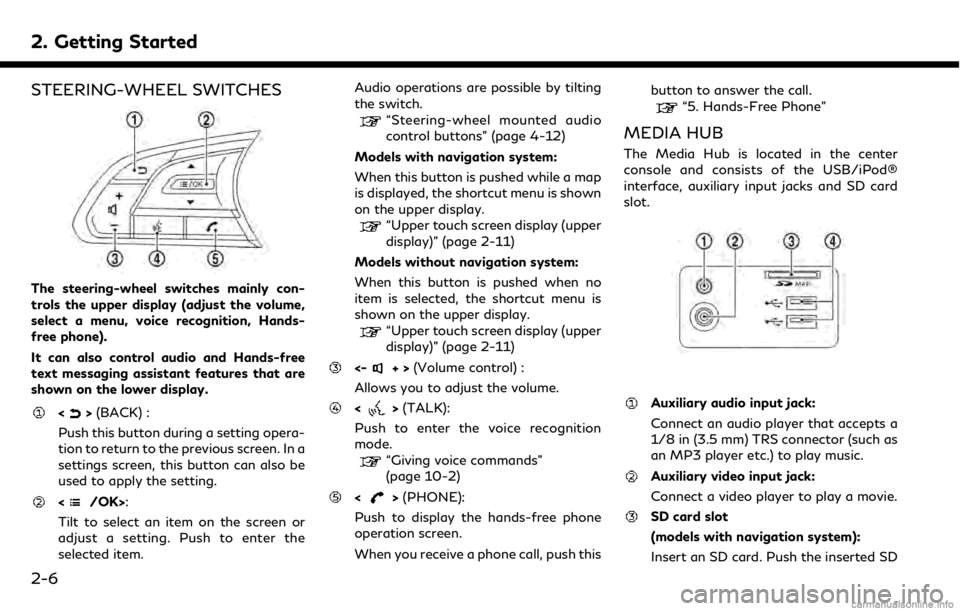
The steering-wheel switches mainly con-
trols the upper display (adjust the volume,
select a menu, voice recognition, Hands-
free phone).
It can also control audio and Hands-free
text messaging assistant features that are
shown on the lower display.
<>(BACK) :
Push this button during a setting opera-
tion to return to the previous screen. In a
settings screen, this button can also be
used to apply the setting.
:
Tilt to select an item on the screen or
adjust a setting. Push to enter the
selected item. Audio operations are possible by tilting
the switch.
“Steering-wheel mounted audio
control buttons” (page 4-12)
Models with navigation system:
When this button is pushed while a map
is displayed, the shortcut menu is shown
on the upper display.
“Upper touch screen display (upper
display)” (page 2-11)
Models without navigation system:
When this button is pushed when no
item is selected, the shortcut menu is
shown on the upper display.
“Upper touch screen display (upper
display)” (page 2-11)
<-+> (Volume control) :
Allows you to adjust the volume.
<> (TALK):
Push to enter the voice recognition
mode.
“Giving voice commands”
(page 10-2)
<> (PHONE):
Push to display the hands-free phone
operation screen.
When you receive a phone call, push this button to answer the call.
“5. Hands-Free Phone”
MEDIA HUB
The Media Hub is located in the center
console and consists of the USB/iPod®
interface, auxiliary input jacks and SD card
slot.
Auxiliary audio input jack:
Connect an audio player that accepts a
1/8 in (3.5 mm) TRS connector (such as
an MP3 player etc.) to play music.
Auxiliary video input jack:
Connect a video player to play a movie.
SD card slot
(models with navigation system):
Insert an SD card. Push the inserted SD
2-6
Page 24 of 288

2. Getting Started
.New Destination
. Show Current Location
. Store Location
. Nearby Places
. Delete Stored Location
Models without navigation system:
When <
/OK>on the INFINITI controller
or steering-wheel is pushed when no item is
selected, the shortcut menu is shown on the
upper display.
The following options are available.
. Audio Source
. Audio List
. Call History
. Phonebook
. Select Add/Edit
Edit shortcut menu:
The following procedure can edit or sort the
shortcut menu.
1. Select [Select Add/Edit] to register a new item to the menu, or to change an
existing menu item. 2. Select preferred setting.
.[Change Order]
Change the order in which shortcut
menu items are shown.
.[Edit Shortcut Items]Edit items to be displayed in the
shortcut menu.
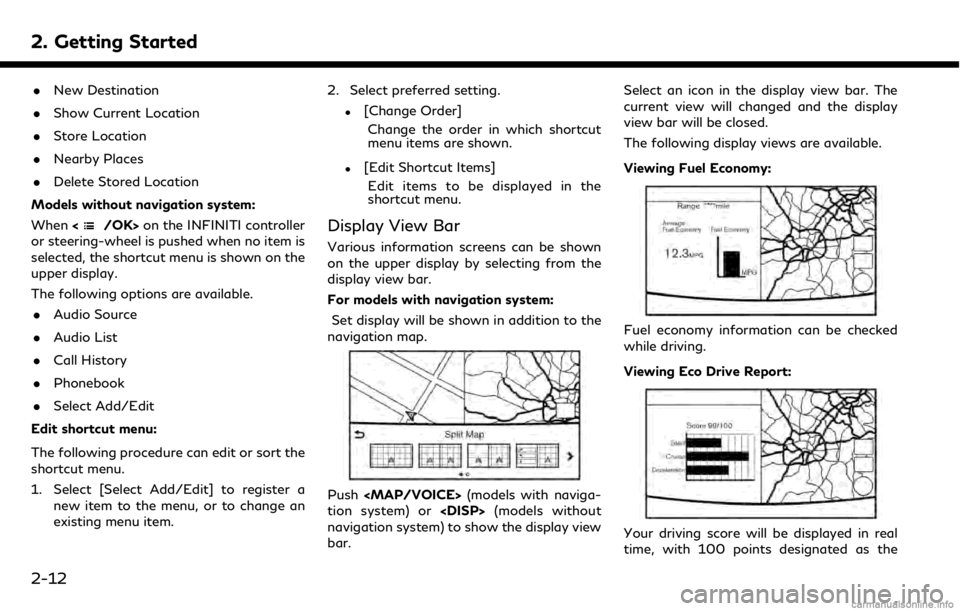
Display View Bar
Various information screens can be shown
on the upper display by selecting from the
display view bar.
For models with navigation system:
Set display will be shown in addition to the
navigation map.
Push
Page 25 of 288

score for ideal eco-driving.
For improving your score:. When starting off, depress the accelera-
tor gently.
. When cruising, accelerate and decelerate
as little as possible.
. When decelerating, releasing the accel-
erator early.
Viewing Split Map (models with navigation
system):
The map can be displayed on a split screen.
Each screen can be adjusted independently. Viewing Intersection (models with naviga-
tion system):
The next intersection is always displayed.
INFO:
When no route is set, the intersection screen
is not displayed and the map is displayed on
the full screen.
Viewing Turn List (models with navigation
system):
Display the turn list on the left screen. When
approaching a guide point, the left screen
automatically switches to an enlarged view
of the intersection.
INFO:
When no route is set, the turn list screen is
not displayed and the map is displayed in the
full screen.
Viewing Where am I ? (models with navi-
gation system):
This displays the information about the
current vehicle location.
2. Getting Started
2-13
Page 29 of 288

include:. Home
. Nearby Places
. Stored Locations
. Previous Destinations
. Journey Planner
. Stored Routes
. Connected SearchITEMS TO BE SET INITIALLY
The settings included in this section should
be performed before using the system for
the first time.
SCREEN SETTINGS
This menu turns on and off the display and
adjusts the image quality of the upper dis-
play and the lower display.
1. Push the
Page 38 of 288

3. Heater and air conditioner
HEATER AND AIR CONDI-
TIONER OPERATION PRECAU-
TIONS
WARNING
.The heater and the air conditioner
operates only when the engine is
running.
. Never leave children or adults who
would normally require the support of
others alone in your vehicle. Pets
should not be left alone either. On
hot, sunny days, temperatures in a
closed vehicle could quickly become
high enough to cause severe or pos-
sibly fatal injuries to people or ani-
mals.
. Do not use the recirculation mode for
long periods as it may cause the
interior air to become stale and the
windows to fog up.
. Do not adjust the heating and air
conditioning controls while driving so
that full attention may be given to
vehicle operation. .
Turn off the system when the engine
is not running to prevent battery
discharge.
INFO:
. Odors from inside and outside the vehi-
cle can build up in the air conditioner unit.
Odor can enter the passenger compart-
ment through the vents.
. When parking, set the heater and air
conditioner controls to turn off air
recirculation to allow fresh air into the
passenger compartment. This should
help reduce odors inside the vehicle.
. Vehicles with an automatic climate con-
trol system will automatically adjust the
passenger compartment to be the set
appropriate temperature when the re-
mote engine start feature (if so
equipped) is used.
For models with Idling Stop System (if so
equipped)
The Idling Stop System will not stop the
engine under the following conditions: .
The front defroster mode is on.
. The rear window defroster mode is on.
While the engine is stopped by the Idling
Stop System, taking one of the following
actions will automatically start the engine: . Turn the front defroster mode on.
. Turn the rear window defroster mode
on.
When the engine is stopped by the Idling
Stop System, performance of the heater and
air conditioner may be reduced to minimize
fuel consumption. For the best heating and
air conditioning performance, turn on the
[Use A/C While Idle] setting.
“Heater and air conditioner settings”
(page 3-10)
3-2
Page 43 of 288

the system may not work properly.
. This mode is not recommended if the
windows fog up.
Dehumidified defrosting or defog-
ging
1. Push <>. The indicator light on the
button will illuminate.
2. Push <
>and <>on the driver’s side
to set the desired temperature.
INFO:
. To quickly remove ice from the outside of
the windows, set the fan speed to the
maximum.
. As soon as possible after the windshield
is clean, push
auto mode.
. When <
>is pushed, the air conditioner
will automatically be turned on at out-
side temperatures above 23°F (−5°C) to
defog the windshield, and the air recir-
culate mode will automatically be turned
off.
Outside air is drawn into the passenger
compartment to improve the defogging performance.
ADVANCED CLIMATE CONTROL
SYSTEM (if so equipped)
The Advanced Climate Control System
keeps the air inside of the vehicle clean,
using the automatic air circulation control
with the exhaust gas/outside odor detecting
sensor and with ion control.
[Auto Recirc]:
Touch to turn on the automatic air
recirculation mode.
Plasmacluster® icon:
Indicates the Plasmacluster® ion emis-
sion status.
Automatic air recirculation control with the
exhaust gas/outside odor detection sensor:
The Advanced Climate Control system
comes with an exhaust gas detection/out-
side odor sensor. When the automatic air
circulation control is activated, the sensor
detects odors outside the vehicle such as
pulp or chemicals, and exhaust gas such as
gasoline or diesel. When such odors or gases
are detected, the display and the system
automatically change from the fresh air
mode to the recirculation mode.
When the automatic air circulation control
mode is on, for the first 5 minutes, the air
recirculation mode is selected to prevent
dust, dirt and pollen from entering the
vehicle and to clean the air inside of the
vehicle.
After 5 minutes, the sensor detects exhaust
gas and automatically alternates between
the air recirculation mode and the fresh air
mode.INFO:
The automatic air recirculation mode can be
activated under the following conditions. . The air flow control is not in the
windshield defrosting mode (the indica-
3. Heater and air conditioner
3-7
Page 51 of 288

Unplayable error:
Indicates that a readable file is not found
on the inserted CD. Check the data in
your CD.
USB (Universal Serial Bus) CON-
NECTION PORT
WARNING
Do not connect, disconnect or operate the
USB device while driving. Doing so can be
a distraction. If distracted you could lose
control of your vehicle and cause an
accident or serious injury.
CAUTION
.Do not force the USB device into the
USB connection port. Inserting the
USB device tilted or up-side-down
into the port may damage the port.
Make sure that the USB device is
connected correctly into the USB
connection port.
. Do not grab the USB connection port
cover (if so equipped) when pulling
the USB device out of the port. This
could damage the port and the cover. .
Do not leave the USB cable in a place
where it can be pulled unintentionally.
Pulling the cable may damage the
port.
The vehicle is not equipped with a USB
device. USB devices should be purchased
separately as necessary.
This system cannot be used to format USB
devices. To format a USB device, use a
personal computer.
In some jurisdictions, the USB device for the
front seats plays only sound without images
for regulatory reasons, even when the
vehicle is parked.
This system supports various USB memory
devices, USB hard drives and iPod® players.
Some USB devices may not be supported by
this system. . Partitioned USB devices may not be
played correctly.
. Some characters used in other languages
(Chinese, Japanese, etc.) are not dis-
played properly on the display. Using
English language characters with a USB
device is recommended. General notes for USB use:
Refer to your device manufacture’s owner
information regarding the proper care of the
device.
Notes for iPod® use:
. Improperly plugging in the iPod® may
cause a checkmark to be displayed on
and off (flickering). Always make sure
that the iPod® is connected properly.
. Audiobooks may not play in the same
order as they appear on an iPod®.
. Large video files cause slow responses in
an iPod®. The vehicle dual display may
momentarily black out, but it will soon
recover.
. If an iPod® automatically selects large
video files while in the shuffle mode, the
vehicle dual display may momentarily
black out, but it will soon recover.
4. Audio system
4-5