Page 89 of 288

Models without navigation system:
Push on the INFINITI Controller during a call to display the clock. Push <
>on
the steering-wheel to display the phone screen again.
HANDS-FREE TEXT MESSAGING
ASSISTANT
WARNING
Use the text messaging feature after
parking your vehicle in a safe location. If
you have to use the feature while driving,
exercise extreme caution at all times so
full attention may be given to vehicle
operation.
CAUTION
This feature is disabled if the connected
device does not support the Message
Access Profile (MAP). See the phone’s
Owner’s Manual for details and instruc-
tions.
Laws in some jurisdictions may restrict the
use of “Text-to-Speech.” Check local regula-
tions before using this feature.
The system allows for the sending and
receiving of text messages through the vehicle interface.
Depending on the device that is connected
to the vehicle, some of the items/functions
may not be displayed or used.
Receiving a message
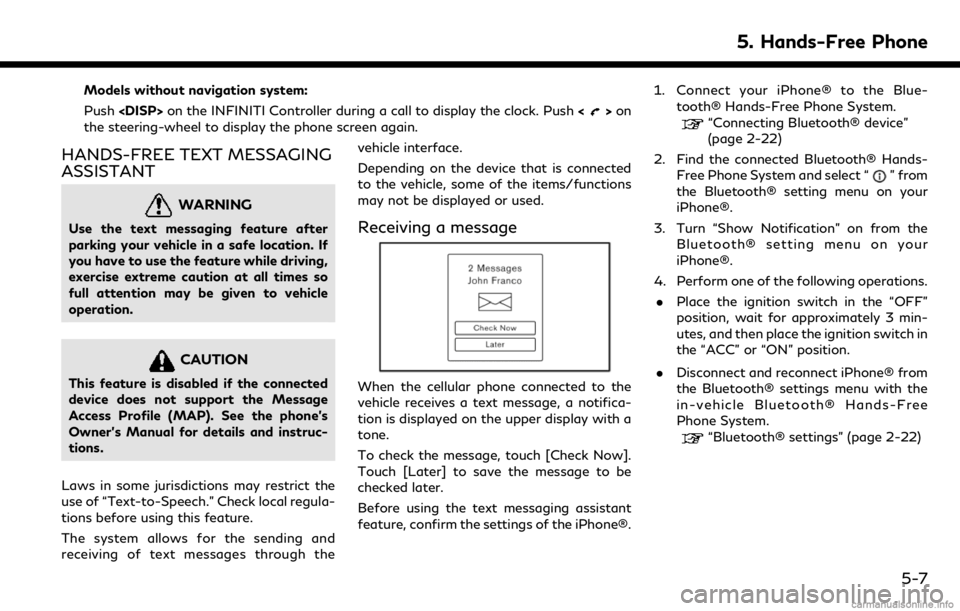
When the cellular phone connected to the
vehicle receives a text message, a notifica-
tion is displayed on the upper display with a
tone.
To check the message, touch [Check Now].
Touch [Later] to save the message to be
checked later.
Before using the text messaging assistant
feature, confirm the settings of the iPhone®.1. Connect your iPhone® to the Blue-
tooth® Hands-Free Phone System.
“Connecting Bluetooth® device”
(page 2-22)
2. Find the connected Bluetooth® Hands- Free Phone System and select “
” from
the Bluetooth® setting menu on your
iPhone®.
3. Turn “Show Notification” on from the Bluetooth® setting menu on your
iPhone®.
4. Perform one of the following operations. . Place the ignition switch in the “OFF”
position, wait for approximately 3 min-
utes, and then place the ignition switch in
the “ACC” or “ON” position.
. Disconnect and reconnect iPhone® from
the Bluetooth® settings menu with the
in-vehicle Bluetooth® Hands-Free
Phone System.
“Bluetooth® settings” (page 2-22)
5. Hands-Free Phone
5-7
Page 90 of 288
![INFINITI QX50 2019 Navigation Manual 5. Hands-Free Phone
Received message screen
Touching [Check Now] on the new message
notification screen or selecting a message
from the message list will show the details of
the received message on th INFINITI QX50 2019 Navigation Manual 5. Hands-Free Phone
Received message screen
Touching [Check Now] on the new message
notification screen or selecting a message
from the message list will show the details of
the received message on th](/manual-img/42/34995/w960_34995-89.png)
5. Hands-Free Phone
Received message screen
Touching [Check Now] on the new message
notification screen or selecting a message
from the message list will show the details of
the received message on the lower display.
Available actions:. [Next]:
Touch to read the next message.
. [Previous]:
Touch to read the previous message.
. [Call]:
If the sender of the message is registered
in the Phonebook, touch this icon to
make a call to the sender.
. [Play]/[Stop]:
Touch [Play] to have the hands-free
phone system read out the received
message. Touch [Stop] to stop reading. .
[Add Template]:
The received text message can be added
to the template (text list).
. [Reply]:
A reply message can be selected from
the template.
“Sending a text message”
(page 5-9)
INFO:
. If<~> or on the steering-wheel is
pushed while the received text message
is read out the next or previous message
will be read.
. After the message is read out, a message
box will appear and an action can be
selected.
[Reply] Create a reply message.“Sending a text mes-
sage” (page 5-9)
[Next] Have the system read out the next message.
.If the sender’s name and address is
registered in the Phonebook, the name
of the sender is displayed as sender
information on the screen.
Displaying received message list
1. Push
Page 95 of 288
![INFINITI QX50 2019 Navigation Manual Phonebook
Phonebook information in cellular phones
can be downloaded.
“5. Phonebook/Favorites Settings”
1. Push <MENU> and touch [Phone].
2. Touch [Phonebook] and touch from the list.
It can be vi INFINITI QX50 2019 Navigation Manual Phonebook
Phonebook information in cellular phones
can be downloaded.
“5. Phonebook/Favorites Settings”
1. Push <MENU> and touch [Phone].
2. Touch [Phonebook] and touch from the list.
It can be vi](/manual-img/42/34995/w960_34995-94.png)
Phonebook
Phonebook information in cellular phones
can be downloaded.
“5. Phonebook/Favorites Settings”
1. Push
Page 105 of 288

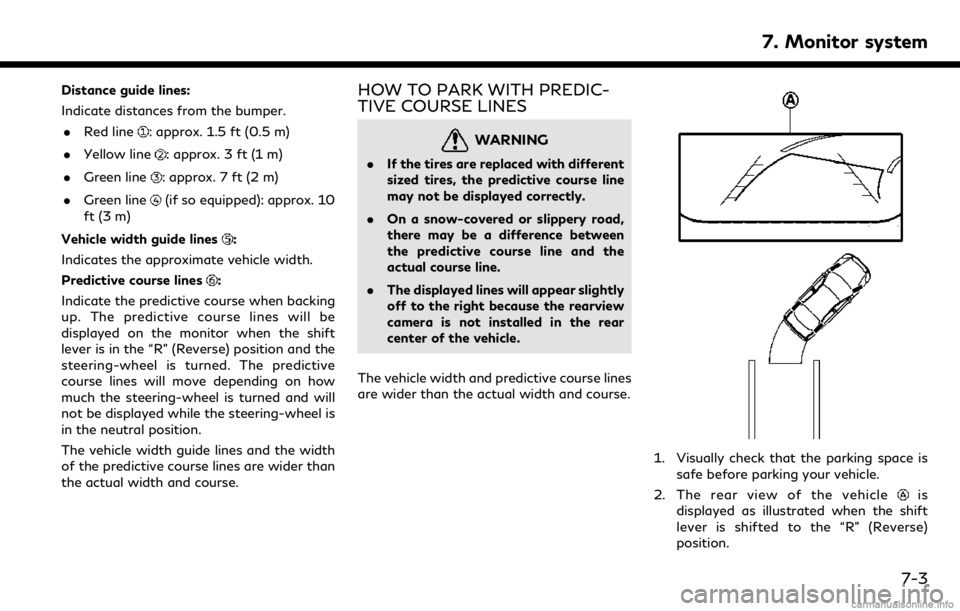
Distance guide lines:
Indicate distances from the bumper.. Red line
: approx. 1.5 ft (0.5 m)
. Yellow line
: approx. 3 ft (1 m)
. Green line
: approx. 7 ft (2 m)
. Green line
(if so equipped): approx. 10
ft (3 m)
Vehicle width guide lines
:
Indicates the approximate vehicle width.
Predictive course lines
:
Indicate the predictive course when backing
up. The predictive course lines will be
displayed on the monitor when the shift
lever is in the “R” (Reverse) position and the
steering-wheel is turned. The predictive
course lines will move depending on how
much the steering-wheel is turned and will
not be displayed while the steering-wheel is
in the neutral position.
The vehicle width guide lines and the width
of the predictive course lines are wider than
the actual width and course.
HOW TO PARK WITH PREDIC-
TIVE COURSE LINES
WARNING
. If the tires are replaced with different
sized tires, the predictive course line
may not be displayed correctly.
. On a snow-covered or slippery road,
there may be a difference between
the predictive course line and the
actual course line.
. The displayed lines will appear slightly
off to the right because the rearview
camera is not installed in the rear
center of the vehicle.
The vehicle width and predictive course lines
are wider than the actual width and course.
1. Visually check that the parking space is safe before parking your vehicle.
2. The rear view of the vehicle
is
displayed as illustrated when the shift
lever is shifted to the “R” (Reverse)
position.
7. Monitor system
7-3
Page 106 of 288

7. Monitor system
3. Slowly back up the vehicle adjusting thesteering-wheel so that the predictive
course lines
enter the parking space.
4. Maneuver the steering wheel to make the vehicle width guide lines
parallel to
the parking spacewhile referring to
the predictive course lines. 5. When the vehicle is parked in the space
completely, move the shift lever to the P
(Park) position and apply the parking
brake.
Difference between predictive and
actual distances
The displayed guidelines and their locations
on the ground are for approximate reference
only. Objects on uphill or downhill surfaces
or projecting objects will be actually located
at distances different from those displayed
in the monitor relative to the guidelines
(refer to illustrations). When in doubt, turn
around and view the objects as you are
backing up, or park and exit the vehicle to
view the positioning of objects behind the
vehicle. Backing up on a steep uphill:
When backing up the vehicle up a hill, the
distance guide lines and the vehicle width
guide lines are shown closer than the actual
distance. Note that any object on the hill is
farther than it appears on the monitor.
7-4
Page 110 of 288

7. Monitor system
AROUND VIEW® MONITOR (if
so equipped)
WARNING
Failure to follow the warnings and in-
structions for the proper use of the
Around View® Monitor system could
result in serious injury or death.. The Around View® Monitor is a con-
venience feature and is not a sub- stitute for proper vehicle operation
because it has areas where objects
cannot be viewed. The four corners of
the vehicle in particular, are areas
where objects do not always appear
in the bird’s-eye, front, or rear views.
Always check your surroundings to be
sure that it is safe to move before
operating the vehicle. Always operate
the vehicle slowly. Always look outthe windows and check mirrors to be
sure that it is safe to move.
. The driver is always responsible for
safety during parking and other man-
euvers.
CAUTION
Do not scratch the lens when cleaning dirt
or snow from the front of the camera.
The Around View® Monitor system is de-
signed as an aid to the driver in situations
such as slot parking or parallel parking.
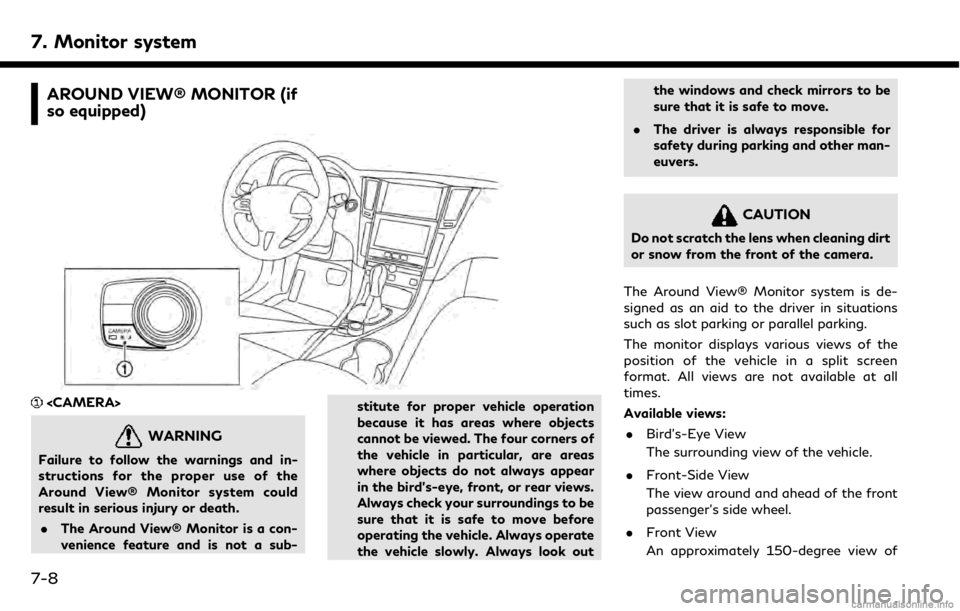
The monitor displays various views of the
position of the vehicle in a split screen
format. All views are not available at all
times.
Available views: . Bird’s-Eye View
The surrounding view of the vehicle.
. Front-Side View
The view around and ahead of the front
passenger’s side wheel.
. Front View
An approximately 150-degree view of
7-8
Page 113 of 288

Rear view
Guiding lines that indicate the approximate
vehicle width and distances to objects with
reference to the vehicle body line
, are
displayed on the monitor.
Distance guide lines:
Indicate distances from the vehicle body.
. Red line
: approx. 1.5 ft (0.5 m)
. Yellow line
: approx. 3 ft (1 m)
. Green line
: approx. 7 ft (2 m)
. Green line
(if so equipped): approx. 10
ft (3 m)
Vehicle width guide lines
: Indicates the approximate vehicle width.
Predictive course lines
:
Indicate the predictive course when operat-
ing the vehicle. The predictive course lines
will be displayed on the monitor when the
steering wheel is turned. The predictive
course lines will move depending on how
much the steering wheel is turned and will
not be displayed while the steering wheel is
in the straight ahead position.
The front view will not be displayed when
the vehicle speed is above 6 MPH (10 km/h).
NOTE:
When the monitor displays the front view
and the steering wheel turns about 90
degrees or less from the straight ahead
position, both the right and left predictive
course lines
are displayed. When the
steering wheel turns about 90 degrees or
more, a line is displayed only on the
opposite side of the turn. Bird’s-eye view:
The bird’s-eye view shows the overhead
view of the vehicle, which helps confirm the
vehicle position and the predictive course to
a parking space.
The vehicle icon
shows the position of the
vehicle. Note that the size of the vehicle icon
on the bird’s-eye view may differ somewhat
from the actual distance to the vehicle.
The areas that the cameras cannot cover
are indicated in black.
The non-viewable area
is highlighted in
yellow for several seconds after the bird’s-
eye view is displayed. It will be shown only
7. Monitor system
7-11
Page 114 of 288

7. Monitor system
the first time after the ignition switch is
placed in the “ON” position.
The driver can check the approximate direc-
tion and angle of the tire on the display by
tire icon
when driving the vehicle forward
or backward.
Predictive course lines (
and) indicate
the predictive course when operating the
vehicle. The predictive course lines will be
displayed on the monitor when the steering
wheel is turned. The predictive course lines
will move depending on how much the
steering wheel is turned and will not be
displayed while the steering wheel is in the
neutral position.
WARNING
. Objects in the bird’s-eye view will
appear further than the actual dis-
tance.
. Tall objects, such as a curb or vehicle,
may be misaligned or not displayed at
the seam of the views.
. Objects that are above the camera
cannot be displayed.
. The view for the bird’s-eye view may
be misaligned when the camera posi- tion alters.
. A line on the ground may be mis-
aligned and is not seen as being
straight at the seam of the views.
The misalignment will increase as the
line proceeds away from the vehicle.
. Tire angle display does not indicate
the actual tire angle
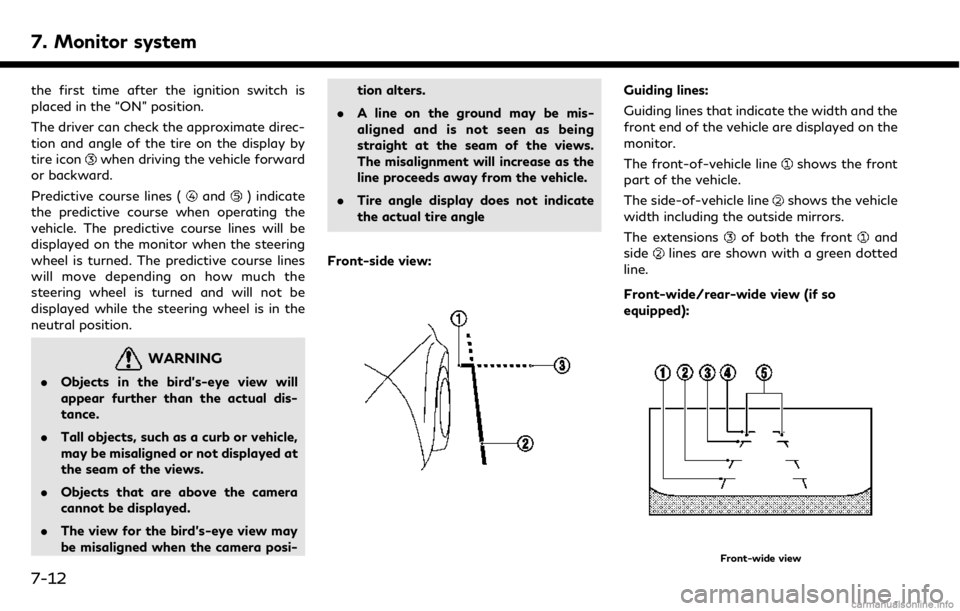
Front-side view:
Guiding lines:
Guiding lines that indicate the width and the
front end of the vehicle are displayed on the
monitor.
The front-of-vehicle line
shows the front
part of the vehicle.
The side-of-vehicle line
shows the vehicle
width including the outside mirrors.
The extensions
of both the frontand
sidelines are shown with a green dotted
line.
Front-wide/rear-wide view (if so
equipped):
Front-wide view
7-12