2019 Hyundai Tucson horn
[x] Cancel search: hornPage 16 of 546
I IN
NS
ST
TR
RU
UM
ME
EN
NT
T
P
PA
AN
NE
EL
L
O
OV
VE
ER
RV
VI
IE
EW
W
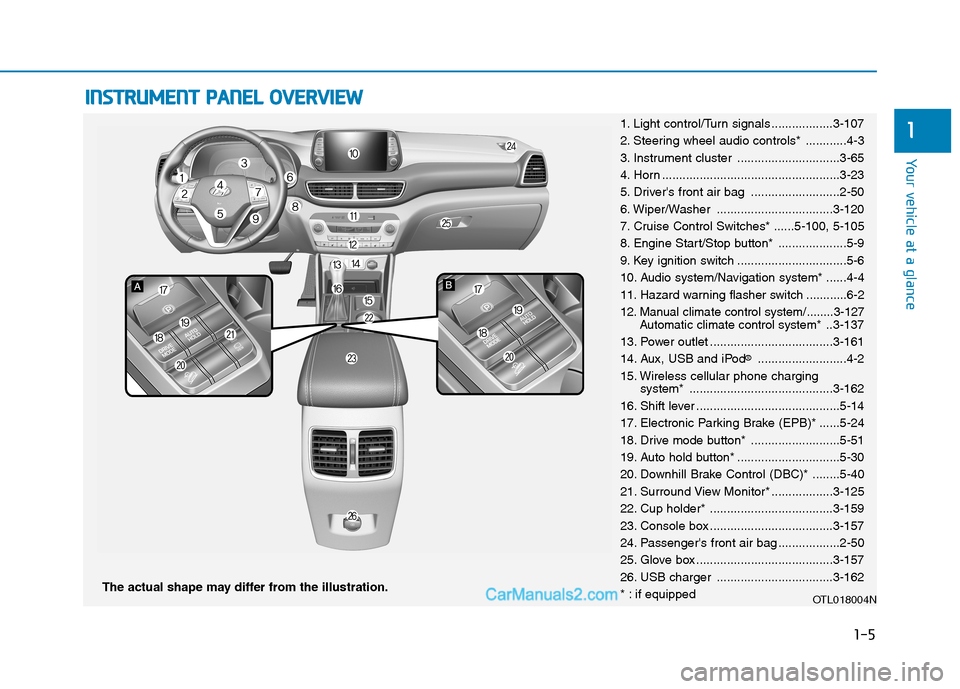
The actual shape may differ from the illustration.
1-5
Your vehicle at a glance
11. Light control/Turn signals ..................3-107
2. Steering wheel audio controls* ............4-3
3. Instrument cluster ..............................3-65
4. Horn ....................................................3-23
5. Driver's front air bag ..........................2-50
6. Wiper/Washer ..................................3-120
7. Cruise Control Switches* ......5-100, 5-105
8. Engine Start/Stop button* ....................5-9
9. Key ignition switch ................................5-6
10. Audio system/Navigation system* ......4-4
11. Hazard warning flasher switch ............6-2
12. Manual climate control system/........3-127
Automatic climate control system*..3-137
13. Power outlet ....................................3-161
14. Aux, USB and iPod
®..........................4-2
15. Wireless cellular phone charging
system* ..........................................3-162
16. Shift lever ..........................................5-14
17. Electronic Parking Brake (EPB)* ......5-24
18. Drive mode button* ..........................5-51
19. Auto hold button* ..............................5-30
20. Downhill Brake Control (DBC)* ........5-40
21. Surround View Monitor* ..................3-125
22. Cup holder* ....................................3-159
23. Console box ....................................3-157
24. Passenger's front air bag ..................2-50
25. Glove box ........................................3-157
26. USB charger ..................................3-162
* : if equipped
OTL018004N
Page 92 of 546
Convenient features of your vehicle
Accessing Your Vehicle .........................................3-4
Remote Key.........................................................................3-4
Smart Key ............................................................................3-8
Immobilizer System .........................................................3-13
Door Locks ............................................................3-15
Operating Door Locks from Outside the Vehicle ....3-15
Operating Door Locks from Inside the Vehicle .......3-16
Automatic Door Lock and Unlock Features .............3-18
Child-Protector Rear Door locks ................................3-19
Theft-Alarm System ............................................3-20
Steering Wheel .....................................................3-21
Electric Power Steering (EPS) .....................................3-21
Tilt Steering/Telescope Steering.................................3-22
Heated Steering Wheel ..................................................3-23
Horn ....................................................................................3-23
Mirrors ...................................................................3-24
Inside Rearview Mirror ..................................................3-24
Side View Mirrors ...........................................................3-36
Windows ................................................................3-39
Power Windows ...............................................................3-40
Panoramic Sunroof ..............................................3-43
Sunshade ...........................................................................3-44
Sliding the Sunroof .........................................................3-44
Tilting the Sunroof .........................................................3-45
Closing the Sunroof........................................................3-45
To Reset the Sunroof.....................................................3-46
Exterior Features .................................................3-47
Hood ...................................................................................3-47
Fuel Filler Door ................................................................3-48
Liftgate ..................................................................3-52
Non-Powered liftgate ....................................................3-52
Power Liftgate .................................................................3-54
Smart Liftgate ..................................................................3-61
Instrument Cluster ...............................................3-65
Instrument Cluster Control............................................3-66
Gauges and Meters ........................................................3-67
Icy Road Warning Light .................................................3-70
Warning and Indicator Lights .......................................3-72
LCD Display Messages ...................................................3-84
LCD Display ...........................................................3-91
LCD Display Control ........................................................3-91
LCD Display Modes .........................................................3-92
Trip Computer .....................................................3-103
3
Page 95 of 546
3-4
Convenient features of your vehicle
Remote Key (if equipped)
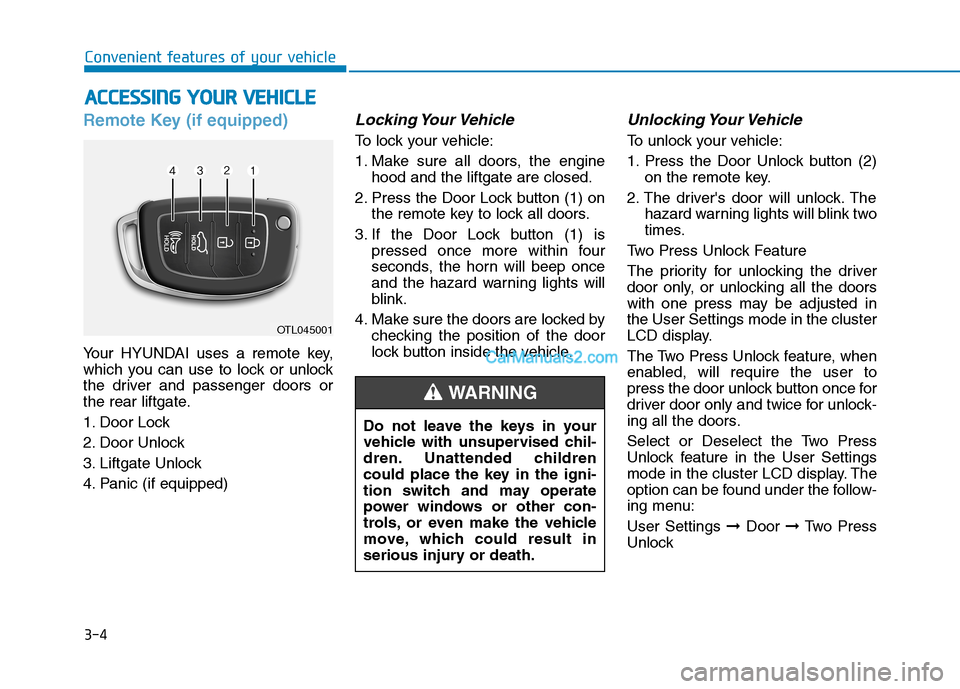
Your HYUNDAI uses a remote key,
which you can use to lock or unlock
the driver and passenger doors or
the rear liftgate.
1. Door Lock
2. Door Unlock
3. Liftgate Unlock
4. Panic (if equipped)
Locking Your Vehicle
To lock your vehicle:
1. Make sure all doors, the engine
hood and the liftgate are closed.
2. Press the Door Lock button (1) on
the remote key to lock all doors.
3. If the Door Lock button (1) is
pressed once more within four
seconds, the horn will beep once
and the hazard warning lights will
blink.
4. Make sure the doors are locked by
checking the position of the door
lock button inside the vehicle.
Unlocking Your Vehicle
To unlock your vehicle:
1. Press the Door Unlock button (2)
on the remote key.
2. The driver's door will unlock. The
hazard warning lights will blink two
times.
Two Press Unlock Feature
The priority for unlocking the driver
door only, or unlocking all the doors
with one press may be adjusted in
the User Settings mode in the cluster
LCD display.
The Two Press Unlock feature, when
enabled, will require the user to
press the door unlock button once for
driver door only and twice for unlock-
ing all the doors.
Select or Deselect the Two Press
Unlock feature in the User Settings
mode in the cluster LCD display. The
option can be found under the follow-
ing menu:
User Settings ➞Door ➞Two Press
Unlock
A AC
CC
CE
ES
SS
SI
IN
NG
G
Y
YO
OU
UR
R
V
VE
EH
HI
IC
CL
LE
E
OTL045001
Do not leave the keys in your
vehicle with unsupervised chil-
dren. Unattended children
could place the key in the igni-
tion switch and may operate
power windows or other con-
trols, or even make the vehicle
move, which could result in
serious injury or death.
WARNING
Page 96 of 546
3-5
Convenient features of your vehicle
The Two Press Unlock feature can
also be enabled or disabled by
pressing the door lock and unlock
buttons simultaneously on the Key
FOB:
Press and hold both the Door Lock
button and the Door Unlock button
simultaneously until the hazard
warning lights blink.
This will enable or disable the Two
Press Unlock feature. Repeat this
procedure to enable/disable the
mode again.
Information
After unlocking the doors, the doors
will automatically relock after 30 sec-
onds unless a door is opened.
Liftgate unlocking
To unlock the liftgate:
1. Press and hold the Liftgate Unlock
button (3) on the remote key for
more than one second.
2. The hazard warning lights will
blink two times.
3. Once the liftgate is opened and
then closed, the liftgate will auto-
matically re-lock after 30 seconds.
Information
The word "HOLD" is written on the
button to inform you that you must
press and hold the button for more
than one second.
Panic button (if equipped)
Press and hold the Panic button (4)
for more than one second. The horn
sounds and hazard warning lights
flash for about 30 seconds.
To cancel the panic mode, press any
button on the remote key.
Start-up
For more details, refer to the "Key
Ignition Switch" section in chapter
5.
To prevent damaging the remote
key:
• Keep the remote key away from
water or any liquid and fire.
Internal circuits may malfunc-
tion if the inside of the remote
key gets damp (from liquids or
moisture) or if it is heated. This
can exclude the remote key from
being covered under warranty.
Avoid dropping or throwing the
remote key.
Protect the remote key from
extreme temperatures.
NOTICE
i
i
3
Page 101 of 546
3-10
Convenient features of your vehicle
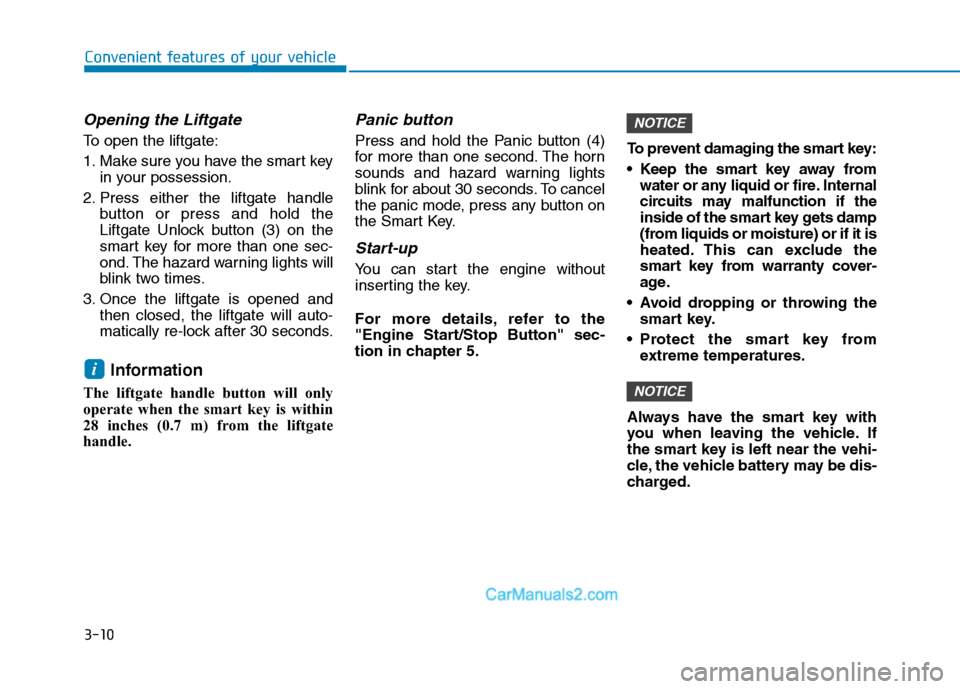
Opening the Liftgate
To open the liftgate:
1. Make sure you have the smart key
in your possession.
2. Press either the liftgate handle
button or press and hold the
Liftgate Unlock button (3) on the
smart key for more than one sec-
ond. The hazard warning lights will
blink two times.
3. Once the liftgate is opened and
then closed, the liftgate will auto-
matically re-lock after 30 seconds.
Information
The liftgate handle button will only
operate when the smart key is within
28 inches (0.7 m) from the liftgate
handle.
Panic button
Press and hold the Panic button (4)
for more than one second. The horn
sounds and hazard warning lights
blink for about 30 seconds. To cancel
the panic mode, press any button on
the Smart Key.
Start-up
You can start the engine without
inserting the key.
For more details, refer to the
"Engine Start/Stop Button" sec-
tion in chapter 5.To prevent damaging the smart key:
Keep the smart key away from
water or any liquid or fire. Internal
circuits may malfunction if the
inside of the smart key gets damp
(from liquids or moisture) or if it is
heated. This can exclude the
smart key from warranty cover-
age.
Avoid dropping or throwing the
smart key.
Protect the smart key from
extreme temperatures.
Always have the smart key with
you when leaving the vehicle. If
the smart key is left near the vehi-
cle, the vehicle battery may be dis-
charged.
NOTICE
NOTICE
i
Page 111 of 546

3-20
Convenient features of your vehicle
This system helps to protect your
vehicle and valuables. The horn will
sound and the hazard warning lights
will blink continuously if any of the
following occurs:
- A door is opened without using the
remote key or smart key.
- The liftgate is opened without
using the remote key or smart key.
- The engine hood is opened.
The alarm continues for 30 seconds,
then the system resets. To turn off
the alarm, unlock the doors with the
remote key or smart key.
The Theft Alarm System automatical-
ly sets 30 seconds after you lock the
doors and the liftgate. For the system
to activate, you must lock the doors
and the liftgate from outside the vehi-
cle with the remote key or smart key
or by pressing the button on the out-
side of the door handle with the smart
key in your possession.
The hazard warning lights will blink
and the chime will sound once to
indicate the system is armed.Once the security system is set,
opening any door, the liftgate, or the
hood without using the remote key or
smart key will cause the alarm to
activate.
The Theft Alarm System will not set if
the hood, the liftgate, or any door is
not fully closed. If the system will not
set, check the hood, the liftgate, or
the doors are fully closed.
Do not attempt to alter this system or
add other devices to it.
Information
• Do not lock the doors until all pas-
sengers have left the vehicle. If the
remaining passenger leaves the
vehicle when the system is armed,
the alarm will be activated.
• If the vehicle is not disarmed with the
remote key or smart key, open the
doors by using the mechanical key
and place the ignition switch in the
ON position (for remote key) or start
the engine (for smart key) by direct-
ly pressing the ignition switch with
the smart key.
• If the system is disarmed by unlock-
ing the vehicle, but neither a door or
the liftgate is opened within 30 sec-
onds, the doors will relock and the
system will rearm automatically.
i
T TH
HE
EF
FT
T-
-A
AL
LA
AR
RM
M
S
SY
YS
ST
TE
EM
M
Page 114 of 546
3-23
Convenient features of your vehicle
3
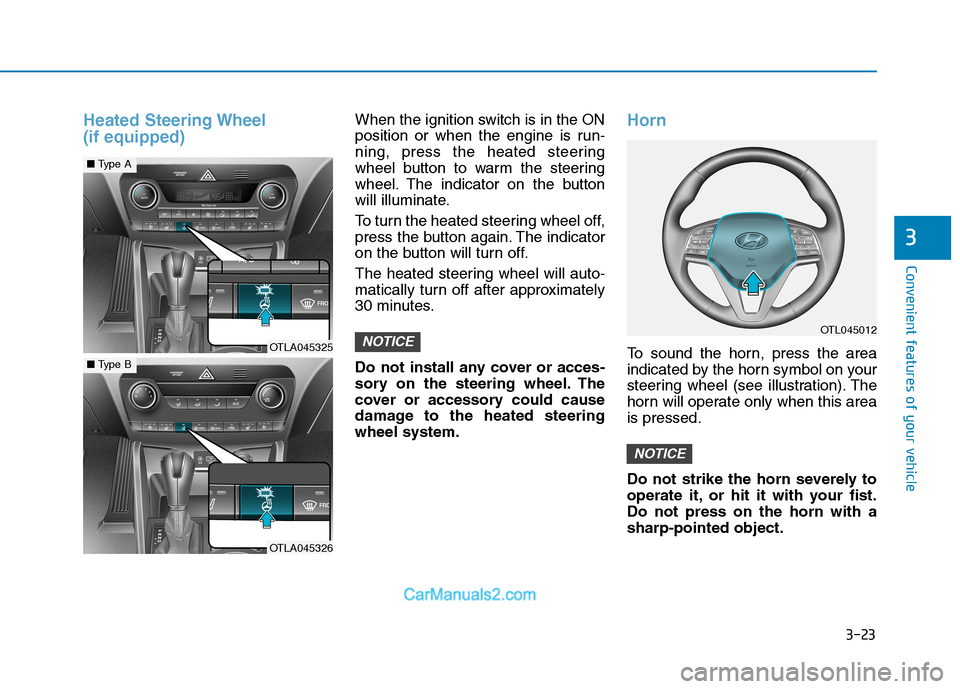
Heated Steering Wheel
(if equipped)When the ignition switch is in the ON
position or when the engine is run-
ning, press the heated steering
wheel button to warm the steering
wheel. The indicator on the button
will illuminate.
To turn the heated steering wheel off,
press the button again. The indicator
on the button will turn off.
The heated steering wheel will auto-
matically turn off after approximately
30 minutes.
Do not install any cover or acces-
sory on the steering wheel. The
cover or accessory could cause
damage to the heated steering
wheel system.Horn
To sound the horn, press the area
indicated by the horn symbol on your
steering wheel (see illustration). The
horn will operate only when this area
is pressed.
Do not strike the horn severely to
operate it, or hit it with your fist.
Do not press on the horn with a
sharp-pointed object.
NOTICE
NOTICEOTL045012
OTLA045325
■Type A
OTLA045326
■Type B
Page 188 of 546
3-97
Convenient features of your vehicle
3
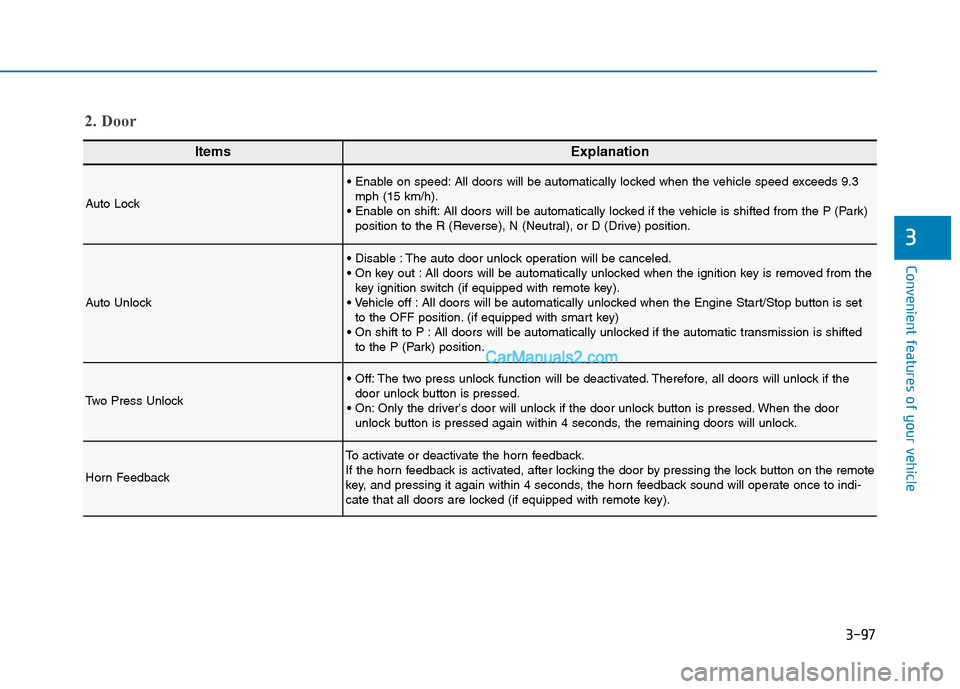
ItemsExplanation
Auto Lock
All doors will be automatically locked when the vehicle speed exceeds 9.3
mph (15 km/h).
All doors will be automatically locked if the vehicle is shifted from the P (Park)
position to the R (Reverse), N (Neutral), or D (Drive) position.
Auto Unlock
The auto door unlock operation will be canceled.
All doors will be automatically unlocked when the ignition key is removed from the
key ignition switch (if equipped with remote key).
All doors will be automatically unlocked when the Engine Start/Stop button is set
to the OFF position. (if equipped with smart key)
All doors will be automatically unlocked if the automatic transmission is shifted
to the P (Park) position.
Two Press Unlock
The two press unlock function will be deactivated. Therefore, all doors will unlock if the
door unlock button is pressed.
Only the driver's door will unlock if the door unlock button is pressed. When the door
unlock button is pressed again within 4 seconds, the remaining doors will unlock.
Horn Feedback
To activate or deactivate the horn feedback.
If the horn feedback is activated, after locking the door by pressing the lock button on the remote
key, and pressing it again within 4 seconds, the horn feedback sound will operate once to indi-
cate that all doors are locked (if equipped with remote key).
2. Door