2019 Hyundai Tucson lights
[x] Cancel search: lightsPage 79 of 546
2-61
Safety system of your vehicle
2
Wearing a thick cloth like ski wear
or hip protection wear.
Putting an additional thick cushion
on the seat.
Putting electrical devices (e.g.
notebook, satellite radio) on the
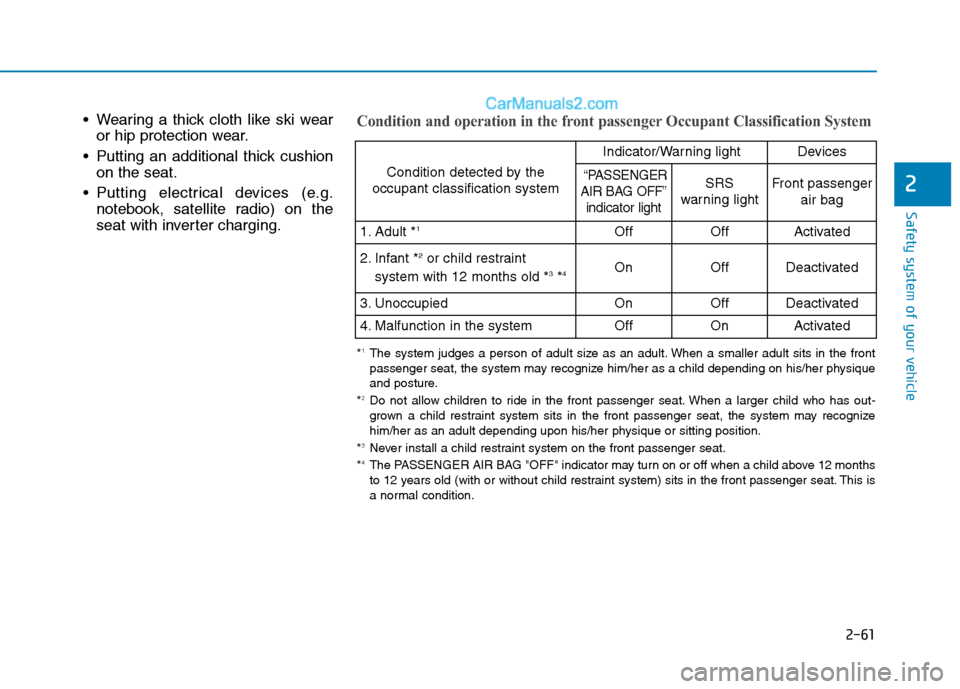
seat with inverter charging.Condition and operation in the front passenger Occupant Classification System
Condition detected by the
occupant classification system
Indicator/Warning lightDevices
“PASSENGER
AIR BAG OFF”
indicator lightSRS
warning lightFront passenger
air bag
1. Adult *1OffOffActivated
2. Infant *2or child restraint
system with 12 months old *3*4 OnOffDeactivated
3. Unoccupied OnOffDeactivated
4. Malfunction in the systemOffOnActivated
*1The system judges a person of adult size as an adult. When a smaller adult sits in the front
passenger seat, the system may recognize him/her as a child depending on his/her physique
and posture.
*
2Do not allow children to ride in the front passenger seat. When a larger child who has out-
grown a child restraint system sits in the front passenger seat, the system may recognize
him/her as an adult depending upon his/her physique or sitting position.
*
3Never install a child restraint system on the front passenger seat.
*4The PASSENGER AIR BAG "OFF" indicator may turn on or off when a child above 12 months
to 12 years old (with or without child restraint system) sits in the front passenger seat. This is
a normal condition.
Page 92 of 546
Convenient features of your vehicle
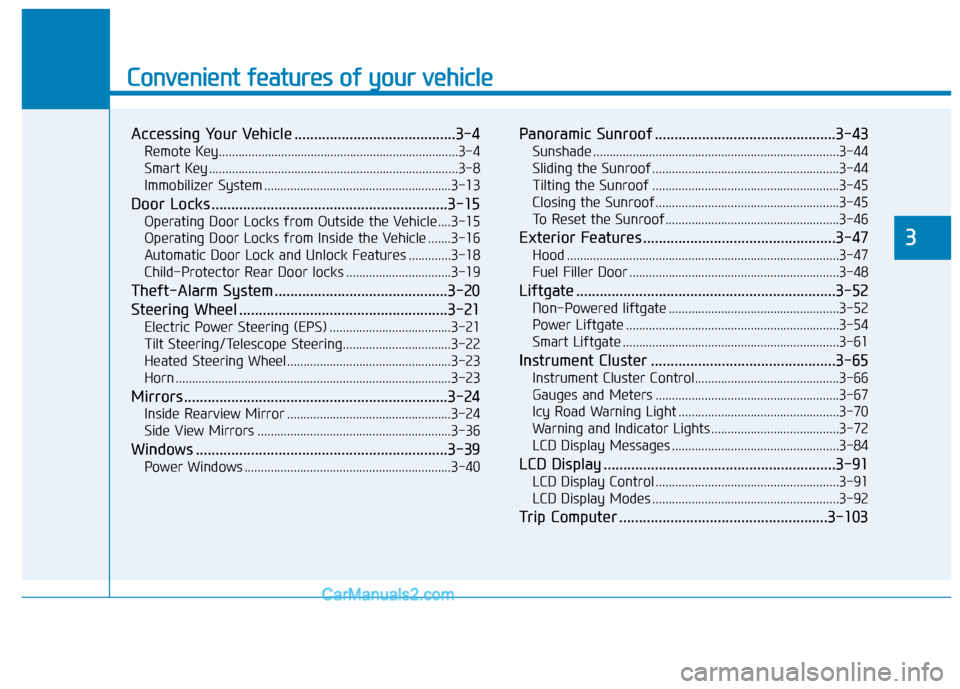
Accessing Your Vehicle .........................................3-4
Remote Key.........................................................................3-4
Smart Key ............................................................................3-8
Immobilizer System .........................................................3-13
Door Locks ............................................................3-15
Operating Door Locks from Outside the Vehicle ....3-15
Operating Door Locks from Inside the Vehicle .......3-16
Automatic Door Lock and Unlock Features .............3-18
Child-Protector Rear Door locks ................................3-19
Theft-Alarm System ............................................3-20
Steering Wheel .....................................................3-21
Electric Power Steering (EPS) .....................................3-21
Tilt Steering/Telescope Steering.................................3-22
Heated Steering Wheel ..................................................3-23
Horn ....................................................................................3-23
Mirrors ...................................................................3-24
Inside Rearview Mirror ..................................................3-24
Side View Mirrors ...........................................................3-36
Windows ................................................................3-39
Power Windows ...............................................................3-40
Panoramic Sunroof ..............................................3-43
Sunshade ...........................................................................3-44
Sliding the Sunroof .........................................................3-44
Tilting the Sunroof .........................................................3-45
Closing the Sunroof........................................................3-45
To Reset the Sunroof.....................................................3-46
Exterior Features .................................................3-47
Hood ...................................................................................3-47
Fuel Filler Door ................................................................3-48
Liftgate ..................................................................3-52
Non-Powered liftgate ....................................................3-52
Power Liftgate .................................................................3-54
Smart Liftgate ..................................................................3-61
Instrument Cluster ...............................................3-65
Instrument Cluster Control............................................3-66
Gauges and Meters ........................................................3-67
Icy Road Warning Light .................................................3-70
Warning and Indicator Lights .......................................3-72
LCD Display Messages ...................................................3-84
LCD Display ...........................................................3-91
LCD Display Control ........................................................3-91
LCD Display Modes .........................................................3-92
Trip Computer .....................................................3-103
3
Page 93 of 546
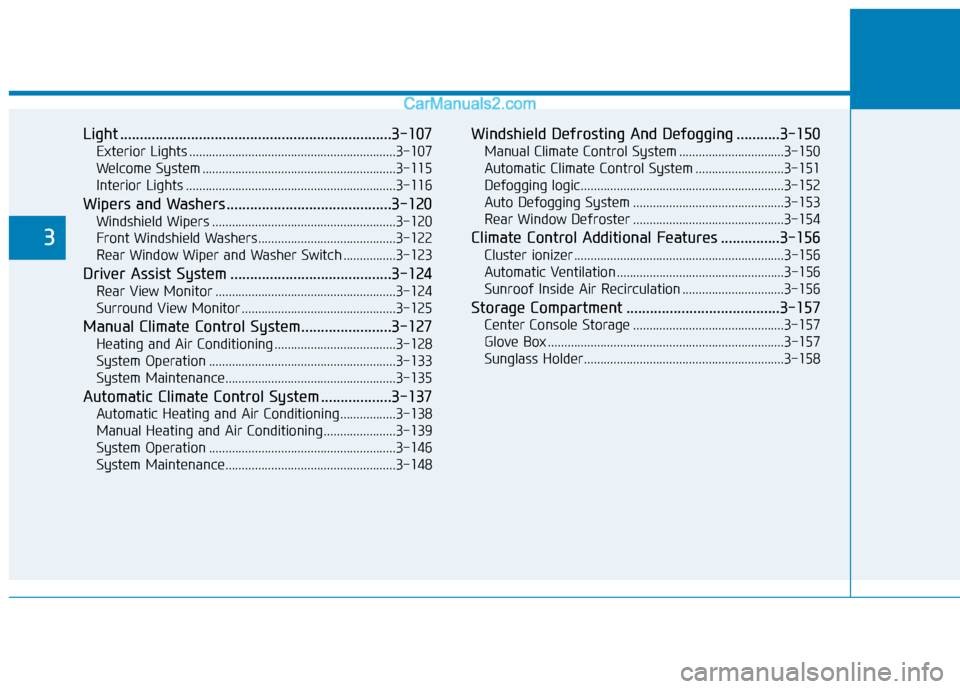
Light .....................................................................3-107
Exterior Lights ...............................................................3-107
Welcome System ...........................................................3-115
Interior Lights ................................................................3-116
Wipers and Washers..........................................3-120
Windshield Wipers ........................................................3-120
Front Windshield Washers ..........................................3-122
Rear Window Wiper and Washer Switch ................3-123
Driver Assist System .........................................3-124
Rear View Monitor .......................................................3-124
Surround View Monitor ...............................................3-125
Manual Climate Control System.......................3-127
Heating and Air Conditioning .....................................3-128
System Operation .........................................................3-133
System Maintenance....................................................3-135
Automatic Climate Control System ..................3-137
Automatic Heating and Air Conditioning.................3-138
Manual Heating and Air Conditioning......................3-139
System Operation .........................................................3-146
System Maintenance....................................................3-148
Windshield Defrosting And Defogging ...........3-150
Manual Climate Control System ................................3-150
Automatic Climate Control System ...........................3-151
Defogging logic..............................................................3-152
Auto Defogging System ..............................................3-153
Rear Window Defroster ..............................................3-154
Climate Control Additional Features ...............3-156
Cluster ionizer ................................................................3-156
Automatic Ventilation ...................................................3-156
Sunroof Inside Air Recirculation ...............................3-156
Storage Compartment .......................................3-157
Center Console Storage ..............................................3-157
Glove Box ........................................................................3-157
Sunglass Holder.............................................................3-158
3
Page 95 of 546
3-4
Convenient features of your vehicle
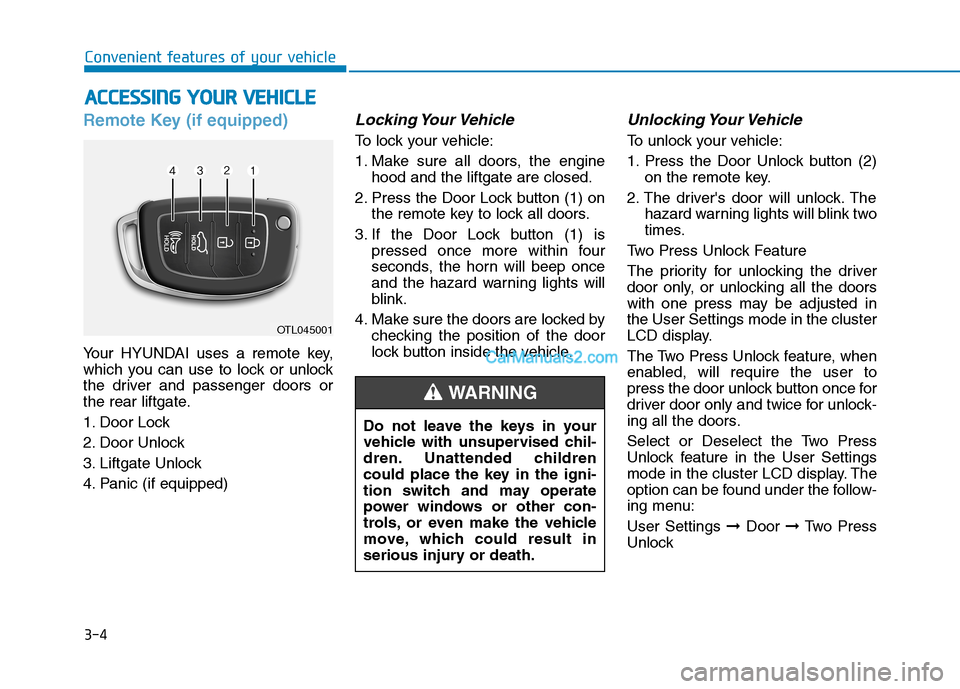
Remote Key (if equipped)
Your HYUNDAI uses a remote key,
which you can use to lock or unlock
the driver and passenger doors or
the rear liftgate.
1. Door Lock
2. Door Unlock
3. Liftgate Unlock
4. Panic (if equipped)
Locking Your Vehicle
To lock your vehicle:
1. Make sure all doors, the engine
hood and the liftgate are closed.
2. Press the Door Lock button (1) on
the remote key to lock all doors.
3. If the Door Lock button (1) is
pressed once more within four
seconds, the horn will beep once
and the hazard warning lights will
blink.
4. Make sure the doors are locked by
checking the position of the door
lock button inside the vehicle.
Unlocking Your Vehicle
To unlock your vehicle:
1. Press the Door Unlock button (2)
on the remote key.
2. The driver's door will unlock. The
hazard warning lights will blink two
times.
Two Press Unlock Feature
The priority for unlocking the driver
door only, or unlocking all the doors
with one press may be adjusted in
the User Settings mode in the cluster
LCD display.
The Two Press Unlock feature, when
enabled, will require the user to
press the door unlock button once for
driver door only and twice for unlock-
ing all the doors.
Select or Deselect the Two Press
Unlock feature in the User Settings
mode in the cluster LCD display. The
option can be found under the follow-
ing menu:
User Settings ➞Door ➞Two Press
Unlock
A AC
CC
CE
ES
SS
SI
IN
NG
G
Y
YO
OU
UR
R
V
VE
EH
HI
IC
CL
LE
E
OTL045001
Do not leave the keys in your
vehicle with unsupervised chil-
dren. Unattended children
could place the key in the igni-
tion switch and may operate
power windows or other con-
trols, or even make the vehicle
move, which could result in
serious injury or death.
WARNING
Page 96 of 546
3-5
Convenient features of your vehicle
The Two Press Unlock feature can
also be enabled or disabled by
pressing the door lock and unlock
buttons simultaneously on the Key
FOB:
Press and hold both the Door Lock
button and the Door Unlock button
simultaneously until the hazard
warning lights blink.
This will enable or disable the Two
Press Unlock feature. Repeat this
procedure to enable/disable the
mode again.
Information
After unlocking the doors, the doors
will automatically relock after 30 sec-
onds unless a door is opened.
Liftgate unlocking
To unlock the liftgate:
1. Press and hold the Liftgate Unlock
button (3) on the remote key for
more than one second.
2. The hazard warning lights will
blink two times.
3. Once the liftgate is opened and
then closed, the liftgate will auto-
matically re-lock after 30 seconds.
Information
The word "HOLD" is written on the
button to inform you that you must
press and hold the button for more
than one second.
Panic button (if equipped)
Press and hold the Panic button (4)
for more than one second. The horn
sounds and hazard warning lights
flash for about 30 seconds.
To cancel the panic mode, press any
button on the remote key.
Start-up
For more details, refer to the "Key
Ignition Switch" section in chapter
5.
To prevent damaging the remote
key:
• Keep the remote key away from
water or any liquid and fire.
Internal circuits may malfunc-
tion if the inside of the remote
key gets damp (from liquids or
moisture) or if it is heated. This
can exclude the remote key from
being covered under warranty.
Avoid dropping or throwing the
remote key.
Protect the remote key from
extreme temperatures.
NOTICE
i
i
3
Page 99 of 546
3-8
Convenient features of your vehicle
Smart Key (if equipped)
Your HYUNDAI uses a Smart Key,
which you can use to lock or unlock
the driver and passenger doors or
the liftgate.
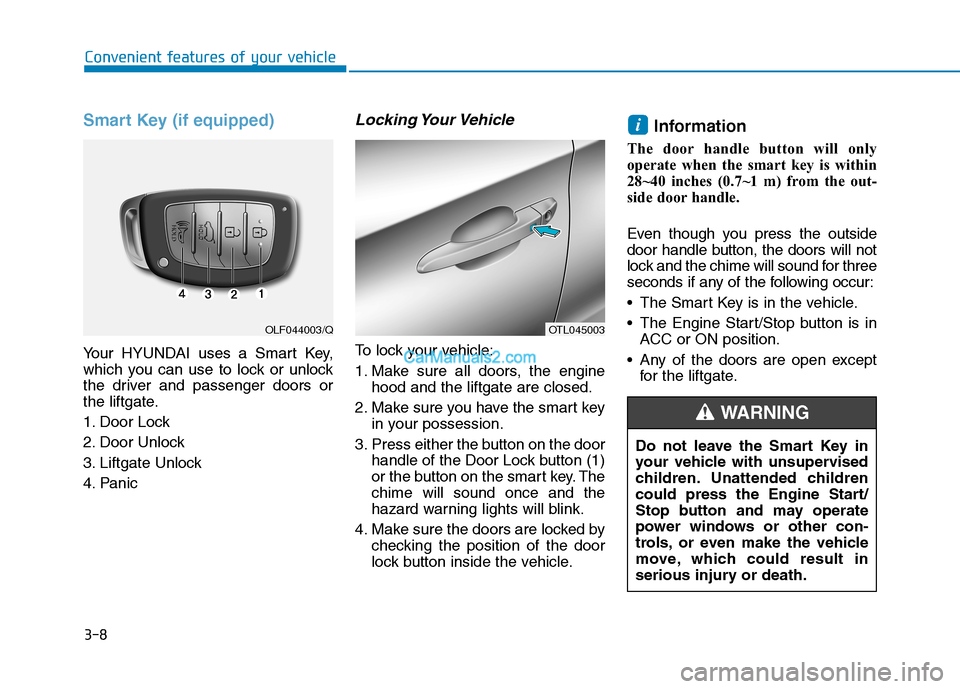
1. Door Lock
2. Door Unlock
3. Liftgate Unlock
4. Panic
Locking Your Vehicle
To lock your vehicle:
1. Make sure all doors, the engine
hood and the liftgate are closed.
2. Make sure you have the smart key
in your possession.
3. Press either the button on the door
handle of the Door Lock button (1)
or the button on the smart key. The
chime will sound once and the
hazard warning lights will blink.
4. Make sure the doors are locked by
checking the position of the door
lock button inside the vehicle.
Information
The door handle button will only
operate when the smart key is within
28~40 inches (0.7~1 m) from the out-
side door handle.
Even though you press the outside
door handle button, the doors will not
lock and the chime will sound for three
seconds if any of the following occur:
The Smart Key is in the vehicle.
The Engine Start/Stop button is in
ACC or ON position.
Any of the doors are open except
for the liftgate.
i
OTL045003OLF044003/Q
Do not leave the Smart Key in
your vehicle with unsupervised
children. Unattended children
could press the Engine Start/
Stop button and may operate
power windows or other con-
trols, or even make the vehicle
move, which could result in
serious injury or death.
WARNING
Page 100 of 546
3-9
Convenient features of your vehicle
3
Unlocking Your Vehicle
To unlock your vehicle:
1. Make sure you have the smart key
in your possession.
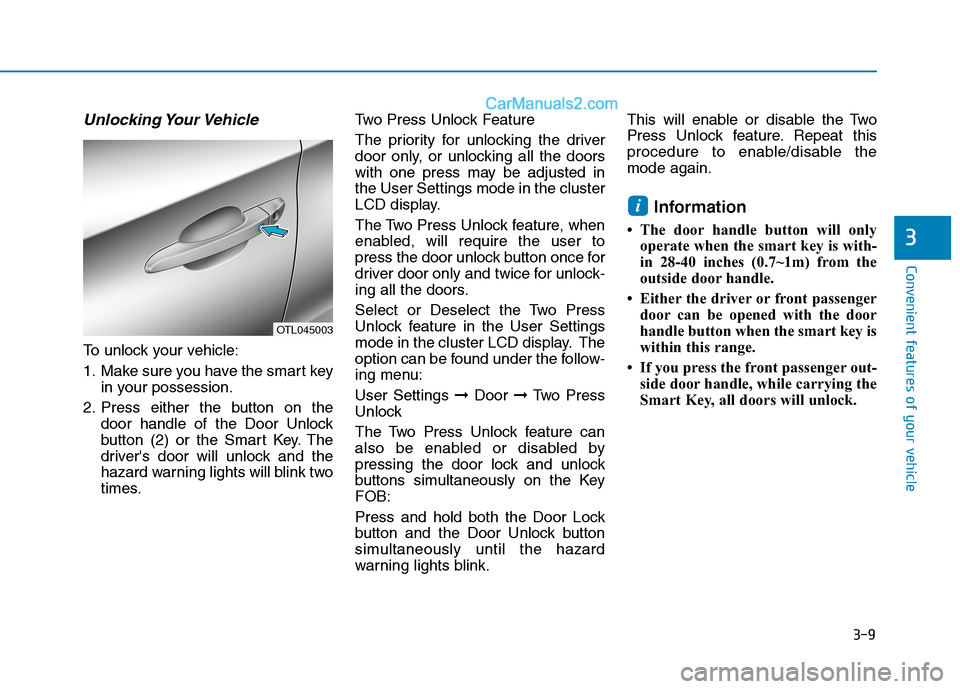
2. Press either the button on the
door handle of the Door Unlock
button (2) or the Smart Key. The
driver's door will unlock and the
hazard warning lights will blink two
times.Two Press Unlock Feature
The priority for unlocking the driver
door only, or unlocking all the doors
with one press may be adjusted in
the User Settings mode in the cluster
LCD display.
The Two Press Unlock feature, when
enabled, will require the user to
press the door unlock button once for
driver door only and twice for unlock-
ing all the doors.
Select or Deselect the Two Press
Unlock feature in the User Settings
mode in the cluster LCD display. The
option can be found under the follow-
ing menu:
User Settings ➞Door ➞Two Press
Unlock
The Two Press Unlock feature can
also be enabled or disabled by
pressing the door lock and unlock
buttons simultaneously on the Key
FOB:
Press and hold both the Door Lock
button and the Door Unlock button
simultaneously until the hazard
warning lights blink.This will enable or disable the Two
Press Unlock feature. Repeat this
procedure to enable/disable the
mode again.
Information
• The door handle button will only
operate when the smart key is with-
in 28-40 inches (0.7~1m) from the
outside door handle.
• Either the driver or front passenger
door can be opened with the door
handle button when the smart key is
within this range.
• If you press the front passenger out-
side door handle, while carrying the
Smart Key, all doors will unlock.
i
OTL045003
Page 101 of 546
3-10
Convenient features of your vehicle
Opening the Liftgate
To open the liftgate:
1. Make sure you have the smart key
in your possession.
2. Press either the liftgate handle
button or press and hold the
Liftgate Unlock button (3) on the
smart key for more than one sec-
ond. The hazard warning lights will
blink two times.
3. Once the liftgate is opened and
then closed, the liftgate will auto-
matically re-lock after 30 seconds.
Information
The liftgate handle button will only
operate when the smart key is within
28 inches (0.7 m) from the liftgate
handle.
Panic button
Press and hold the Panic button (4)
for more than one second. The horn
sounds and hazard warning lights
blink for about 30 seconds. To cancel
the panic mode, press any button on
the Smart Key.
Start-up
You can start the engine without
inserting the key.
For more details, refer to the
"Engine Start/Stop Button" sec-
tion in chapter 5.To prevent damaging the smart key:
Keep the smart key away from
water or any liquid or fire. Internal
circuits may malfunction if the
inside of the smart key gets damp
(from liquids or moisture) or if it is
heated. This can exclude the
smart key from warranty cover-
age.
Avoid dropping or throwing the
smart key.
Protect the smart key from
extreme temperatures.
Always have the smart key with
you when leaving the vehicle. If
the smart key is left near the vehi-
cle, the vehicle battery may be dis-
charged.
NOTICE
NOTICE
i