Page 307 of 546
5-41
Driving your vehicle
5
The system automatically applies the
brakes to maintain the vehicle speed
below 5 mph (8 km/h) and allows the
driver to concentrate on steering the
vehicle down hill.
The DBC defaults to the OFF
position whenever the ignition
switch is placed in the ON posi-
tion.
Noise or vibration may occur
from the brakes when the DBC is
activated.
The rear stop light comes on
when DBC is activated.
NOTICE
Always turn off the DBC on nor-
mal roads. The DBC might acti-
vate inadvertently from the stand-
by mode when driving through
speed bumps or making sharp
curves.
WARNING
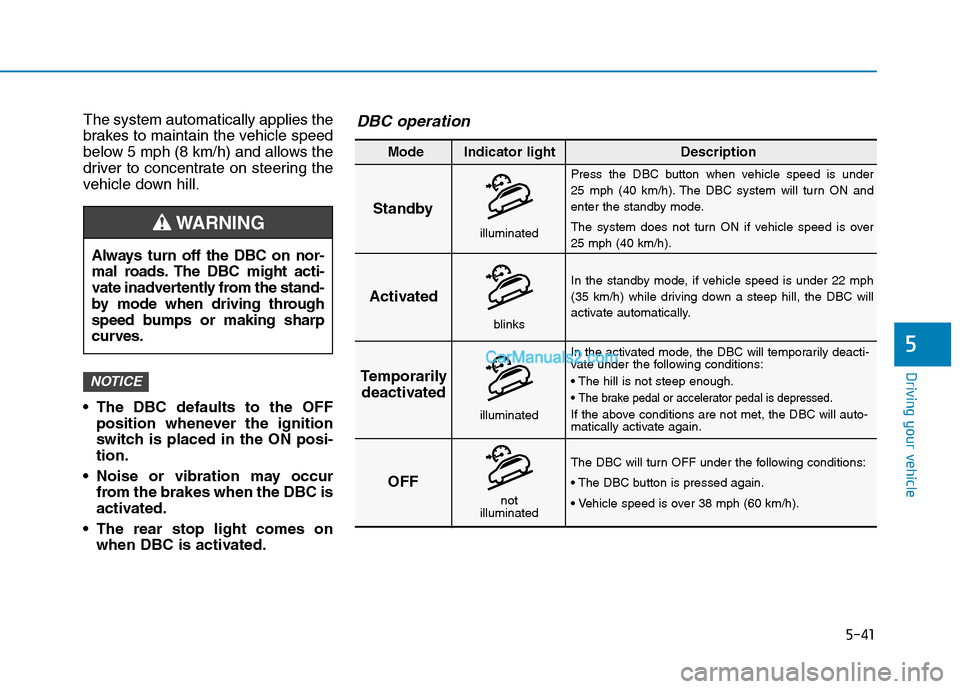
Standby
Press the DBC button when vehicle speed is under
25 mph (40 km/h). The DBC system will turn ON and
enter the standby mode.
The system does not turn ON if vehicle speed is over
25 mph (40 km/h).
In the standby mode, if vehicle speed is under 22 mph
(35 km/h) while driving down a steep hill, the DBC will
activate automatically.
In the activated mode, the DBC will temporarily deacti-
vate under the following conditions:
The brake pedal or accelerator pedal is depressed.
If the above conditions are not met, the DBC will auto-
matically activate again.
The DBC will turn OFF under the following conditions:
Activated
Temporarily
deactivated
OFF
Mode Indicator light Description
blinks
illuminated
not
illuminated
illuminated
DBC operation
Page 311 of 546
5-45
Driving your vehicle
5
AWD operation
If AWD warning light ( ) stays on the instrument cluster, your vehicle may have a malfunction with the
AWD system. When the AWD warning light ( ) illuminates have your vehicle checked by an authorized
HYUNDAI dealer as soon as possible.
WARNING
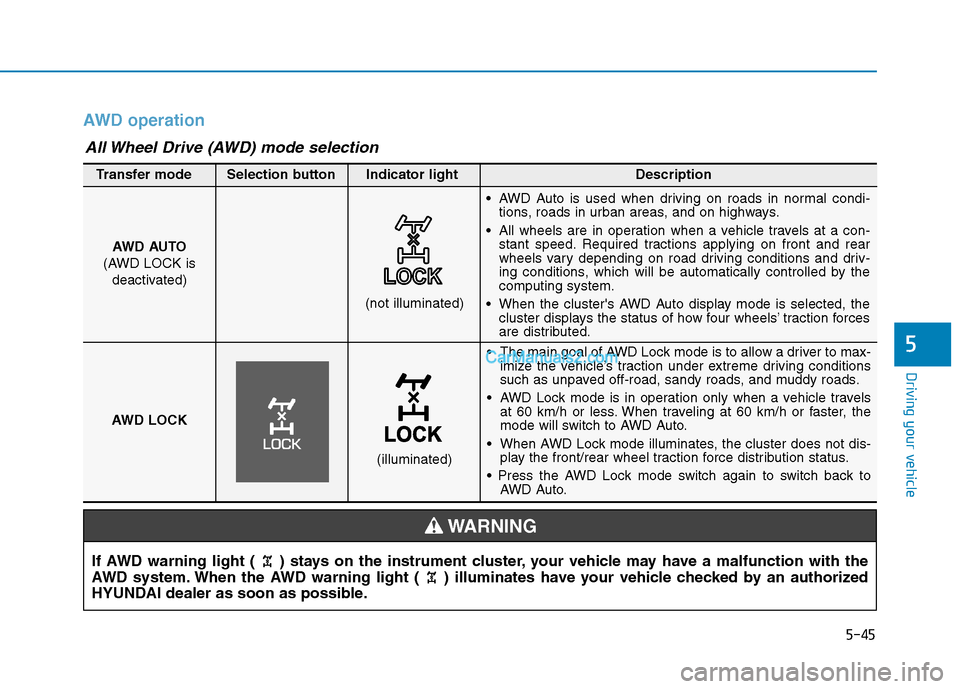
The main goal of AWD Lock mode is to allow a driver to max-
imize the vehicle’s traction under extreme driving conditions
such as unpaved off-road, sandy roads, and muddy roads.
AWD Lock mode is in operation only when a vehicle travels
at 60 km/h or less. When traveling at 60 km/h or faster, the
mode will switch to AWD Auto.
When AWD Lock mode illuminates, the cluster does not dis-
play the front/rear wheel traction force distribution status.
AWD Auto. AWD AUTO
(AWD LOCK is
deactivated)
(not illuminated)
Transfer mode Selection button Indicator light Description
AWD Auto is used when driving on roads in normal condi-
tions, roads in urban areas, and on highways.
All wheels are in operation when a vehicle travels at a con-
stant speed. Required tractions applying on front and rear
wheels vary depending on road driving conditions and driv-
ing conditions, which will be automatically controlled by the
computing system.
When the cluster's AWD Auto display mode is selected, the
cluster displays the status of how four wheels’ traction forces
are distributed.
AWD LOCK
(illuminated)
All Wheel Drive (AWD) mode selection
Page 312 of 546
5-46
Driving your vehicle
Maintain AWD Auto mode when
driving on roads in normal con-
ditions.
When driving under normal road
conditions (especially when cor-
nering) in AWD Lock mode, a
driver may find minor mechani-
cal vibration or noise, which is
extremely normal phenomenon,
not a malfunction. When AWD
Lock mode is released, such
noise or vibration will be imme-
diately gone.When driving on normal roads,
deactivate the AWD LOCK mode
by pushing the AWD LOCK button
(AWD LOCK indicator light goes
off). Driving on normal roads with
the AWD LOCK mode, especially,
when cornering may cause
mechanical noise or vibration. The
noise and vibration will disappear
when the AWD LOCK mode is
deactivated. Prolong driving with
the noise and vibration may dam-
age some parts of the power train.
Information
When the AWD LOCK mode is deac-
tivated, a sensation may be felt as the
driving power is delivered entirely to
the front wheels.
For safe AWD operation
Before driving
Make sure all passengers are
wearing seat belts.
Sit upright and closer to the steer-
ing wheel than usual. Adjust the
steering wheel to a position com-
fortable for you to drive.
Driving on snow-covered or icy
roads
Start off slowly by applying the
accelerator pedal gently.
Use snow tires or tire chains.
Keep sufficient distance between
your vehicle and the vehicle in front
of you.
Apply engine braking during decel-
eration by switching the gear shift
lever to Manual Shift Mode and
manually selecting a lower gear.
Avoid speeding, rapid acceleration,
sudden brake applications, and
sharp turns to prevent skids.
i
NOTICENOTICE
Page 323 of 546

5-57
Driving your vehicle
5
Blind-Spot Collision Warning -
Sensor Location
The sensors are located inside the
rear bumper.
Always keep the rear bumper clean
for the proper operation of the sys-
tem.
Warning message
Blind-Spot Collision Warning
(BCW) system disabled.
Radar blocked
This warning message may appear
when :
- One or both of the sensors on the
rear bumper is blocked by dirt or
snow or a foreign object.
- Driving in rural areas where the
BCW sensor does not detect
another vehicle for an extended
period of time.
- When there is inclement weather
such as heavy snow or rain.- A trailer or carrier is installed. To
use the BCW system, remove the
trailer or carrier from your vehicle.
If any of these conditions occur, the
light on the BCW switch and the sys-
tem will turn off automatically.
When the BCW cancelled warning
message is displayed in the cluster,
check to make sure that the rear
bumper is free from any dirt or snow
in the areas where the sensor is
located. Remove any dirt, snow, or
foreign material that could interfere
with the radar sensors.
After any dirt or debris is removed,
the BCW system should operate nor-
mally after about 10 minutes of driv-
ing the vehicle.
If the system still does not operate
normally have your vehicle inspected
by an authorized HYUNDAI dealer.
Information
Turn off the system by pressing the
BCW switch and deselecting Rear
Cross Traffic Alert from the User
Settings mode on the cluster, when
using a trailer or carrier behind your
vehicle.
i
OTLE058031
OIK057092L
Page 355 of 546

5-89
Driving your vehicle
5
LKA System Operation
To activate/deactivate the LKA sys-
tem:
With the ignition switch in the ON
position, press the LKA system
switch located on the instrument
panel on the left hand side of the
steering wheel. The indicator in the
cluster display will initially illuminate
white. This indicates the LKA system
is in the READY but NOT ENABLED
state.
If you press the LKA button again,
the indicator on the cluster display
will go off.Note that the vehicle
speed must be at least
approximately 40 mph
(64 km/h) to ENABLE the
LKA system. The indicator in the
cluster display will illuminate green.
The color of indicator will change
depending on the condition of LKA
system.
- White :Sensor does not detect
lane markers or vehicle
speed is under 40 mph (64
km/h).
- Green : Sensor detects lane mark-
ers and the system is able
to control vehicle steering.
Information
If the indicator (white) is activated
from the previous ignition cycle, the
system will turn ON without any addi-
tional control. If you press the LKA
switch again, the indicator on the clus-
ter goes off.
LKA system activation
To see the LKA system screen on
the LCD display in the cluster,
select Assist mode ( ).For more
details, refer to "LCD Display
Modes" in chapter 3.
i
OTLE058189OTL058188
Page 369 of 546
5-103
Driving your vehicle
5
Cruise Control will be canceled
when:
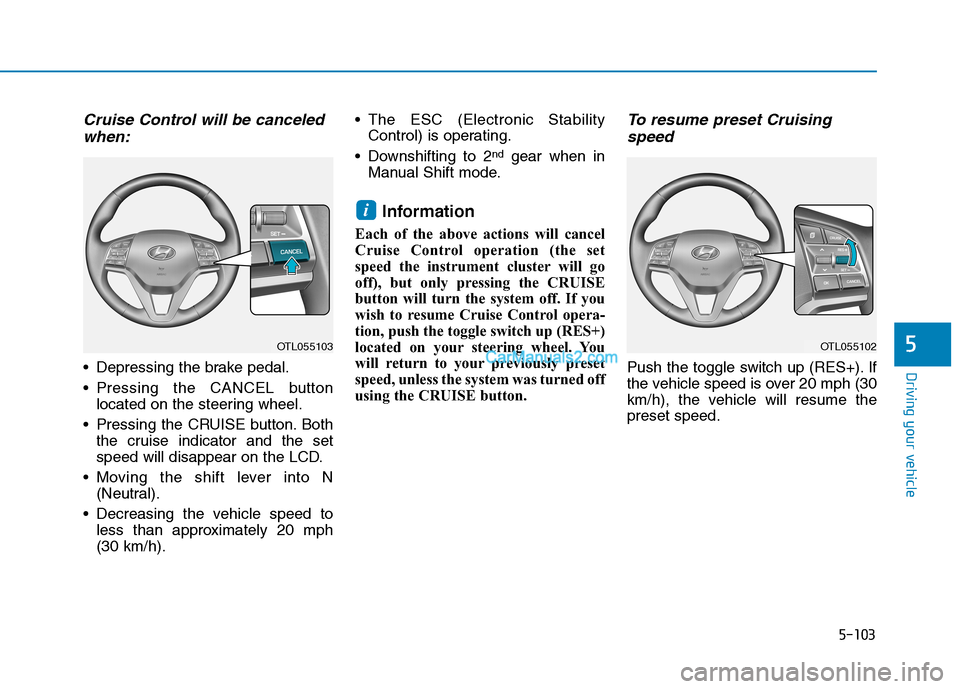
Depressing the brake pedal.
Pressing the CANCEL button
located on the steering wheel.
Pressing the CRUISE button. Both
the cruise indicator and the set
speed will disappear on the LCD.
Moving the shift lever into N
(Neutral).
Decreasing the vehicle speed to
less than approximately 20 mph
(30 km/h). The ESC (Electronic Stability
Control) is operating.
Downshifting to 2
ndgear when in
Manual Shift mode.
Information
Each of the above actions will cancel
Cruise Control operation (the set
speed the instrument cluster will go
off), but only pressing the CRUISE
button will turn the system off. If you
wish to resume Cruise Control opera-
tion, push the toggle switch up (RES+)
located on your steering wheel. You
will return to your previously preset
speed, unless the system was turned off
using the CRUISE button.
To resume preset Cruising
speed
Push the toggle switch up (RES+). If
the vehicle speed is over 20 mph (30
km/h), the vehicle will resume the
preset speed.
i
OTL055102OTL055103
Page 371 of 546
5-105
Driving your vehicle
5
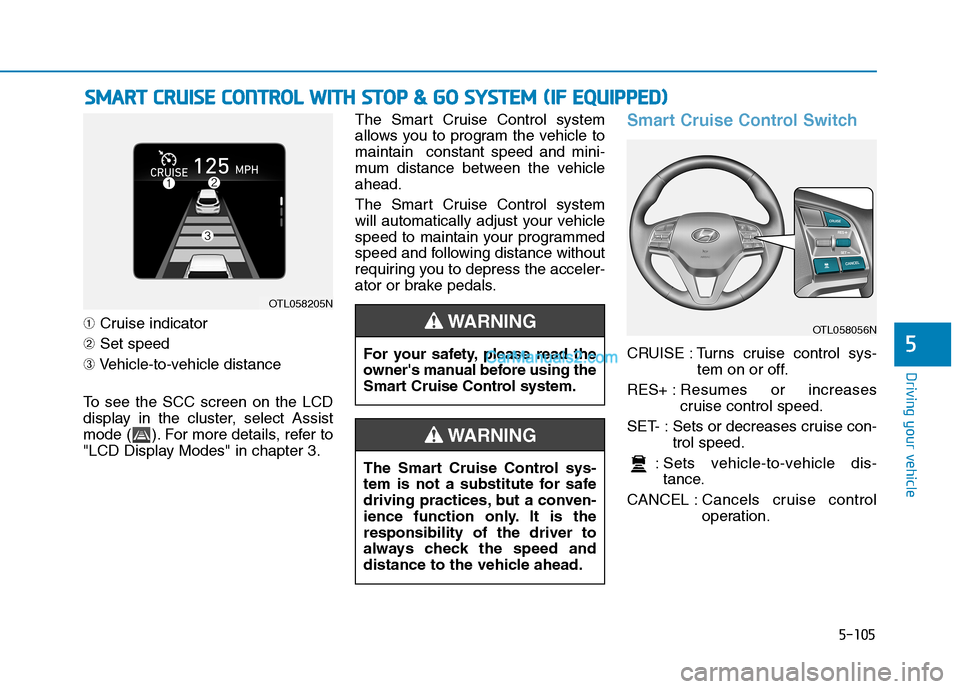
➀Cruise indicator
➁Set speed
➂Vehicle-to-vehicle distance
To see the SCC screen on the LCD
display in the cluster, select Assist
mode ( ). For more details, refer to
"LCD Display Modes" in chapter 3.The Smart Cruise Control system
allows you to program the vehicle to
maintain constant speed and mini-
mum distance between the vehicle
ahead.
The Smart Cruise Control system
will automatically adjust your vehicle
speed to maintain your programmed
speed and following distance without
requiring you to depress the acceler-
ator or brake pedals.
Smart Cruise Control Switch
CRUISE : Turns cruise control sys-
tem on or off.
RES+ :Resumes or increases
cruise control speed.
SET- : Sets or decreases cruise con-
trol speed.
: Sets vehicle-to-vehicle dis-
tance.
CANCEL :Cancels cruise control
operation.
S SM
MA
AR
RT
T
C
CR
RU
UI
IS
SE
E
C
CO
ON
NT
TR
RO
OL
L
W
WI
IT
TH
H
S
ST
TO
OP
P
&
&
G
GO
O
S
SY
YS
ST
TE
EM
M
(
(I
IF
F
E
EQ
QU
UI
IP
PP
PE
ED
D)
)
OTL058205N
The Smart Cruise Control sys-
tem is not a substitute for safe
driving practices, but a conven-
ience function only. It is the
responsibility of the driver to
always check the speed and
distance to the vehicle ahead.
WARNING
OTL058056N
For your safety, please read the
owner's manual before using the
Smart Cruise Control system.
WARNING
Page 382 of 546
5-116
Driving your vehicle
Normal:
Vehicle speed following the front
vehicle to maintain the set distance
is normal.
Slow:
Vehicle speed following the front
vehicle to maintain the set distance
is slower than normal speed.
Information
When you select the SCC Reaction
sensitivity in the User Settings menu,
this setting will remain as the default
setting each time you start your vehi-
cle.
Conventional Cruise Control
Mode
The driver may choose to switch to
use the conventional Cruise Control
mode (speed only control function)
by following these steps:
1. Push the CRUISE button on the
steering wheel to turn the system
on. The cruise ( ) indi-
cator will illuminate.
2. Push and hold the Vehicle-to-
Vehicle Distance button for more
than 2 seconds.
3. Choose between "Smart Cruise
Control" and "Cruise Control".
When the system is canceled using
the CRUISE button or the CRUISE
button is used after the engine is
turned on, the Smart Cruise Control
mode will turn on.
i
When using the conventional
Cruise Control mode, you must
manually adjust the distance to
other vehicles by depressing
the brake pedal. The system
does not automatically adjust
the distance to vehicles in front
of you.
WARNING