2019 HYUNDAI SONATA HYBRID lock
[x] Cancel search: lockPage 153 of 546
3-17
Convenient features of your vehicle
3
Tilt Steering / Telescope Steering
When adjusting the steering wheel to
a comfortable position, adjust the
steering wheel so that it points
toward your chest, not toward your
face. Make sure you can see the
instrument panel warning lights and
gauges. After adjusting, push the
steering wheel both up and down to
be certain it is locked in position.
Always adjust the position of the
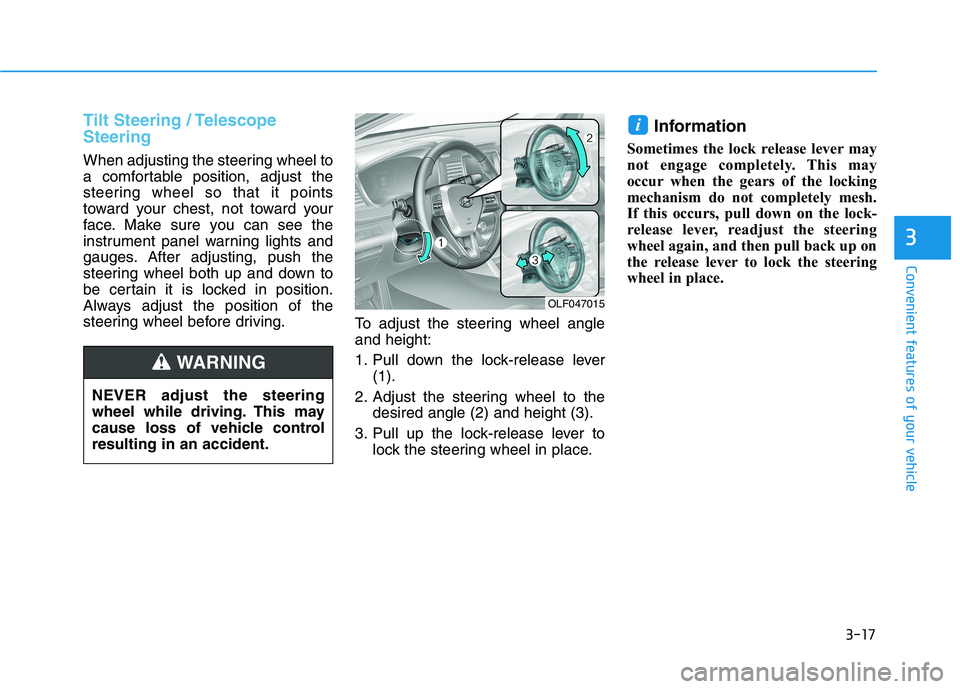
steering wheel before driving.To adjust the steering wheel angleand height:
1. Pull down the lock-release lever
(1).
2. Adjust the steering wheel to the desired angle (2) and height (3).
3. Pull up the lock-release lever to lock the steering wheel in place. Information
Sometimes the lock release lever may
not engage completely. This may
occur when the gears of the locking
mechanism do not completely mesh.
If this occurs, pull down on the lock-
release lever, readjust the steering
wheel again, and then pull back up on
the release lever to lock the steering
wheel in place.
i
OLF047015
NEVER adjust the steering
wheel while driving. This may
cause loss of vehicle controlresulting in an accident.
WARNING
Page 159 of 546
3-23
Convenient features of your vehicle
3
To adjust the Zone setting:
1. Determine the desired ZoneNumber based upon your current
location on the Zone Map.
2. Press and hold the button for more than 3 but less than 6 sec-
onds, the current Zone Number
will appear on the display.
3. Pressing and holding the button again will cause the numbers to
increment (Note: they will repeat
…13, 14, 15, 1, 2, …). Releasing
the button when the desired Zone
Number appears on the display
will set the new Zone.
4. Within about 5 seconds the com- pass will start displaying a com-pass heading again.
There are some conditions that can
cause changes to the vehicle mag-
nets, such as installing a ski rack or
a CB antenna. Body repair work on
the vehicle can also cause changes
to the vehicle’s magnetic field. In
these situations, the compass will
need to be re-calibrated to quickly
correct these changes. If you need to recalibrate the com-pass:
1. Press and hold the button for
more than 6 seconds. When the
compass memory is cleared a "C"
will appear in the display.
2. Drive the vehicle in 2 complete cir- cles at less than 8 km/h (5 mph).Integrated HomeLink ®
Wireless
Control System
The HomeLink ®
Wireless Control
System can replace up to three hand-
held radio-frequency (RF) transmit-
ters with a single built-in device. This
innovative feature will learn the radiofrequency codes of most current
transmitters to operate devices such
as gate operators, garage door open-
ers, entry door locks, security sys-
tems, even home lighting. Both stan-
dard and rolling code-equipped trans-
mitters can be programmed by fol-
lowing the outlined procedures. Additional HomeLink ®
information
can be found at: www.homelink.com
or by calling 1-800-355-3515.
Retain the original transmitter of the
RF device you are programming for
use in other vehicles as well as forfuture HomeLink ®
programming. It is
also suggested that upon the sale of
the vehicle, the programmedHomeLink ®
buttons be erased for
security purposes.
Page 162 of 546
3-26
Convenient features of your vehicle
5. Press and hold the just-trainedHomeLink ®
button and observe
the red Status Indicator LED. If the
indicator light stays on constantly,
programming is complete and
your device should activate whenthe HomeLink ®
button is pressed
and released.
6. To program the remaining two HomeLink ®
buttons, follow steps 2
through 5.Gate operator & Canadian program-
ming
During programming, your handheld
transmitter may automatically stop
transmitting. Continue to press the
Integrated HomeLink ®
Wireless
Control System button (note steps 2 through 4 in the Standard
Programming portion of this docu-
ment) while you press and re-press
("cycle") your handheld transmitter
every two seconds until the frequen-
cy signal has been learned. The indi-
cator light will flash slowly and then
rapidly after several seconds upon
successful training.
Operating HomeLink®
To operate, simply press and release
the programmed HomeLink ®
button.
Activation will now occur for the
trained device (i.e. garage door
opener, gate operator, security sys-
tem, entry door lock, home/office
lighting, etc.). For convenience, the
hand-held transmitter of the device
may also be used at any time.
Reprogramming a single
HomeLink®button
To program a new device to a previ-
ously trained HomeLink ®
button, fol-
low these steps:
1. Press and hold the desired HomeLink ®
button. Do NOT
release until step 4 has been com- pleted.
2. When the indicator light begins to flash slowly (after 20 seconds),
position the handheld transmitter
2-8 cm (1 to 3 inches) away fromthe HomeLink ®
surface.
3. Press and hold the handheld transmitter button. The HomeLink ®
indicator light will flash, first slowly
and then rapidly.
4. When the indicator light begins to flash rapidly, release both buttons.
5. Press and hold the just-trained HomeLink ®
button and observe
the red Status Indicator LED. If the
indicator light stays on constantly,
programming is complete and
your new device should activate.
Page 167 of 546
3-31
Convenient features of your vehicle
3
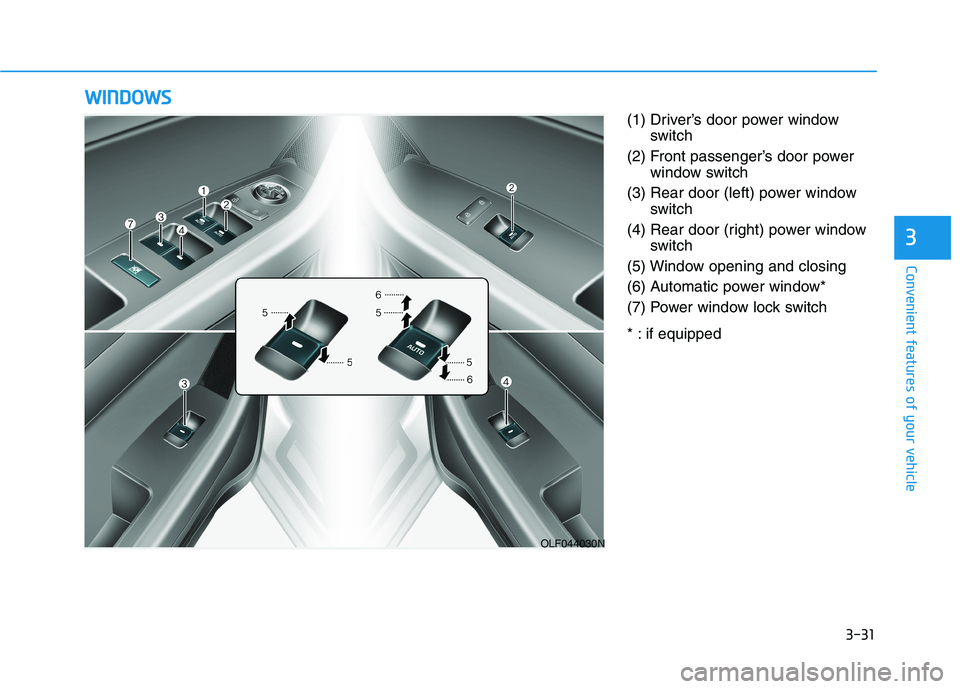
(1) Driver’s door power windowswitch
(2) Front passenger’s door power window switch
(3) Rear door (left) power window switch
(4) Rear door (right) power window switch
(5) Window opening and closing
(6) Automatic power window*
(7) Power window lock switch
* : if equipped
WW IINN DDOO WW SS
OLF044030N
Page 168 of 546
3-32
Convenient features of your vehicle
Power Windows
Engine Start/Stop button must be in
the ON position to be able to raise or
lower the windows. Each door has a
Power Window switch to control that
door’s window. The driver has a
Power Window Lock switch which
can block the operation of passenger
windows. The power windows will
operate for approximately 30 sec-
onds after engine Start/Stop button
is in the ACC or OFF position.
However, if the front doors are
opened, the Power Windows cannot
be operated even within the 30 sec-
ond period.Information
In cold and wet climates, power win- dows may not work properly due to
freezing conditions.
While driving with the rear win- dows down or with the sunroof (if
equipped) opened (or partially
opened), your vehicle may demon-
strate a wind buffeting or pulsation
noise. This noise is normal and can
be reduced or eliminated by taking
the following actions. If the noise
occurs with one or both of the rear
windows down, partially lower both
front windows approximately
2.5 cm (one inch). If you experience
the noise with the sunroof open,
slightly close the sunroof.
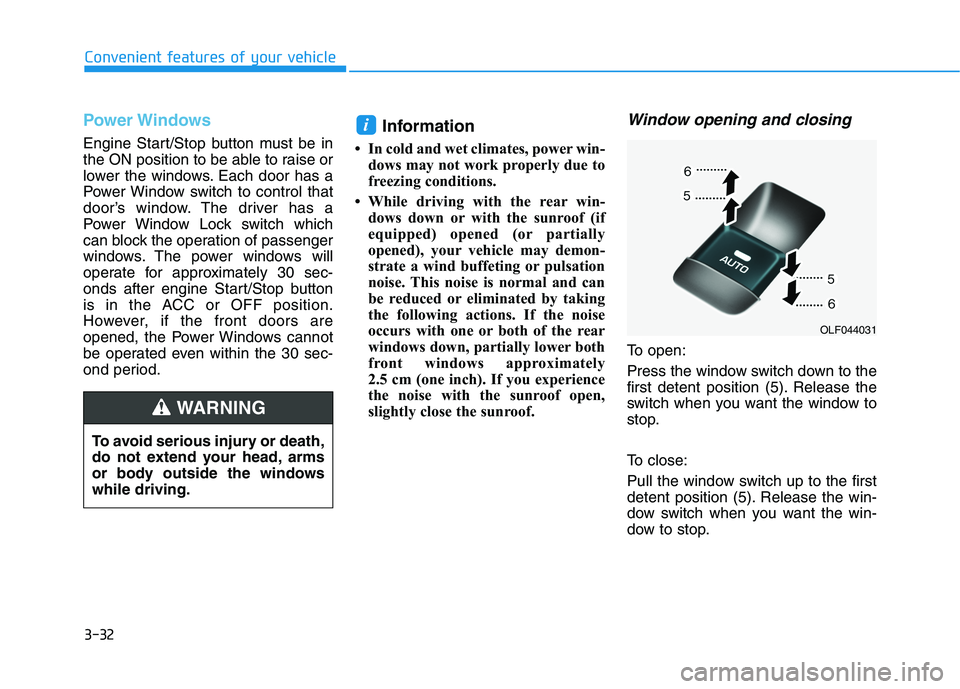
Window opening and closing
To open:
Press the window switch down to the
first detent position (5). Release the
switch when you want the window to
stop.
To close:
Pull the window switch up to the first
detent position (5). Release the win-
dow switch when you want the win-
dow to stop.
i
To avoid serious injury or death,
do not extend your head, arms
or body outside the windowswhile driving.
WARNING
OLF044031
Page 170 of 546
3-34
Convenient features of your vehicle
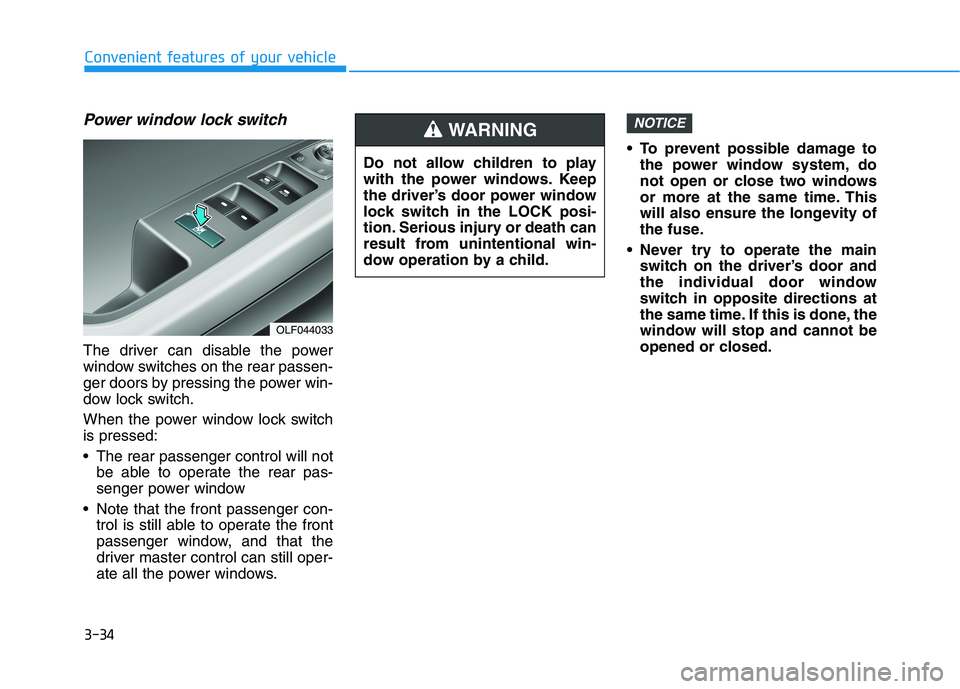
Power window lock switch
The driver can disable the power
window switches on the rear passen-
ger doors by pressing the power win-
dow lock switch.
When the power window lock switch is pressed:
The rear passenger control will notbe able to operate the rear pas-
senger power window
Note that the front passenger con- trol is still able to operate the front
passenger window, and that the
driver master control can still oper-
ate all the power windows. To prevent possible damage to
the power window system, do
not open or close two windows
or more at the same time. This
will also ensure the longevity of
the fuse.
Never try to operate the main switch on the driver’s door and
the individual door window
switch in opposite directions at
the same time. If this is done, the
window will stop and cannot be
opened or closed.
NOTICE
OLF044033 Do not allow children to play
with the power windows. Keep
the driver’s door power window
lock switch in the LOCK posi-
tion. Serious injury or death can
result from unintentional win-
dow operation by a child.
WARNING
Page 171 of 546

3-35
Convenient features of your vehicle
3
If your vehicle is equipped with a
sunroof, you can slide or tilt your
sunroof with the sunroof control lever
located on the overhead console.
The Engine Start/Stop button must
be in the ON position before you can
open or close the sunroof.
The sunroof can be operated for
approximately 30 seconds after the
ignition key is removed or turned to
the ACC or LOCK (or OFF) position.
However, if the front doors are opened, the sunroof cannot be oper-
ated even within the 30 seconds.Information
In cold and wet climates, the sun- roof may not work properly due to
freezing conditions.
After the vehicle is washed or in a rainstorm, be sure to wipe off any
water that is on the sunroof before
operating it.
Do not continue to move the sun-roof control lever after the sun-
roof is fully opened, closed, or
tilted. Damage to the motor or
system components could occur.
Make sure the sunroof is closed fully when leaving your vehicle.
If the sunroof is open, rain or
snow may leak through the sun-
roof and wet the interior as well
as allow theft.
NOTICE
i
PPAA NN OO RRAA MM AA SS UU NNRROO OOFF (( IIFF EE QQ UUIIPP PP EEDD ))
OLF047034
Never adjust the sunroof or
sunshade while driving. This
could result in loss of control
and an accident that may
cause death, serious injury, or
property damage.
Make sure heads, other body
parts or objects are out of the
way before using the sunroof.
Do not extend your head, arms
or body outside the sunroof
while driving, to avoid serious
injury.
Do not leave the engine run-
ning and the key in your vehi-
cle with unsupervised children.
(Continued)
(Continued)
Unattended children could
operate the sunroof, which
could result in serious injury.
The panorama sunroof is made
of glass, subject to break in
case of accident. Passengers
without the appropriate protec-
tion(e.g. seat belt, CRS, etc.) on
may project out through the
broken glasses and get seri-
ously injured or even result indeath.
Do not sit on the top of the
vehicle. It may cause injuries or
vehicle damage.
WARNING
Page 175 of 546
3-39
Convenient features of your vehicle
3
Hood
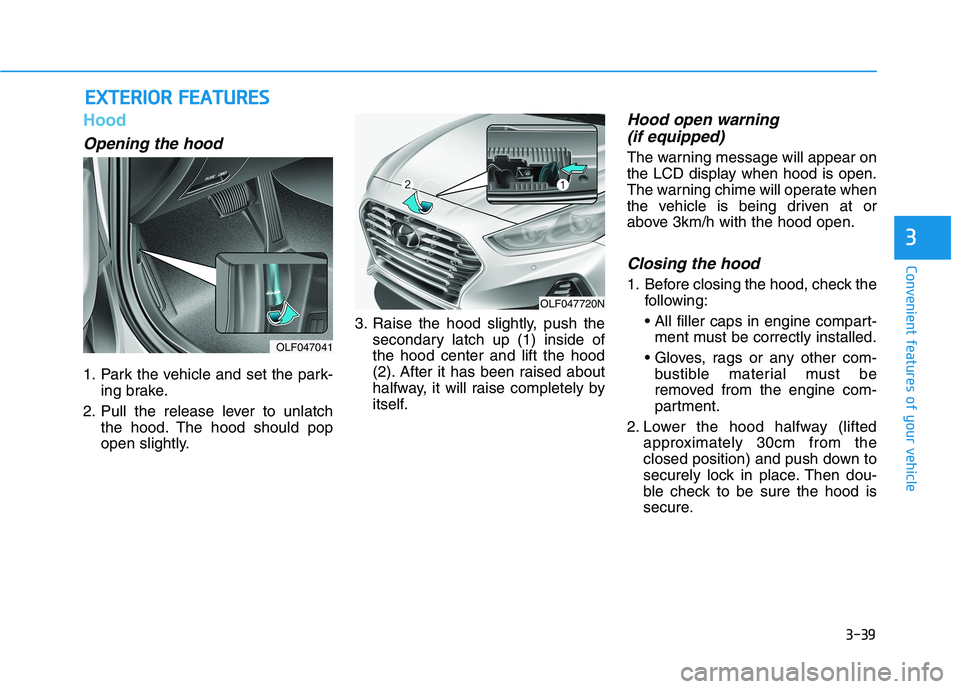
Opening the hood
1. Park the vehicle and set the park-ing brake.
2. Pull the release lever to unlatch the hood. The hood should pop
open slightly. 3. Raise the hood slightly, push the
secondary latch up (1) inside ofthe hood center and lift the hood
(2). After it has been raised about
halfway, it will raise completely by
itself.
Hood open warning
(if equipped)
The warning message will appear on
the LCD display when hood is open.
The warning chime will operate when
the vehicle is being driven at or
above 3km/h with the hood open.
Closing the hood
1. Before closing the hood, check the following:
ment must be correctly installed.
bustible material must be
removed from the engine com-
partment.
2. Lower the hood halfway (lifted approximately 30cm from the
closed position) and push down to
securely lock in place. Then dou-
ble check to be sure the hood is
secure.
EEXX TTEERR IIOO RR FF EE AA TTUU RREESS
OLF047041
OLF047720N