2019 Hyundai Santa Fe Change gear
[x] Cancel search: Change gearPage 194 of 557
3-105
Convenient features of your vehicle
3
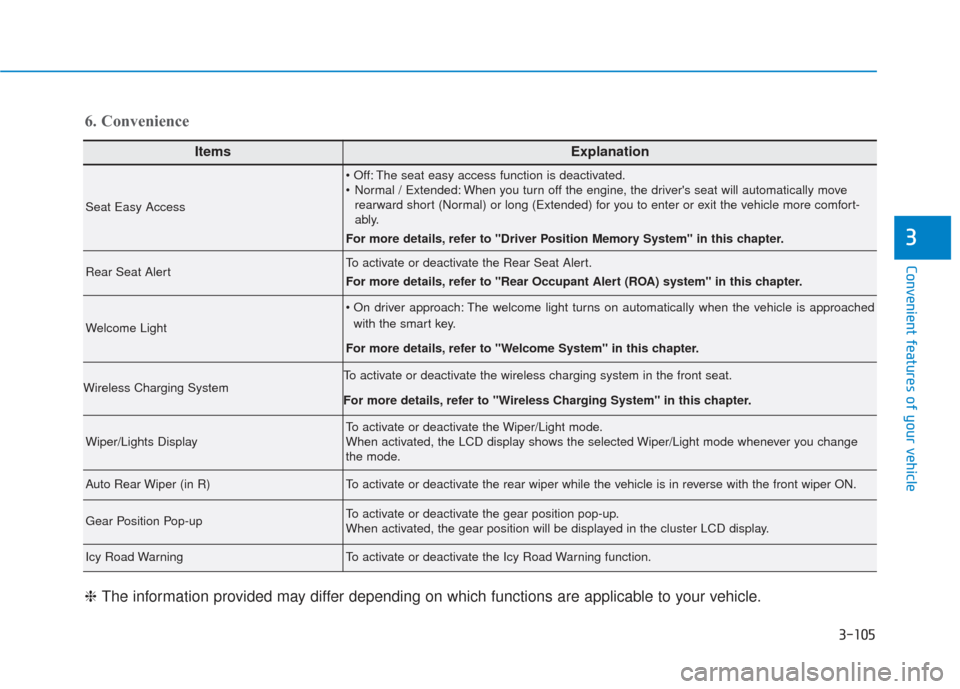
ItemsExplanation
Seat Easy Access
The seat easy access function is deactivated.
Normal / Extended: When you turn off the engine, the driver's seat will automatically moverearward short (Normal) or long (Extended) for you to enter or exit the vehicle more comfort-
ably.
For more details, refer to "Driver Position Memory System" in this chapter.
Rear Seat AlertTo activate or deactivate the Rear Seat Alert.
For more details, refer to "Rear Occupant Alert (ROA) system" in this chapter.
Welcome Light
The welcome light turns on automatically when the vehicle is approached with the smart key.
For more details, refer to ''Welcome System'' in this chapter.
Wireless Charging SystemTo activate or deactivate the wireless charging system in the front seat.
For more details, refer to "Wireless Charging System" in this chapter.
Wiper/Lights DisplayTo activate or deactivate the Wiper/Light mode.
When activated, the LCD display shows the selected Wiper/Light mode whenever you change
the mode.
Auto Rear Wiper (in R)To activate or deactivate the rear wiper while the vehicle is in reverse with the front wiper ON.
Gear Position Pop-upTo activate or deactivate the gear position pop-up.
When activated, the gear position will be displayed in the cluster LCD display.
Icy Road WarningTo activate or deactivate the Icy Road Warning function.
6. Convenience
❈ The information provided may differ depending on which functions are applicable to your vehicle.
Page 291 of 557
5-17
Driving your vehicle
5
• If the driver presses the lever to + (Up) or - (Down) position, the
transmission may not make the
requested gear change if the next
gear is outside of the allowable
engine rpm range. The driver must
execute upshifts in accordance with
road conditions, taking care to keep
the engine rpms below the red zone.
• When accelerating from a stop on a slippery road, push the shift lever
forward into the + (Up) position.
This allows the transmission to
shift into the 2
ndgear which is bet-
ter for smooth driving on a slippery
road. Push the shift lever to the -
(Down) side to shift back to the 1
st
gear.
• When driving in Manual Shift Mode, slow down before shifting to
a lower gear. Otherwise, the lower
gear may not be engaged if the
engine rpms are outside of the
allowable range.
Shift-lock system
For your safety, the automatic trans-
mission has a shift-lock system
which prevents shifting the transmis-
sion from P (Park) into R (Reverse)
unless the brake pedal is depressed.
To shift the transmission from P
(Park) into R (Reverse):
1. Depress and hold the brake pedal.
2. Start the engine or place the igni-tion switch in the ON position.
3. Move the shift lever.
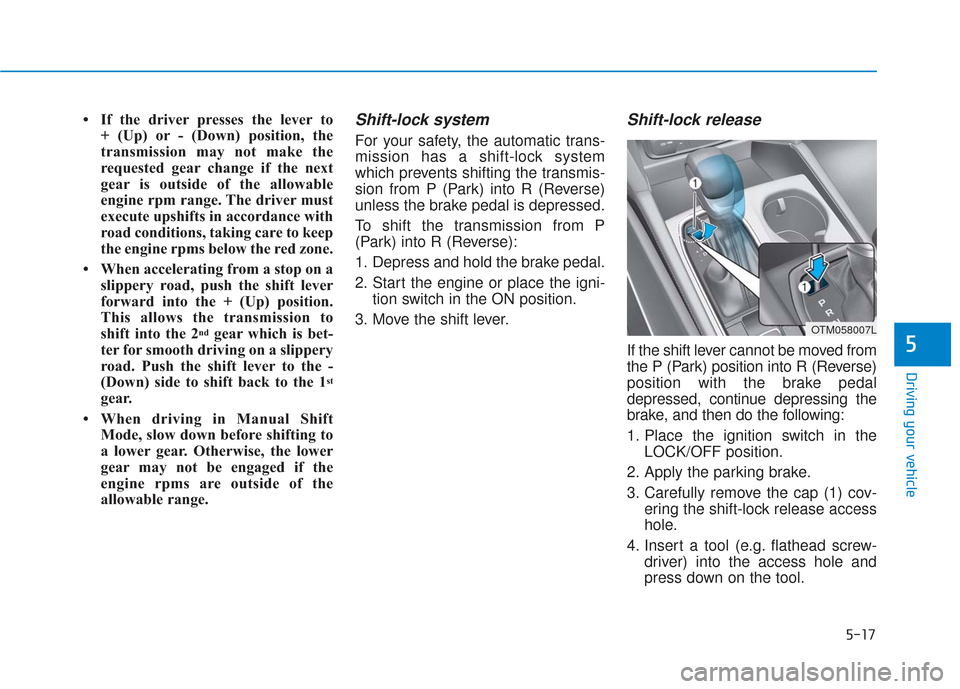
Shift-lock release
If the shift lever cannot be moved from
the P (Park) position into R (Reverse)
position with the brake pedal
depressed, continue depressing the
brake, and then do the following:
1. Place the ignition switch in the LOCK/OFF position.
2. Apply the parking brake.
3. Carefully remove the cap (1) cov- ering the shift-lock release access
hole.
4. Insert a tool (e.g. flathead screw- driver) into the access hole and
press down on the tool.
OTM058007L
Page 293 of 557
5-19
Driving your vehicle
5
Depressing both accelerator andbrake pedals at the same time can
trigger logic for engine power
reduction to assure vehicle decel-
eration. Vehicle acceleration will
resume after the brake pedal is
released.
Always apply the parking brake when leaving the vehicle. Do not
depend on placing the transmis-
sion in P (Park) to keep the vehicle
from moving.
Exercise extreme caution when driving on a slippery surface. Be
especially careful when braking,
accelerating or shifting gears. On
a slippery surface, an abrupt
change in vehicle speed can
cause the drive wheels to lose
traction and may cause loss of
vehicle control resulting in an acci-
dent.
Optimum vehicle performance and economy is obtained by smoothly
depressing and releasing the
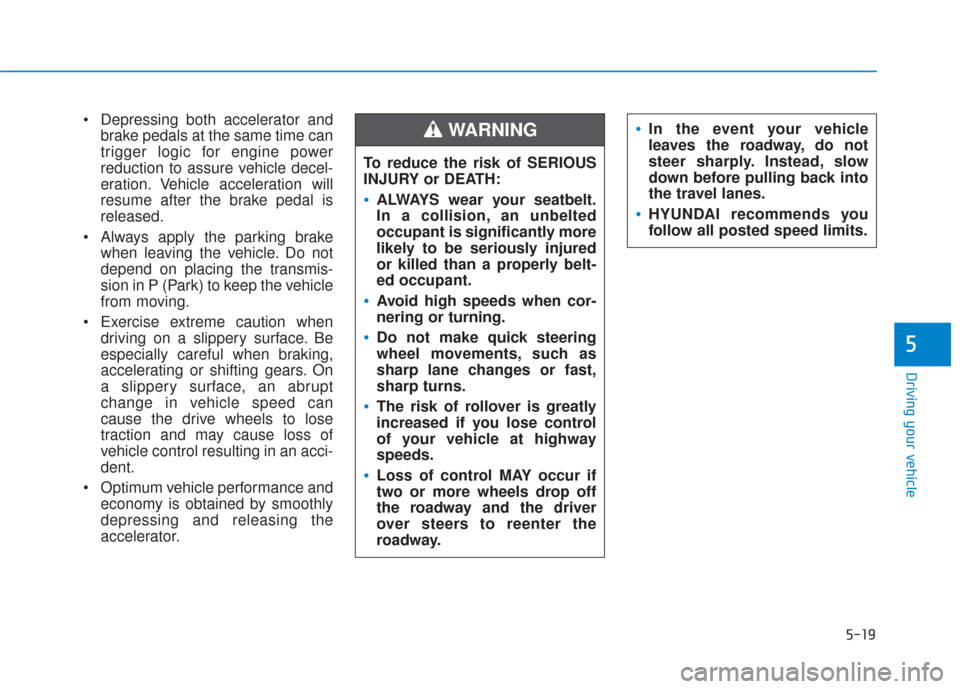
accelerator. To reduce the risk of SERIOUS
INJURY or DEATH:
ALWAYS wear your seatbelt.
In a collision, an unbelted
occupant is significantly more
likely to be seriously injured
or killed than a properly belt-
ed occupant.
Avoid high speeds when cor-
nering or turning.
Do not make quick steering
wheel movements, such as
sharp lane changes or fast,
sharp turns.
The risk of rollover is greatly
increased if you lose control
of your vehicle at highway
speeds.
Loss of control MAY occur if
two or more wheels drop off
the roadway and the driver
over steers to reenter the
roadway.
WARNING In the event your vehicle
leaves the roadway, do not
steer sharply. Instead, slow
down before pulling back into
the travel lanes.
HYUNDAI recommends you
follow all posted speed limits.
Page 317 of 557
5-43
Driving your vehicle
5
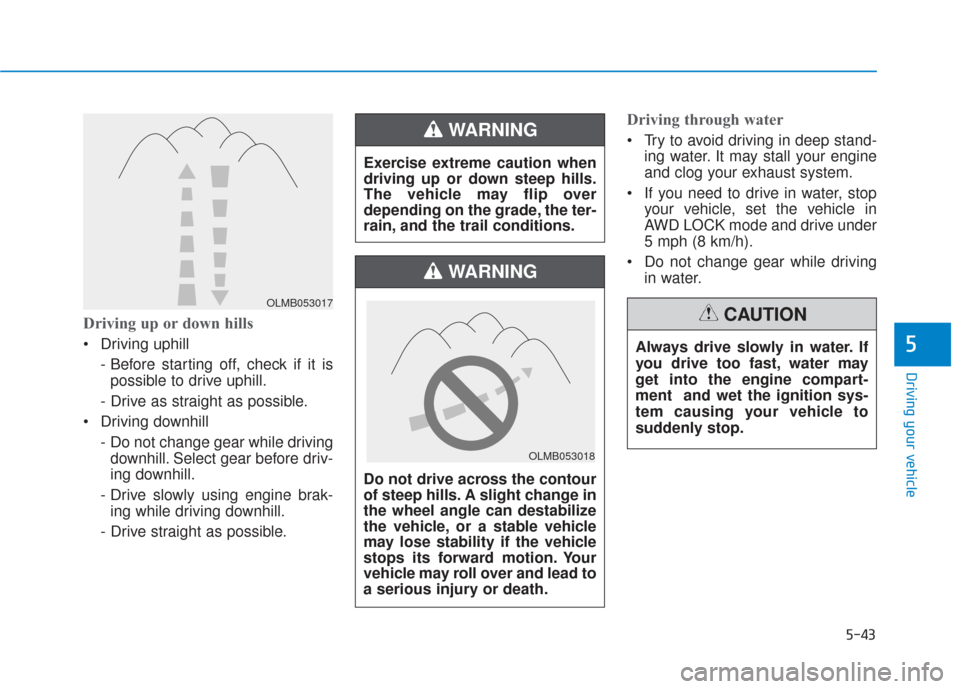
Driving up or down hills
Driving uphill - Before starting off, check if it ispossible to drive uphill.
- Drive as straight as possible.
Driving downhill - Do not change gear while drivingdownhill. Select gear before driv-
ing downhill.
- Drive slowly using engine brak- ing while driving downhill.
- Drive straight as possible.
Driving through water
Try to avoid driving in deep stand- ing water. It may stall your engine
and clog your exhaust system.
If you need to drive in water, stop your vehicle, set the vehicle in
AWD LOCK mode and drive under
5 mph (8 km/h).
Do not change gear while driving in water.
OLMB053017
Exercise extreme caution when
driving up or down steep hills.
The vehicle may flip over
depending on the grade, the ter-
rain, and the trail conditions.
WARNING
Do not drive across the contour
of steep hills. A slight change in
the wheel angle can destabilize
the vehicle, or a stable vehicle
may lose stability if the vehicle
stops its forward motion. Your
vehicle may roll over and lead to
a serious injury or death.
WARNING
Always drive slowly in water. If
you drive too fast, water may
get into the engine compart-
ment and wet the ignition sys-
tem causing your vehicle to
suddenly stop.
CAUTION
OLMB053018
Page 326 of 557
5-52
SMART mode
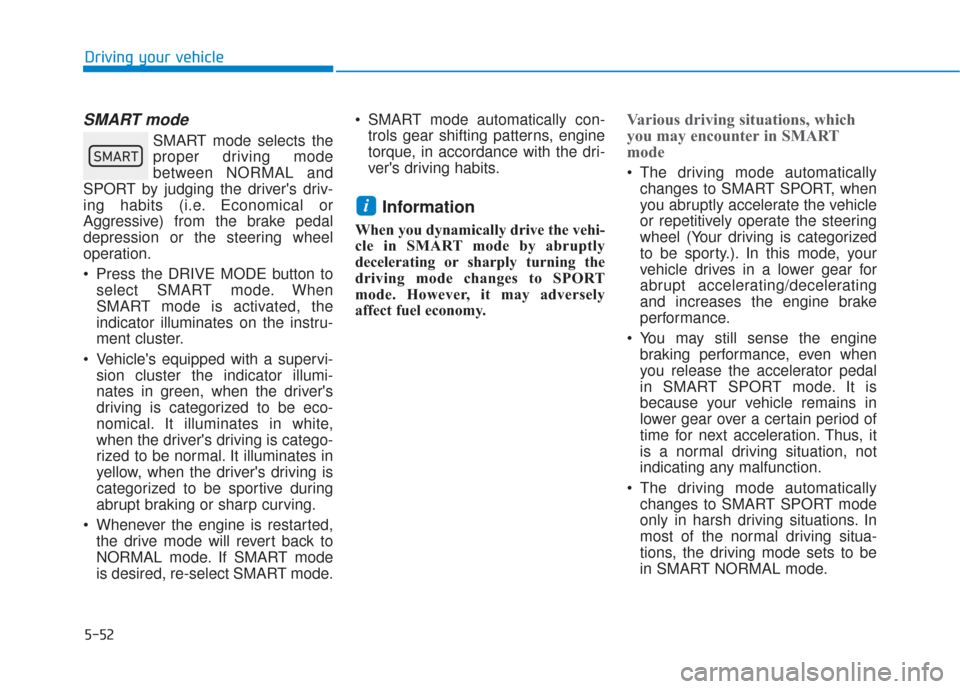
SMART mode selects the
proper driving mode
between NORMAL and
SPORT by judging the driver's driv-
ing habits (i.e. Economical or
Aggressive) from the brake pedal
depression or the steering wheel
operation.
Press the DRIVE MODE button to select SMART mode. When
SMART mode is activated, the
indicator illuminates on the instru-
ment cluster.
Vehicle's equipped with a supervi- sion cluster the indicator illumi-
nates in green, when the driver's
driving is categorized to be eco-
nomical. It illuminates in white,
when the driver's driving is catego-
rized to be normal. It illuminates in
yellow, when the driver's driving is
categorized to be sportive during
abrupt braking or sharp curving.
Whenever the engine is restarted, the drive mode will revert back to
NORMAL mode. If SMART mode
is desired, re-select SMART mode. SMART mode automatically con-
trols gear shifting patterns, engine
torque, in accordance with the dri-
ver's driving habits.
Information
When you dynamically drive the vehi-
cle in SMART mode by abruptly
decelerating or sharply turning the
driving mode changes to SPORT
mode. However, it may adversely
affect fuel economy.
Various driving situations, which
you may encounter in SMART
mode
The driving mode automaticallychanges to SMART SPORT, when
you abruptly accelerate the vehicle
or repetitively operate the steering
wheel (Your driving is categorized
to be sporty.). In this mode, your
vehicle drives in a lower gear for
abrupt accelerating/decelerating
and increases the engine brake
performance.
You may still sense the engine braking performance, even when
you release the accelerator pedal
in SMART SPORT mode. It is
because your vehicle remains in
lower gear over a certain period of
time for next acceleration. Thus, it
is a normal driving situation, not
indicating any malfunction.
The driving mode automatically changes to SMART SPORT mode
only in harsh driving situations. In
most of the normal driving situa-
tions, the driving mode sets to be
in SMART NORMAL mode.
i
Driving your vehicle
00360030002400350037
Page 399 of 557
5-125
Driving your vehicle
5
Hazardous Driving Conditions
When hazardous driving elements
are encountered such as water,
snow, ice, mud and sand, take the
below suggestions:
Drive cautiously and keep a longerbraking distance.
Avoid abrupt braking or steering.
When your vehicle is stuck in snow, mud, or sand, use second
gear. Accelerate slowly to avoid
unnecessary wheel spin.
Put sand, rock salt, tire chains or other non-slip materials under the
wheels to provide additional trac-
tion while the vehicle becomes
stuck in ice, snow, or mud.
Rocking the Vehicle
If it is necessary to rock the vehicle
to free it from snow, sand, or mud,
first turn the steering wheel right and
left to clear the area around your
front wheels. Then, shift back and
forth between R (Reverse) and a for-
ward gear.
Try to avoid spinning the wheels, and
do not race the engine.
To prevent transmission wear, wait
until the wheels stop spinning before
shifting gears. Release the accelera-
tor pedal while shifting, and press
lightly on the accelerator pedal while
the transmission is in gear. Slowly
spinning the wheels in forward and
reverse directions causes a rocking
motion that may free the vehicle.
S SP
P E
EC
CI
IA
A L
L
D
D R
RI
IV
V I
IN
N G
G
C
C O
O N
ND
DI
IT
T I
IO
O N
NS
S
Downshifting with an automatic
transmission while driving on
slippery surfaces can cause an
accident. The sudden change in
tire speed could cause the tires
to skid. Be careful when down-
shifting on slippery surfaces.
WARNING
If the vehicle is stuck and
excessive wheel spin occurs,
the temperature in the tires can
increase very quickly. If the tires
become damaged, a tire blow
out or tire explosion can occur.
This condition is dangerous -
you and others may be injured.
Do not attempt this procedure if
people or objects are anywhere
near the vehicle.
If you attempt to free the vehicle,
the vehicle can overheat quickly,
possibly causing an engine
compartment fire or other dam-
age. Try to avoid spinning the
wheels as much as possible to
prevent overheating of either the
tires or the engine. DO NOT
allow the vehicle to spin the
wheels above 35 mph (56 km/h).
WARNING
Page 451 of 557
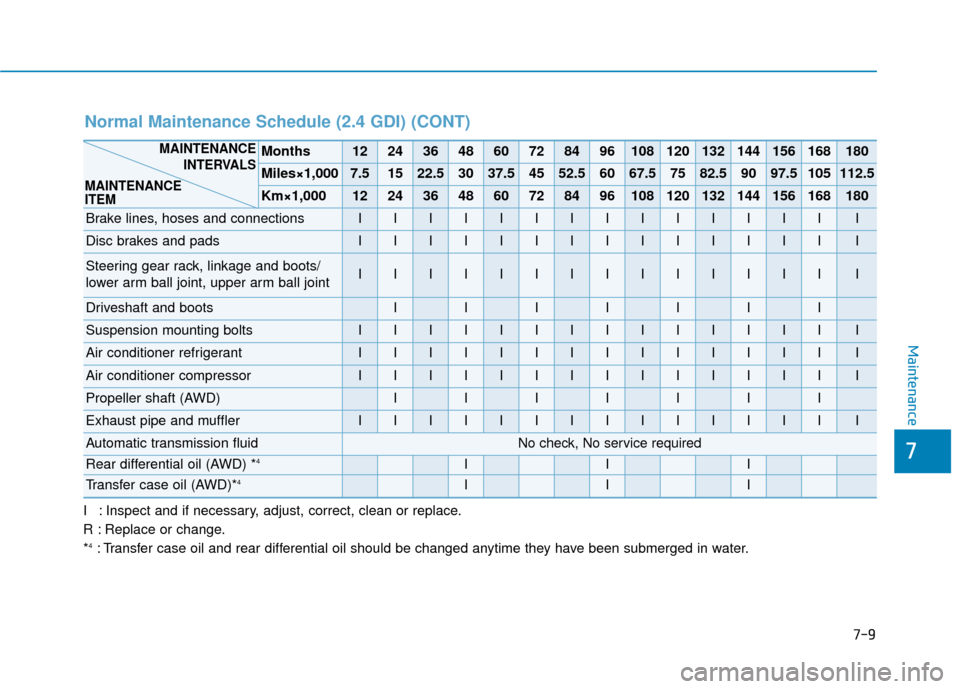
I : Inspect and if necessary, adjust, correct, clean or replace.
R : Replace or change.
*
4: Transfer case oil and rear differential oil should be changed anytime they have been submerged in water.
Normal Maintenance Schedule (2.4 GDI) (CONT)
Months1224364860728496108120132144156168180
Miles×1,0007.51522.53037.54552.56067.57582.59097.5105112.5
Km×1,0001224364860728496108120132144156168180
Brake lines, hoses and connectionsIIIIIIIIIIIIIII
Disc brakes and padsIIIIIIIIIIIIIII
Steering gear rack, linkage and boots/
lower arm ball joint, upper arm ball jointIIIIIIIIIIIIIII
Driveshaft and bootsIIIIIII
Suspension mounting boltsIIIIIIIIIIIIIII
Air conditioner refrigerantIIIIIIIIIIIIIII
Air conditioner compressorIIIIIIIIIIIIIII
Propeller shaft (AWD)IIIIIII
Exhaust pipe and mufflerIIIIIIIIIIIIIII
Automatic transmission fluidNo check, No service required
Rear differential oil (AWD) *4III
Transfer case oil (AWD)*4III
MAINTENANCEINTERVALS
MAINTENANCE
ITEM
Maintenance
7
7-9
Page 456 of 557
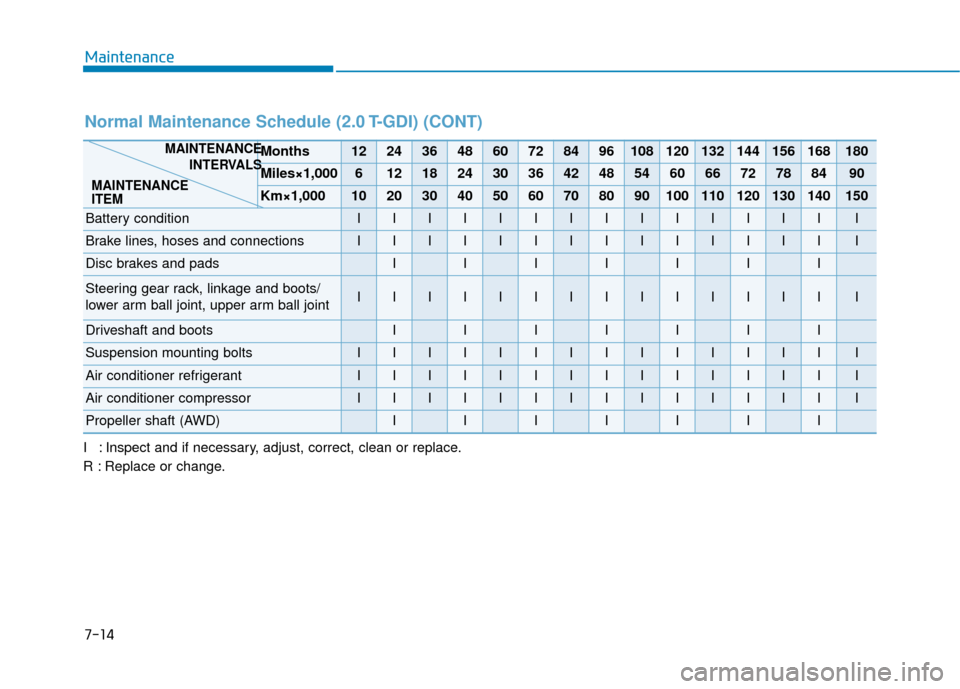
I : Inspect and if necessary, adjust, correct, clean or replace.
R : Replace or change.
Normal Maintenance Schedule (2.0 T-GDI) (CONT)
Months1224364860728496108120132144156168180
Miles×1,00061218243036424854606672788490
Km×1,000102030405060708090100110120130140150
Battery conditionIIIIIIIIIIIIIII
Brake lines, hoses and connectionsIIIIIIIIIIIIIII
Disc brakes and padsIIIIIII
Steering gear rack, linkage and boots/
lower arm ball joint, upper arm ball jointIIIIIIIIIIIIIII
Driveshaft and bootsIIIIIII
Suspension mounting boltsIIIIIIIIIIIIIII
Air conditioner refrigerantIIIIIIIIIIIIIII
Air conditioner compressorIIIIIIIIIIIIIII
Propeller shaft (AWD)IIIIIII
MAINTENANCEINTERVALS
MAINTENANCE
ITEM
Maintenance
7-14