2019 Hyundai Kona clutch
[x] Cancel search: clutchPage 16 of 485
I
IN
N S
ST
T R
R U
U M
M E
EN
N T
T
P
P A
A N
N E
EL
L
O
O V
VE
ER
R V
V I
IE
E W
W
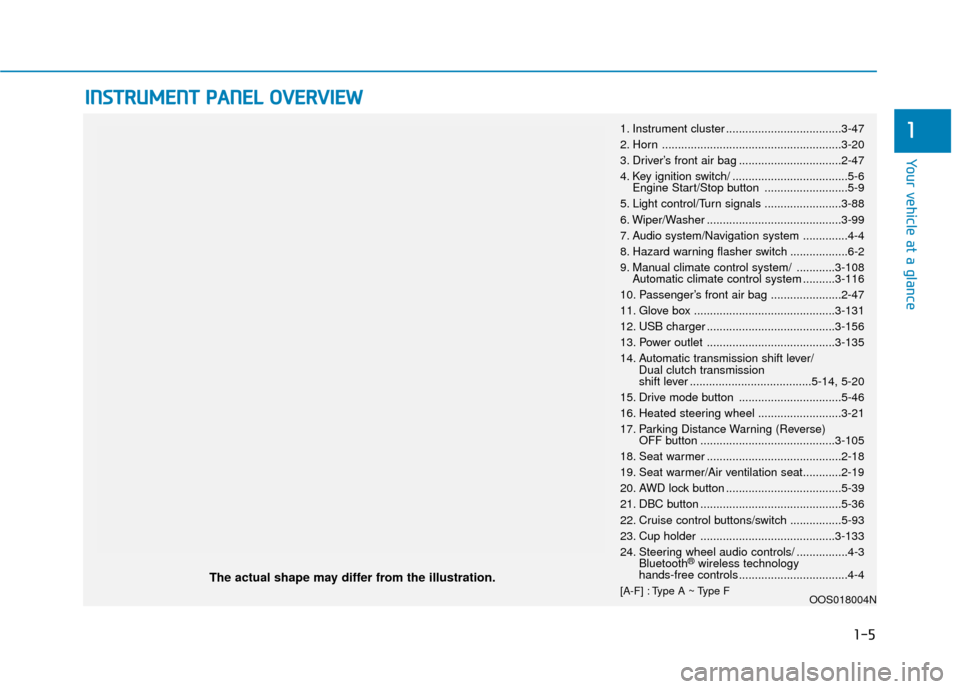
The actual shape may differ from the illustration.
1-5
Your vehicle at a glance
11. Instrument cluster ....................................3-47
2. Horn ........................................................3-20
3. Driver’s front air bag ................................2-47
4. Key ignition switch/ ....................................5-6
Engine Start/Stop button ..........................5-9
5. Light control/Turn signals ........................3-88
6. Wiper/Washer ..........................................3-99
7. Audio system/Navigation system ..............4-4
8. Hazard warning flasher switch ..................6-2
9. Manual climate control system/ ............3-108 Automatic climate control system ..........3-116
10. Passenger’s front air bag ......................2-47
11. Glove box ............................................3-131
12. USB charger ........................................3-156
13. Power outlet ........................................3-135
14. Automatic transmission shift lever/ Dual clutch transmission
shift lever ......................................5-14, 5-20
15. Drive mode button ................................5-46
16. Heated steering wheel ..........................3-21
17. Parking Distance Warning (Reverse) OFF button ..........................................3-105
18. Seat warmer ..........................................2-18
19. Seat warmer/Air ventilation seat............2-19
20. AWD lock button ....................................5-39
21. DBC button ............................................5-36
22. Cruise control buttons/switch ................5-93
23. Cup holder ..........................................3-133
24. Steering wheel audio controls/ ................4-3 Bluetooth
®wireless technology
hands-free controls ..................................4-4
[A-F] : Type A ~ Type F OOS018004N
Page 130 of 485

3-46
Convenient features of your vehicle
Information
Make sure to refuel your vehicle
according to the "Fuel Requirements"
suggested in the Introduction chapter.
Do not spill fuel on the exteriorsurfaces of the vehicle. Any type
of fuel spilled on painted sur-
faces may damage the paint.
If the fuel filler cap requires replacement, use only a genuine
HYUNDAI cap or the equivalent
specified for your vehicle. An
incorrect fuel filler cap can
result in a serious malfunction
of the fuel system or emission
control system.
NOTICE
iDo not over-fill or top-off your
vehicle tank, which can cause
gasoline spillage.
If a fire breaks out during refu-
eling, leave the vicinity of the
vehicle, and immediately con-
tact the manager of the gas
station and then contact the
local fire department. Follow
any safety instructions they
provide.
If pressurized fuel sprays out,
it can cover your clothes or
skin and thus subject you to
the risk of fire and burns.
Always remove the fuel cap
carefully and slowly. If the cap
is venting fuel or if you hear a
hissing sound, wait until the
condition stops before com-
pletely removing the cap.
Always check that the fuel cap
is installed securely to pre-
vent fuel spillage in the event
of an accident.
Once refueling has begun,
contact between your bare
hand and the vehicle should
be maintained until the filling
is complete.
Use only approved portable
plastic fuel containers designed
to carry and store gasoline.
When refueling, always move
the shift lever to the P (Park)
position (for automatic trans-
mission/dual clutch transmis-
sion), set the parking brake,
and place the ignition switch
to the LOCK/OFF position.
Sparks produced by electrical
components related to the
engine can ignite fuel vapors
causing a fire.
Do not use matches or a
lighter and do not smoke or
leave a lit cigarette in your
vehicle while at a gas station,
especially during refueling.
Page 136 of 485
3-52
Convenient features of your vehicle
Range
The range is the estimated dis-tance the vehicle can be driven
with the remaining fuel.
If the estimated distance is below 1 mi. (1 km), the trip computer will
display "----" as range.
Information
• If the vehicle is not on level groundor the battery power has been inter-
rupted, the range function may not
operate correctly.
• The range may differ from the actu- al driving distance as it is only an
estimate of the available driving
range for the vehicle and driving
conditions.
• The trip computer may not register additional fuel if less than 1.6 gallon
(6 liters) of fuel are added to the
vehicle.
• The range may vary significantly based on driving conditions, driving
habits, and condition of the vehicle.
Transmission shift indicator
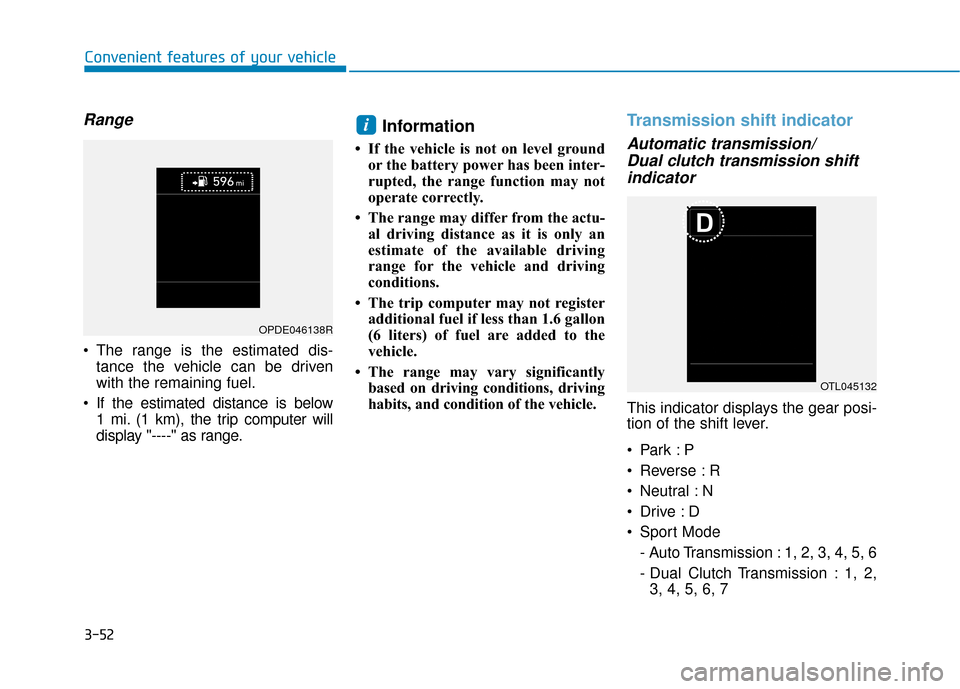
Automatic transmission/Dual clutch transmission shiftindicator
This indicator displays the gear posi-
tion of the shift lever.
Reverse : R
Neutral : N
Sport Mode
- Auto Transmission : 1, 2, 3, 4, 5, 6
- Dual Clutch Transmission : 1, 2,3, 4, 5, 6, 7
i
OPDE046138R
OTL045132
Page 233 of 485
Driving your vehicle
5
Before driving.........................................................5-4
Before Entering the Vehicle ...........................................5-4
Before Starting ..................................................................5-4
Ignition switch ........................................................5-6
Key Ignition Switch ...........................................................5-6
Engine Start/Stop Button................................................5-9
Automatic Transmission ......................................5-14
Automatic Transmission Operation .............................5-14
Good Driving Practices ..................................................5-18
Dual clutch transmission .....................................5-20
Dual Clutch Transmission Operation ..........................5-20
Good Driving Practices ..................................................5-27
Braking system.....................................................5-29
Power Brakes ...................................................................5-29
Disc Brakes Wear Indicator ..........................................5-30
Parking Brake...................................................................5-30
Anti-lock Brake System (ABS) ....................................5-32
Electronic Stability Control (ESC)................................5-34
Vehicle Stability Management (VSM).........................5-36
Hill-Start Assist Control (HAC) ....................................5-37
Downhill Brake Control (DBC) ......................................5-37
Good Braking Practices .................................................5-39
All Wheel Drive (AWD) ........................................5-40
AWD operation.................................................................5-41
Emergency precautions .................................................5-44
Drive Mode Integrated Control System ............5-46
Blind-spot Collision Warning (BCW) system ...5-47
BCW (Blind-spot Collision Warning) ...........................5-48
RCCW (Rear Cross-Traffic Collision Warning) .........5-50
Detecting sensor .............................................................5-52
Limitations of the System .............................................5-53
Forward collision-avoidance assist (FCA)
system - Camera type.........................................5-55
System setting and activation......................................5-55
FCA warning message and system control ..............5-57
FCA sensor........................................................................\
5-59
System malfunction ........................................................5-61
Limitations of the system .............................................5-63
Forward collision-avoidance assist (FCA)
system-sensor fusion type
(Front radar + Front camera) ............................5-68
System Setting and Activation.....................................5-68
FCA Warning Message and System Control ............5-70
FCA Sensor .......................................................................5\
-72
System Malfunction .......................................................5-73
Limitations of the System .............................................5-75
Page 238 of 485
5-6
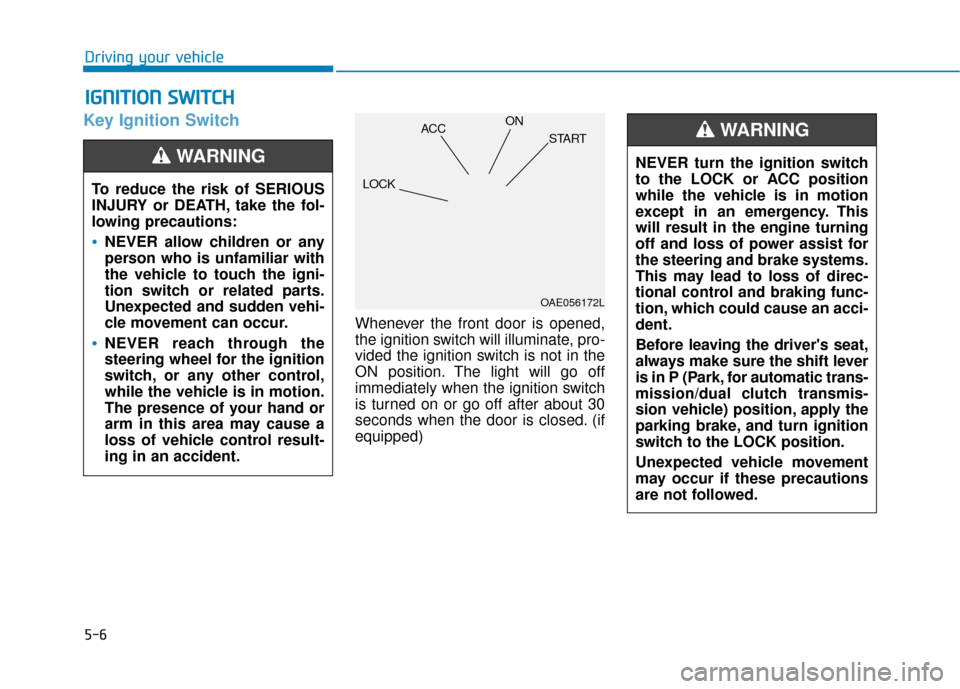
Key Ignition Switch
Whenever the front door is opened,
the ignition switch will illuminate, pro-
vided the ignition switch is not in the
ON position. The light will go off
immediately when the ignition switch
is turned on or go off after about 30
seconds when the door is closed. (if
equipped)
I IG
G N
N I
IT
T I
IO
O N
N
S
S W
W I
IT
T C
CH
H
Driving your vehicle
To reduce the risk of SERIOUS
INJURY or DEATH, take the fol-
lowing precautions:
NEVER allow children or any
person who is unfamiliar with
the vehicle to touch the igni-
tion switch or related parts.
Unexpected and sudden vehi-
cle movement can occur.
NEVER reach through the
steering wheel for the ignition
switch, or any other control,
while the vehicle is in motion.
The presence of your hand or
arm in this area may cause a
loss of vehicle control result-
ing in an accident.
WARNING NEVER turn the ignition switch
to the LOCK or ACC position
while the vehicle is in motion
except in an emergency. This
will result in the engine turning
off and loss of power assist for
the steering and brake systems.
This may lead to loss of direc-
tional control and braking func-
tion, which could cause an acci-
dent.
Before leaving the driver's seat,
always make sure the shift lever
is in P (Park, for automatic trans-
mission/dual clutch transmis-
sion vehicle) position, apply the
parking brake, and turn ignition
switch to the LOCK position.
Unexpected vehicle movement
may occur if these precautions
are not followed.
WARNING
OAE056172L
LOCK ACC
ON
START
Page 239 of 485
5-7
Driving your vehicle
5
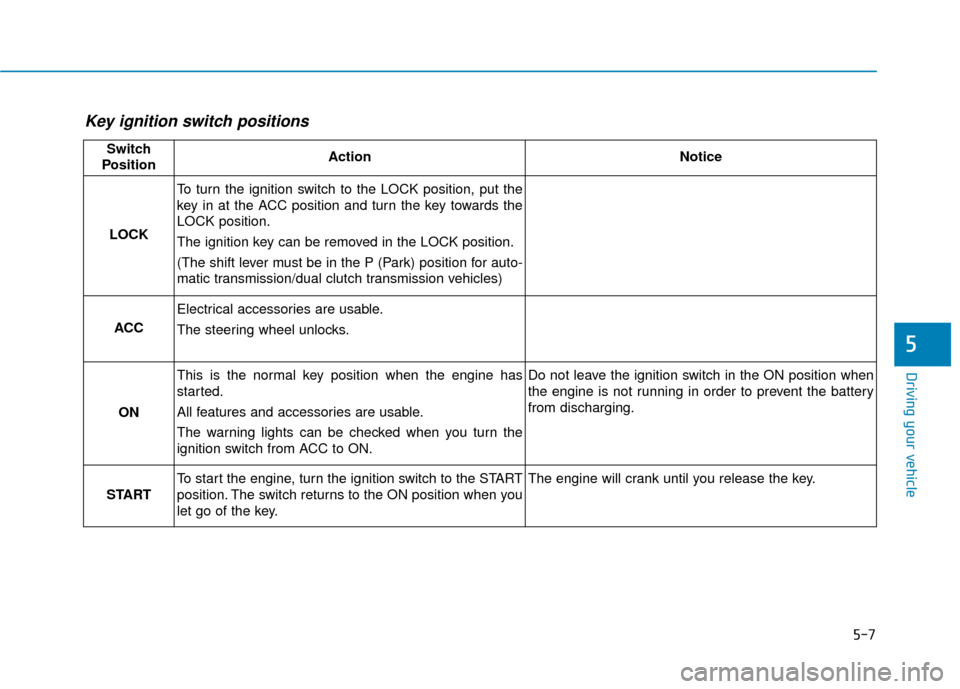
Key ignition switch positions
Switch
PositionActionNotice
LOCK
To turn the ignition switch to the LOCK position, put the
key in at the ACC position and turn the key towards the
LOCK position.
The ignition key can be removed in the LOCK position.
(The shift lever must be in the P (Park) position for auto-
matic transmission/dual clutch transmission vehicles)
ACC
Electrical accessories are usable.
The steering wheel unlocks.
ON
This is the normal key position when the engine has
started.
All features and accessories are usable.
The warning lights can be checked when you turn the
ignition switch from ACC to ON.Do not leave the ignition switch in the ON position when
the engine is not running in order to prevent the battery
from discharging.
START
To start the engine, turn the ignition switch to the START
position. The switch returns to the ON position when you
let go of the key.The engine will crank until you release the key.
Page 240 of 485
5-8
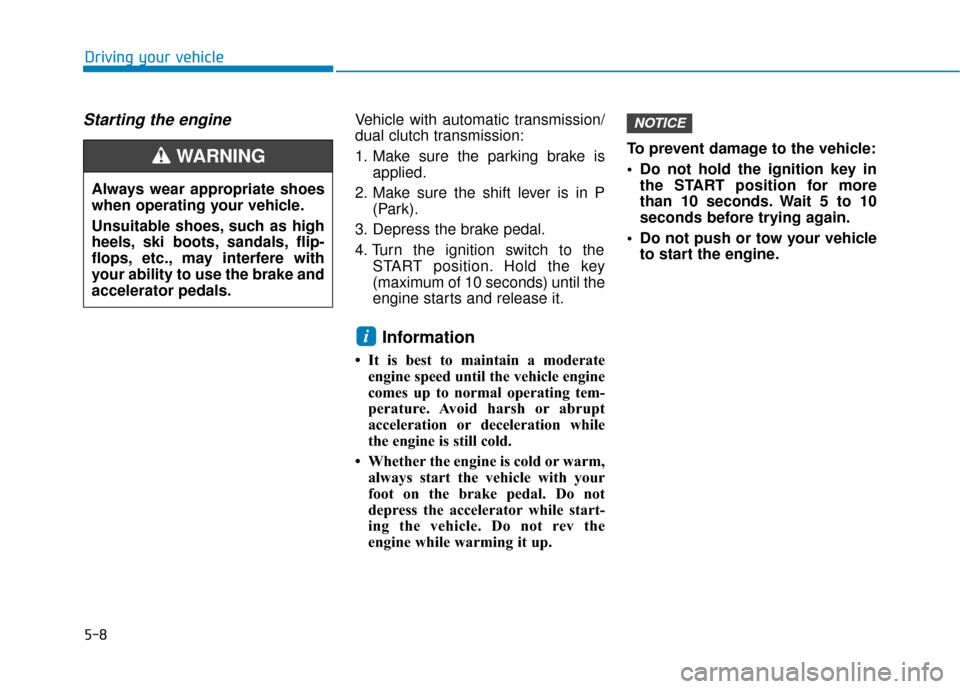
Starting the engine Vehicle with automatic transmission/
dual clutch transmission:
1. Make sure the parking brake isapplied.
2. Make sure the shift lever is in P (Park).
3. Depress the brake pedal.
4. Turn the ignition switch to the START position. Hold the key
(maximum of 10 seconds) until the
engine starts and release it.
Information
• It is best to maintain a moderateengine speed until the vehicle engine
comes up to normal operating tem-
perature. Avoid harsh or abrupt
acceleration or deceleration while
the engine is still cold.
• Whether the engine is cold or warm, always start the vehicle with your
foot on the brake pedal. Do not
depress the accelerator while start-
ing the vehicle. Do not rev the
engine while warming it up. To prevent damage to the vehicle:
Do not hold the ignition key in
the START position for more
than 10 seconds. Wait 5 to 10
seconds before trying again.
Do not push or tow your vehicle to start the engine.
NOTICE
i
Driving your vehicle
Always wear appropriate shoes
when operating your vehicle.
Unsuitable shoes, such as high
heels, ski boots, sandals, flip-
flops, etc., may interfere with
your ability to use the brake and
accelerator pedals.
WARNING
Page 242 of 485
5-10
Driving your vehicle
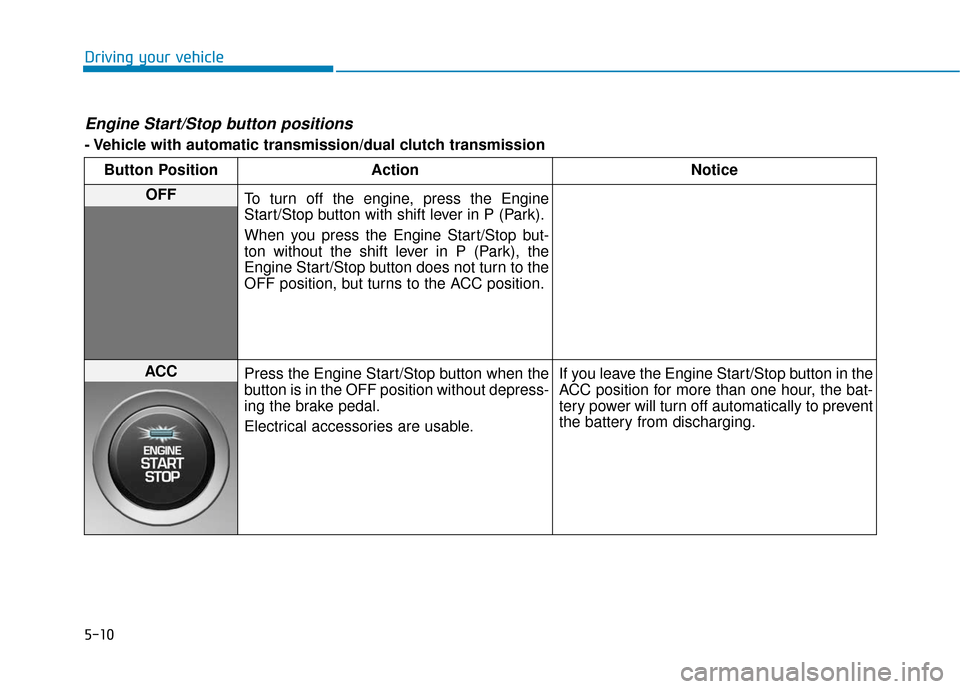
Engine Start/Stop button positions
- Vehicle with automatic transmission/dual clutch transmissionButton Position Action Notice
OFF To turn off the engine, press the Engine
Start/Stop button with shift lever in P (Park).
When you press the Engine Start/Stop but-
ton without the shift lever in P (Park), the
Engine Start/Stop button does not turn to the
OFF position, but turns to the ACC position.
ACC Press the Engine Start/Stop button when the
button is in the OFF position without depress-
ing the brake pedal.
Electrical accessories are usable. If you leave the Engine Start/Stop button in the
ACC position for more than one hour, the bat-
tery power will turn off automatically to prevent
the battery from discharging.