2019 Hyundai Kona stop start
[x] Cancel search: stop startPage 378 of 526
6-6
What to do in an emergencyTo prevent damage to your vehi-
cle:
Only use a 12-volt power supply(battery or jumper system) to
jump start your vehicle.
Do not attempt to jump start your vehicle by push-starting.
Information
An inappropriately disposedbattery can be harmful to the
environment and human
health. Dispose of the battery
according to your local law(s)
or regulations.
Jump starting procedure
1. Position the vehicles close enough that the jumper cables will reach,
but do not allow the vehicles to
touch.
2. Avoid fans or any moving parts in the engine compartment at all
times, even when the vehicles are
turned off.
3. Turn off all electrical devices such as radios, lights, air conditioning,
etc. Put the vehicles in P (Park, for
dual clutch transmission vehicle)
or neutral (for manual transmis-
sion vehicle), and set the parking
brakes. Turn both vehicles OFF.
i
NOTICEDo not attempt to jump start
your vehicle if your battery is
frozen.
NEVER attempt to recharge
the battery when the vehicle’s
battery cables are connected
to the battery.
The electrical ignition system
works with high voltage.
NEVER touch these compo-
nents with the engine running
or when the ignition switch (or
Engine Start/Stop button) is in
the ON position.
Do not allow the (+) and (-)
jumper cables to touch. It may
cause sparks.
The battery may rupture or
explode when you jump start
with a low or frozen battery.
Pb
Page 382 of 526
6-10
What to do in an emergency
Your vehicle has also been equipped
with a TPMS malfunction indicator to
indicate when the system is not
operating properly. The TPMS mal-
function indicator is combined with
the low tyre pressure telltale. When
the system detects a malfunction,
the telltale will flash for approximate-
ly one minute and then remain con-
tinuously illuminated.
This sequence will continue upon
subsequent vehicle start-ups as long
as the malfunction exists. When the
malfunction indicator is illuminated,
the system may not be able to detect
or signal low tyre pressure as intend-
ed. TPMS malfunctions may occur
for a variety of reasons, including the
installation of replacement or alter-
nate tyres or wheels on the vehicle
that prevent the TPMS from function-
ing properly. Always check the
TPMS malfunction telltale after
replacing one or more tyres or
wheels on your vehicle to ensure that
the replacement or alternate tyres
and wheels allow the TPMS to con-
tinue to function properly. If the TPMS indicator does not illu-
minate for 3 seconds when the
ignition switch is turned to the ON
position or engine is running, or if
it comes on after blinking for
approximately one minute, we rec-
ommend that you contact a
HYUNDAI authorised repairer.
Low tyre pressure telltale
When the tyre pressure
monitoring system warn-
ing indicator is illuminated
and warning message
displayed on the cluster LCD display,
one or more of your tyres is signifi-
cantly under-inflated.
If the telltale illuminates, immediately
reduce your speed, avoid hard cor-
nering and anticipate increased stop-
ping distances. You should stop and
check your tyres as soon as possi-
ble. Inflate the tyres to the proper
pressure as indicated on the vehi-
cle’s placard or tyre inflation pres-
sure label located on the driver’s side
centre pillar outer panel. If you can-
not reach a service station or if the
tyre cannot hold the newly added air,
replace the low pressure tyre with
the spare tyre.
Then the Low Tyre Pressure telltale
may flash for approximately one
minute and then remain continuously
illuminated after restarting and about
10 minutes of continuous driving
before you have the low pressure
tyre repaired and replaced on the
vehicle.
NOTICE
Page 386 of 526
6-14
What to do in an emergency
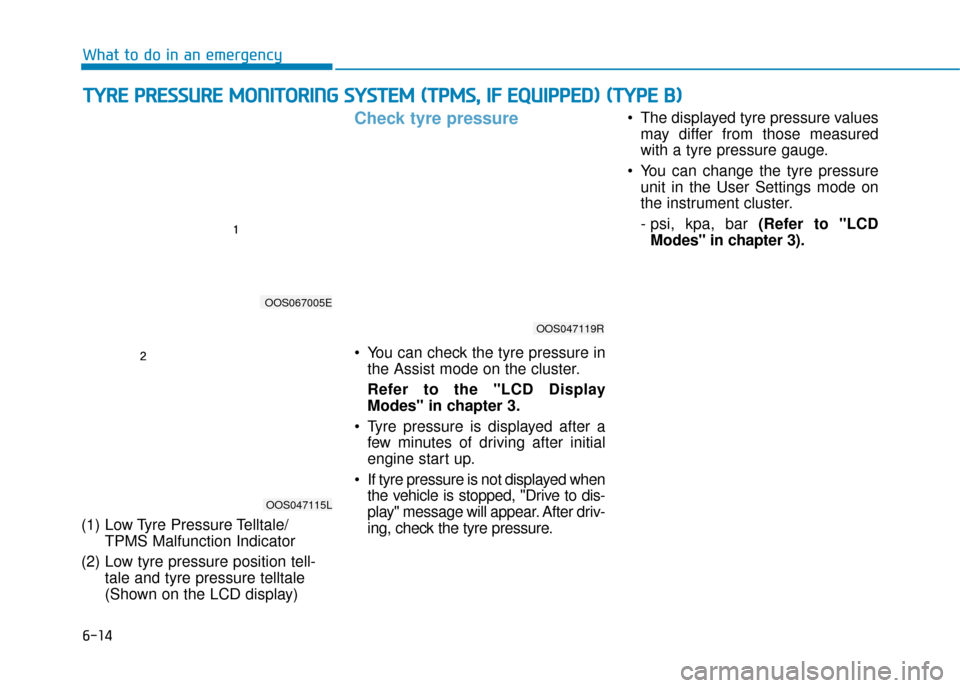
(1) Low Tyre Pressure Telltale/ TPMS Malfunction Indicator
(2) Low tyre pressure position tell- tale and tyre pressure telltale
(Shown on the LCD display)
Check tyre pressure
You can check the tyre pressure inthe Assist mode on the cluster.
Refer to the "LCD Display
Modes" in chapter 3.
Tyre pressure is displayed after a few minutes of driving after initial
engine start up.
If tyre pressure is not displayed when the vehicle is stopped, "Drive to dis-
play" message will appear. After driv-
ing, check the tyre pressure. The displayed tyre pressure values
may differ from those measured
with a tyre pressure gauge.
You can change the tyre pressure unit in the User Settings mode on
the instrument cluster.
- psi, kpa, bar (Refer to "LCDModes" in chapter 3).
T TY
Y R
RE
E
P
P R
R E
ES
SS
SU
U R
RE
E
M
M O
ON
NI
IT
T O
O R
RI
IN
N G
G
S
S Y
Y S
ST
T E
EM
M
(
( T
T P
P M
M S
S,
,
I
IF
F
E
E Q
Q U
UI
IP
P P
PE
ED
D )
)
(
( T
T Y
Y P
PE
E
B
B )
)
OOS067005E
OOS047115L
OOS047119R
Page 387 of 526
6-15
What to do in an emergency
6
Tyre pressure monitoring sys-
tem
Each tyre, including the spare (if pro-
vided), should be checked monthly
when cold and inflated to the inflation
pressure recommended by the vehi-
cle manufacturer on the vehicle plac-
ard or tyre inflation pressure label. (If
your vehicle has tyres of a different
size than the size indicated on the
vehicle placard or tyre inflation pres-
sure label, you should determine the
proper tyre inflation pressure for
those tyres.)As an added safety feature, your
vehicle has been equipped with a
tyre pressure monitoring system
(TPMS) that illuminates a low tyre
pressure telltale when one or more
of your tyres is significantly under-
inflated. Accordingly, when the low
tyre pressure telltale illuminates, you
should stop and check your tyres as
soon as possible, and inflate them to
the proper pressure. Driving on a sig-
nificantly under-inflated tyre causes
the tyre to overheat and can lead to
tyre failure. Under-inflation also
reduces fuel efficiency and tyre tread
life, and may affect the vehicle’s han-
dling and stopping ability.
Please note that the TPMS is not a
substitute for proper tyre mainte-
nance, and it is the driver’s responsi-
bility to maintain correct tyre pres-
sure, even if under-inflation has not
reached the level to trigger illumina-
tion of the TPMS low tyre pressure
telltale.Your vehicle has also been equipped
with a TPMS malfunction indicator to
indicate when the system is not
operating properly. The TPMS mal-
function indicator is combined with
the low tyre pressure telltale. When
the system detects a malfunction,
the telltale will flash for approximate-
ly one minute and then remain con-
tinuously illuminated. This sequence
will continue upon subsequent vehi-
cle start-ups as long as the malfunc-
tion exists. When the malfunction
indicator is illuminated, the system
may not be able to detect or signal
low tyre pressure as intended.
TPMS malfunctions may occur for a
variety of reasons, including the
installation of replacement or alter-
nate tyres or wheels on the vehicle
that prevent the TPMS from function-
ing properly. Always check the TPMS
malfunction telltale after replacing
one or more tyres or wheels on your
vehicle to ensure that the replace-
ment or alternate tyres and wheels
allow the TPMS to continue to func-
tion properly.
Over-inflation or under-inflation
can reduce tyre life, adversely
affect vehicle handling, and
lead to sudden tyre failure that
may cause loss of vehicle con-
trol resulting in an accident.
WARNING
Page 414 of 526
6-42
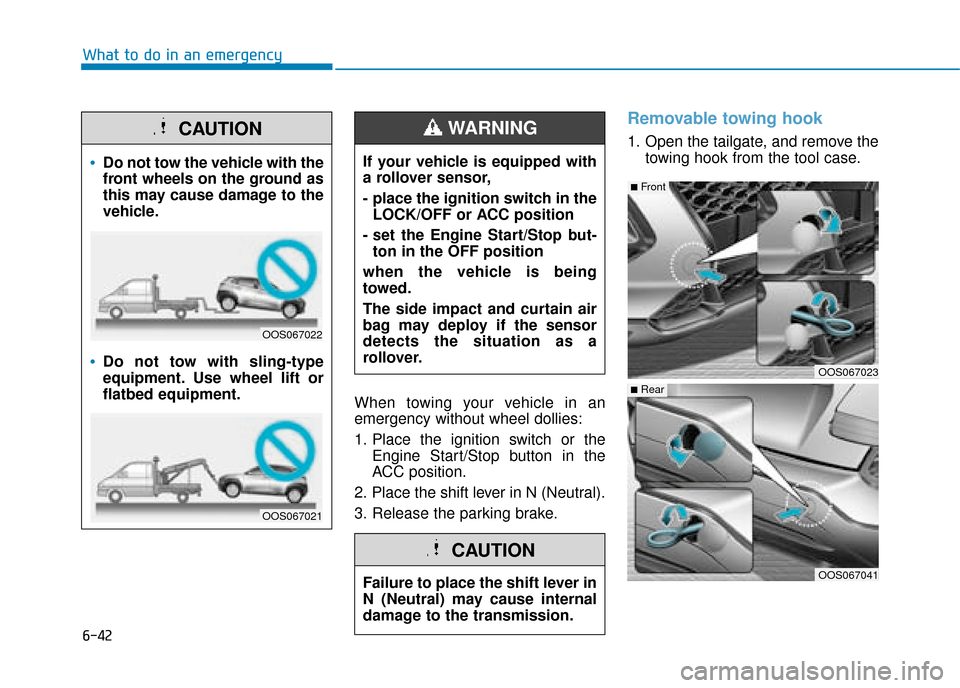
What to do in an emergencyWhen towing your vehicle in an
emergency without wheel dollies:
1. Place the ignition switch or theEngine Start/Stop button in the
ACC position.
2. Place the shift lever in N (Neutral).
3. Release the parking brake.
Removable towing hook
1. Open the tailgate, and remove the towing hook from the tool case.
Do not tow the vehicle with the
front wheels on the ground as
this may cause damage to the
vehicle.
Do not tow with sling-type
equipment. Use wheel lift or
flatbed equipment.
CAUTION
OOS067022
OOS067021
Failure to place the shift lever in
N (Neutral) may cause internal
damage to the transmission.
CAUTION
If your vehicle is equipped with
a rollover sensor,
- place the ignition switch in theLOCK/OFF or ACC position
- set the Engine Start/Stop but- ton in the OFF position
when the vehicle is being
towed.
The side impact and curtain air
bag may deploy if the sensor
detects the situation as a
rollover.
WARNING
OOS067023
OOS067041
■Front
■Rear
Page 423 of 526
7-6
Maintenance
O
OW
W N
NE
ER
R
M
M A
AI
IN
N T
TE
EN
N A
AN
N C
CE
E
The following lists are vehicle checks
and inspections that should be per-
formed by the owner or a HYUNDAI
authorised repairer at the frequen-
cies indicated to help ensure safe,
dependable operation of your vehi-
cle.
Any adverse conditions should be
brought to the attention of your deal-
er as soon as possible.
These Owner Maintenance vehicle
checks are generally not covered by
warranties and you may be charged
for labour, parts and lubricants used.
Performing maintenance work
on a vehicle can be dangerous.
If you lack sufficient knowledge
and experience or the proper
tools and equipment to do the
work, we recommend that the
system be serviced by a
HYUNDAI authorised repairer.
ALWAYS follow these precau-
tions for performing mainte-
nance work:
Park your vehicle on level
ground, move the shift lever
into the P (Park, dual clutch
transmission vehicle) or neu-
tral (for manual transmission
vehicle) position, apply the
parking brake, and place the
ignition switch in the
LOCK/OFF position of place
the Engine Start/Stop button
in the OFF position.
WARNING Block the tyres (front and
back) to prevent the vehicle
from moving.
Remove loose clothing or jew-
ellery that can become entan-
gled in moving parts.
If you must run the engine
during maintenance, do so
out doors or in an area with
plenty of ventilation.
Keep flames, sparks, or smok-
ing materials away from the
battery and fuel-related parts.
Diesel Engine
Never manipulate or modify the
injection system whilst running
the diesel engine or within 30
seconds after turning OFF the
diesel engine. The high-pressure
pump, high-pressure pipes, rail,
and injectors are still subject to
high pressure immediately after
stopping the diesel engine.
When the fuel leakage vents out,
it may cause serious body injury.
Any people, who are implanted
with the artificial cardiac pace-
maker, should remain away from
the ECU or the wiring harness by
at least 30 cm, whilst running the
diesel engine. The high currents
of the electronic engine control
system produce a considerable
amount of magnetic fields.
WARNING
Page 426 of 526
7-9
7
Maintenance
E
EX
X P
PL
LA
A N
N A
AT
TI
IO
O N
N
O
O F
F
S
S C
C H
H E
ED
D U
U L
LE
E D
D
M
M A
AI
IN
N T
TE
EN
N A
AN
N C
CE
E
I
IT
T E
EM
M S
S
Engine oil and filter
The engine oil and filter should be
changed at the intervals specified in
the maintenance schedule. If the
vehicle is being driven in severe con-
ditions, more frequent oil and filter
changes are required.
Drive belts
Inspect all drive belts for evidence of
cuts, cracks, excessive wear or oil
saturation and replace if necessary.
Drive belts should be checked peri-
odically for proper tension and
adjusted as necessary.
Fuel filter (cartridge)
A clogged-up fuel filter may limit the
vehicle driving speed, damage the
emission system, and cause the
hard starting. When a considerable
amount of foreign substances are
accumulated in the fuel tank, the fuel
filter should be replaced.
Upon installing a new fuel filter, oper-
ate the diesel engine for several min-
utes, and check the connections for
any leakages. We recommend you to
have the fuel filter replaced by a
HYUNDAI authorised repairer.
Fuel lines, fuel hoses and con-
nections
Check the fuel lines, fuel hoses and
connections for leakage and dam-
age. We recommend that the fuel
lines, fuel hoses and connections be
replaced by a HYUNDAI authorised
repairer.
Fuel filter
This HYUNDAI petrol vehicle is
equipped with a lifetime fuel filter that
is integrated with the fuel tank.
Regular maintenance or replace-
ment is not needed but depends on
fuel quality. If there are some impor-
tant safety matters like fuel flow
restriction, surging, loss of power,
hard starting problem etc, fuel filter
inspection or replace is needed. We
recommend that the fuel filter be
Inspected or replaced by a
HYUNDAI authorised repairer.
Vapour hose and fuel filler cap
The vapour hose and fuel filler cap
should be inspected at those inter-
vals specified in the maintenance
schedule. Make sure that a new
vapour hose or fuel filler cap is cor-
rectly replaced.
When you are inspecting the belt,
place the ignition switch to the
LOCK/OFF or ACC position or
place the Engin Start/Stop button
to the OFF position.CAUTION
Page 434 of 526
7-17
7
MaintenanceThe electric motor for the cooling fan
is controlled by engine coolant tem-
perature, refrigerant pressure and
vehicle speed. As the engine coolant
temperature decreases, the electric
motor will automatically shut off. This
is a normal condition. If your vehicle
is equipped with T-GDI, the electric
motor for the cooling fan may begin
to operate at any time and continue
to operate until you disconnect the
negative battery cable.The electric motor for
the cooling fan may
continue to operate
or start up when the
engine is not running
and can cause serious injury.
Keep hands, clothing and tools
away from the rotating fan
blades of the cooling fan.
WARNING
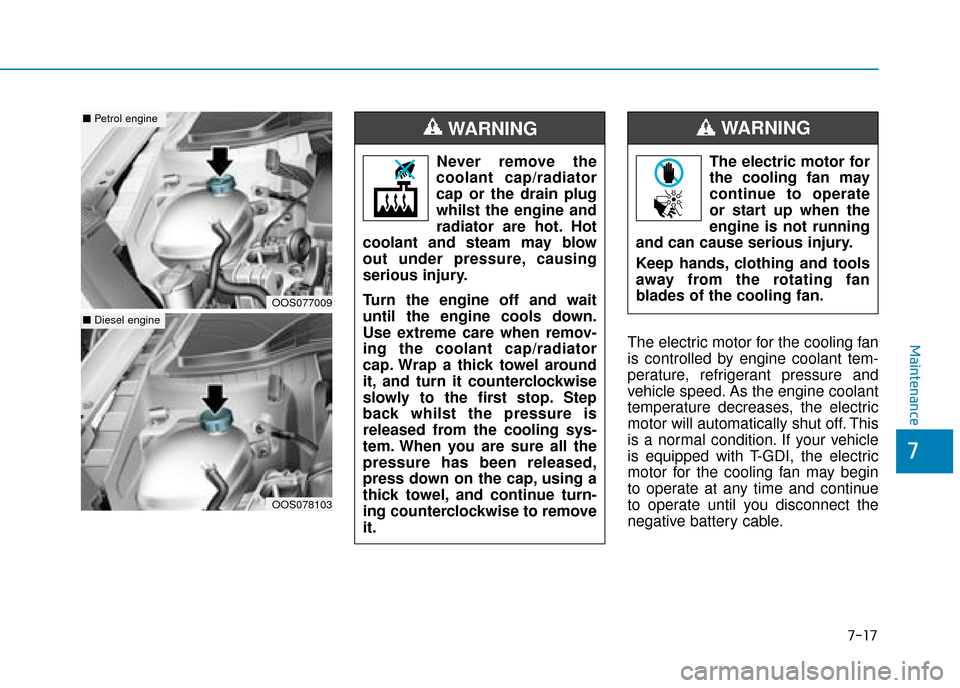
Never remove the
coolant cap/radiator
cap or the drain plug
whilst the engine and
radiator are hot. Hot
coolant and steam may blow
out under pressure, causing
serious injury.
Turn the engine off and wait
until the engine cools down.
Use extreme care when remov-
ing the coolant cap/radiator
cap. Wrap a thick towel around
it, and turn it counterclockwise
slowly to the first stop. Step
back whilst the pressure is
released from the cooling sys-
tem. When you are sure all the
pressure has been released,
press down on the cap, using a
thick towel, and continue turn-
ing counterclockwise to remove
it.
WARNING
OOS077009
■ Petrol engine
OOS078103
■Diesel engine