2019 Hyundai Kona maintenance schedule
[x] Cancel search: maintenance schedulePage 426 of 526
7-9
7
Maintenance
E
EX
X P
PL
LA
A N
N A
AT
TI
IO
O N
N
O
O F
F
S
S C
C H
H E
ED
D U
U L
LE
E D
D
M
M A
AI
IN
N T
TE
EN
N A
AN
N C
CE
E
I
IT
T E
EM
M S
S
Engine oil and filter
The engine oil and filter should be
changed at the intervals specified in
the maintenance schedule. If the
vehicle is being driven in severe con-
ditions, more frequent oil and filter
changes are required.
Drive belts
Inspect all drive belts for evidence of
cuts, cracks, excessive wear or oil
saturation and replace if necessary.
Drive belts should be checked peri-
odically for proper tension and
adjusted as necessary.
Fuel filter (cartridge)
A clogged-up fuel filter may limit the
vehicle driving speed, damage the
emission system, and cause the
hard starting. When a considerable
amount of foreign substances are
accumulated in the fuel tank, the fuel
filter should be replaced.
Upon installing a new fuel filter, oper-
ate the diesel engine for several min-
utes, and check the connections for
any leakages. We recommend you to
have the fuel filter replaced by a
HYUNDAI authorised repairer.
Fuel lines, fuel hoses and con-
nections
Check the fuel lines, fuel hoses and
connections for leakage and dam-
age. We recommend that the fuel
lines, fuel hoses and connections be
replaced by a HYUNDAI authorised
repairer.
Fuel filter
This HYUNDAI petrol vehicle is
equipped with a lifetime fuel filter that
is integrated with the fuel tank.
Regular maintenance or replace-
ment is not needed but depends on
fuel quality. If there are some impor-
tant safety matters like fuel flow
restriction, surging, loss of power,
hard starting problem etc, fuel filter
inspection or replace is needed. We
recommend that the fuel filter be
Inspected or replaced by a
HYUNDAI authorised repairer.
Vapour hose and fuel filler cap
The vapour hose and fuel filler cap
should be inspected at those inter-
vals specified in the maintenance
schedule. Make sure that a new
vapour hose or fuel filler cap is cor-
rectly replaced.
When you are inspecting the belt,
place the ignition switch to the
LOCK/OFF or ACC position or
place the Engin Start/Stop button
to the OFF position.CAUTION
Page 427 of 526
7-10
Maintenance
Vacuum crankcase ventilation
hoses (if equipped)
Inspect the surface of hoses for evi-
dence of heat and/or mechanical
damage. Hard and brittle rubber,
cracking, tears, cuts, abrasions, and
excessive swelling indicate deterio-
ration. Particular attention should be
paid to examine those hose surfaces
nearest to high heat sources, such
as the exhaust manifold.
Inspect the hose routing to ensure
that the hoses do not come in con-
tact with any heat source, sharp
edges or moving component which
might cause heat damage or
mechanical wear. Inspect all hose
connections, such as clamps and
couplings, to make sure they are
secure, and that no leaks are pres-
ent. Hoses should be replaced
immediately if there is any evidence
of deterioration or damage.
Air cleaner filter
We recommend that the air cleaner
filter be replaced by a HYUNDAI
authorised repairer.
Spark plugs
(for Petrol Engine)
Make sure to install new spark plugs
of the correct heat range.
Valve clearance
(for Petrol Engine)
Inspect excessive valve noise and/or
engine vibration and adjust if neces-
sary. We recommend that the system
be serviced by a HYUNDAI authorised
repairer.
Cooling system
Check the cooling system parts,
such as radiator, coolant reservoir,
hoses and connections for leakage
and damage. Replace any damaged
parts.
Engine coolant
The coolant should be changed at
the intervals specified in the mainte-
nance schedule.
Manual transmission fluid
(if equipped)
Inspect the manual transmission
fluid according to the maintenance
schedule.
Do not disconnect and inspect
spark plugs when the engine is
hot. You may burn yourself.
WARNING
Page 428 of 526
7-11
7
Maintenance
Dual clutch transmission fluid
(if equipped)
Inspect the dual clutch transmission
fluid according to the maintenance
schedule.
Brake hoses and lines
Visually check for proper installation,
chafing, cracks, deterioration and
any leakage. Replace any deteriorat-
ed or damaged parts immediately.
Brake/Clutch fluid
(if equipped)
Check the brake/clutch fluid level in
the brake fluid reservoir. The level
should be between “MIN” and “MAX”
marks on the side of the reservoir.
Use only hydraulic brake fluid con-
forming to DOT 3 or DOT 4 specifi-
cation.
Parking brake
Inspect the parking brake system
including the parking brake lever and
cables.
Brake pads, calipers and
rotors
Check the pads for excessive wear,
discs for run out and wear, and
calipers for fluid leakage.
For more information on checking
the pads or lining wear limit, refer to
the HYUNDAI web site.
(http://ser
vice.hyundai-motor.com)
Suspension mounting bolts
Check the suspension connections
for looseness or damage. Retighten
to the specified torque.
Steering gear box, linkage &
boots/lower arm ball joint
With the vehicle stopped and engine
off, check for excessive free-play in
the steering wheel.
Check the linkage for bends or dam-
age. Check the dust boots and ball
joints for deterioration, cracks, or
damage. Replace any damaged
parts.
Drive shafts and boots
Check the drive shafts, boots and
clamps for cracks, deterioration, or
damage. Replace any damaged
parts and, if necessary, repack the
grease.
Air conditioning refrigerant/
compressor
Check the air conditioning lines and
connections for leakage and dam-
age.
Page 435 of 526
7-18
Maintenance
Recommended engine coolant
When adding coolant, use only dis-tilled (deionised) water for your
vehicle and never mix hard water in
the coolant filled at the factory. An
incorrect coolant mixture can result
in serious malfunction or engine
damage.
The engine in your vehicle has alu- minium engine parts and must be
protected by an ethylene-glycol
with phosphate based coolant to
prevent corrosion and freezing.
DO NOT USE alcohol or methanol coolant or mix them with the spec-
ified coolant.
Do not use a solution that contains more than 60% antifreeze or less
than 35% antifreeze, which would
reduce the effectiveness of the
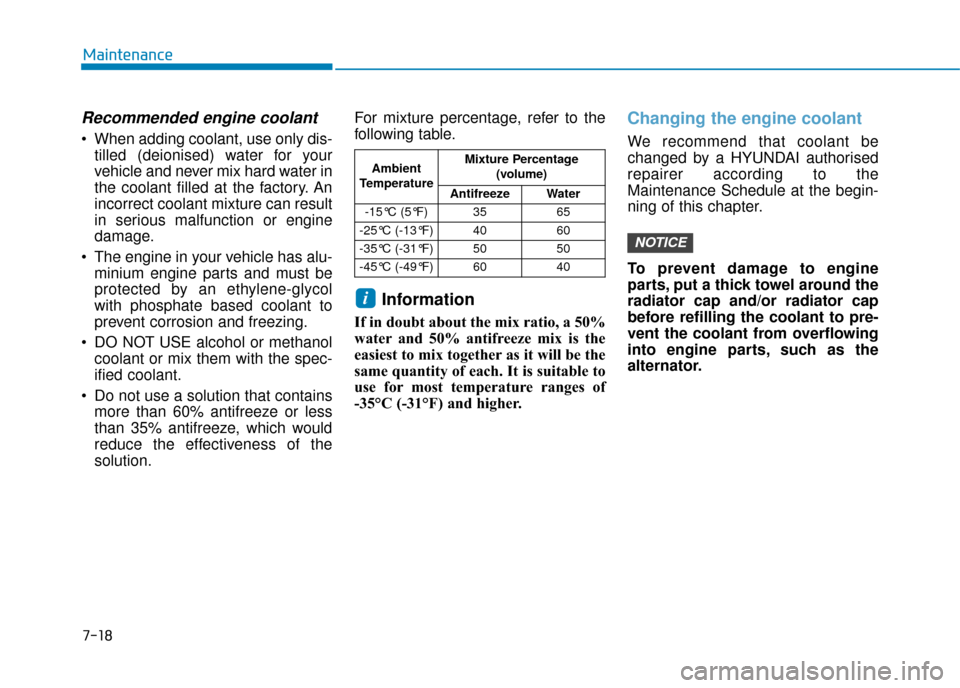
solution. For mixture percentage, refer to the
following table.
Information
If in doubt about the mix ratio, a 50%
water and 50% antifreeze mix is the
easiest to mix together as it will be the
same quantity of each. It is suitable to
use for most temperature ranges of
-35°C (-31°F) and higher.
Changing the engine coolant
We recommend that coolant be
changed by a HYUNDAI authorised
repairer according to the
Maintenance Schedule at the begin-
ning of this chapter.
To prevent damage to engine
parts, put a thick towel around the
radiator cap and/or radiator cap
before refilling the coolant to pre-
vent the coolant from overflowing
into engine parts, such as the
alternator.
NOTICE
i
Ambient
Temperature Mixture Percentage
(volume)
Antifreeze Water
-15°C (5°F) 35 65
-25°C (-13°F) 40 60
-35°C (-31°F) 50 50
-45°C (-49°F) 60 40
Page 438 of 526
7-21
7
Maintenance
F
FU
U E
EL
L
F
F I
IL
L T
T E
ER
R
(
( F
F O
O R
R
D
D I
IE
E S
SE
E L
L)
)
Draining water from fuel filter
The fuel filter in the diesel engine
operates the critical function of sepa-
rating water from the fuels and pre-
venting accumulating of water in the
base.
When enough water is accumulated
inside the fuel filter, the warning light
( ) illuminates with the ignition
switch in the ON position.
In this case, we recommend you to
have the system checked by a
HYUNDAI authorised repairer.
When the accumulated water is
not drained at the proper timing,
water may permeate in the fuel fil-
ter, damaging the major vehicle
components, such as the fuel sys-
tem.
Fuel filter cartridge replace-
ment
We recommend the fuel filter car-
tridge be replaced by a HYUNDAI
authorised repairer according to the
Maintenance Schedule at the begin-
ning of this chapter.
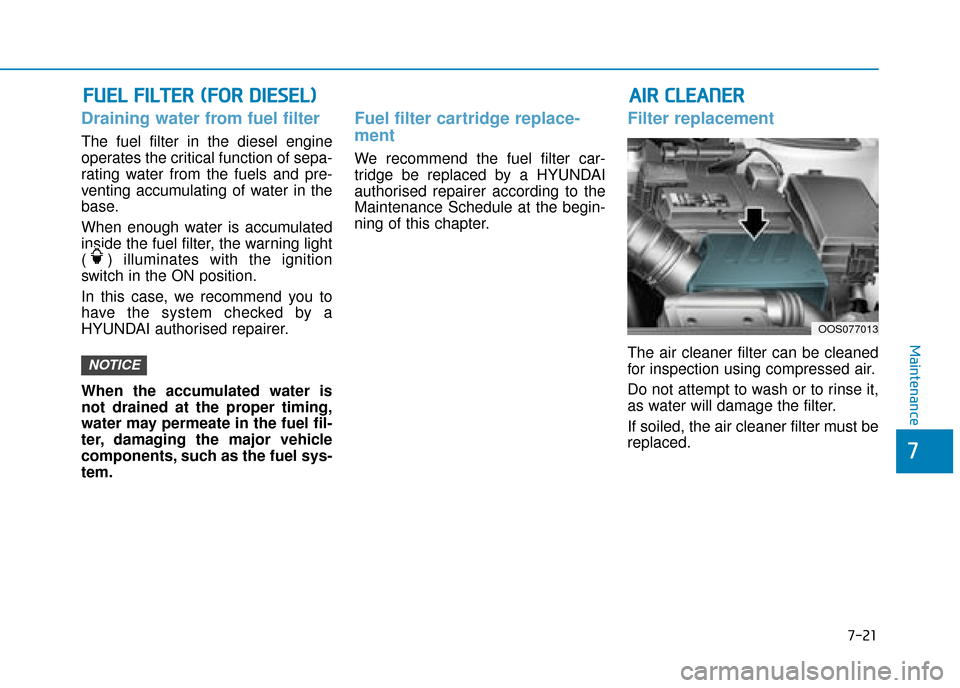
Filter replacement
The air cleaner filter can be cleaned
for inspection using compressed air.
Do not attempt to wash or to rinse it,
as water will damage the filter.
If soiled, the air cleaner filter must be
replaced.NOTICE
A
A I
IR
R
C
C L
LE
E A
A N
N E
ER
R
OOS077013
Page 440 of 526
C
CL
LI
IM
M A
AT
TE
E
C
C O
O N
NT
TR
R O
O L
L
A
A I
IR
R
F
F I
IL
L T
T E
ER
R
Filter inspection
If the vehicle is operated in the
severely air-polluted cities or on
dusty rough roads for a long period,
it should be inspected more fre-
quently and replaced earlier. When
you, the owner, replace the climate
control air filter, replace it performing
the following procedure, and be care-
ful to avoid damaging other compo-
nents.
Replace the filter according to the
Maintenance Schedule.
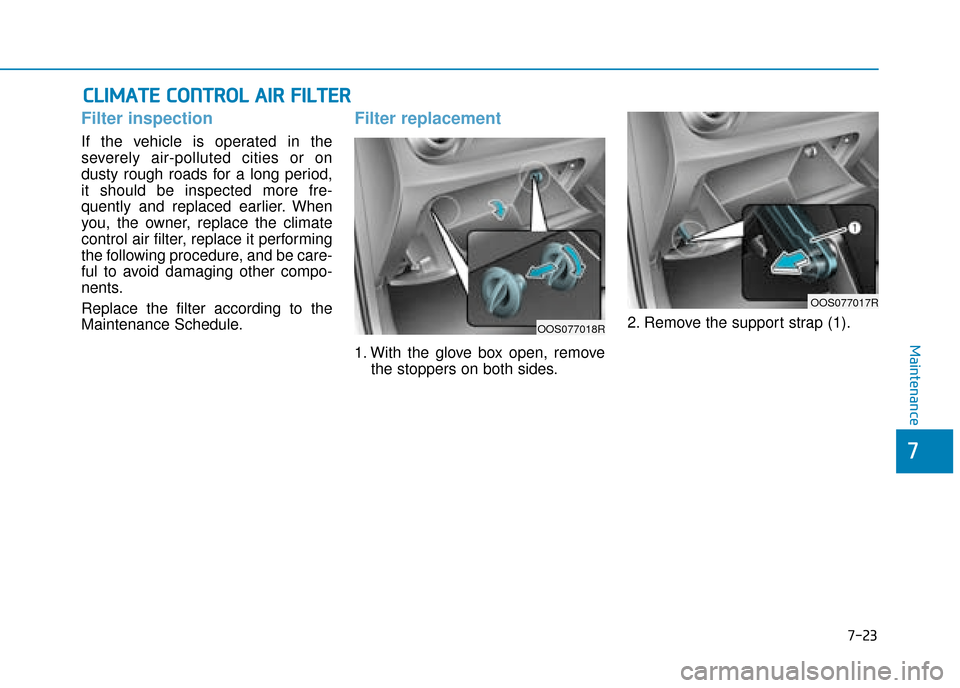
Filter replacement
1. With the glove box open, remove
the stoppers on both sides. 2. Remove the support strap (1).
7-23
7
MaintenanceOOS077018R
OOS077017R
Page 497 of 526
7-80
Maintenance
Cleaning the lap/shoulder beltwebbing
Clean the belt webbing with any mild
soap solution recommended for clean-
ing upholstery or carpet. Follow the
instructions provided with the soap. Do
not bleach or re-dye the webbing
because this may weaken it.
Cleaning the interior windowglass
If the interior glass surfaces of the
vehicle become fogged (that is, cov-
ered with an oily, greasy or waxy film),
they should be cleaned with glass
cleaner. Follow the directions on the
glass cleaner container.
Do not scrape or scratch the inside
of the rear window. This may result
in damage to the rear window
defroster grid. The emission control system of your
vehicle is covered by a written limited
warranty. Please see the warranty
information contained in the
Warranty Booklet in your vehicle.
Your vehicle is equipped with an
emission control system to meet all
applicable emission regulations.
There are three emission control
systems, as follows.
(1) Crankcase emission control sys-
tem
(2) Evaporative emission control sys- tem
(3) Exhaust emission control system
In order to ensure the proper function
of the emission control systems, it is
recommended that you have your
vehicle inspected and maintained by
a HYUNDAI authorised repairer in
accordance with the maintenance
schedule.
NOTICE
E E M
M I
IS
S S
SI
IO
O N
N
C
C O
O N
NT
TR
R O
O L
L
S
S Y
Y S
ST
T E
EM
M
For the Inspection and Maintenance
Test (with Electronic Stability Control
(ESC) system)
To prevent the vehicle from
misfiring during dynamome-
ter testing, turn the Electronic
Stability Control (ESC) sys-
tem off by pressing the ESC
switch.
After dynamometer testing is
completed, turn the ESC sys-
tem back on by pressing the
ESC switch again.
CAUTION