Page 140 of 599
2-63
Safety system of your vehicle
2
1. SRS control module*
2. Front impact sensor*
3. Side pressure sensor (front)*
4. Side impact sensor (B-pillar)*
* : if equipped
OAE036043R/OAE036044R/OAE036045R/OAE036046R/OAE036047R
Page 141 of 599

2-64
Safety system of your vehicle
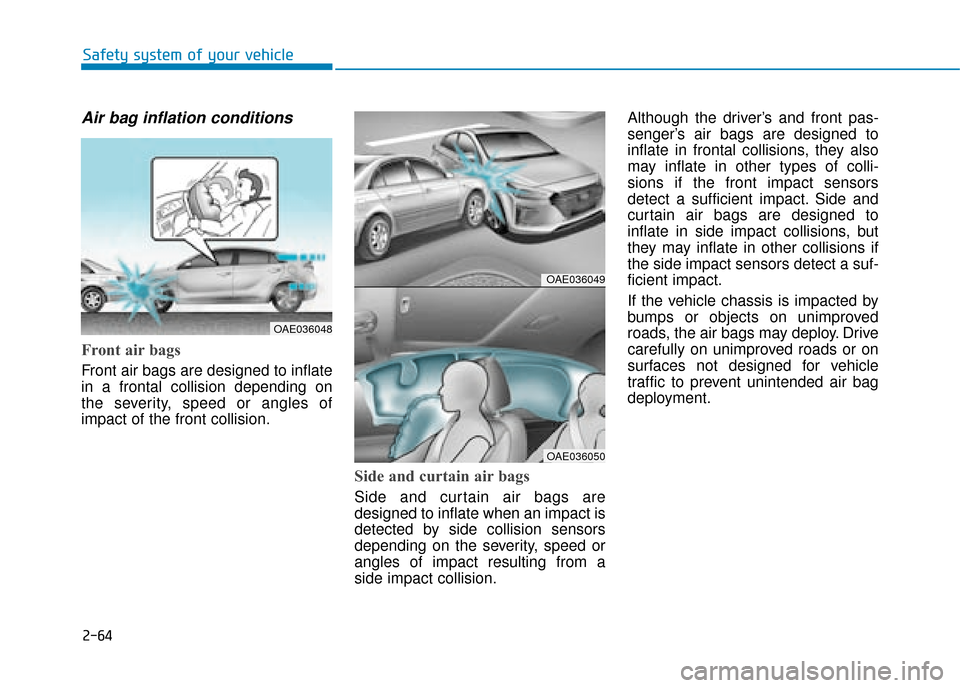
Air bag inflation conditions
Front air bags
Front air bags are designed to inflate
in a frontal collision depending on
the severity, speed or angles of
impact of the front collision.
Side and curtain air bags
Side and curtain air bags are
designed to inflate when an impact is
detected by side collision sensors
depending on the severity, speed or
angles of impact resulting from a
side impact collision.Although the driver’s and front pas-
senger’s air bags are designed to
inflate in frontal collisions, they also
may inflate in other types of colli-
sions if the front impact sensors
detect a sufficient impact. Side and
curtain air bags are designed to
inflate in side impact collisions, but
they may inflate in other collisions if
the side impact sensors detect a suf-
ficient impact.
If the vehicle chassis is impacted by
bumps or objects on unimproved
roads, the air bags may deploy. Drive
carefully on unimproved roads or on
surfaces not designed for vehicle
traffic to prevent unintended air bag
deployment.
OAE036049
OAE036050
OAE036048
Page 143 of 599
2-66
Safety system of your vehicle
In an angled collision, the force of
impact may direct the occupants in a
direction where the air bags would
not be able to provide any additional
benefit, and thus the sensors may
not deploy any air bags. Just before impact, drivers often
brake heavily. Such heavy braking
lowers the front portion of the vehicle
causing it to “ride” under a vehicle
with a higher ground clearance. Air
bags may not inflate in this "under-
ride" situation because deceleration
forces that are detected by sensors
may be significantly reduced by such
“underride” collisions.Front air bags may not inflate in
rollover accidents because front air
bag deployment would not provide
additional occupant protection.
Information
The side and/or curtain air bags may
inflate when the vehicle is rolled over
by a side impact collision, if the vehi-
cle is equipped with side and/or cur-
tain air bags.
i
OAE036061OAE036054OAE036055
Page 169 of 599

3-23
Convenient features of your vehicle
3
When cleaning the mirror, use a
paper towel or similar material
dampened with glass cleaner. Do
not spray glass cleaner directly on
the mirror as that may cause the
liquid cleaner to enter the mirror
housing.
Day/night rearview mirror (if equipped)
Make this adjustment before you
start driving and whilst the day/night
lever is in the day position.
Pull the day/night lever towards you
to reduce glare from the headlamps
of the vehicles behind you during
night driving.
Remember that you lose some
rearview clarity in the night position.
Electric Chromic Mirror (ECM) (if equipped)
The electric rearview mirror automati-
cally controls the glare from the head-
lamp of the vehicle behind you in
nighttime or low light driving condi-
tions.
When the engine is running, the
glare is automatically controlled by
the sensor mounted in the rearview
mirror. The sensor detects the light
level around the vehicle, and auto-
matically adjusts to control the head-
lamp glare from vehicles behind you.
Whenever the shift lever is placed in
R (Reverse), the mirror will automat-
ically go to the brightest setting in
order to improve the driver's view
behind the vehicle.
NOTICE
NEVER adjust the mirror whilst
driving. This may cause loss of
vehicle control resulting in an
accident.
WARNING
OAE046010
Day Night
Page 210 of 599

3-64
Convenient features of your vehicle
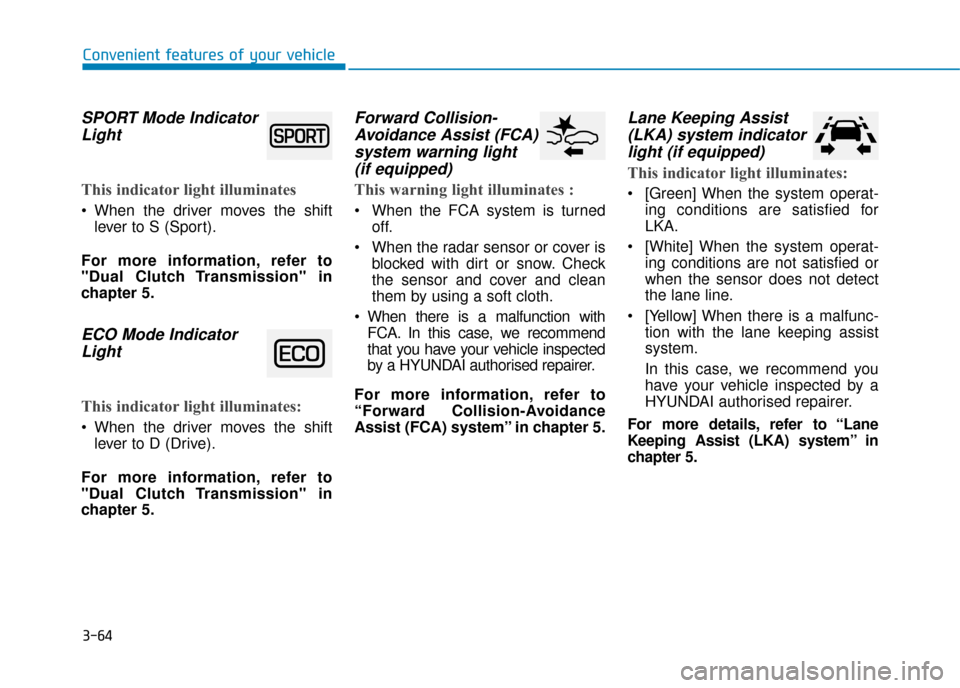
SPORT Mode IndicatorLight
This indicator light illuminates
When the driver moves the shift
lever to S (Sport).
For more information, refer to
"Dual Clutch Transmission" in
chapter 5.
ECO Mode Indicator Light
This indicator light illuminates:
When the driver moves the shift
lever to D (Drive).
For more information, refer to
"Dual Clutch Transmission" in
chapter 5.
Forward Collision- Avoidance Assist (FCA)system warning light (if equipped)
This warning light illuminates :
When the FCA system is turned
off.
When the radar sensor or cover is blocked with dirt or snow. Check
the sensor and cover and clean
them by using a soft cloth.
When there is a malfunction with FCA. In this case, we recommend
that you have your vehicle inspected
by a HYUNDAI authorised repairer.
For more information, refer to
“Forward Collision-Avoidance
Assist (FCA) system’’ in chapter 5.
Lane Keeping Assist (LKA) system indicatorlight (if equipped)
This indicator light illuminates:
[Green] When the system operat-
ing conditions are satisfied for
LKA.
[White] When the system operat- ing conditions are not satisfied or
when the sensor does not detect
the lane line.
[Yellow] When there is a malfunc- tion with the lane keeping assist
system.
In this case, we recommend you
have your vehicle inspected by a
HYUNDAI authorised repairer.
For more details, refer to “Lane
Keeping Assist (LKA) system” in
chapter 5.
Page 254 of 599

3-108
Convenient features of your vehicle
Exterior lights
Lighting control
To operate the lights, turn the knob at
the end of the control lever to one of
the following positions:
(1) O (OFF) position
(2) AUTO light position
(3) Position lamp position
(4) Headlamp position
AUTO light position
When the light switch is in the AUTO
position, the position lamp and head-
lamp will be turned ON or OFF auto-
matically depending on the amount
of light outside the vehicle.Even with the AUTO light feature in
operation, it is recommended to
manually turn ON the lamps when
driving at night or in fog, or when you
enter dark areas, such as tunnels
and parking facilities.
• Do not cover or spill anything on
the sensor (1) located on the
instrument panel.
Do not clean the sensor using a window cleaner, the cleanser
may leave a light film which
could interfere with sensor oper-
ation.
If your vehicle has window tint or other types of metallic coat-
ing on the front windscreen, the
AUTO light system may not work
properly.
NOTICE
L LI
IG
G H
H T
T
OAE046449L
OAE046451L
Page 264 of 599

3-118
Convenient features of your vehicle
W
WI
IP
P E
ER
R S
S
A
A N
N D
D
W
W A
AS
SH
H E
ER
R S
S
A : Wiper speed control
· MIST /
V– Single wipe
· OFF / O – Off
· AUTO* – Auto control wipe
· INT / --- – Intermittent wipe
· LO / 1 – Low wiper speed
· HI / 2 – High wiper speed
B : Auto control wipe time adjust- ment
C : Wash with brief wipes
* : if equipped
Windscreen wipers
Operates as follows when the igni-
tion switch is in the ON position.
MIST (
V) : For a single wiping cycle, push the lever upward (or
downward) and release.
The wipers will operate
continuously if the lever
is held in this position.
OFF (O) : Wiper is not in operation.
INT (---) : Wiper operates intermit-
tently at the same wiping
intervals.To vary the speed
setting, turn the speed
control knob (B). AUTO : The rain sensor located on
the upper end of the wind-
screen glass senses the
amount of rainfall and con-
trols the wiping cycle for the
proper interval. The more it
rains, the faster the wiper
operates. When the rain
stops, the wiper stops.To
vary the speed setting, turn
the speed control knob (B).
LO (1) : The wiper runs at a lower speed.
HI (2) : The wiper runs at a higher
speed.
Information
If there is heavy accumulation of snow
or ice on the windscreen, defrost the
windscreen for about 10 minutes, or
until the snow and/or ice is removed
before using the windscreen wipers to
ensure proper operation.
If you do not remove the snow and/or
ice before using the wiper and washer,
it may damage the wiper and washer
system.
i
OAD045437L
OAD045438L
■ Type A
■Type B
Page 265 of 599

3-119
Convenient features of your vehicle
3
AUTO (Automatic) control (if equipped)
The rain sensor located on the upper
end of the windscreen glass senses
the amount of rainfall and controls
the wiping cycle for the proper inter-
val. The more it rains, the faster the
wiper operates.
When the rain stops, the wiper stops.
To vary the speed setting, turn the
speed control knob (1).
If the wiper switch is set in AUTO
mode when the ignition switch is in
the ON position, the wiper will oper-
ate once to perform a self-check of
the system. Set the wiper to OFF
position when the wiper is not in use. When washing the vehicle, set
the wiper switch in the OFF (O)
position to stop the auto wiper
operation. The wiper may oper-
ate and be damaged if the switch
is set in the AUTO mode whilst
washing the vehicle.
Do not remove the sensor cover located on the upper end of the
passenger side windscreen
glass. Damage to system parts
could occur and may not be cov-
ered by your vehicle warranty.
NOTICE
OAE046480N
To avoid personal injury from
the windscreen wipers, when
the engine is running and the
windscreen wiper switch is
placed in the AUTO mode:
Do not touch the upper end of
the windscreen glass facing
the rain sensor.
Do not wipe the upper end of
the windscreen glass with a
damp or wet cloth.
Do not put pressure on the
windscreen glass.
WARNING
Rain Sensor
(O)