2019 Hyundai Ioniq Electric key
[x] Cancel search: keyPage 445 of 555
7-48
Maintenance
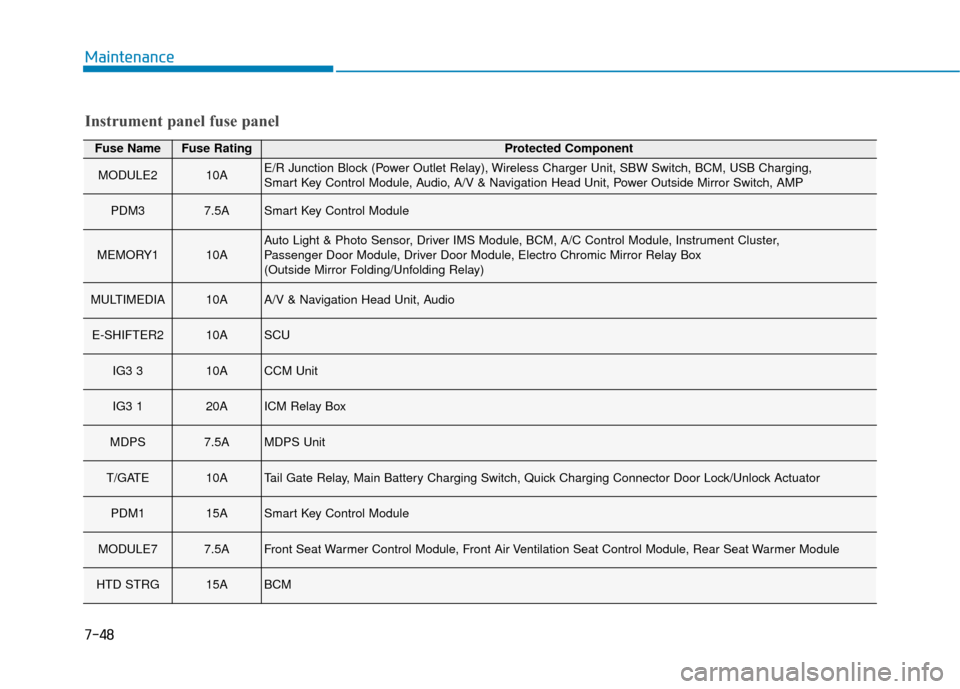
Fuse NameFuse RatingProtected Component
MODULE210AE/R Junction Block (Power Outlet Relay), Wireless Charger Unit, SBW Switch, BCM, USB Charging,
Smart Key Control Module, Audio, A/V & Navigation Head Unit, Power Outside Mirror Switch, AMP
PDM37.5ASmart Key Control Module
MEMORY110AAuto Light & Photo Sensor, Driver IMS Module, BCM, A/C Control Module, Instrument Cluster,
Passenger Door Module, Driver Door Module, Electro Chromic Mirror Relay Box
(Outside Mirror Folding/Unfolding Relay)
MULTIMEDIA10AA/V & Navigation Head Unit, Audio
E-SHIFTER210ASCU
IG3 310ACCM Unit
IG3 120AICM Relay Box
MDPS7.5AMDPS Unit
T/GATE10ATail Gate Relay, Main Battery Charging Switch, Quick Charging Connector Door Lock/Unlock Actuator
PDM115ASmart Key Control Module
MODULE77.5AFront Seat Warmer Control Module, Front Air Ventilation Seat Control Module, Rear Seat Warmer Module
HTD STRG15ABCM
Instrument panel fuse panel
Page 446 of 555
7-49
7
Maintenance
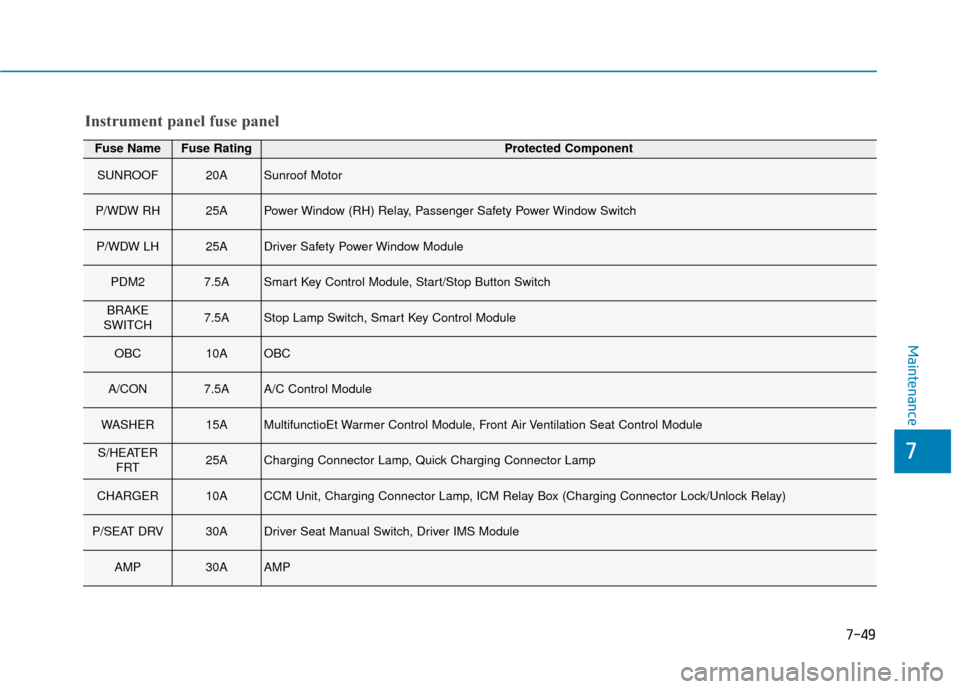
Fuse NameFuse RatingProtected Component
SUNROOF20ASunroof Motor
P/WDW RH25APower Window (RH) Relay, Passenger Safety Power Window Switch
P/WDW LH25ADriver Safety Power Window Module
PDM27.5ASmart Key Control Module, Start/Stop Button Switch
BRAKE
SWITCH7.5AStop Lamp Switch, Smart Key Control Module
OBC10AOBC
A/CON7.5AA/C Control Module
WASHER15AMultifunctioEt Warmer Control Module, Front Air Ventilation Seat Control Module
S/HEATER FRT25ACharging Connector Lamp, Quick Charging Connector Lamp
CHARGER10ACCM Unit, Charging Connector Lamp, ICM Relay Box (Charging Connector Lock/Unlock Relay)
P/SEAT DRV30ADriver Seat Manual Switch, Driver IMS Module
AMP30AAMP
Instrument panel fuse panel
Page 447 of 555
7-50
Maintenance
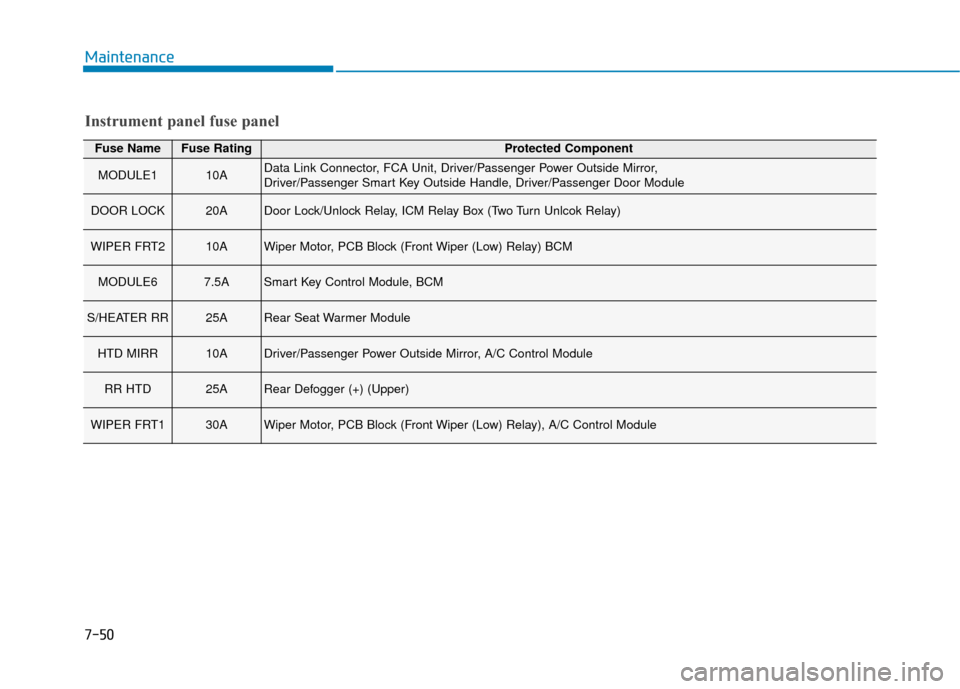
Fuse NameFuse RatingProtected Component
MODULE110AData Link Connector, FCA Unit, Driver/Passenger Power Outside Mirror,
Driver/Passenger Smart Key Outside Handle, Driver/Passenger Door Module
DOOR LOCK20ADoor Lock/Unlock Relay, ICM Relay Box (Two Turn Unlcok Relay)
WIPER FRT210AWiper Motor, PCB Block (Front Wiper (Low) Relay) BCM
MODULE67.5ASmart Key Control Module, BCM
S/HEATER RR25ARear Seat Warmer Module
HTD MIRR10ADriver/Passenger Power Outside Mirror, A/C Control Module
RR HTD25ARear Defogger (+) (Upper)
WIPER FRT130AWiper Motor, PCB Block (Front Wiper (Low) Relay), A/C Control Module
Instrument panel fuse panel
Page 452 of 555
7-55
7
Maintenance
L
LI
IG
G H
H T
T
B
B U
U L
LB
B S
S
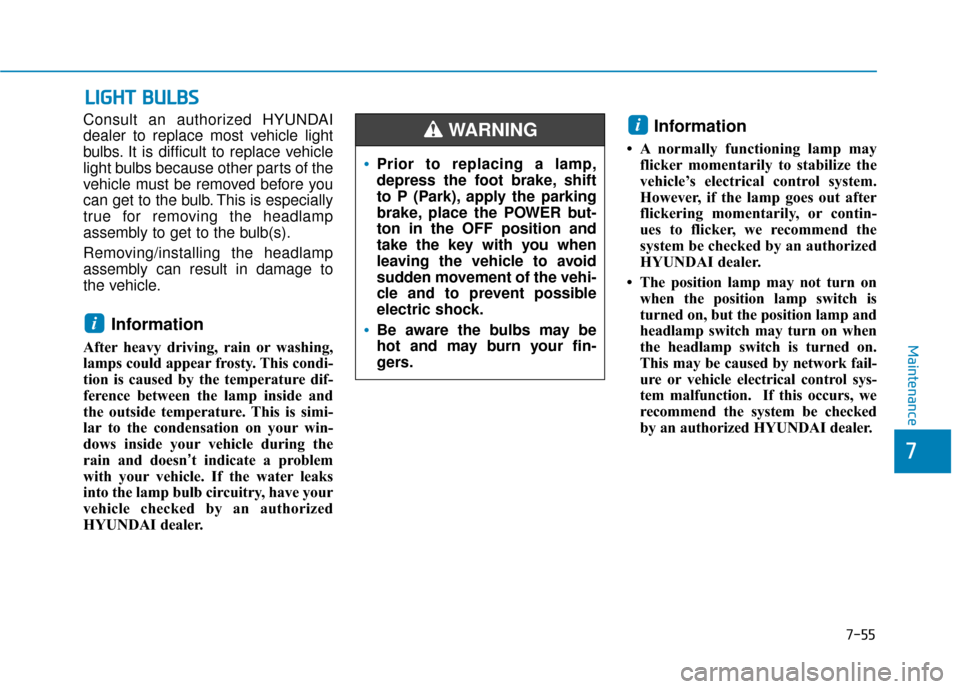
Consult an authorized HYUNDAI
dealer to replace most vehicle light
bulbs. It is difficult to replace vehicle
light bulbs because other parts of the
vehicle must be removed before you
can get to the bulb. This is especially
true for removing the headlamp
assembly to get to the bulb(s).
Removing/installing the headlamp
assembly can result in damage to
the vehicle.
Information
After heavy driving, rain or washing,
lamps could appear frosty. This condi-
tion is caused by the temperature dif-
ference between the lamp inside and
the outside temperature. This is simi-
lar to the condensation on your win-
dows inside your vehicle during the
rain and doesn ’t indicate a problem
with your vehicle. If the water leaks
into the lamp bulb circuitry, have your
vehicle checked by an authorized
HYUNDAI dealer.
Information
• A normally functioning lamp may flicker momentarily to stabilize the
vehicle’s electrical control system.
However, if the lamp goes out after
flickering momentarily, or contin-
ues to flicker, we recommend the
system be checked by an authorized
HYUNDAI dealer.
• The position lamp may not turn on when the position lamp switch is
turned on, but the position lamp and
headlamp switch may turn on when
the headlamp switch is turned on.
This may be caused by network fail-
ure or vehicle electrical control sys-
tem malfunction. If this occurs, we
recommend the system be checked
by an authorized HYUNDAI dealer.
i
i
Prior to replacing a lamp,
depress the foot brake, shift
to P (Park), apply the parking
brake, place the POWER but-
ton in the OFF position and
take the key with you when
leaving the vehicle to avoid
sudden movement of the vehi-
cle and to prevent possible
electric shock.
Be aware the bulbs may be
hot and may burn your fin-
gers.
WARNING
Page 468 of 555
7-71
7
Maintenance
Cleaning the upholstery andinterior trim
Vinyl (if equipped)
Remove dust and loose dirt from
vinyl with a whisk broom or vacuum
cleaner. Clean vinyl surfaces with a
vinyl cleaner.
Fabric (if equipped)
Remove dust and loose dirt from fab-
ric with a whisk broom or vacuum
cleaner. Clean with a mild soap solu-
tion recommended for upholstery or
carpets. Remove fresh spots imme-
diately with a fabric spot cleaner. If
fresh spots do not receive immediate
attention, the fabric can be stained
and its color can be affected. Also, its
fire-resistant properties can be
reduced if the material is not proper-
ly maintained.
Using anything but recommended
cleaners and procedures may
affect the fabric's appearance and
fire-resistant properties.
Leather (if equipped)
Feature of Seat Leather
- Leather is made from the outerskin of an animal, which goes
through a special process to be
available for use. Since it is a nat-
ural object, each part differs in
thickness or density.
Wrinkles may appear as a natural result of stretching and shrinking
depending on the temperature
and humidity.
- The seat is made of stretchable fabric to improve comfort.
- The parts contacting the body are curved and the side supporting
area is high which provides driv-
ing comfort and stability.
- Wrinkles may appear naturally from usage. It is not a fault of the
products.
NOTICE
Wrinkles or abrasions which
appear naturally from usage
are not covered by warranty.
Belts with metallic acces-
sories, zippers or keys inside
the back pocket may damage
the seat fabric.
Make sure not to wet the seat.
It may change the nature of
natural leather.
Jeans or clothes which could
bleach may contaminate the
surface of the seat covering
fabric.
CAUTION
Page 470 of 555
7-73
7
Maintenance
C
CA
A L
LI
IF
F O
O R
RN
N I
IA
A
P
P E
ER
R C
CH
H L
LO
O R
RA
A T
TE
E
N
N O
O T
TI
IC
C E
E
Perchlorate Material-special handling may apply, See: www.dtsc.ca.gov/hazardouswaste/perchlorate.
Notice to California Vehicle Dismantlers:
Perchlorate containing materials, such as air bag inflators, seatbelt pretensioners and keyless remote entry batteries,
must be disposed of according to Title 22 California Code of Regulations Section 67384.10 (a).
Page 522 of 555
H42
How to Start the Vehicle
1. Holding the smart key, sit in thedriver's seat.
2. Fasten the seat belt before start- ing the vehicle.
3. Make sure to engage the parking brake.
4. Turn OFF all electrical devices.
5. Make sure to depress and hold the brake pedal.
6. While depressing the brake pedal, shift to P (Park).
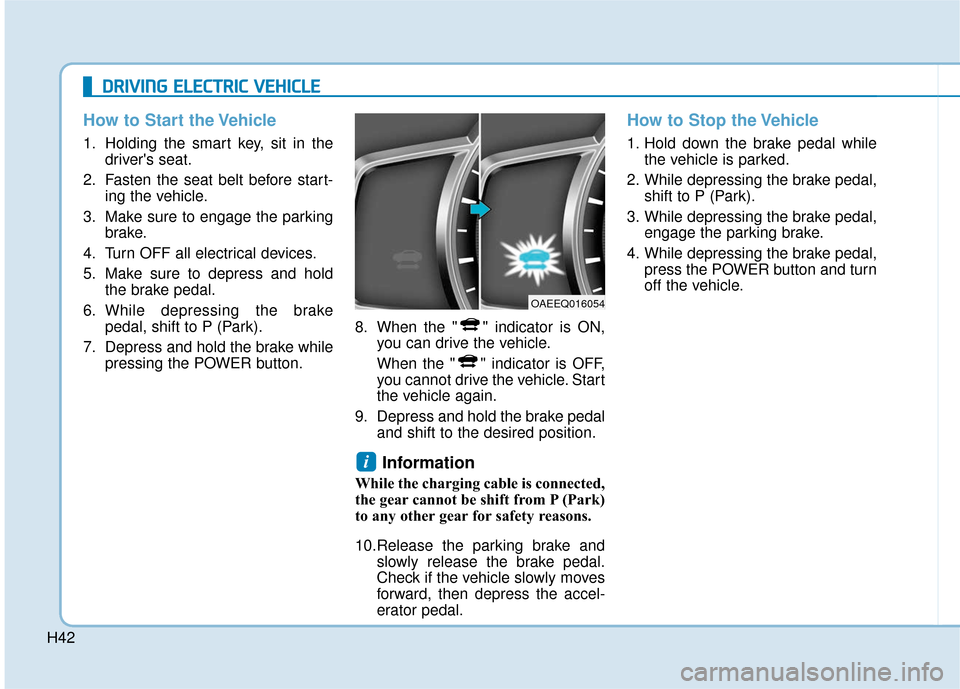
7. Depress and hold the brake while pressing the POWER button. 8. When the " " indicator is ON,
you can drive the vehicle.
When the " " indicator is OFF,
you cannot drive the vehicle. Start
the vehicle again.
9. Depress and hold the brake pedal and shift to the desired position.
Information
While the charging cable is connected,
the gear cannot be shift from P (Park)
to any other gear for safety reasons.
10.Release the parking brake andslowly release the brake pedal.
Check if the vehicle slowly moves
forward, then depress the accel-
erator pedal.
How to Stop the Vehicle
1. Hold down the brake pedal whilethe vehicle is parked.
2. While depressing the brake pedal, shift to P (Park).
3. While depressing the brake pedal, engage the parking brake.
4. While depressing the brake pedal, press the POWER button and turn
off the vehicle.
i
D
DR
RI
IV
V I
IN
N G
G
E
E L
LE
E C
CT
T R
R I
IC
C
V
V E
EH
H I
IC
C L
LE
E
OAEEQ016054
Page 549 of 555
I-8
LCD displayAssist mode ................................................................3-83
LCD display modes ....................................................3-81
Quick guide help ........................................................3-82
Trip computer mode ...................................................3-82
Turn By Turn (TBT) mode.........................................3-82
User settings mode .....................................................3-84
Warning mode ............................................................3-83
LCD display messages Aux. Battery Saver+ used while parked ....................3-75
Battery Overheated! Stop vehicle ..............................3-77
Charge immediately. Power limited ...........................3-76
Charger Error!/Quick Charger Error!.........................3-75
Charging door open ....................................................3-74
Check BRAKE SWITCH fuse ...................................3-70
Check brakes ..............................................................3-76
Check electric vehicle system ....................................3-79
Check headlamp FAN ................................................3-73
Check headlamp LED ................................................3-72
Check headlight ..........................................................3-72
Check steering wheel lock system .............................3-69
Check virtual engine sound ........................................3-79
Door, Hood, Tailgate Open ........................................3-70
Key not detected .........................................................3-69
Key not in vehicle ......................................................3-69
Lights mode ................................................................3-73
Low battery ................................................................3-76
Low Battery Temp. Power limited .............................3-77 Low Battery. Charge immediately .............................3-77
Low Key Battery ........................................................3-68
Low pressure ..............................................................3-72
Low washer fluid........................................................3-70
Power limited .............................................................3-78
Press brake pedal to start vehicle ...............................3-69
Press POWER button again .......................................3-69
Press POWER button while turning wheel ................3-69
Press POWER button with key ..................................3-70
Remaining time ..........................................................3-74
Shift to P.....................................................................3-6\
8
Shift to P to charge .....................................................3-74
Shift to P to start vehicle ............................................3-70
Stop vehicle and check brakes ...................................3-75
Stop vehicle and check power supply ........................3-78
Sunroof open ..............................................................3-71
Turn on "FUSE SWITCH".........................................3-71
Unplug vehicle to start ...............................................3-70
Wiper ........................................................................\
..3-73
LCD display modes ........................................................3-81
Liftgate ........................................................................\
....3-48
Light ........................................................................\
........3-95 Turn signals ..............................................................3-100
Parking lamp position ................................................3-96
Lane change signals .................................................3-100
High Beam Assist (HBA) ...........................................3-97
High beam operation ..................................................3-97
Index