2019 Hyundai Ioniq Electric key
[x] Cancel search: keyPage 192 of 555
3-107
Convenient features of your vehicle
3
Interior lamp
When the interior lamp switch is in
the DOOR position and all doors (and
liftgate) are closed and locked, the
room lamp will come on for 30 sec-
onds if any of the below is performed.
When the door unlock button is pressed on the smart key.
When the button of the outside door handle is pressed.
At this time, if you press the door lock
or unlock button, the room lamp will
turn off immediately.
Page 218 of 555
3-133
Convenient features of your vehicle
3
Wireless Cellular Phone
Charging System (if equipped)
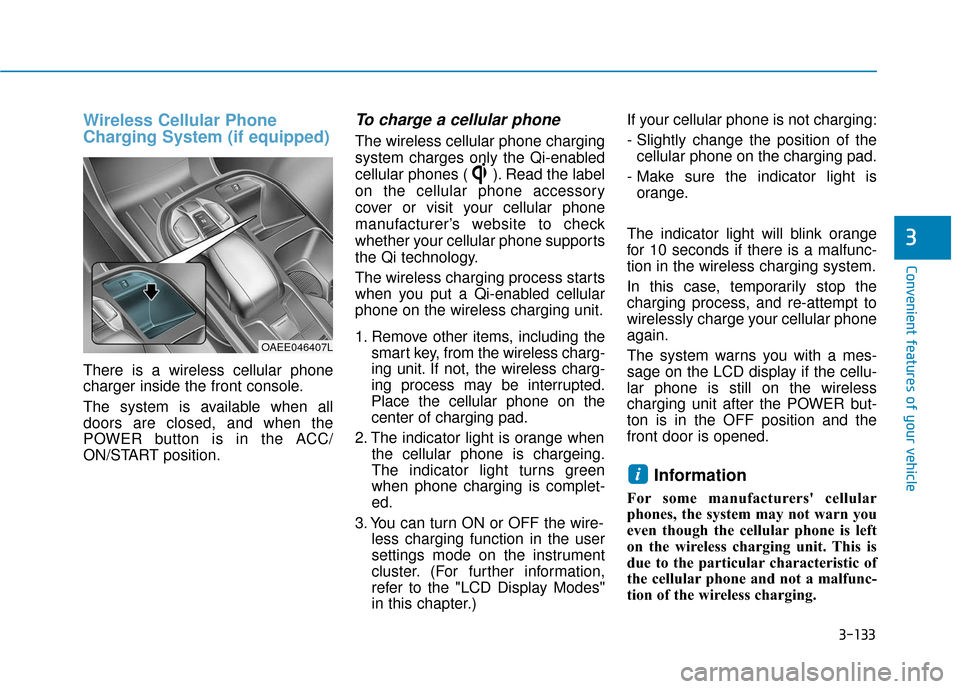
There is a wireless cellular phone
charger inside the front console.
The system is available when all
doors are closed, and when the
POWER button is in the ACC/
ON/START position.
To charge a cellular phone
The wireless cellular phone charging
system charges only the Qi-enabled
cellular phones ( ). Read the label
on the cellular phone accessory
cover or visit your cellular phone
manufacturer’s website to check
whether your cellular phone supports
the Qi technology.
The wireless charging process starts
when you put a Qi-enabled cellular
phone on the wireless charging unit.
1. Remove other items, including thesmart key, from the wireless charg-
ing unit. If not, the wireless charg-
ing process may be interrupted.
Place the cellular phone on the
center of charging pad.
2. The indicator light is orange when the cellular phone is chargeing.
The indicator light turns green
when phone charging is complet-
ed.
3. You can turn ON or OFF the wire- less charging function in the user
settings mode on the instrument
cluster. (For further information,
refer to the "LCD Display Modes"
in this chapter.) If your cellular phone is not charging:
- Slightly change the position of the
cellular phone on the charging pad.
- Make sure the indicator light is orange.
The indicator light will blink orange
for 10 seconds if there is a malfunc-
tion in the wireless charging system.
In this case, temporarily stop the
charging process, and re-attempt to
wirelessly charge your cellular phone
again.
The system warns you with a mes-
sage on the LCD display if the cellu-
lar phone is still on the wireless
charging unit after the POWER but-
ton is in the OFF position and the
front door is opened.
Information
For some manufacturers' cellular
phones, the system may not warn you
even though the cellular phone is left
on the wireless charging unit. This is
due to the particular characteristic of
the cellular phone and not a malfunc-
tion of the wireless charging.
i
OAEE046407L
Page 219 of 555
3-134
Convenient features of your vehicle
The wireless cellular phone charging system may not sup-
port certain cellular phones,
which are not verified for the Qi
specification ( ).
When placing your cellular phone on the charging mat,
position the phone in the middle
of the mat for optimal charging
performance. If your cell phone
is off to the side, the charging
rate may be less and in some
cases the cell phone may experi-
ence higher heat conduction.
In some cases, the wireless charging may stop temporarily
when the Smart Key is used,
either when starting the vehicle
or locking/unlocking the doors,
etc.
When charging certain cellular phones, the charging indicator
may not change to green when
the cell phone is fully charged.
(Continued)(Continued)
The wireless charging process
may temporarily stop, when tem-
perature abnormally increases
inside the wireless cellular
phone charging system. The
wireless charging process
restarts, when temperature falls
to a proper level.
The wireless charging process may temporarily stop when
there is any metallic item, such
as a coin, between the wireless
cellular phone charging system
and a cellular phone.
For certain cellular phone with their own protection, the wire-
less charging speed may
decrease and the wireless
charging may stop.
If the cellular phone has a thick cover, the wireless charging may
not be possible.
If the cell phone is not complete- ly contacting the charging pad,
wireless charging may not oper-
ate properly.
(Continued) (Continued)
Some magnetic items like credit
cards, phone cards or rail tickets
may be damaged if left with the
cellular phone during the charg-
ing process.
If the cellular phone without the wireless charging function or
the metallic items are placed on
the charging pad, it may cause
slight noise. This noise does not
affect the cellular phone and the
vehicle, because this noise is an
operating sound during deter-
mining the item on the charging
pad.
If the POWER button is in the OFF position, the charging also
stops.
NOTICE
Page 245 of 555
4-22
Multimedia System
(Continued)
• Operation is guaranteed only for standard (Metal Cover Type) USB
Memory drives.
• Operation of HDD, CF, SD and mem- ory stick devices is not guaranteed.
• DRM (Digital Rights Management) files cannot be played.
• SD-type USB memory, CF-type USB memory, and other USB mem-
ory devices that require adapters
for connection are not supported.
• Proper operation of USB HDDs or USB drives with connectors that
loosen due to vehicle vibrations is
not guaranteed. (iStick, etc.)
• USB products that are used as key chains or
cell phone accessories
may damage the USB
jack and affect proper
file playback. Please refrain from
use. Use only products with plug
connectors, as shown in the follow-
ing illustration.
• When MP3 devices or cell phones are connected simultaneously
through AUX, BT Audio and USB
modes, a popping noise or malfunc-
tion may occur.
USB
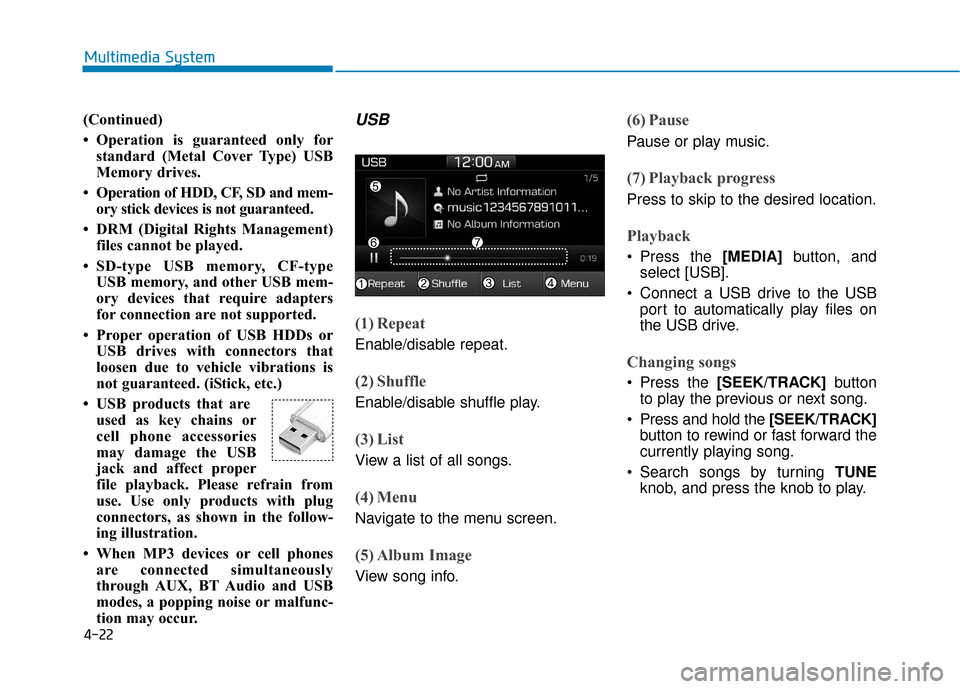
(1) Repeat
Enable/disable repeat.
(2) Shuffle
Enable/disable shuffle play.
(3) List
View a list of all songs.
(4) Menu
Navigate to the menu screen.
(5) Album Image
View song info.
(6) Pause
Pause or play music.
(7) Playback progress
Press to skip to the desired location.
Playback
Press the [MEDIA] button, and
select [USB].
Connect a USB drive to the USB port to automatically play files on
the USB drive.
Changing songs
Press the [SEEK/TRACK] button
to play the previous or next song.
Press and hold the [SEEK/TRACK] button to rewind or fast forward the
currently playing song.
Search songs by turning TUNE knob, and press the knob to play.
Page 257 of 555
4-34
Multimedia System
Even if your device supports
Bluetooth®Wireless Technology, a
Bluetooth®Wireless Technology con-
nection cannot be established if
the device’s
Bluetooth®Wireless
Technology function is switched off.
Search and connect with the
Bluetooth®Wireless Technology
function enabled.
Pair or connect
Bluetooth®Wireless
Technology de vices to the audio
system with the vehicle at a stand-
still.
If a
Bluetooth®Wireless Technology
connection is lost due to abnormal
conditions while a
Bluetooth®
Wireless Technology de vice is con-
nected (communication range
exceeded, device power OFF,
communication errors, etc.), the
disconnected
Bluetooth®Wireless
Technology de vice is searched for
and automatically reconnected.
If you want to disable the
Bluetooth®
Wireless Technology device auto-
connect function, turn the
Bluetooth®
Wireless Technology function OFF on
your device. Consult the user manu-
als for individual devices to see
whether
Bluetooth®Wireless
Technology is supported. Handsfree call quality and volume
may vary depending on the type of
Bluetooth®Wireless Technology
device.
Some
Bluetooth®Wireless
Technology de vices are subject to
intermittent
Bluetooth®Wireless
Technology connection failures. In
this case, use the following
method.
1) Turn the
Bluetooth®Wireless
Technology function off on your
Bluetooth®Wireless Technology
device ➟Turn it on and try again.
2) Delete the paired device from both the audio system and
Bluetooth®Wireless Technology
device, then pair again.
3) Power down your
Bluetooth®
Wireless Technology de vice ➟
Turn it on and try again.
4) Completely remove the battery from your
Bluetooth®Wireless
Technology de vice; reinsert it,
reboot, and attempt connection.
5) Restart the vehicle and reat- tempt connection.
Pairing a Bluetooth®Wireless
Technology device
Information on pairing Bluetooth®
Wireless Technology devices
Pairing refers to the process of pair-
ing
Bluetooth®Wireless Technology
cell phones or devices with the sys-
tem prior to connection. This is a nec-
essary procedure for
Bluetooth®
Wireless Technology connection and
usage.
Up to five devices can be paired.
Pairing Bluetooth
®device is not
allowed while vehicle is moving.
Pairing the first Bluetooth®Wireless
Technology device
Press the [PHONE]button on the
audio system or the [CALL] button
on the steering wheel remote control
➟ Search for the vehicle from the
Bluetooth®Wireless Technology
device, and pair ➟ Enter the passkey
on the
Bluetooth®Wireless Technology
device or approve passkey ➟
Bluetooth®Wireless Technologypair-
ing completed.
Page 258 of 555
![Hyundai Ioniq Electric 2019 Owners Manual 4-35
Multimedia System
4
1. When the [PHONE]button on the
audio or the [CALL] button on the
steering wheel remote control is
pressed, the following screen is dis-
played. Devices can now be paired.
(1 Hyundai Ioniq Electric 2019 Owners Manual 4-35
Multimedia System
4
1. When the [PHONE]button on the
audio or the [CALL] button on the
steering wheel remote control is
pressed, the following screen is dis-
played. Devices can now be paired.
(1](/manual-img/35/14897/w960_14897-257.png)
4-35
Multimedia System
4
1. When the [PHONE]button on the
audio or the [CALL] button on the
steering wheel remote control is
pressed, the following screen is dis-
played. Devices can now be paired.
(1) Vehicle Name: Searched name in
Bluetooth®Wireless Technology
device.
Information
The vehicle name in the image above
is an example. Refer to your device for
the actual name of your device.
2. Search for available
Bluetooth®
Wireless Technology de vices in the
Bluetooth®Wireless Technology
menu of your
Bluetooth®Wireless
Technology device (cell phone,
etc.). 3. Confirm that the vehicle name in your
Bluetooth®Wireless Technology
device matches the v ehicle name
shown on the audio screen, then
select it.
4. For devices that require passkey confirmation, the following screen
is shown on the audio system. A
6-digit passkey input screen is
shown in the
Bluetooth®Wireless
Technology de vice.
- After confirming that the 6-digit passkey on the audio screen and the
Bluetooth®Wireless Technology
device are identical, select [OK] in
your
Bluetooth®Wireless Technology
device.
Information
The 6-digit passkey in the image
above is an example. Refer to your
vehicle for the actual passkey.
Pairing a second Bluetooth®Wireless
Technology device
Press the [SETUP] button on the
audio system ➟ Select [Bluetooth] ➟
Select [Connections] ➟ Select [Add
New].
- The pairing procedure from this point is identical to [Pairing the first
Bluetooth device].
i
i
Page 260 of 555
4-37
Multimedia System
4
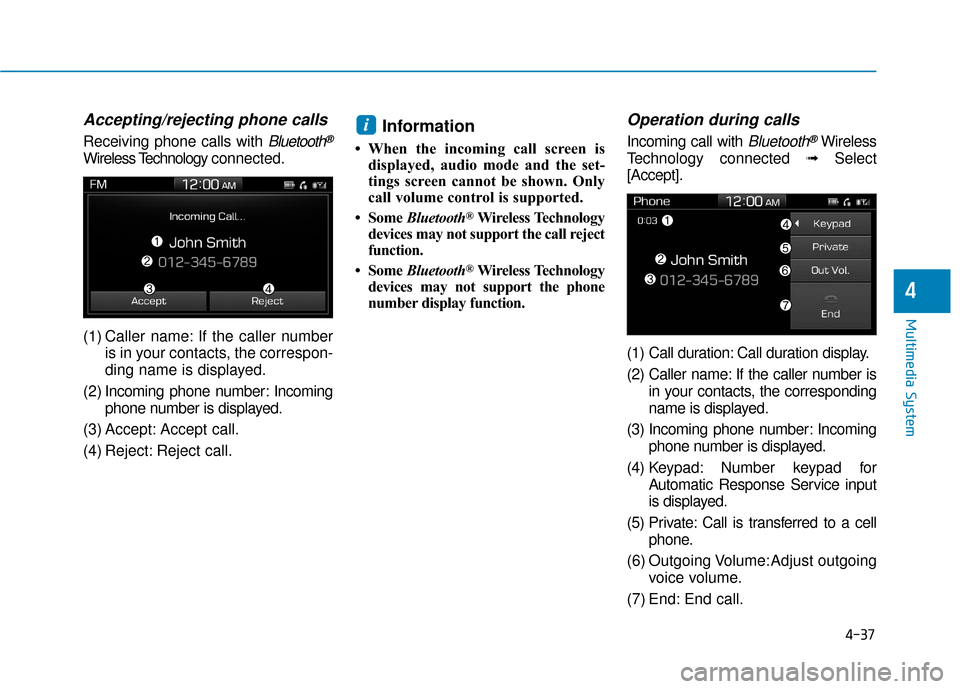
Accepting/rejecting phone calls
Receiving phone calls with Bluetooth®
Wireless Technology connected.
(1) Caller name: If the caller number is in your contacts, the correspon-
ding name is displayed.
(2) Incoming phone number: Incoming phone number is displayed.
(3) Accept: Accept call.
(4) Reject: Reject call.
Information
• When the incoming call screen is displayed, audio mode and the set-
tings screen cannot be shown. Only
call volume control is supported.
• Some Bluetooth
®Wireless Technology
devices may not support the call reject
function.
• Some Bluetooth
®Wireless Technology
devices may not support the phone
number display function.
Operation during calls
Incoming call with Bluetooth®Wireless
Technology connected ➟Select
[Accept].
(1) Call duration: Call duration display.
(2) Caller name: If the caller number is in your contacts, the corresponding
name is displayed.
(3) Incoming phone number: Incoming phone number is displayed.
(4) Keypad: Number keypad for Automatic Response Service input
is displayed.
(5) Private: Call is transferred to a cell phone.
(6) Outgoing Volume:Adjust outgoing voice volume.
(7) End: End call.
i
Page 263 of 555
![Hyundai Ioniq Electric 2019 Owners Manual 4-40
Multimedia System
Dial
Press the [PHONE]button on the
audio ➟Select [Dial].
(1) Phone number entry window: The phone number entered using the
keypad is displayed.
(2) Clear - Press to delete i Hyundai Ioniq Electric 2019 Owners Manual 4-40
Multimedia System
Dial
Press the [PHONE]button on the
audio ➟Select [Dial].
(1) Phone number entry window: The phone number entered using the
keypad is displayed.
(2) Clear - Press to delete i](/manual-img/35/14897/w960_14897-262.png)
4-40
Multimedia System
Dial
Press the [PHONE]button on the
audio ➟Select [Dial].
(1) Phone number entry window: The phone number entered using the
keypad is displayed.
(2) Clear - Press to delete individual digits.
- Press and hold to delete theentire phone number.
(3) Keypad: Enter phone number.
(4)
Bluetooth®Wireless Technology
Phone name
- The name of the connected
Bluetooth®Wireless Technology
device is displayed.
- Contacts matching the keypad number/letter input are displayed.(5) Call
- Enter and select a phone num-ber to call.
- Select without entering a phone number to see the most recent
dialed call.
Settings
Press the [PHONE]button on the
audio ➟Select [Settings].
- For phone Setup, refer to Setup page ➟Select [Bluetooth].
Siri
Information -
Using Siri
• If you want to use Siri, you have to connect your iOS device to multime-
dia system through Bluetooth
®
Wireless Technology. (Please check
whether your iOS device supports
Siri and turning Siri On)
• If the iOS version is changed, the functions and response may be dif-
ferent according to the iOS device
and the latest version.
• Siri automatically stops in the fol- lowing events.
1)Outgoing and incoming phonecalls.
2)Media (USB, etc.) is connected. (Siri mode is maintained when
iPod
®s are connected)
3)Rear view monitor is activated (option).
4)Vehicle is started or engine is turned off.
5)Screen transition buttons, such as RADIO or MEDIA, are selected.
(Continued)
i