2019 Hyundai Ioniq Electric cooling
[x] Cancel search: coolingPage 368 of 555
5-101
Driving your vehicle
5
Use approved window washeranti-freeze in system
To keep the water in the window
washer system from freezing, add an
approved window washer anti-freeze
solution in accordance with instruc-
tions on the container. Window wash-
er anti-freeze is available from an
authorized HYUNDAI dealer and
most auto parts outlets. Do not use
coolant or other types of anti-freeze
as these may damage the paint fin-
ish.
Do not let your parking brakefreeze
Under some conditions your parking
brake can freeze in the engaged
position. This is most likely to happen
when there is an accumulation of
snow or ice around or near the rear
brakes or if the brakes are wet. If
there is a risk the parking brake may
freeze, apply it only temporarily while
you shift to P (Park) and block the
rear wheels so the car cannot roll.
Then release the parking brake.
Do not let ice and snow accu-mulate underneath
Under some conditions, snow and
ice can build up under the fenders
and interfere with the steering. When
driving in severe winter conditions
where this may happen, you should
periodically check underneath the
car to be sure the movement of the
front wheels and the steering com-
ponents is not obstructed.
Don't place foreign objects ormaterials in the motor compart-ment
Placement of foreign object or mate-
rials which prevent cooling of the
vehicle, in the motor compartment,
may cause a failure. The manufactur-
er is not responsible for the damage
caused by such placement.
To keep locks from freezing
To keep the locks from freezing,
squirt an approved de-icer fluid or
glycerine into the key opening. If a
lock is covered with ice, squirt it with
an approved de-icing fluid to remove
the ice. If the lock is frozen internally,
you may be able to thaw it out by
using a heated key. Handle the heat-
ed key with care to avoid injury.
Page 379 of 555
6-6
What to do in an emergency
7. Connect the other end of the sec- ond jumper cable to the black,
negative (-) chassis ground of
your vehicle (4).
Do not allow the jumper cables to
contact anything except the cor-
rect battery or jumper terminals or
the correct ground. Do not lean
over the battery when making
connections.
8. Start the engine of the assisting vehicle and let it run at approxi-
mately 2,000 rpm for a few min-
utes. Then start your vehicle.
9. After your vehicle starts allow it to operate at least 30 minutes with-
out shutting it down, this will help
charge back the 12V battery.
If your vehicle will not start after a
few attempts, it probably requires
servicing. In this event please seek
qualified assistance. If the cause of
your battery discharging is not
apparent, have your vehicle checked
by an authorized HYUNDAI dealer. Disconnect the jumper cables in the
exact reverse order you connected
them:
1. Disconnect the jumper cable from
the black, negative (-) chassis
ground of your vehicle (4).
2. Disconnect the other end of the jumper cable from the black, neg-
ative (-) battery/chassis ground of
the assisting vehicle (3).
3. Disconnect the second jumper cable from the red, positive (+)
battery/jumper terminal of the
assisting vehicle (2).
4. Disconnect the other end of the jumper cable from the red, positive
(+) jumper terminal of your vehicle
(1). 1. Pull off the road and stop as soon
as it is safe to do so.
2. Shift to P (Park) and set the park- ing brake. If the air conditioning is
on, turn it off.
3. If coolant is running out under the vehicle or steam is coming out
from the hood, stop the vehicle.
Do not open the hood until the
coolant has stopped running or
the steaming has stopped. If there
is no visible loss of coolant and no
steam, leave the vehicle running
and check to be sure the vehicle
cooling fan is operating. If the fan
is not running, turn the vehicle off.
I IF
F
T
T H
H E
E
V
V E
EH
H I
IC
C L
LE
E
O
O V
VE
ER
R H
H E
EA
A T
TS
S
Page 380 of 555
6-7
What to do in an emergency
6
4. Check for coolant leaking from theradiator, hoses or under the vehi-
cle. (If the air conditioning had
been in use, it is normal for cold
water to be draining from it when
you stop.)
5. If coolant is leaking out, stop the vehicle immediately and call the
nearest authorized HYUNDAI
dealer for assistance. 6. If you cannot find the cause of the
overheating, wait until the radiator
temperature has returned to nor-
mal. Then, if coolant has been
lost, carefully add coolant to the
reservoir to bring the fluid level in
the reservoir up to the halfway
mark.
7. Proceed with caution, keeping alert for further signs of overheat-
ing. If overheating happens again,
call an authorized HYUNDAI deal-
er for assistance.
While the vehicle is
running, keep hands,
clothing and tools
away from the mov-
ing parts such as the
cooling fan to prevent
serious injury.
WARNING
Serious loss of coolant indi-
cates a leak in the cooling sys-
tem and should be checked as
soon as possible by an author-
ized HYUNDAI dealer.
CAUTION
Your vehicle is
equipped with a pres-
surized coolant
reserve tank. NEVER
remove the coolant
reserve tank cap or the radiator
drain plug while the radiator is
HOT. Hot coolant and steam
may blow out under pressure,
causing serious injury.
Turn the vehicle off and wait
until the vehicle cools down.
Use extreme care when remov-
ing the coolant reserve tank
cap. Wrap a towel or thick rag
around it, and turn it counter-
clockwise slowly to release
some of the pressure from the
system. Step back while the
pressure is released.
When you are sure all the pres-
sure has been released, contin-
ue turning the cap counter-
clockwise to remove it.
WARNING
Page 405 of 555
7-8
Maintenance
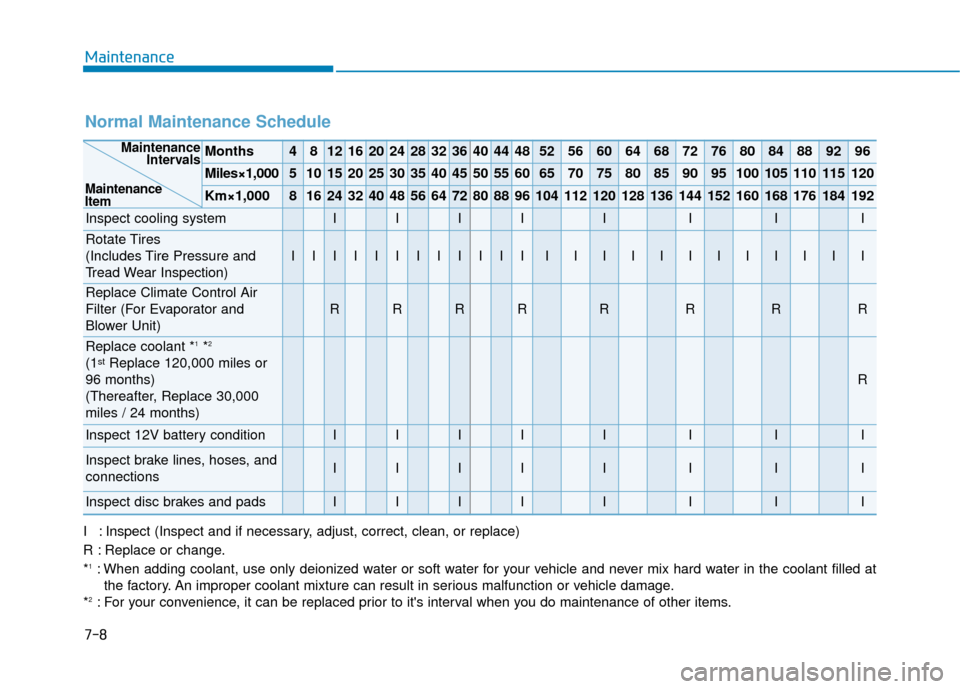
Normal Maintenance Schedule
Months4812162024283236404448525660646872768084889296
Miles×1,0005101520253035404550556065707580859095100105110115120
Km×1,00081624324048566472808896104112120128136144152160168176184192
Inspect cooling systemIIIIIIII
Rotate Tires
(Includes Tire Pressure and
Tread Wear Inspection)
IIIIIIIIIIIIIIIIIIIIIIII
Replace Climate Control Air
Filter (For Evaporator and
Blower Unit)
RRRRRRRR
Replace coolant *1*2
(1stReplace 120,000 miles or
96 months)
(Thereafter, Replace 30,000
miles / 24 months)
R
Inspect 12V battery conditionIIIIIIII
Inspect brake lines, hoses, and
connectionsIIIIIIII
Inspect disc brakes and padsIIIIIIII
Maintenance Intervals
Maintenance
Item
I : Inspect (Inspect and if necessary, adjust, correct, clean, or replace)
R : Replace or change.
*
1: When adding coolant, use only deionized water or soft water for your vehicle and never mix hard water in the coolant filled at the factory. An improper coolant mixture can result in serious malfunction or vehicle damage.
*
2: For your convenience, it can be replaced prior to it's interval when you do maintenance of other items.
Page 408 of 555
7-11
7
Maintenance
E
EX
X P
PL
LA
A N
N A
AT
TI
IO
O N
N
O
O F
F
S
S C
C H
H E
ED
D U
U L
LE
E D
D
M
M A
AI
IN
N T
TE
EN
N A
AN
N C
CE
E
I
IT
T E
EM
M S
S
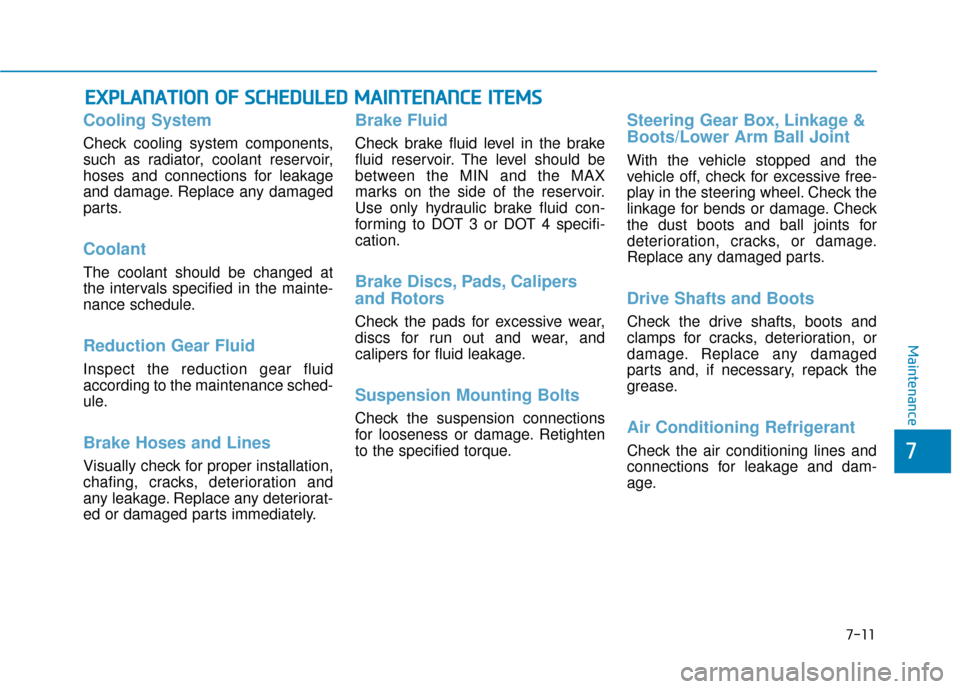
Cooling System
Check cooling system components,
such as radiator, coolant reservoir,
hoses and connections for leakage
and damage. Replace any damaged
parts.
Coolant
The coolant should be changed at
the intervals specified in the mainte-
nance schedule.
Reduction Gear Fluid
Inspect the reduction gear fluid
according to the maintenance sched-
ule.
Brake Hoses and Lines
Visually check for proper installation,
chafing, cracks, deterioration and
any leakage. Replace any deteriorat-
ed or damaged parts immediately.
Brake Fluid
Check brake fluid level in the brake
fluid reservoir. The level should be
between the MIN and the MAX
marks on the side of the reservoir.
Use only hydraulic brake fluid con-
forming to DOT 3 or DOT 4 specifi-
cation.
Brake Discs, Pads, Calipers
and Rotors
Check the pads for excessive wear,
discs for run out and wear, and
calipers for fluid leakage.
Suspension Mounting Bolts
Check the suspension connections
for looseness or damage. Retighten
to the specified torque.
Steering Gear Box, Linkage &
Boots/Lower Arm Ball Joint
With the vehicle stopped and the
vehicle off, check for excessive free-
play in the steering wheel. Check the
linkage for bends or damage. Check
the dust boots and ball joints for
deterioration, cracks, or damage.
Replace any damaged parts.
Drive Shafts and Boots
Check the drive shafts, boots and
clamps for cracks, deterioration, or
damage. Replace any damaged
parts and, if necessary, repack the
grease.
Air Conditioning Refrigerant
Check the air conditioning lines and
connections for leakage and dam-
age.
Page 409 of 555
7-12
Maintenance
C
CO
O O
OL
LA
A N
N T
T
The high-pressure cooling system
has a reservoir filled with year-round
antifreeze coolant. The reservoir is
filled at the factory.
Check the antifreeze protection and
coolant level at least once a year, at
the beginning of the winter season
and before traveling to a colder cli-
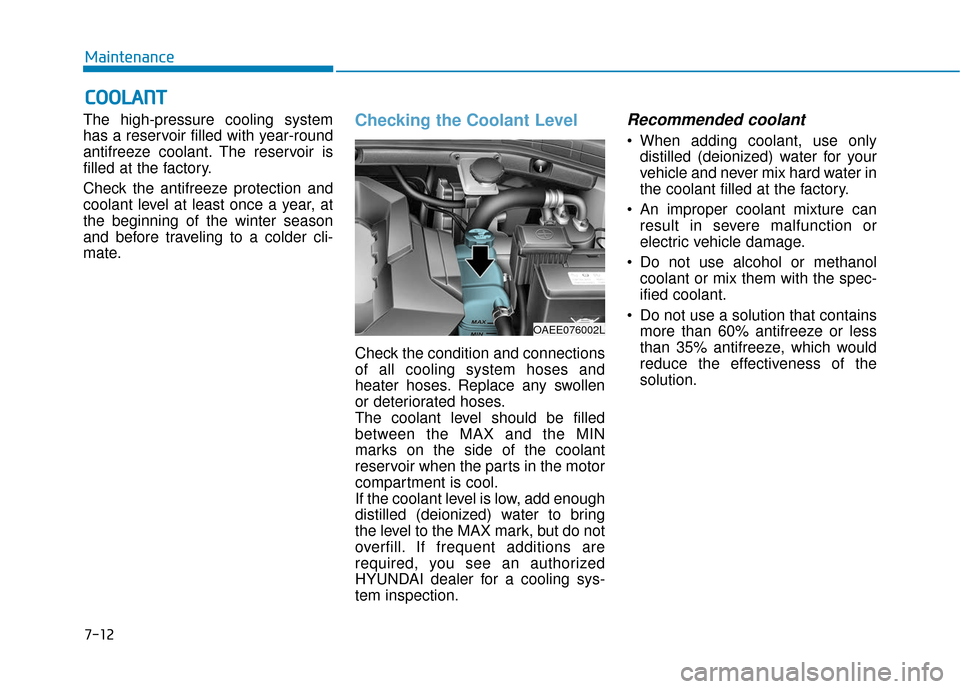
mate.Checking the Coolant Level
Check the condition and connections
of all cooling system hoses and
heater hoses. Replace any swollen
or deteriorated hoses.
The coolant level should be filled
between the MAX and the MIN
marks on the side of the coolant
reservoir when the parts in the motor
compartment is cool.
If the coolant level is low, add enough
distilled (deionized) water to bring
the level to the MAX mark, but do not
overfill. If frequent additions are
required, you see an authorized
HYUNDAI dealer for a cooling sys-
tem inspection.
Recommended coolant
When adding coolant, use only
distilled (deionized) water for your
vehicle and never mix hard water in
the coolant filled at the factory.
An improper coolant mixture can result in severe malfunction or
electric vehicle damage.
Do not use alcohol or methanol coolant or mix them with the spec-
ified coolant.
Do not use a solution that contains more than 60% antifreeze or less
than 35% antifreeze, which would
reduce the effectiveness of the
solution.
OAEE076002L
Page 410 of 555
7-13
7
Maintenance
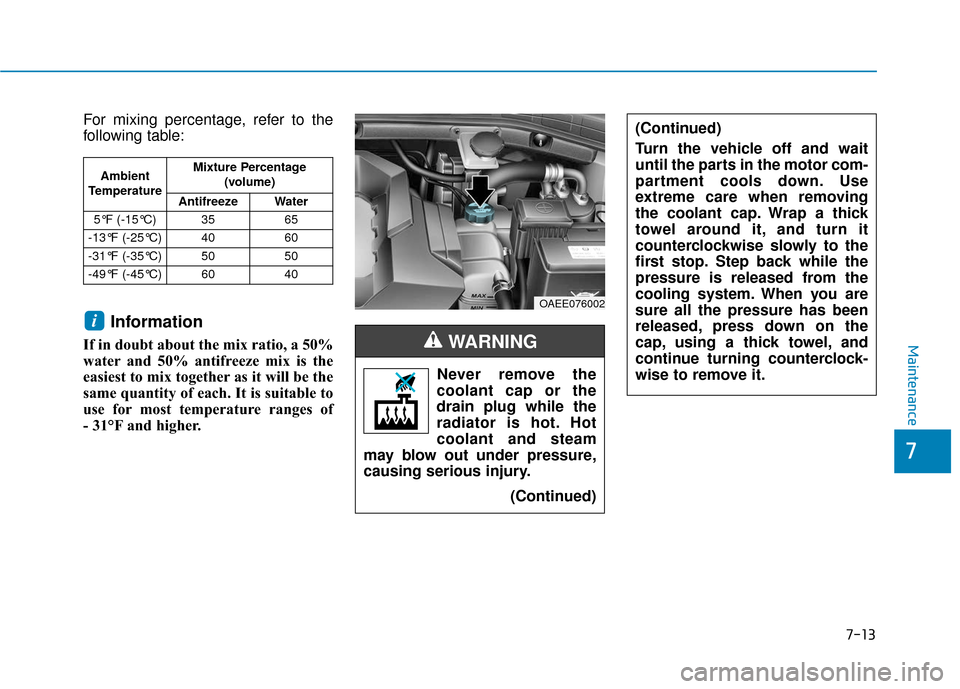
For mixing percentage, refer to the
following table:
Information
If in doubt about the mix ratio, a 50%
water and 50% antifreeze mix is the
easiest to mix together as it will be the
same quantity of each. It is suitable to
use for most temperature ranges of
- 31°F and higher.
i
Ambient
Temperature Mixture Percentage
(volume)
Antifreeze Water
5°F (-15°C) 35 65
-13°F (-25°C) 40 60
-31°F (-35°C) 50 50
-49°F (-45°C) 60 40
Never remove the
coolant cap or the
drain plug while the
radiator is hot. Hot
coolant and steam
may blow out under pressure,
causing serious injury.
(Continued)
WARNING
OAEE076002
(Continued)
Turn the vehicle off and wait
until the parts in the motor com-
partment cools down. Use
extreme care when removing
the coolant cap. Wrap a thick
towel around it, and turn it
counterclockwise slowly to the
first stop. Step back while the
pressure is released from the
cooling system. When you are
sure all the pressure has been
released, press down on the
cap, using a thick towel, and
continue turning counterclock-
wise to remove it.
Page 411 of 555
7-14
Maintenance
The electric motor for the cooling fan
is controlled by coolant temperature,
refrigerant pressure and vehicle
speed. As the coolant temperature
decreases, the electric motor will
automatically shut off. This is a nor-
mal condition. The electric motor for
the cooling fan may
continue to operate
or start up when the
vehicle is not running
and can cause serious injury.
Keep hands, clothing and tools
away from the rotating fan
blades of the cooling fan.
WARNING
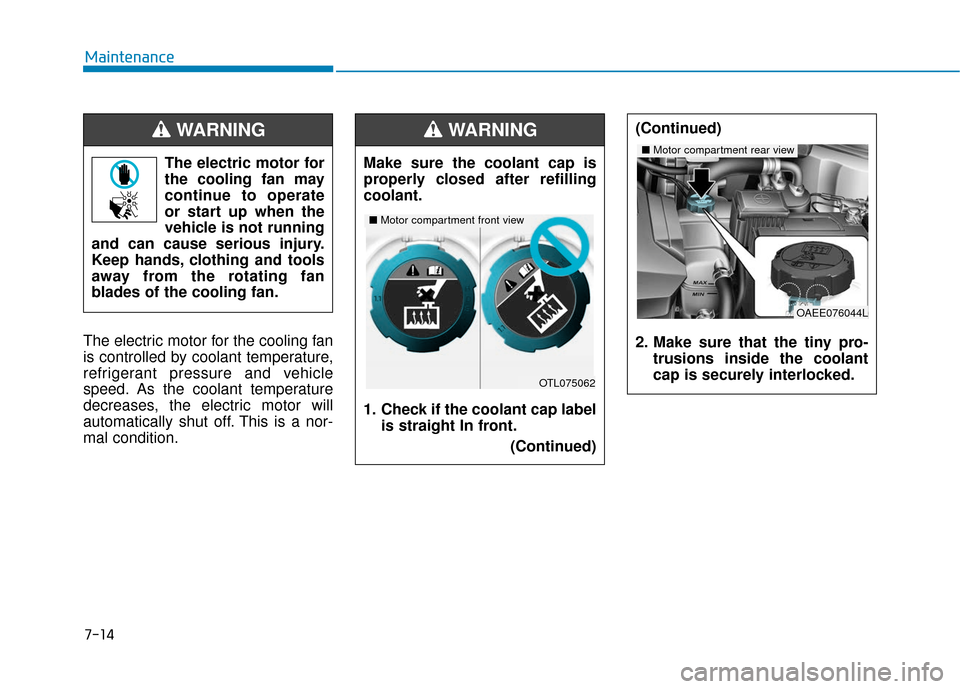
Make sure the coolant cap is
properly closed after refilling
coolant.
1. Check if the coolant cap label is straight In front.
(Continued)
WARNING
OTL075062
■Motor compartment front view
(Continued)
2. Make sure that the tiny pro-
trusions inside the coolant
cap is securely interlocked.
OAEE076044L
■Motor compartment rear view