2019 Hyundai Ioniq Electric Cable
[x] Cancel search: CablePage 248 of 555
4-25
Multimedia System
4
(Continued)
• The search and song play order inthe iPod
®device may be different
from the search order in the audio
system.
• If the iPod
®has failed due to an
internal defect, please reset the
iPod
®(consult your iPod®manual).
• Depending on the software version, the iPod
®may fail to sync with the
system. If the media is removed or
disconnected before recognition, the
previous mode may not be restored
(iPad
®cannot be charged).
• Cables other than the 1-meter cable provided with iPod
®/iPhone®prod-
ucts may not be recognized.
• When other music apps are used on your iPod
®, the system sync func-
tion may fail due to malfunction of
the iPod
®application.
iPod®
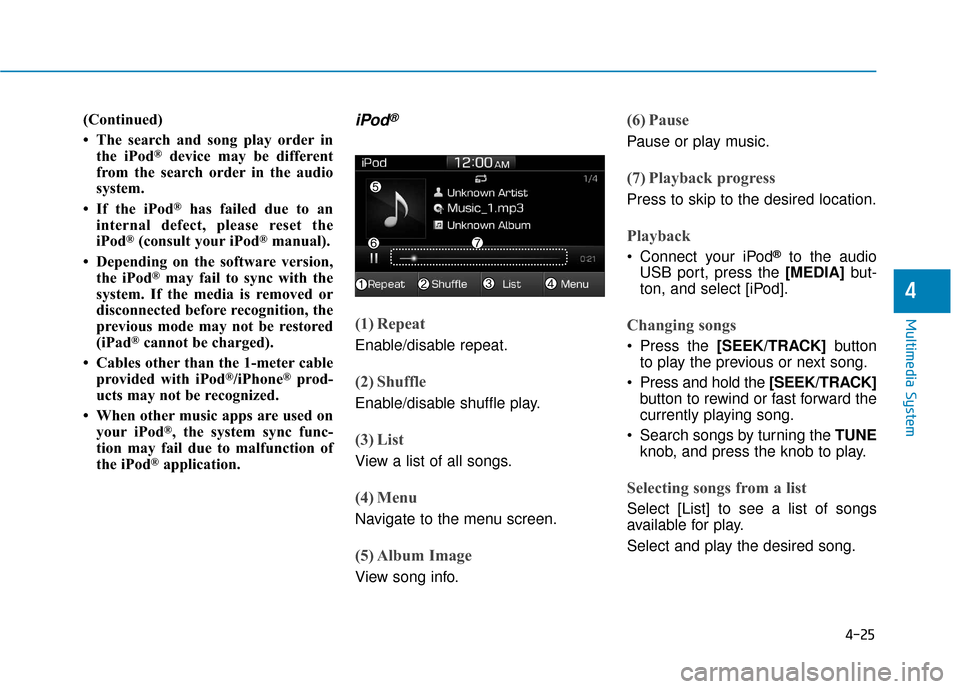
(1) Repeat
Enable/disable repeat.
(2) Shuffle
Enable/disable shuffle play.
(3) List
View a list of all songs.
(4) Menu
Navigate to the menu screen.
(5) Album Image
View song info.
(6) Pause
Pause or play music.
(7) Playback progress
Press to skip to the desired location.
Playback
Connect your iPod®to the audio
USB port, press the [MEDIA] but-
ton, and select [iPod].
Changing songs
Press the [SEEK/TRACK] button
to play the previous or next song.
Press and hold the [SEEK/TRACK] button to rewind or fast forward the
currently playing song.
Search songs by turning the TUNE knob, and press the knob to play.
Selecting songs from a list
Select [List] to see a list of songs
available for play.
Select and play the desired song.
Page 255 of 555
4-32
Multimedia System
(7) Pause
Pause or play music.
(8) Shared Station
Indicate that the station is already
shared.
Information
Thumbs Up/Down is not available for
shared stations.
Playback
Press the [MEDIA]button, and
select [Pandora].
Information
• Pandora®: Connect a smartphone to
listen to Pandora®Radio
• Apple devices must be connected via USB cable and Android devices
must be connected via Bluetooth
®
Wireless Technology in order to run
Pandora®.
Menu
Select [Menu] and select the desired
function.
Bookmark: Add the song that iscurrently playing to your book-
marks list.
Information
• You can view your bookmarkedsongs on your online Pandora®pro-
file. Go to pandora.com, then go to
[Your profile] above the player. That
will bring up a page with your sta-
tions and bookmarked songs.
• The settings of this function cannot be reset.
Quit: Exit Pandora
®mode and
return to previous audio mode.
Information: Detailed info on the currently playing song is displayed.
Sound Settings: Audio sound set- tings can be changed.
Phone
Information
-
Using the Bluetooth®
Wireless Technology
Cellular Phone
• Bluetooth
®Wireless Technology is a
near-field wireless networking tech-
nology that uses the 2.4 GHz fre-
quency to connect various devices
within a certain distance wirelessly.
• The technology is used in PCs, peripherals, Bluetooth
®Wireless
Technology phones, tablet PCs,
household appliances and automo-
biles. Devices supporting Bluetooth
®
Wireless Technology can exchange
data at high speeds without physical
cable connections.
• Bluetooth
®Wireless Technology
Handsfree devices enable convenient
access to phone functions through cell
phones equipped with Bluetooth
®
Wireless Technology.
• Some Bluetooth
®Wireless Technology
devices may not be supported by the
Bluetooth
®Wireless Technology
Handsfree function.
(Continued)
i
i
i
i
Page 365 of 555
5-98
Driving your vehicle
The severe weather conditions of
winter quickly wear out tires and
cause other problems. To minimize
winter driving problems, you should
take the following suggestions:
Snow or Icy Conditions
You need to keep sufficient distance
between your vehicle and the vehicle
in front of you.
Apply the brakes gently. Speeding,
rapid acceleration, sudden brake
applications, and sharp turns are
potentially very hazardous practices.
During deceleration, use regenera-
tive braking to the fullest extent.
Sudden brake applications on snowy
or icy roads may cause the vehicle to
skid.
To drive your vehicle in deep snow, it
may be necessary to use snow tires
or to install tire chains on your tires.
Always carry emergency equipment.
Some of the items you may want to
carry include tire chains, tow straps
or chains, a flashlight, emergency
flares, sand, a shovel, jumper cables,
a window scraper, gloves, ground
cloth, coveralls, a blanket, etc.
Snow tires
If you mount snow tires on your vehi-
cle, make sure to use radial tires of
the same size and load range as the
original tires. Mount snow tires on all
four wheels to balance your vehicle’s
handling in all weather conditions.
The traction provided by snow tires
on dry roads may not be as high as
your vehicle's original equipment
tires. Check with the tire dealer for
maximum speed recommendations.
Information
Do not install studded tires without
first checking local, state and munici-
pal regulations for possible restric-
tions against their use.
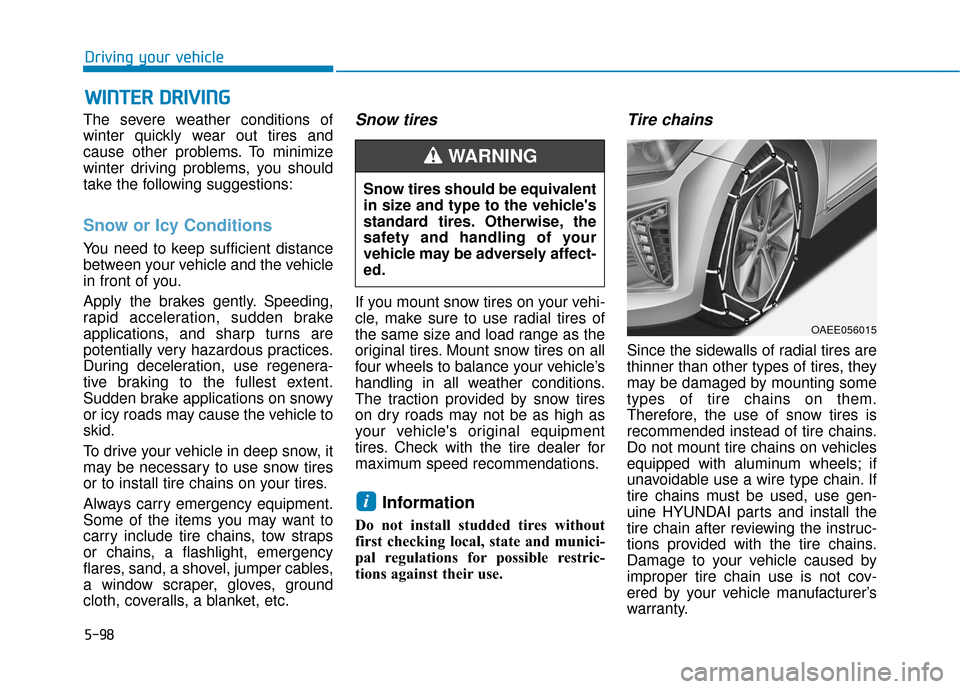
Tire chains
Since the sidewalls of radial tires are
thinner than other types of tires, they
may be damaged by mounting some
types of tire chains on them.
Therefore, the use of snow tires is
recommended instead of tire chains.
Do not mount tire chains on vehicles
equipped with aluminum wheels; if
unavoidable use a wire type chain. If
tire chains must be used, use gen-
uine HYUNDAI parts and install the
tire chain after reviewing the instruc-
tions provided with the tire chains.
Damage to your vehicle caused by
improper tire chain use is not cov-
ered by your vehicle manufacturer’s
warranty.
i
W W I
IN
N T
TE
ER
R
D
D R
RI
IV
V I
IN
N G
G
Snow tires should be equivalent
in size and type to the vehicle's
standard tires. Otherwise, the
safety and handling of your
vehicle may be adversely affect-
ed.
WARNING
OAEE056015
Page 367 of 555
5-100
Driving your vehicle
When using tire chains:
Wrong size chains or improperly installed chains can damage
your vehicle's brake lines, sus-
pension, body and wheels.
Use SAE "S" class or wire chains.
If you hear noise caused by chains contacting the body,
retighten the chain to prevent
contact with the vehicle body.
To prevent body damage, retighten the chains after driving
0.3~0.6 miles (0.5~1.0 km).
Do not use tire chains on vehi- cles equipped with aluminum
wheels. If unavoidable, use a
wire type chain.
Use wire chains less than 0.47 in (12 mm) thick to prevent damage
to the chain's connection.
Winter Precautions
Use high quality ethylene glycolcoolant
Your vehicle is delivered with high
quality ethylene glycol coolant in the
cooling system. It is the only type of
coolant that should be used because
it helps prevent corrosion in the cool-
ing system, lubricates the water
pump and prevents freezing. Be sure
to replace or replenish your coolant
in accordance with the maintenance
schedule in chapter 7. Before winter,
have your coolant tested to assure
that its freezing point is sufficient for
the temperatures anticipated during
the winter.
Change to "winter weight" oil ifnecessary
In some climates it is recommended
that a lower viscosity "winter weight"
oil be used during cold weather. See
chapter 8 for recommendations. If
you aren't sure what weight oil you
should use, consult an authorized
HYUNDAI dealer.
Check battery and cables
Winter puts additional burdens on
the battery system. Visually inspect
the battery and cables as described
in chapter 7. The level of charge in
your battery can be checked by an
authorized HYUNDAI dealer or a
service station.
NOTICE
Page 377 of 555
6-4
What to do in an emergency
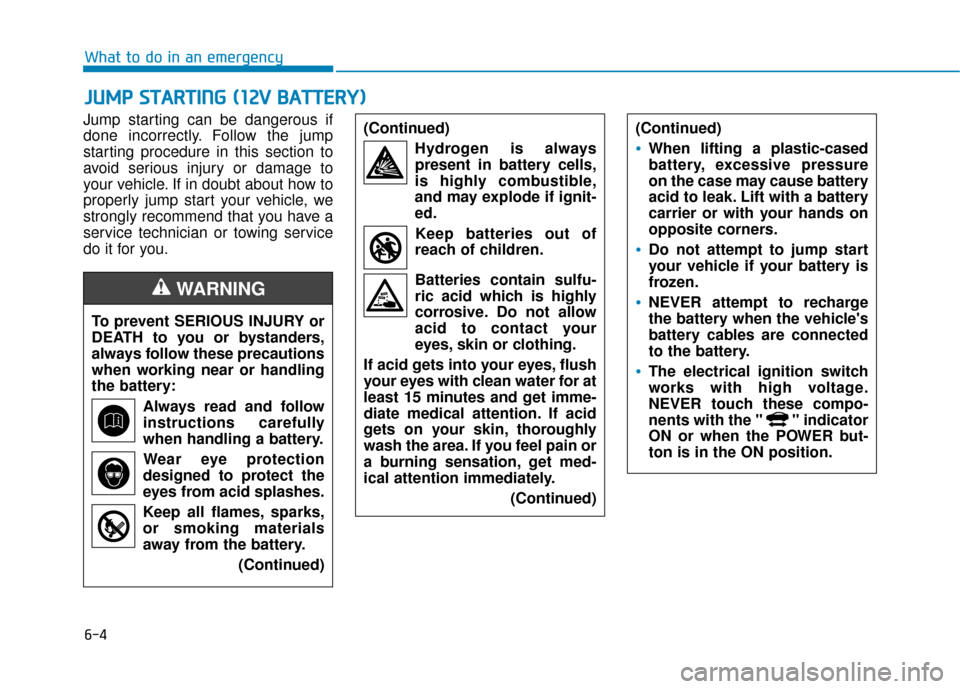
Jump starting can be dangerous if
done incorrectly. Follow the jump
starting procedure in this section to
avoid serious injury or damage to
your vehicle. If in doubt about how to
properly jump start your vehicle, we
strongly recommend that you have a
service technician or towing service
do it for you.
J J U
U M
M P
P
S
S T
T A
A R
RT
TI
IN
N G
G
(
( 1
1 2
2V
V
B
B A
A T
TT
TE
ER
R Y
Y )
)
To prevent SERIOUS INJURY or
DEATH to you or bystanders,
always follow these precautions
when working near or handling
the battery:
Always read and follow
instructions carefully
when handling a battery.Wear eye protection
designed to protect the
eyes from acid splashes.
Keep all flames, sparks,
or smoking materials
away from the battery.
(Continued)
WARNING
(Continued)Hydrogen is alwayspresent in battery cells,
is highly combustible,
and may explode if ignit-
ed.
Keep batteries out of
reach of children.
Batteries contain sulfu-
ric acid which is highly
corrosive. Do not allow
acid to contact your
eyes, skin or clothing.
If acid gets into your eyes, flush
your eyes with clean water for at
least 15 minutes and get imme-
diate medical attention. If acid
gets on your skin, thoroughly
wash the area. If you feel pain or
a burning sensation, get med-
ical attention immediately. (Continued)(Continued)
•When lifting a plastic-cased
battery, excessive pressure
on the case may cause battery
acid to leak. Lift with a battery
carrier or with your hands on
opposite corners.
Do not attempt to jump start
your vehicle if your battery is
frozen.
NEVER attempt to recharge
the battery when the vehicle's
battery cables are connected
to the battery.
The electrical ignition switch
works with high voltage.
NEVER touch these compo-
nents with the " " indicator
ON or when the POWER but-
ton is in the ON position.
Page 378 of 555
6-5
What to do in an emergency
6
Information
An inappropriately disposedbattery can be harmful to the
environment and human
health. Dispose the battery
according to your local law(s)
or regulations.
To prevent damage to your vehi-
cle:
Only use a 12-volt power supply (battery or jumper system) to
jump start your vehicle.
Do not attempt to jump start your vehicle by push-starting.
Jump starting procedure
1. Position the vehicles close enough that the jumper cables will reach,
but do not allow the vehicles to
touch.
2. Avoid fans or any moving parts in the motor compartment at all
times, even when the vehicles are
turned off.
3. Turn off all electrical devices such as radios, lights, air conditioning,
etc. Put the vehicles in P (Park)
and set the parking brakes. Turn
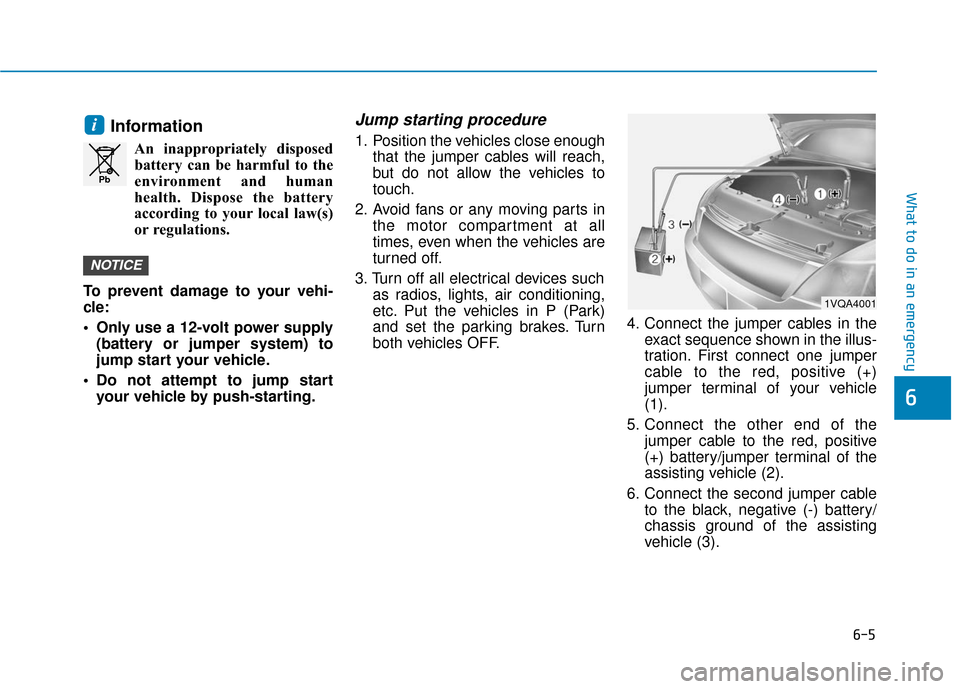
both vehicles OFF. 4. Connect the jumper cables in the
exact sequence shown in the illus-
tration. First connect one jumper
cable to the red, positive (+)
jumper terminal of your vehicle
(1).
5. Connect the other end of the jumper cable to the red, positive
(+) battery/jumper terminal of the
assisting vehicle (2).
6. Connect the second jumper cable to the black, negative (-) battery/
chassis ground of the assisting
vehicle (3).
NOTICE
i
Pb
1VQA4001
Page 379 of 555
6-6
What to do in an emergency
7. Connect the other end of the sec- ond jumper cable to the black,
negative (-) chassis ground of
your vehicle (4).
Do not allow the jumper cables to
contact anything except the cor-
rect battery or jumper terminals or
the correct ground. Do not lean
over the battery when making
connections.
8. Start the engine of the assisting vehicle and let it run at approxi-
mately 2,000 rpm for a few min-
utes. Then start your vehicle.
9. After your vehicle starts allow it to operate at least 30 minutes with-
out shutting it down, this will help
charge back the 12V battery.
If your vehicle will not start after a
few attempts, it probably requires
servicing. In this event please seek
qualified assistance. If the cause of
your battery discharging is not
apparent, have your vehicle checked
by an authorized HYUNDAI dealer. Disconnect the jumper cables in the
exact reverse order you connected
them:
1. Disconnect the jumper cable from
the black, negative (-) chassis
ground of your vehicle (4).
2. Disconnect the other end of the jumper cable from the black, neg-
ative (-) battery/chassis ground of
the assisting vehicle (3).
3. Disconnect the second jumper cable from the red, positive (+)
battery/jumper terminal of the
assisting vehicle (2).
4. Disconnect the other end of the jumper cable from the red, positive
(+) jumper terminal of your vehicle
(1). 1. Pull off the road and stop as soon
as it is safe to do so.
2. Shift to P (Park) and set the park- ing brake. If the air conditioning is
on, turn it off.
3. If coolant is running out under the vehicle or steam is coming out
from the hood, stop the vehicle.
Do not open the hood until the
coolant has stopped running or
the steaming has stopped. If there
is no visible loss of coolant and no
steam, leave the vehicle running
and check to be sure the vehicle
cooling fan is operating. If the fan
is not running, turn the vehicle off.
I IF
F
T
T H
H E
E
V
V E
EH
H I
IC
C L
LE
E
O
O V
VE
ER
R H
H E
EA
A T
TS
S
Page 385 of 555

6-12
What to do in an emergency
The TPMS Malfunction Indicator
may illuminate after blinking for
one minute if the vehicle is near
electric power supply cables or
radio transmitters such as police
stations, government and public
offices, broadcasting stations,
military installations, airports,
transmitting towers, etc.
Additionally, the TPMS Malfunction
Indicator may illuminate if snow
chains are used or electronic
devices such as computers, charg-
ers, remote starters, navigation,
etc. This may interfere with normal
operation of the TPMS.
Changing a Tire with TPMS
If you have a flat tire, the Low Tire
Pressure and LCD position indicator
will come on. Have the flat tire
repaired by an authorized HYUNDAI
dealer as soon as possible or
replace the flat tire with the spare
tire. Once the original tire equipped with
a tire pressure monitoring sensor is
reinflated to the recommended pres-
sure and reinstalled on the vehicle,
the Low Tire Pressure LCD position
indicator and TPMS Malfunction
Indicator will go off within a few min-
utes of driving.
If the indicators do not disappear
after a few minutes, please visit an
authorized HYUNDAI dealer.
Each wheel is equipped with a tire
pressure sensor mounted inside the
tire behind the valve stem. You must
use TPMS specific wheels. It is rec-
ommended that you always have
your tires serviced by an authorized
HYUNDAI dealer.
NOTICE
Never use a puncture-repairing
agent not approved by HYUNDAI
dealer to repair and/or inflate a
low pressure tire. Tire sealant
not approved by HYUNDAI deal-
er may damage the tire pressure
sensor.
CAUTION