2019 Hyundai Ioniq Electric brakes
[x] Cancel search: brakesPage 409 of 526
5-93
Driving your vehicle
5
To convert to Cruise Control
mode
The driver may choose to switch to
use the conventional Cruise Control
mode (speed only control function)
by following these steps:
1. Push the CUISE button on thesteering wheel to turn the system
on. The cruise ( ) indi-
cator will illuminate.
2. Push and hold the Vehicle-to- Vehicle Distance button for more
than 2 seconds.
3. Choose between "Smart Cruise Control" and "Cruise Control".
When the system is cancelled using
theCRUISE/ button or the
CRUISE/ button is used after the
vehicle is in the ready ( ) mode,
the Smart Cruise Control mode will
turn on.
Limitations of the system
The Smart Cruise Control System
may have limits to its ability to detect
distance to the vehicle ahead due to
road and traffic conditions.
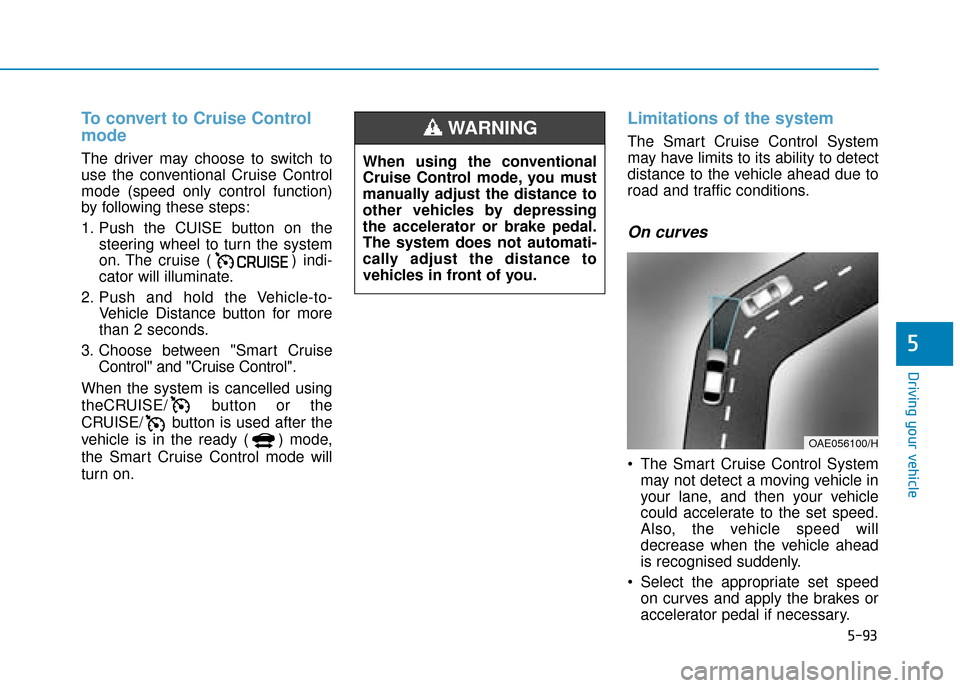
On curves
The Smart Cruise Control System may not detect a moving vehicle in
your lane, and then your vehicle
could accelerate to the set speed.
Also, the vehicle speed will
decrease when the vehicle ahead
is recognised suddenly.
Select the appropriate set speed on curves and apply the brakes or
accelerator pedal if necessary.
OAE056100/H
When using the conventional
Cruise Control mode, you must
manually adjust the distance to
other vehicles by depressing
the accelerator or brake pedal.
The system does not automati-
cally adjust the distance to
vehicles in front of you.
WARNING
Page 413 of 526
5-97
Driving your vehicle
5
The Smart Cruise Control System
may not operate temporarily due
to:
Electrical interference
Modifying the suspension
Differences of tyre abrasion ortyre pressure
Installing different type of tyres
NOTICE
(Continued)
The Smart Cruise Control
System cannot recognise a
stopped vehicle, pedestrians
or an oncoming vehicle.
Always look ahead cautiously
to prevent unexpected and
sudden situations from occur-
ring.
Vehicles moving in front of you
with a frequent lane change
may cause a delay in the sys-
tem's reaction or may cause
the system to react to a vehicle
actually in an adjacent lane.
Always drive cautiously to pre-
vent unexpected and sudden
situations from occurring.
Always be aware of the select-
ed speed and vehicle to vehi-
cle distance. The driver
should not solely rely on the
system but always pay atten-
tion to driving conditions and
control your vehicle speed. (Continued)
When using the Smart Cruise
Control take the following pre-
cautions:
If an emergency stop is nec-
essary, you must apply the
brakes. The vehicle cannot be
stopped at every emergency
situation by using the Smart
Cruise Control System.
Keep a safe distance accord-
ing to road conditions and
vehicle speed. If the vehicle to
vehicle distance is too close
during a high-speed driving, a
serious collision may result.
Always maintain sufficient
braking distance and deceler-
ate your vehicle by applying
the brakes if necessary.(Continued)
WARNING (Continued)
The Smart Cruise Control
System may not recognise
complex driving situations so
always pay attention to driv-
ing conditions and control
your vehicle speed.
Page 415 of 526
5-99
Driving your vehicle
5
Information
The ESC system (if equipped) must be
turned OFF before rocking the vehi-
cle.
If you are still stuck after rocking
the vehicle a few times, have the
vehicle pulled out by a tow vehicle
to avoid vehicle overheating, pos-
sible damage to the reduction
gear and tyre damage. See
"Towing" in chapter 6.
Smooth cornering
Avoid braking or gear changing in
corners, especially when roads are
wet. Ideally, corners should always
be taken under gentle acceleration.
Driving at night
Night driving presents more hazards
than driving in the daylight. Here are
some important tips to remember:
Slow down and keep more dis-tance between you and other vehi-
cles, as it may be more difficult to
see at night, especially in areas
where there may not be any street
lights.
Adjust your mirrors to reduce the glare from other driver's head-
lamps.
Keep your headlamps clean and properly aimed. Dirty or improperly
aimed headlamps will make it
much more difficult to see at night.
Avoid staring directly at the head- lamps of oncoming vehicles. You
could be temporarily blinded, and it
will take several seconds for your
eyes to readjust to the darkness.
Driving in the rain
Rain and wet roads can make driving
dangerous. Here are a few things to
consider when driving in the rain or
on slick pavement:
Slow down and allow extra follow-ing distance. A heavy rainfall
makes it harder to see and increas-
es the distance needed to stop
your vehicle.
Turn OFF your Cruise Control. (if equipped)
Replace your windscreen wiper blades when they show signs of
streaking or missing areas on the
windscreen.
Be sure your tyres have enough tread. If your tyres do not have
enough tread, making a quick stop
on wet pavement can cause a skid
and possibly lead to an accident.
See "Tyre Tread" in chapter 7 .
Turn on your headlamps to make it easier for others to see you.
Driving too fast through large pud- dles can affect your brakes. If you
must go through puddles, try to
drive through them slowly.
NOTICE
i
Page 416 of 526
5-100
Driving your vehicle
If you believe your brakes may be wet, apply them lightly whilst driv-
ing until normal braking operation
returns.
Hydroplaning
If the road is wet enough and you are
going fast enough, your vehicle may
have little or no contact with the road
surface and actually ride on the
water. The best advice is SLOW
DOWN when the road is wet.
The risk of hydroplaning increas-
es as the depth of tyre tread
decreases, refer to "Tyre Tread" in
chapter 7.
Driving in flooded areas
Avoid driving through flooded areas
unless you are sure the water is no
higher than the bottom of the wheel
hub. Drive through any water slowly.
Allow adequate stopping distance
because brake performance may be
reduced.
After driving through water, dry the
brakes by gently applying them sev-
eral times whilst the vehicle is mov-
ing slowly.
Highway driving
Tyres
Adjust the tyre inflation, as specified.
Under-inflation may overheat or
damage the tyres.
Do not install worn-out or damaged
tyres, which may reduce traction or
fail the braking operation.
Information
Never over-inflate your tyres above
the maximum inflation pressure, as
specified on your tyres.
Coolant and high voltage bat-tery
Be sure to check both the coolant
level and the high voltage battery
level before driving.
i
Page 417 of 526
5-101
Driving your vehicle
5
The severe weather conditions of
winter quickly wear out tyres and
cause other problems. To minimise
winter driving problems, you should
take the following suggestions:
Snow or icy conditions
You need to keep sufficient distance
between your vehicle and the vehicle
in front of you.
Apply the brakes gently. Speeding,
rapid acceleration, sudden brake
applications, and sharp turns are
potentially very hazardous practices.
During deceleration, use the paddle
shifter (left side lever) to increase
regenerative braking. Sudden brake
applications on snowy or icy roads
may cause the vehicle to skid.
To drive your vehicle in deep snow, it
may be necessary to use snow tyres
or to install tyre chains on your tyres.Always carry emergency equipment.
Some of the items you may want to
carry include tyre chains, tow straps
or chains, a flashlight, emergency
flares, sand, a shovel, jumper cables,
a window scraper, gloves, ground
cloth, coveralls, a blanket, etc.Snow tyres
If you mount snow tyres on your vehi-
cle, make sure to use radial tyres of
the same size and load range as the
original tyres. Mount snow tyres on
all four wheels to balance your vehi-
cle’s handling in all weather condi-
tions. The traction provided by snow
tyres on dry roads may not be as
high as your vehicle's original equip-
ment tyres. Check with the tyre deal-
er for maximum speed recommenda-
tions.
Information
Do not install studded tyres without
first checking local and municipal regu-
lations for possible restrictions against
their use.
i
W W
I
IN
N T
TE
ER
R
D
D R
RI
IV
V I
IN
N G
G
Snow tyres should be equiva-
lent in size and type to the vehi-
cle's standard tyres. Otherwise,
the safety and handling of your
vehicle may be adversely affect-
ed.
WARNING
Page 420 of 526
Check battery and cables
The winter temperature increases
the battery consumption.Inspect
the battery and cables, as speci-
fied in the chapter 7. The battery
charging level can be checked by a
HYUNDAI authorised repairer or in a
service station.
Change to "winter weight" oil if
necessary
In some regions during winter, it is
recommended to use the "winter
weight" oil with lower viscosity. For
further information, refer to the chap-
ter 8. When you are not sure about a
type of winter weight oil, we recom-
mend that you consult a HYUNDAI
authorised repairer. To prevent locks from freezing
To prevent the locks from being
frozen, spray approved de-icing fluid
or glycerin into key holes. When a
lock opening is already covered with
ice, spray approved de-icing fluid
over the ice to remove it. When an
internal part of a lock freezes, try to
thaw it with a heated key. Carefully
use the heated key to avoid an injury.
Use approved window washer
anti-freeze solution in system
To prevent the window washer from
being frozen, add authorized window
washer anti-freeze solution, as spec-
ified on the window washer contain-
er. Window washer anti-freeze solu-
tion is available from a HYUNDAI
authorised repairer, and so are the
most vehicle accessory outlets. Do
not use coolant or other types of anti-
freeze solution to prevent any dam-
age to the vehicle paint.Do not let your parking brake
freeze
Under some conditions your parking
brake can freeze in the engaged
position. This is most likely to happen
when there is an accumulation of
snow or ice around or near the rear
brakes or if the brakes are wet. When
there is the risk that your parking
brake may freeze, temporarily shift to
P (Park). Also, block the rear wheels
in advance, so the vehicle may not
roll. Then, release the parking brake.
Do not let ice and snow accumu-
late underneath
Under some conditions, snow and
ice can build up under the fenders
and interfere with the steering. When
driving in such conditions during the
severe winter, you should check
underneath the vehicle on a regular
basis, so that moving the front
wheels and the steering components
is unblocked.
Driving your vehicle
5-104
Page 426 of 526
6-3
What to do in an emergency
If you have a flat tyre whilst
driving
If a tyre goes flat whilst you are driv-
ing:
Take your foot off the acceleratorpedal and let the vehicle slow
down whilst driving straight ahead.
Do not apply the brakes immedi-
ately to slow down the vehicle, but
use the paddle shifter (left side
lever) to increase regenerative
braking control. Also, do not
attempt to pull off the road as this
may cause loss of vehicle control
resulting in an accident. When the
vehicle has slowed to such a
speed that it is safe to do so, brake
carefully and pull off the road.
Drive off the road as far as possible
and park on firm, level ground. If
you are on a divided highway, do
not park in the median area
between the two traffic lanes.
When the vehicle is stopped, press the hazard warning flasher button,
shift to P (Park), apply the parking
brake, and place the POWER but-
ton in the OFF position. Have all passengers get out of the
vehicle. Be sure they all get out on
the side of the vehicle that is away
from traffic.
Follow the instructions provided later in this chapter. (Refer to "If
You Have a Flat Tyre" provided in
this chapter.)
6
Page 429 of 526
6-6
What to do in an emergency
Jump starting procedure
1. Position the vehicles close enoughthat the jumper cables will reach,
but do not allow the vehicles to
touch.
2. Avoid fans or any moving parts in the motor compartment at all
times, even when the vehicles are
turned off.
3. Turn off all electrical devices such as radios, lights, air conditioning,
etc. Put the vehicles in P (Park)
and set the parking brakes. Turn
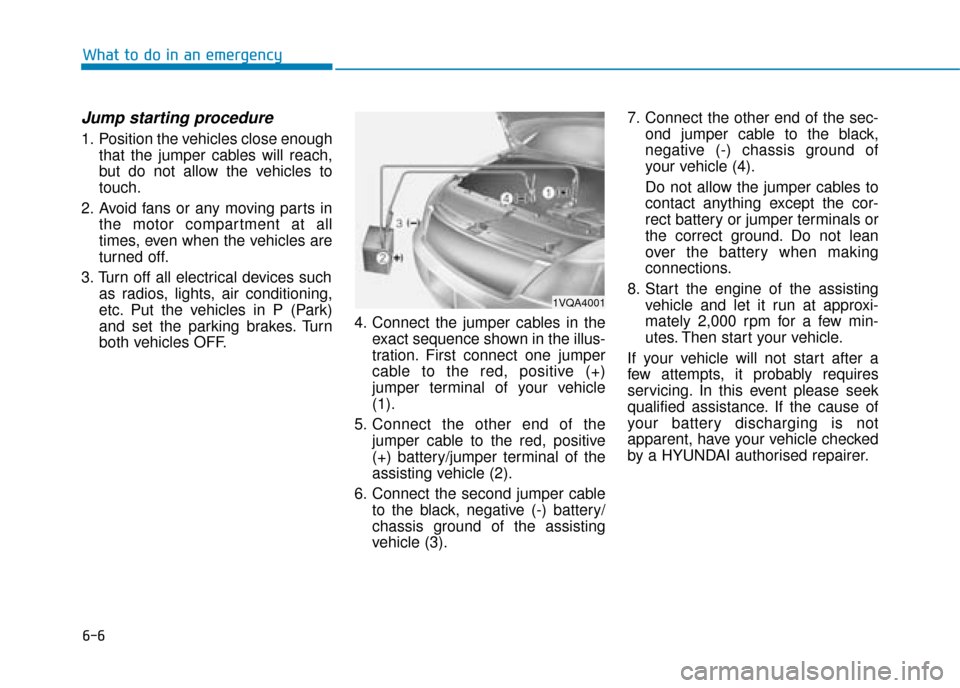
both vehicles OFF. 4. Connect the jumper cables in the
exact sequence shown in the illus-
tration. First connect one jumper
cable to the red, positive (+)
jumper terminal of your vehicle
(1).
5. Connect the other end of the jumper cable to the red, positive
(+) battery/jumper terminal of the
assisting vehicle (2).
6. Connect the second jumper cable to the black, negative (-) battery/
chassis ground of the assisting
vehicle (3). 7. Connect the other end of the sec-
ond jumper cable to the black,
negative (-) chassis ground of
your vehicle (4).
Do not allow the jumper cables to
contact anything except the cor-
rect battery or jumper terminals or
the correct ground. Do not lean
over the battery when making
connections.
8. Start the engine of the assisting vehicle and let it run at approxi-
mately 2,000 rpm for a few min-
utes. Then start your vehicle.
If your vehicle will not start after a
few attempts, it probably requires
servicing. In this event please seek
qualified assistance. If the cause of
your battery discharging is not
apparent, have your vehicle checked
by a HYUNDAI authorised repairer.
1VQA4001