2019 Hyundai Ioniq Electric fuel
[x] Cancel search: fuelPage 354 of 526
5-38
Driving your vehicle
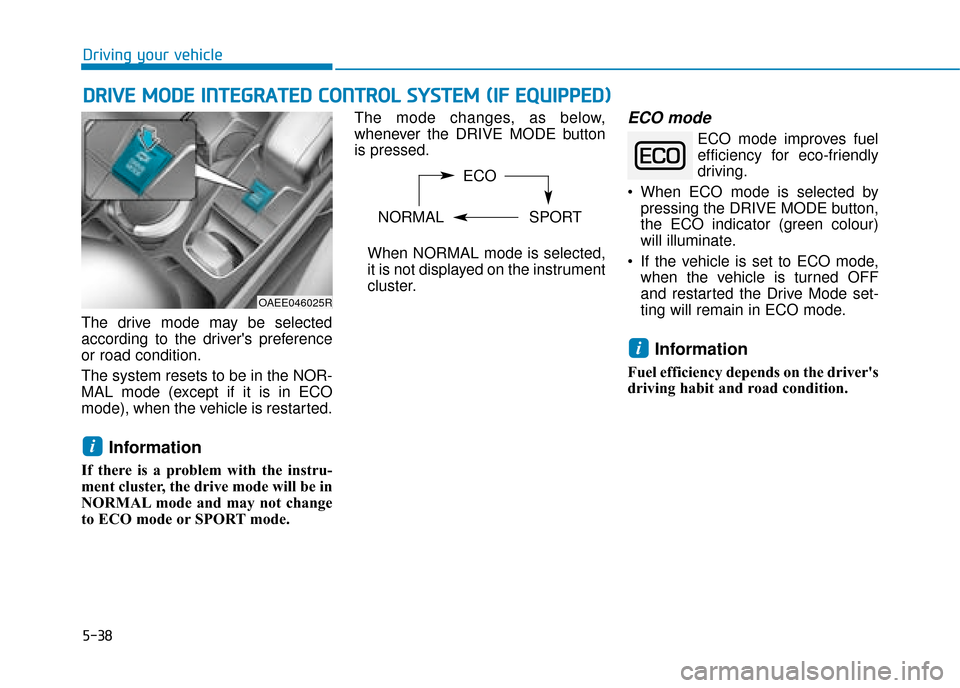
The drive mode may be selected
according to the driver's preference
or road condition.
The system resets to be in the NOR-
MAL mode (except if it is in ECO
mode), when the vehicle is restarted.
Information
If there is a problem with the instru-
ment cluster, the drive mode will be in
NORMAL mode and may not change
to ECO mode or SPORT mode. The mode changes, as below,
whenever the DRIVE MODE button
is pressed.
When NORMAL mode is selected,
it is not displayed on the instrument
cluster.
ECO mode
ECO mode improves fuel efficiency for eco-friendly
driving.
When ECO mode is selected by pressing the DRIVE MODE button,
the ECO indicator (green colour)
will illuminate.
If the vehicle is set to ECO mode, when the vehicle is turned OFF
and restarted the Drive Mode set-
ting will remain in ECO mode.
Information
Fuel efficiency depends on the driver's
driving habit and road condition.
i
i
D DR
RI
IV
V E
E
M
M O
OD
DE
E
I
IN
N T
TE
EG
G R
RA
A T
TE
ED
D
C
C O
O N
NT
TR
R O
O L
L
S
S Y
Y S
ST
T E
EM
M
(
( I
IF
F
E
E Q
Q U
UI
IP
P P
PE
ED
D )
)
OAEE046025R
ECO
NORMAL SPORT
Page 355 of 526

5-39
Driving your vehicle
5
When ECO mode is activated:
The acceleration response may beslightly reduced as the accelerator
pedal is depressed moderately.
The air conditioner performance may be limited.
The shift pattern of the gear may change.
The above situations are normal
conditions when ECO mode is acti-
vated to improve fuel efficiency.SPORT mode
SPORT mode provides
sporty but firm riding.
When SPORT mode is selected by pressing the DRIVE MODE button,
the SPORT indicator (orange
colour) will illuminate.
Whenever the vehicle is restarted, the Drive Mode will revert back to
NORMAL mode. If SPORT mode is
desired, re-select SPORT mode
from the DRIVE MODE button.
Information
In SPORT mode, the fuel efficiency
may decrease.
i
Page 422 of 526
Two labels on your driver’s door sill
show how much weight your vehicle
was designed to carry: the Tyre and
Loading Information Label and the
Certification Label.
Before loading your vehicle, familiar-
ize yourself with the following terms
for determining your vehicle's weight
ratings, from the vehicle's specifica-
tions and the Certification Label:
Base Kerb Weight
This is the weight of the vehicle
including a full tank of fuel and all
standard equipment. It does not
include passengers, cargo, or option-
al equipment.
Vehicle Kerb Weight
This is the weight of your new vehicle
when you picked it up from your deal-
er plus any aftermarket equipment.
Cargo Weight
This figure includes all weight added
to the Base Kerb Weight, including
cargo and optional equipment.GAW (Gross Axle Weight)
This is the total weight placed on
each axle (front and rear) - including
vehicle kerb weight and all payload.
GAWR (Gross Axle Weight Rating)
This is the maximum allowable
weight that can be carried by a single
axle (front or rear). These numbers
are shown on the Certification Label.
The total load on each axle must
never exceed its GAWR.
GVW (Gross Vehicle Weight)
This is the Base Kerb Weight plus
actual Cargo Weight plus passen-
gers.
GVWR (Gross Vehicle Weight
Rating)
This is the maximum allowable
weight of the fully loaded vehicle
(including all options, equipment,
passengers and cargo). The GVWR
is shown on the Certification Label
located on the driver’s door sill.Overloading
V V
E
EH
H I
IC
C L
LE
E
W
W E
EI
IG
G H
H T
T
The Gross Axle Weight Rating
(GAWR) and the Gross Vehicle
Weight Rating (GVWR) for your
vehicle are on the Certification
Label attached to the driver's
(or front passenger’s) door.
Exceeding these ratings can
cause an accident or vehicle
damage. You can calculate the
weight of your load by weighing
the items (and people) before
putting them in the vehicle. Be
careful not to overload your
vehicle.
WARNING
Driving your vehicle
5-106
Page 433 of 526
6-10
What to do in an emergency
Tyre pressure monitoring sys-
tem
Each tyre should be checked month-
ly when cold and inflated to the infla-
tion pressure recommended by the
vehicle manufacturer on the vehicle
placard or tyre inflation pressure
label. (If your vehicle has tyres of a
different size than the size indicated
on the vehicle placard or tyre infla-
tion pressure label, you should deter-
mine the proper tyre inflation pres-
sure for those tyres.)As an added safety feature, your
vehicle has been equipped with a
tyre pressure monitoring system
(TPMS) that illuminates a low tyre
pressure telltale when one or more
of your tyres is significantly under-
inflated. Accordingly, when the low
tyre pressure telltale illuminates, you
should stop and check your tyres as
soon as possible, and inflate them to
the proper pressure. Driving on a sig-
nificantly under-inflated tyre causes
the tyre to overheat and can lead to
tyre failure.
Under-inflation also reduces fuel effi-
ciency and tyre tread life, and may
affect the vehicle’s handling and
stopping ability.
Please note that the TPMS is not a
substitute for proper tyre mainte-
nance, and it is the driver’s responsi-
bility to maintain correct tyre pres-
sure, even if under-inflation has not
reached the level to trigger illumina-
tion of the TPMS low tyre pressure
telltale.Your vehicle has also been equipped
with a TPMS malfunction indicator to
indicate when the system is not
operating properly. The TPMS mal-
function indicator is combined with
the low tyre pressure telltale. When
the system detects a malfunction,
the telltale will flash for approximate-
ly one minute and then remain con-
tinuously illuminated. This sequence
will continue upon subsequent vehi-
cle start-ups as long as the malfunc-
tion exists.
When the malfunction indicator is illu-
minated, the system may not be able
to detect or signal low tyre pressure
as intended. TPMS malfunctions may
occur for a variety of reasons, includ-
ing the installation of replacement or
alternate tyres or wheels on the vehi-
cle that prevent the TPMS from func-
tioning properly.
Always check the TPMS malfunction
telltale after replacing one or more
tyres or wheels on your vehicle to
ensure that the replacement or alter-
nate tyres and wheels allow the
TPMS to continue to function proper-
ly.
Over-inflation or under-inflation
can reduce tyre life, adversely
affect vehicle handling, and
lead to sudden tyre failure that
may cause loss of vehicle con-
trol resulting in an accident.
WARNING
Page 471 of 526
7-23
7
Maintenance
T
TY
Y R
RE
ES
S
A
A N
N D
D
W
W H
HE
EE
EL
LS
S
Tyre care
For proper maintenance, safety, and
maximum fuel economy, you must
always maintain recommended tyre
inflation pressures and stay within the
load limits and weight distribution rec-
ommended for your vehicle.
(Continued)Replace tyres that are worn,
show uneven wear, or are dam-
aged. Worn tyres can cause
loss of braking effectiveness,
steering control, or traction.
ALWAYS replace tyres with
the same size as each tyre
that was originally supplied
with this vehicle. Using tyres
and wheels other than the rec-
ommended sizes could cause
unusual handling characteris-
tics, poor vehicle control, or
negatively affect your vehi-
cle’s Anti-Lock Brake System
(ABS) resulting in a serious
accident.
Tyre failure may cause loss of
vehicle control resulting in an
accident. To reduce risk of
SERIOUS INJURY or DEATH,
take the following precautions:
Inspect your tyres monthly for
proper inflation as well as
wear and damage.
The recommended cold tyre
pressure for your vehicle can
be found in this manual and on
the tyre label located on the
driver’s side centre pillar.
Always use a tyre pressure
gauge to measure tyre pres-
sure. Tyres with too much or
too little pressure wear
unevenly causing poor han-
dling.
Check the pressure of the
spare every time you check
the pressure of the other tyres
on your vehicle.
(Continued)
WARNING
Page 473 of 526
7-25
7
Maintenance
Check tyre inflation pressure
Check your tyres, including the spare
tyre, once a month or more.
How to check
Use a good quality tyre pressure
gauge to check tyre pressure. You
can not tell if your tyres are properly
inflated simply by looking at them.
Radial tyres may look properly inflat-
ed when they are under-inflated.
Remove the valve cap from the tyre
valve stem. Press the tyre gauge
firmly onto the valve to get a pres-
sure measurement. If the cold tyre
inflation pressure matches the rec-
ommended pressure on the tyre and
loading information label, no further
adjustment is necessary. If the pres-
sure is low, add air until you reach
the recommended pressure. Make
sure to put the valve caps back on
the valve stems. Without the valve
cap, dirt or moisture could get into
the valve core and cause air leakage.
If a valve cap is missing, install a new
one as soon as possible.If you overfill the tyre, release air by
pushing on the metal stem in the
centre of the tyre valve. Recheck the
tyre pressure with the tyre gauge. Be
sure to put the valve caps back on
the valve stems. Without the valve
cap, dirt or moisture could get into
the valve core and cause air leakage.
If a valve cap is missing, install a new
one as soon as possible.
Under-inflation results in
excessive wear, poor handling
and reduced fuel economy.
Wheel deformation is also
possible. Keep your tyre pres-
sures at the proper levels. If a
tyre frequently needs refilling,
we recommend it be checked
by a HYUNDAI authorised
repairer.
Over-inflation produces a
harsh ride, excessive wear at
the centre of the tyre tread,
and a greater possibility of
damage from road hazards.
CAUTION
Page 512 of 526
7-64
Maintenance
Wiping dust or dirt off the body with a dry cloth will scratch the
finish.
Do not use steel wool, abrasive cleaners, or strong detergents
containing highly alkaline or
caustic agents on chrome-plat-
ed or anodized aluminium parts.
This may result in damage to the
protective coating and cause
discolouration or paint deterio-
ration.
Finish damage repair
Deep scratches or stone chips in the
painted surface must be repaired
promptly. Exposed metal will quickly
rust and may develop into a major
repair expense.
If your vehicle is damaged and
requires any metal repair or
replacement, be sure the body
shop applies anti-corrosion mate-
rials to the parts repaired or
replaced.
Bright-metal maintenance
To remove road tar and insects,use a tar remover, not a scraper or
other sharp object.
To protect the surfaces of bright- metal parts from corrosion, apply a
coating of wax or chrome preser-
vative and rub to a high luster.
During winter weather or in coastal areas, cover the bright metal parts
with a heavier coating of wax or
preservative. If necessary, coat the
parts with non-corrosive petroleum
jelly or other protective compound.
Underbody maintenance
Corrosive materials used for ice and
snow removal and dust control may
collect on the underbody. If these
materials are not removed, acceler-
ated rusting can occur on underbody
parts such as the fuel lines, frame,
floor pan and exhaust system, even
though they have been treated with
rust protection.
Thoroughly flush the vehicle under-
body and wheel openings with luke-
warm or cold water once a month,
after off-road driving and at the end
of each winter. Pay special attention
to these areas because it is difficult
to see all the mud and dirt. It will do
more harm than good to wet down
the road grime without removing it.
The lower edges of doors, rocker
panels, and frame members have
drain holes that should not be
allowed to clog with dirt; trapped
water in these areas can cause rust-
ing.
NOTICE
NOTICE