2019 HYUNDAI I30 ECU
[x] Cancel search: ECUPage 191 of 659

3-41
Convenient features of your vehicle
3
Closing the fuel filler door
1. To install the fuel tank cap, turn itclockwise until it “clicks” one time.
2. Close the fuel filler door until it is latched securely.
Gasoline is highly flammable
and explosive. Failure to follow
these guidelines may result in
SERIOUS INJURY or DEATH:
Read and follow all warnings
posted at the gas station.
Before refueling, note the
location of the Emergency
Gasoline Shut-Off, if available,
at the gas station.
Before touching the fuel noz-
zle, you should eliminate the
potential build-up of static
electricity by touching a metal
part of the vehicle, a safe dis-
tance away from the fuel filler
neck, nozzle, or other gas
source, with your bare hand. (Continued)
WARNING
(Continued)
When refueling, always move
the shift lever to the P (Park)
position (for automatic transmis-
sion/
dual clutch transmission)
or first gear or R (Reverse, for
manual transmission), set the
parking brake, and place the
ignition switch to the LOCK/OFF
position. Sparks produced by
electrical components related to
the engine can ignite fuel vapors
causing a fire.
When using an approved
portable fuel container, be sure
to place the container on the
ground prior to refueling. Static
electricity discharge from the
container can ignite fuel vapors
causing a fire. Once refueling
has begun, contact between
your bare hand and the vehicle
should be maintained until the
filling is complete.
(Continued)
(Continued)
Do not use cellular phones
while refueling. Electric cur-
rent and/or electronic interfer-
ence from cellular phones can
potentially ignite fuel vapors
and cause a fire.
Do not get back into a vehicle
once you have begun refuel-
ing. You can generate a build-
up of static electricity by touch-
ing, rubbing or sliding against
any item or fabric capable of
producing static electricity.
Static electricity discharge can
ignite fuel vapors causing a
fire. If you must re-enter the
vehicle, you should once again
eliminate potentially danger-
ous static electricity discharge
by touching a metal part of the
vehicle, away from the fuel filler
neck, nozzle or other gasoline
source, with your bare hand.(Continued)
Page 192 of 659

3-42
Convenient features of your vehicle
Information
Make sure to refuel your vehicle
according to the "Fuel Requirements"
suggested in the Introduction chapter.
Do not spill fuel on the exteriorsurfaces of the vehicle. Any type
of fuel spilled on painted sur-
faces may damage the paint.
If the fuel filler cap requires replacement, use only a genuine
HYUNDAI cap or the equivalent
specified for your vehicle. An
incorrect fuel filler cap can
result in a serious malfunction
of the fuel system or emission
control system.
NOTICE
i(Continued)
Use only approved portable
plastic fuel containers designed
to carry and store gasoline.
Do not use matches or a
lighter and do not smoke or
leave a lit cigarette in your
vehicle while at a gas station,
especially during refueling.
Do not over-fill or top-off your
vehicle tank, which can cause
gasoline spillage.
If a fire breaks out during refu-
eling, leave the vicinity of the
vehicle, and immediately con-
tact the manager of the gas
station and then contact the
local fire department. Follow
any safety instructions they
provide.
(Continued)
(Continued)
If pressurized fuel sprays out,
it can cover your clothes or
skin and thus subject you to
the risk of fire and burns.
Always remove the fuel cap
carefully and slowly. If the cap
is venting fuel or if you hear a
hissing sound, wait until the
condition stops before com-
pletely removing the cap.
Always check that the fuel cap
is installed securely to prevent
fuel spillage in the event of an
accident.
Page 217 of 659
3-67
Convenient features of your vehicle
3
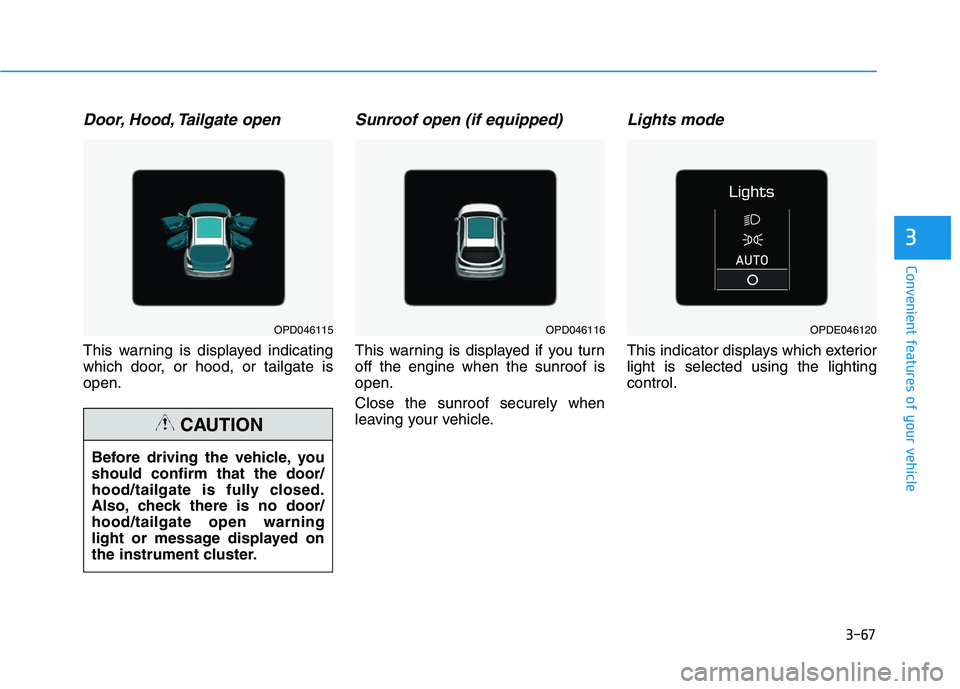
Door, Hood, Tailgate open
This warning is displayed indicating
which door, or hood, or tailgate is
open.
Sunroof open (if equipped)
This warning is displayed if you turn
off the engine when the sunroof is
open.
Close the sunroof securely when
leaving your vehicle.
Lights mode
This indicator displays which exterior
light is selected using the lighting
control.
Before driving the vehicle, you
should confirm that the door/
hood/tailgate is fully closed.
Also, check there is no door/
hood/tailgate open warning
light or message displayed on
the instrument cluster.
CAUTION
OPD046115OPD046116OPDE046120
Page 289 of 659
4-57
Multimedia System
4
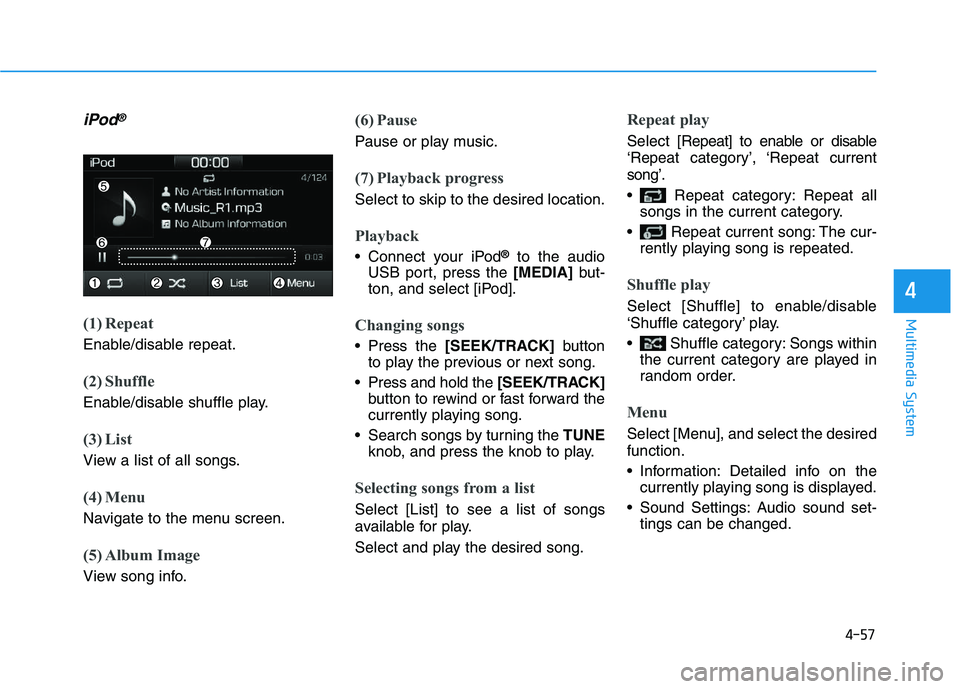
iPod®
(1) Repeat
Enable/disable repeat.
(2) Shuffle
Enable/disable shuffle play.
(3) List
View a list of all songs.
(4) Menu
Navigate to the menu screen.
(5) Album Image
View song info.
(6) Pause
Pause or play music.
(7) Playback progress
Select to skip to the desired location.
Playback
Connect your iPod®to the audio
USB port, press the [MEDIA]but-
ton, and select [iPod].
Changing songs
Press the [SEEK/TRACK] button
to play the previous or next song.
Press and hold the [SEEK/TRACK]
button to rewind or fast forward the
currently playing song.
Search songs by turning the TUNE
knob, and press the knob to play.
Selecting songs from a list
Select [List] to see a list of songs
available for play.
Select and play the desired song.
Repeat play
Select [Repeat] to enable or disable
‘Repeat category’, ‘Repeat current
song’.
Repeat category: Repeat all songs in the current category.
Repeat current song: The cur- rently playing song is repeated.
Shuffle play
Select [Shuffle] to enable/disable
‘Shuffle category’ play.
Shuffle category: Songs withinthe current category are played in
random order.
Menu
Select [Menu], and select the desired
function.
Information: Detailed info on thecurrently playing song is displayed.
Sound Settings: Audio sound set- tings can be changed.
Page 309 of 659
5-5
Driving your vehicle
5
Before entering the vehicle
• Be sure all windows, outside mir-ror(s), and outside lights are clean
and unobstructed.
Remove frost, snow, or ice.
Visually check the tires for uneven wear and damage.
Check under the vehicle for any sign of leaks.
Be sure there are no obstacles behind you if you intend to back up.
Before starting
Make sure the hood, the tailgate,and the doors are securely closed
and locked.
Adjust the position of the seat and steering wheel.
Adjust the inside and outside rearview mirrors.
Verify all the lights work.
Fasten your seatbelt. Check that all passengers have fastened their
seatbelts.
Check the gauges and indicators in the instrument panel and the mes-
sages on the instrument display
when the ignition switch is in the
ON position.
Check that any items you are car- rying are stored properly or fas-
tened down securely.
B
B E
E F
F O
O R
R E
E
D
D R
R I
I V
V I
I N
N G
G
To reduce the risk of SERIOUS
INJURY or DEATH, take the fol-
lowing precautions:
•ALWAYS wear your seat belt.
All passengers must be prop-
erly belted whenever the vehi-
cle is moving. For more infor-
mation, refer to "Seat Belts" in
chapter 2.
Always drive defensively.
Assume other drivers or pedes-
trians may be careless and
make mistakes.
Stay focused on the task of
driving. Driver distraction can
cause accidents.
Leave plenty of space between
you and the vehicle in front of
you.
WARNING
Page 331 of 659
5-27
Driving your vehicle
5
In manual shift mode, moving the
shift lever backwards and forwards
will allow you to select the desired
range of gears for the current driving
conditions.
+ (Up) : Push the lever forward onceto shift up one gear.
- (Down) : Pull the lever backwards once to shift down one
gear.Information
• Only the six forward gears can beselected. To reverse or park the
vehicle, move the shift lever to the R
(Reverse) or P (Park) position as
required.
• Downshifts are made automatically when the vehicle slows down. When
the vehicle stops, 1st gear is auto-
matically selected.
• When the engine rpm approaches the red zone the transmission will
upshift automatically.
(Continued)(Continued)
• If the driver presses the lever to
+ (Up) or - (Down) position, the
transmission may not make the
requested gear change if the next
gear is outside of the allowable
engine rpm range. The driver must
execute upshifts in accordance with
road conditions, taking care to keep
the engine rpms below the red zone.
• When driving on a slippery road, push the shift lever forward into the
+ (Up) position. This causes the
transmission to shift into the 2nd
gear which is better for smooth driv-
ing on a slippery road. Push the shift
lever to the - (Down) side to shift
back to the 1st gear.
i
Page 341 of 659
5-37
Driving your vehicle
5
Information
• Only the seven forward gears can beselected. To reverse or park the
vehicle, move the shift lever to the R
(Reverse) or P (Park) position as
required.
• Downshifts are made automatically when the vehicle slows down. When
the vehicle stops, 1st gear is auto-
matically selected.
• When the engine rpm approaches the red zone the transmission will
upshift automatically.
• If the driver presses the lever to + (Up) or - (Down) position, the
transmission may not make the
requested gear change if the next
gear is outside of the allowable
engine rpm range. The driver must
execute upshifts in accordance with
road conditions, taking care to keep
the engine rpms below the red zone.
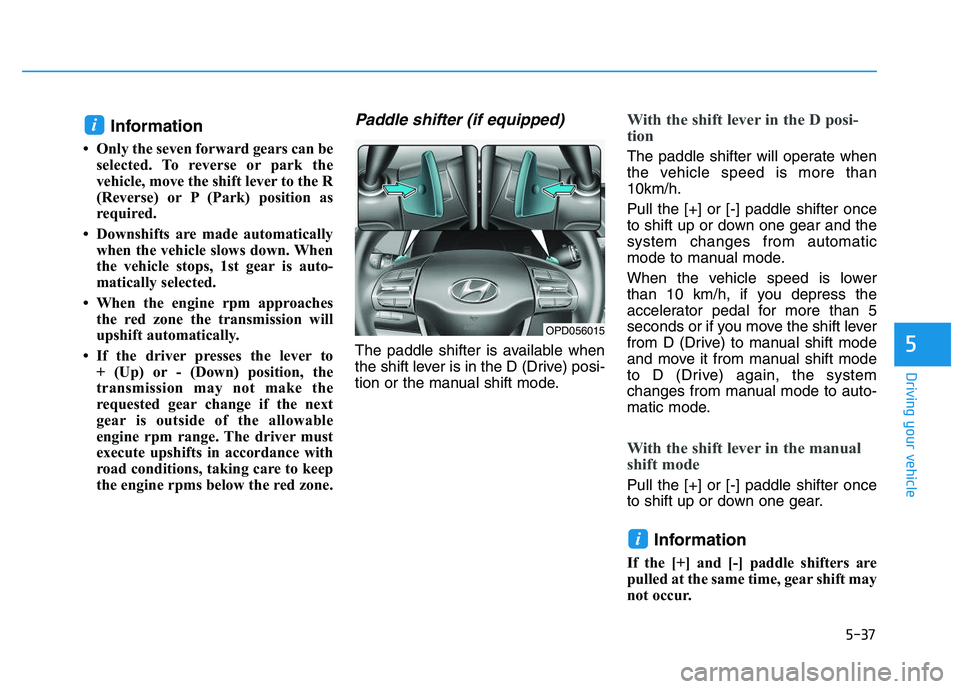
Paddle shifter (if equipped)
The paddle shifter is available when
the shift lever is in the D (Drive) posi-
tion or the manual shift mode.
With the shift lever in the D posi-
tion
The paddle shifter will operate when
the vehicle speed is more than
10km/h.
Pull the [+] or [-] paddle shifter once
to shift up or down one gear and the
system changes from automatic
mode to manual mode.
When the vehicle speed is lower
than 10 km/h, if you depress the
accelerator pedal for more than 5
seconds or if you move the shift lever
from D (Drive) to manual shift mode
and move it from manual shift mode
to D (Drive) again, the system
changes from manual mode to auto-
matic mode.
With the shift lever in the manual
shift mode
Pull the [+] or [-] paddle shifter once
to shift up or down one gear.
Information
If the [+] and [-] paddle shifters are
pulled at the same time, gear shift may
not occur.
i
i
OPD056015
Page 388 of 659

5-84
Driving your vehicle
System malfunction
Check AEB system
When the AEB is not working prop-erly, the AEB warning light ( )
will illuminate and the warning
message will appear for a few sec-
onds. After the message disap-
pears, the master warning light
( ) will illuminate. In this case, we
recommend you to have the vehicle
inspected by an authorized
HYUNDAI dealer.
The AEB warning message may appear along with the illumination
of the ESC (Electronic Stability
Control) warning light.
The AEB is only a supplemen-
tal system for the driver's con-
venience. The driver should
hold the responsibility to con-
trol the vehicle operation. Do
not solely depend on the AEB
system. Rather, maintain a
safe braking distance, and, if
necessary, depress the brake
pedal to reduce the driving
speed.
In certain instances and
under certain driving condi-
tions, the AEB system may
activate prematurely. This ini-
tial warning message appears
on the LCD display with a
warning chime.
Also, in certain instances the
front radar sensor or camera
recognition system may not
detect the vehicle or pedestri-
an ahead. The AEB system
may not activate and the
warning message will not be
displayed.
(Continued)
(Continued)
If there is a malfunction with the
AEB system, the autonomous
emergency braking is not
applied even though the brak-
ing system is operating normal-
ly.
If the vehicle in front stops
suddenly, you may have less
control of the brake system.
Therefore, always keep a safe
distance between your vehicle
and the vehicle in front of you.
The AEB system may activate
during braking and the vehi-
cle may stop suddenly shift-
ing loose objects toward the
passengers. Always keep
loose objects secured.
The AEB system may not acti-
vate if the driver applies the
brake pedal to avoid a colli-
sion.
The AEB system operates
only to detect vehicles or
pedestrians in front of the
vehicle.(Continued)
WARNING ■ Type A■Type B
OTLE055071/OAE056038L