Page 59 of 659

2-39
Safety system of your vehicle
2
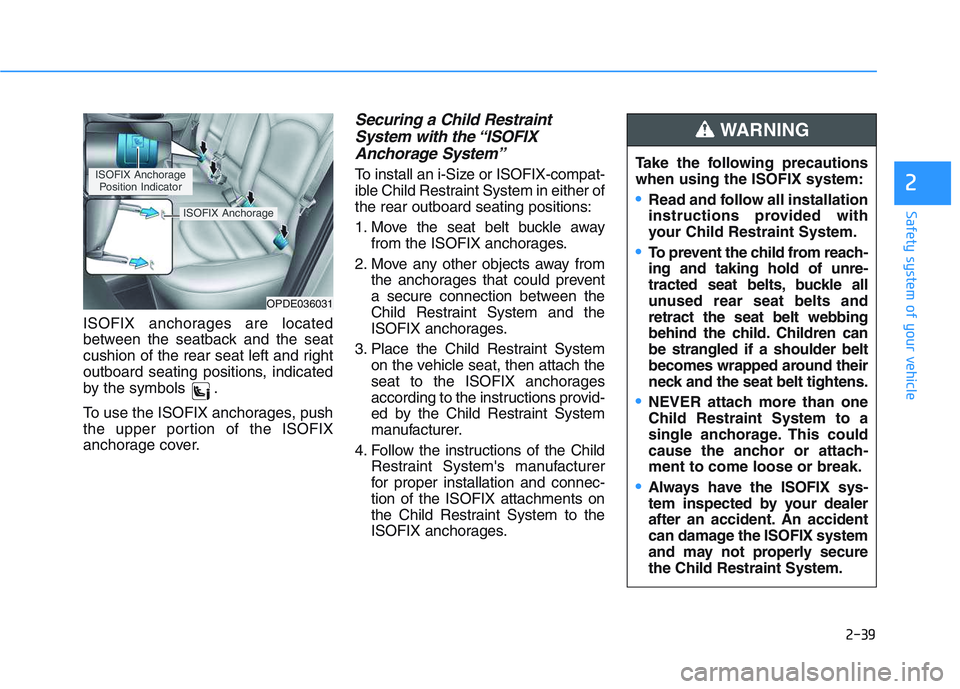
ISOFIX anchorages are located
between the seatback and the seat
cushion of the rear seat left and right
outboard seating positions, indicated
by the symbols .
To use the ISOFIX anchorages, push
the upper portion of the ISOFIX
anchorage cover.
Securing a Child Restraint System with the “ISOFIXAnchorage System”
To install an i-Size or ISOFIX-compat-
ible Child Restraint System in either of
the rear outboard seating positions:
1. Move the seat belt buckle away
from the ISOFIX anchorages.
2. Move any other objects away from the anchorages that could prevent
a secure connection between the
Child Restraint System and the
ISOFIX anchorages.
3. Place the Child Restraint System on the vehicle seat, then attach the
seat to the ISOFIX anchorages
according to the instructions provid-
ed by the Child Restraint System
manufacturer.
4. Follow the instructions of the Child Restraint System's manufacturer
for proper installation and connec-
tion of the ISOFIX attachments on
the Child Restraint System to the
ISOFIX anchorages.
OPDE036031
ISOFIX Anchorage
Position Indicator
ISOFIX Anchorage
Take the following precautions
when using the ISOFIX system:
Read and follow all installation
instructions provided with
your Child Restraint System.
To prevent the child from reach-
ing and taking hold of unre-
tracted seat belts, buckle all
unused rear seat belts and
retract the seat belt webbing
behind the child. Children can
be strangled if a shoulder belt
becomes wrapped around their
neck and the seat belt tightens.
NEVER attach more than one
Child Restraint System to a
single anchorage. This could
cause the anchor or attach-
ment to come loose or break.
Always have the ISOFIX sys-
tem inspected by your dealer
after an accident. An accident
can damage the ISOFIX system
and may not properly secure
the Child Restraint System.
WARNING
Page 60 of 659

2-40
Safety system of your vehicle
Securing a Child RestraintSystem seat with “Top-tetherAnchorage” system
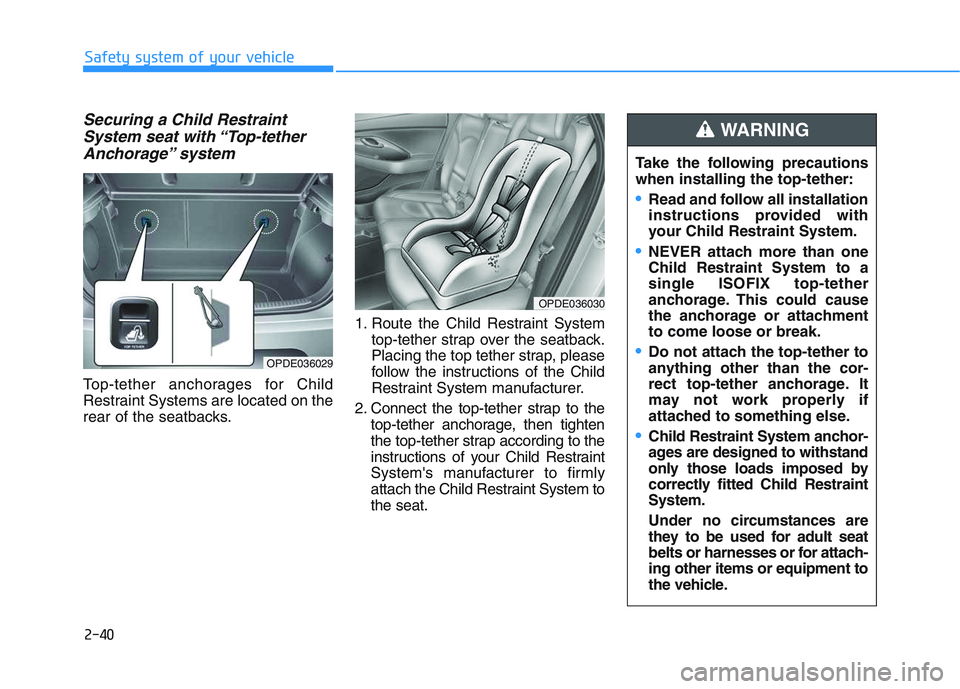
Top-tether anchorages for Child
Restraint Systems are located on the
rear of the seatbacks. 1. Route the Child Restraint System
top-tether strap over the seatback.
Placing the top tether strap, please
follow the instructions of the Child
Restraint System manufacturer.
2. Connect the top-tether strap to the top-tether anchorage, then tighten
the top-tether strap according to the
instructions of your Child Restraint
System's manufacturer to firmly
attach the Child Restraint System to
the seat.
OPDE036029
OPDE036030
Take the following precautions
when installing the top-tether:
Read and follow all installation
instructions provided with
your Child Restraint System.
NEVER attach more than one
Child Restraint System to a
single ISOFIX top-tether
anchorage. This could cause
the anchorage or attachment
to come loose or break.
Do not attach the top-tether to
anything other than the cor-
rect top-tether anchorage. It
may not work properly if
attached to something else.
Child Restraint System anchor-
ages are designed to withstand
only those loads imposed by
correctly fitted Child Restraint
System.
Under no circumstances are
they to be used for adult seat
belts or harnesses or for attach-
ing other items or equipment to
the vehicle.
WARNING
Page 62 of 659

2-42
Safety system of your vehicle
Securing a Child RestraintSystem with a lap/shoulder belt
When not using the ISOFIX system,
all Child Restraint Systems must be
secured to a rear seat with the lap
part of a lap/shoulder belt.
Installing a Child Restraint System
with a lap/shoulder belt
To install a Child Restraint System
on the rear seats, do the following:
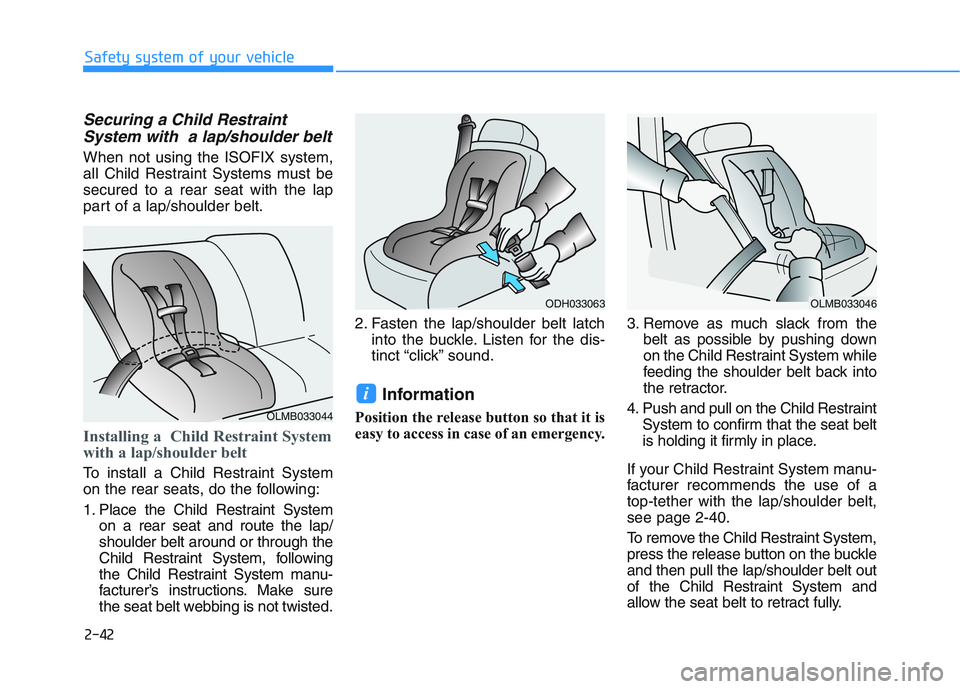
1. Place the Child Restraint System
on a rear seat and route the lap/
shoulder belt around or through the
Child Restraint System, following
the Child Restraint System manu-
facturer’s instructions. Make sure
the seat belt webbing is not twisted. 2. Fasten the lap/shoulder belt latch
into the buckle. Listen for the dis-
tinct “click” sound.
Information
Position the release button so that it is
easy to access in case of an emergency. 3. Remove as much slack from the
belt as possible by pushing down
on the Child Restraint System while
feeding the shoulder belt back into
the retractor.
4. Push and pull on the Child Restraint System to confirm that the seat belt
is holding it firmly in place.
If your Child Restraint System manu-
facturer recommends the use of a
top-tether with the lap/shoulder belt,
see page 2-40.
To remove the Child Restraint System,
press the release button on the buckle
and then pull the lap/shoulder belt out
of the Child Restraint System and
allow the seat belt to retract fully.
i
OLMB033044
ODH033063OLMB033046
Page 72 of 659

2-52
Safety system of your vehicle
How does the air bags system
operate?
The SRS consists of the following
components:
(1) Driver's front air bag module/Driver’s knee air bag module
(2) Passenger's front air bag module
(3) Side air bag modules/ Side impact sensors
(4) Curtain air bag modules
(5) Retractor pre-tensioner assem- blies
(6) Air bag warning light
(7) SRS control module (SRSCM)/
Rollover sensor (8) Front impact sensors
(9) Side pressure sensors
(10) Passenger’s front air bag
ON/OFF indicator
(front passenger's seat only)
(11) Passenger’s front air bag ON/OFF switch
The SRSCM continually monitors all
SRS components while the ignition
switch is ON to determine if a crash
impact is severe enough to require
air bag deployment or pre-tensioner
seat belt deployment.
OPDE036063
(Continued)
Properly secure Child Restraint
System as far away from the
door as possible.
Do not place any objects over
the air bag. Also, do not attach
any objects around the area the
air bag inflates such as the
door, side door glass, front and
rear pillar, roof side rail.
Do not hang hard or breakable
objects on the clothes hanger.
Do not allow passengers to
lean their heads or bodies
onto doors, put their arms on
the doors, stretch their arms
out of the window, or place
objects between the doors
and seats.
Do not open or repair the side
curtain air bags.
Page 97 of 659
3-95
Convenient features of your vehicle
3
Rear lamps
Do not leave the lamp switches on
for an extended period of time
when the engine is turned off.
Luggage room lamp
The luggage room lamp comes on
when the tailgate is opened.
The luggage room lamp comes on
as long as the tailgate lid is open.
To prevent unnecessary charging
system drain, close the tailgate lid
securely after using the tailgate.
NOTICE
NOTICE
OPD046042
Rear room lamp switch :
Press this button to turn the room
lamp on and off.
OAD045407
OPD046406
■Type A
■Type B
Page 140 of 659

3-138
Convenient features of your vehicle
S
S T
T O
O R
R A
A G
G E
E
C
C O
O M
M P
P A
A R
R T
T M
M E
E N
N T
T
To avoid possible theft, do not
leave valuables in the storage
compartments.
Center console storage
To open :
Pull the lever (1).
Glove box
To open the glove box, pull the handle
(1) and the glove box will automatical-
ly open. Close the glove box after use.
NOTICE
Never store cigarette lighters,
propane cylinders, or other
flammable/explosive materials
in the vehicle. These items may
catch fire and/or explode if the
vehicle is exposed to hot tem-
peratures for extended periods.
WARNING
ALWAYS keep the storage com-
partment covers closed secure-
ly while driving. Items inside
your vehicle are moving as fast
as the vehicle. If you have to
stop or turn quickly, or if there
is a crash, the items may fly out
of the compartment and may
cause an injury if they strike the
driver or a passenger.
WARNING
OPD046331
ALWAYS close the glove box
door after use.
An open glove box door can
cause serious injury to the pas-
senger in an accident, even if the
passenger is wearing a seat belt.
WARNING
OPD046333
Page 143 of 659

3-141
Convenient features of your vehicle
3
Keep your drinks sealed whiledriving to prevent spilling your
drink. If liquid spills, it may get
into the vehicle's electrical/elec-
tronic system and damage elec-
trical/electronic parts.
When cleaning spilled liquids, do not dry the cup holder at high
temperature. This may damage
the cup holder.
Sliding armrest (if equipped)
To move the armrest forward:
Pull up the lever (1) then pull the
armrest forward.
To move the armrest rearward:
Pull up the lever (1) then push the
armrest rearward.
NOTICE
Avoid abrupt starting and
braking when the cup holder
is in use to prevent spilling
your drink. If hot liquid spills,
you could be burned. Such a
burn to the driver could cause
loss of vehicle control result-
ing in an accident.
Do not place uncovered or
unsecured cups, bottles,
cans, etc., in the cup holder
containing hot liquid while the
vehicle is in motion. Injuries
may result in the event of sud-
den stop or collision.
Only use soft cups in the cup
holders. Hard objects can
injure you in an accident.
WARNING
Keep cans or bottles out of
direct sun light and do not put
them in a hot vehicle. It may
explode.
WARNING
OPD046332
Page 144 of 659
3-142
Convenient features of your vehicle
Sunvisor
To use a sunvisor, pull it downward.
To use a sunvisor for a side window,
pull it downward, unsnap it from the
bracket (1) and swing it to the side (2).
To use the vanity mirror, pull down the
sunvisor and slide the mirror cover (3).
Use the ticket holder (4) to hold tick-
ets.
Information
Close the vanity mirror cover securely
and return the sunvisor to its original
position after use.Do not put several tickets in the
ticket holder at one time. This
could cause damage to the ticket
holder.
Power outlet (if equipped)
NOTICE
i
For your safety, do not block your
view when using the sunvisor.
WARNING
OPDE046339
■
Front
OPDE046430
OPD046337
A
B