Page 551 of 767
Continued549
uuWhen Driving uShifting
Driving
In freezing or sub-freezing conditions, the gear selection response may be slow.
Always depress the brake pedal before changing the gear position to
(P, and
confirm that
(P is shown on the gear position in dicator before releasing the brake.
■When opening the driver’s door
If you open the driver’s door under the following conditions, the gear position
automatically changes to
(P;
• The vehicle is stationary with the engine running, or moving at 1 mph (2 km/h) or
slower.
• The transmission is in other than
(P.
• You have unfastened the driver side seat belt.
u If you manually change the gear position from
(P with the brake pedal
depressed, the gear position will automatically return to
(P once you release
the brake pedal.
■When turning off the power mode
If you turn the engine off wh ile the vehicle is stationary, and the transmission is in
other than
(P, the gear position au tomatically changes to (P.
Except ELITE and TOURING grade models
1When opening the driver’s door
You should always select
(P before opening the
driver’s door.
Make sure to park the vehicle in a safe place. 2 When Stopped P. 619
If you want to drive the ve hicle after the gear position
has automatically changed to
( P under the described
conditions, close the door, fasten the seat belt,
depress the brake pedal, then change the gear
position.
If you leave the vehicle, tu rn off the engine and lock
the doors.
19 ODYSSEY-31THR6120.book 549 ページ 2018年12月6日 木曜日 午後4時35分
Page 635 of 767
633
uuRefueling uHow to Refuel
Continued
Driving
How to Refuel
Your fuel tank is not equipped with a fuel filler cap. You can insert the filler nozzle
directly into the filler neck. The tank seals itself again when you pull out the filler
nozzle. 1.Stop your vehicle with the service station
pump on the left side of the vehicle in the
rear.
2. Turn off the engine.
3. Unlock the driver’s door using the master
door lock switch.
u The fuel fill door on the outer side of the
vehicle will unlock.
2 Locking/Unlocking the Doors from
the Inside P. 154
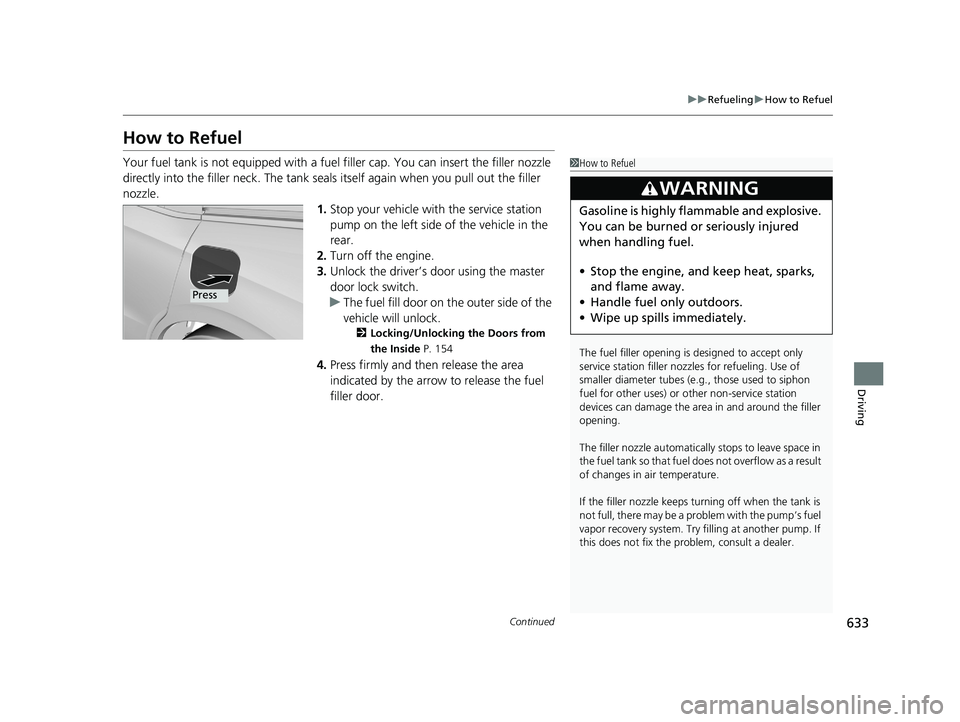
4.Press firmly and then release the area
indicated by the arrow to release the fuel
filler door.
1How to Refuel
The fuel filler opening is designed to accept only
service station filler nozzles for refueling. Use of
smaller diamet er tubes (e.g., those used to siphon
fuel for other uses) or other non-service station
devices can damage the area in and around the filler
opening.
The filler nozzle automatically stops to leave space in
the fuel tank so that fuel does not overflow as a result
of changes in air temperature.
If the filler nozzle keeps tu rning off when the tank is
not full, there may be a problem with the pump’s fuel
vapor recovery system. Try fi lling at another pump. If
this does not fix the problem, consult a dealer.
3WARNING
Gasoline is highly flammable and explosive.
You can be burned or seriously injured
when handling fuel.
• Stop the engine, and keep heat, sparks,
and flame away.
• Handle fuel only outdoors.
• Wipe up spills immediately.
Press
19 ODYSSEY-31THR6120.book 633 ページ 2018年12月6日 木曜日 午後4時35分
Page 636 of 767
uuRefueling uHow to Refuel
634
Driving
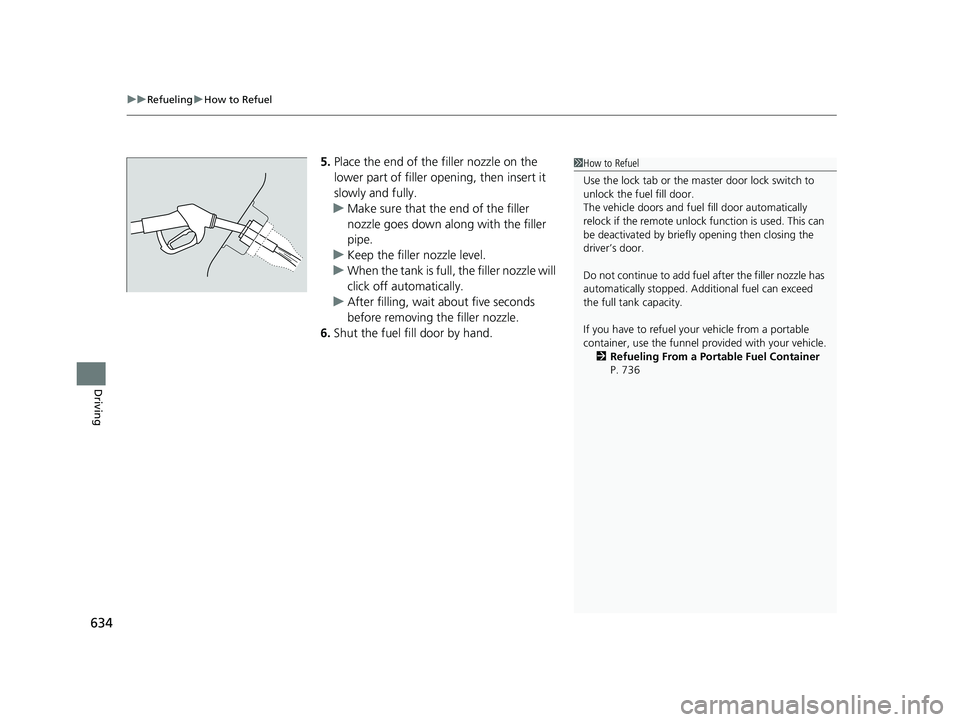
5. Place the end of the filler nozzle on the
lower part of filler opening, then insert it
slowly and fully.
u Make sure that the end of the filler
nozzle goes down along with the filler
pipe.
u Keep the filler nozzle level.
u When the tank is full, the filler nozzle will
click off automatically.
u After filling, wait about five seconds
before removing th e filler nozzle.
6. Shut the fuel fill door by hand.1How to Refuel
Use the lock tab or the ma ster door lock switch to
unlock the fuel fill door.
The vehicle doors and fuel fill door automatically
relock if the remote unlock function is used. This can
be deactivated by briefl y opening then closing the
driver’s door.
Do not continue to add fuel after the filler nozzle has
automatically stopped. Addi tional fuel can exceed
the full tank capacity.
If you have to refuel y our vehicle from a portable
container, use the funnel pr ovided with your vehicle.
2 Refueling From a Portable Fuel Container
P. 736
19 ODYSSEY-31THR6120.book 634 ページ 2018年12月6日 木曜日 午後4時35分
Page 668 of 767
666
uuReplacing Light Bulbs uFront Side Marker Light Bulbs
Maintenance
Front Side Marker Light Bulbs
When replacing, use the following bulb.
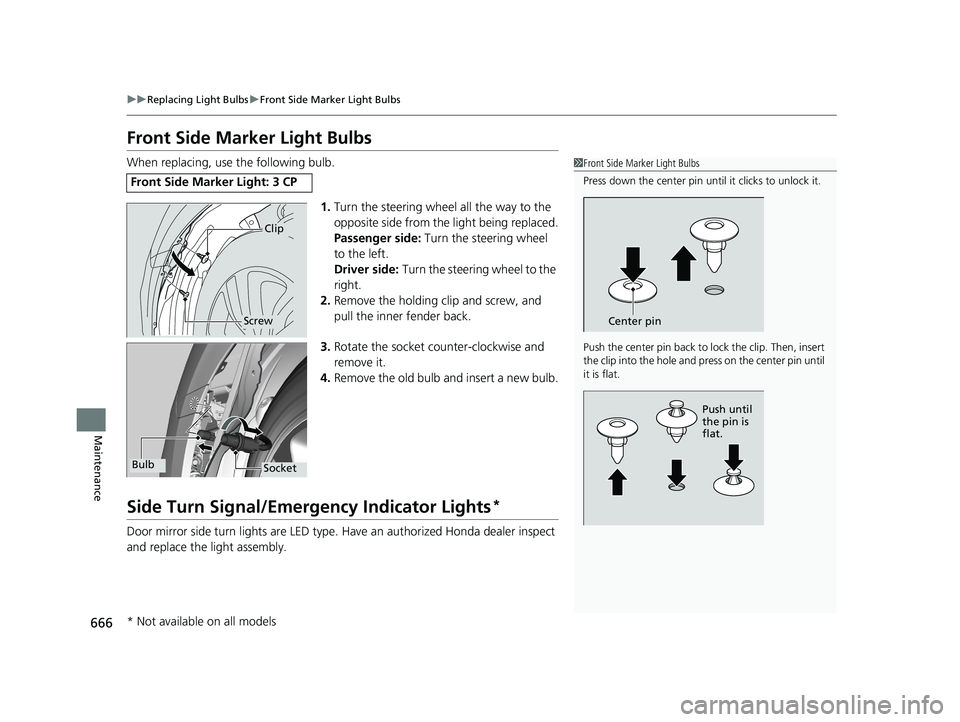
1.Turn the steering wheel all the way to the
opposite side from the light being replaced.
Passenger side: Turn the steering wheel
to the left.
Driver side: Turn the steering wheel to the
right.
2. Remove the holding clip and screw, and
pull the inner fender back.
3. Rotate the socket co unter-clockwise and
remove it.
4. Remove the old bulb and insert a new bulb.
Side Turn Signal/Emergency Indicator Lights*
Door mirror side turn lights are LED type. Have an authorized Honda dealer inspect
and replace the light assembly.
Front Side Marker Light: 3 CP
1 Front Side Marker Light Bulbs
Press down the center pin until it clicks to unlock it.
Push the center pin back to lock the clip. Then, insert
the clip into the hole and press on the center pin until
it is flat.
Center pin
Push until
the pin is
flat.
Clip
Screw
SocketBulb
* Not available on all models
19 ODYSSEY-31THR6120.book 666 ページ 2018年12月6日 木曜日 午後4時35分
Page 701 of 767
699
Handling the Unexpected
This chapter explains how to handle unexpected troubles.
ToolsTypes of Tools .................................. 700
If a Tire Goes Flat Changing a Flat Tire ......................... 701
Engine Does Not Start Checking the Engine ........................ 710
If the Remote Battery is Weak .......... 711
Emergency Engine Stop ................... 712
Jump Starting .................................... 713
Overheating How to Handle Overheating ............. 715
Indicator, Coming On/Blinking
If the Low Oil Pressure Symbol Appears... 718
If the Charging System Indicator Comes On ................................................. 718
If the Malfunction Indicator Lamp Comes
On or Blinks ................................... 719
If the Brake System Indicator (Red) Comes On or Blinks ................................... 720
If the Brake System Indicator (Red) Comes On or Blinks at the Same Time When the Brake
System Indicator (Amber) Comes On ..... 721
If the Electric Power Steering (EPS) System Indicator Comes On ....................... 722
If the Low Tire Pressure/TPMS Indicator
Comes On or Blinks........................ 722 If the Transmission System Indicator Blinks
along with the Warning Message... 723
Fuses
Fuse Locations ................................. 724
Inspecting and Changing Fuses ........ 730
Emergency Towing ........................... 731
When You Cannot Unlock the Fuel Fill Door ................................................. 732When You Cannot Open the Tailgate..... 733When You Cannot Close the Power
Sliding Doors*................................. 735
Refueling
Refueling From a Portable Fuel Container .... 736
* Not available on all models
19 ODYSSEY-31THR6120.book 699 ページ 2018年12月6日 木曜日 午後4時35分
Page 728 of 767
726
uuFuses uFuse Locations
Handling the Unexpected
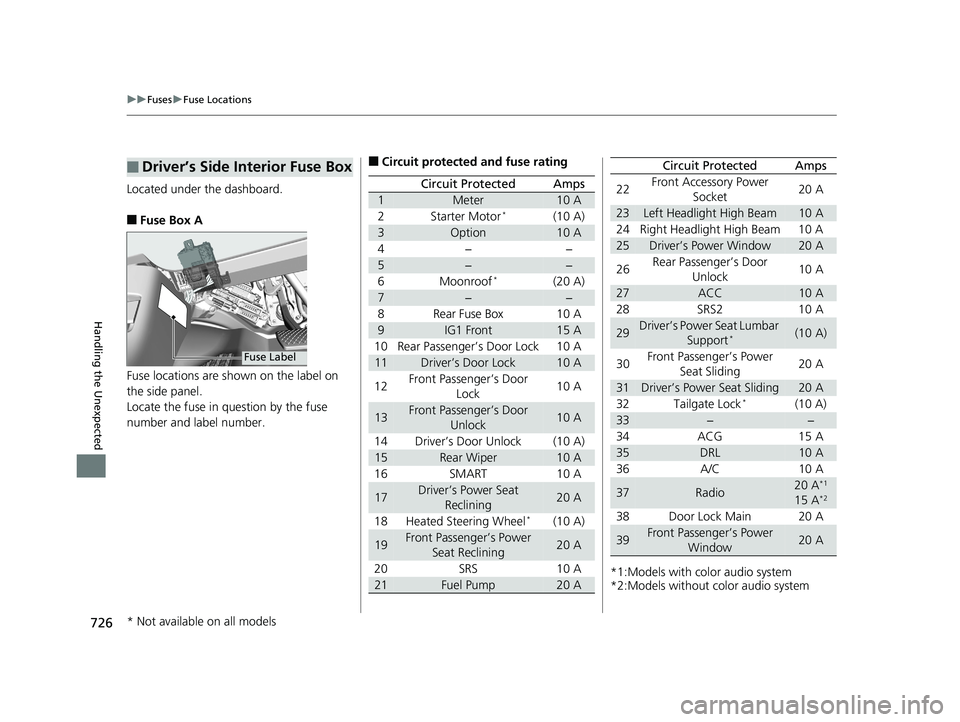
Located under the dashboard.
■Fuse Box A
Fuse locations are shown on the label on
the side panel.
Locate the fuse in question by the fuse
number and label number.
■Driver’s Side Interior Fuse Box
Fuse Label
■Circuit protected and fuse rating
Circuit ProtectedAmps
1Meter10 A
2Starter Motor*(10 A)
3Option10 A
4−−
5−−
6Moonroof*(20 A)
7−−
8Rear Fuse Box10 A
9IG1 Front15 A
10 Rear Passenger’s Door Lock 10 A
11Driver’s Door Lock10 A
12 Front Passenger’s Door
Lock 10 A
13Front Passenger’s Door
Unlock10 A
14 Driver’s Door Unlock (10 A)
15Rear Wiper10 A
16 SMART 10 A
17Driver’s Power Seat Reclining20 A
18 Heated Steering Wheel
*(10 A)
19Front Passenger’s Power Seat Reclining20 A
20 SRS 10 A
21Fuel Pump20 A*1:Models with color audio system
*2:Models without color audio system22
Front Accessory Power
Socket 20 A
23Left Headlight High Beam10 A
24 Right Headlight High Beam 10 A
25Driver’s Power Window20 A
26 Rear Passenger’s Door
Unlock 10 A
27ACC10 A
28 SRS2 10 A
29Driver’s Power Seat Lumbar Support*(10 A)
30 Front Passenger’s Power
Seat Sliding 20 A
31Driver’s Power Seat Sliding20 A
32 Tailgate Lock*(10 A)
33−−
34 ACG 15 A
35DRL10 A
36 A/C 10 A
37Radio20 A*1
15 A*2
38 Door Lock Main 20 A
39Front Passenger’s Power Window20 A
Circuit ProtectedAmps
* Not available on all models
19 ODYSSEY-31THR6120.book 726 ページ 2018年12月6日 木曜日 午後4時35分
Page 731 of 767
729
uuFuses uFuse Locations
Handling the Unexpected
Located on the left side of cargo area. Take
off the cover to open.
Fuse locations are shown on the fuse box
cover.
Locate the fuse in question by the fuse
number and box cover number.
■Rear Side Interior Fuse Box■Circuit protected and fuse rating
Circuit ProtectedAmps
1Rear Driver’s Side Door
Lock10 A
2Passenger’s Side Power Sliding Door Closer*(20 A)
3Power Tailgate Closer Motor*(20 A)
4Cargo Area’s Accessory
Power Socket20 A
5Fuel Fill Door10 A
6−−
7Driver’s Side Power Sliding Door Closer*(20 A)
8−−
9−−
10 − −
11−−
12 − −
13−−
14 Passenger’s Side Power
Sliding Door Motor
*(30 A)
15−−
16 Power Tailgate Motor*(40 A)
17−−
18 − −
19Driver’s Side Power Sliding
Door Motor*(30 A)
* Not available on all models
19 ODYSSEY-31THR6120.book 729 ページ 2018年12月6日 木曜日 午後4時35分
Page 734 of 767
732
Handling the Unexpected
When You Cannot Unlock the Fuel Fill Door
If you cannot unlock the fuel fill door, use the following procedure:1.Open the tailgate and remove the cover on
the left side of cargo area.
2. Pull the yellow releas e cord (as shown).
u The release cord opens the fuel fill door
when it is pulled.
■What to Do When Unable to Unlock the Fuel Fill Door1 When You Cannot Unlo ck the Fuel Fill Door
After taking these steps, contact a dealer to have
your vehicle checked.
Cover
Release Cord
19 ODYSSEY-31THR6120.book 732 ページ 2018年12月6日 木曜日 午後4時35分