2019 GMC ACADIA instrument cluster
[x] Cancel search: instrument clusterPage 3 of 20

3
Refer to your Owner’s Manual to learn about the information being relayed by the lights, gauges and indicators on the instrument cluster.
See In Brief in your Owner’s Manual.
Infotainment System Touch ScreenInfotainment System Controls
Traction Control and StabiliTrak Button
Driver’s Heated/Ventilated Seat ButtonsF
Hazard Warning Flashers Button
USB Ports/Accessory Power Outlet
Climate Controls
Passenger’s Heated/Ventilated Seat ButtonsF
IntelliBeam Lighting
Lights On Reminder
Antilock Brake System Warning
Low Tire Pressure
Power Steering Warning
Vehicle Ahead
StabiliTrak Off
2 Passenger Seat Belt Reminder
F Optional equipment
Page 9 of 20

9
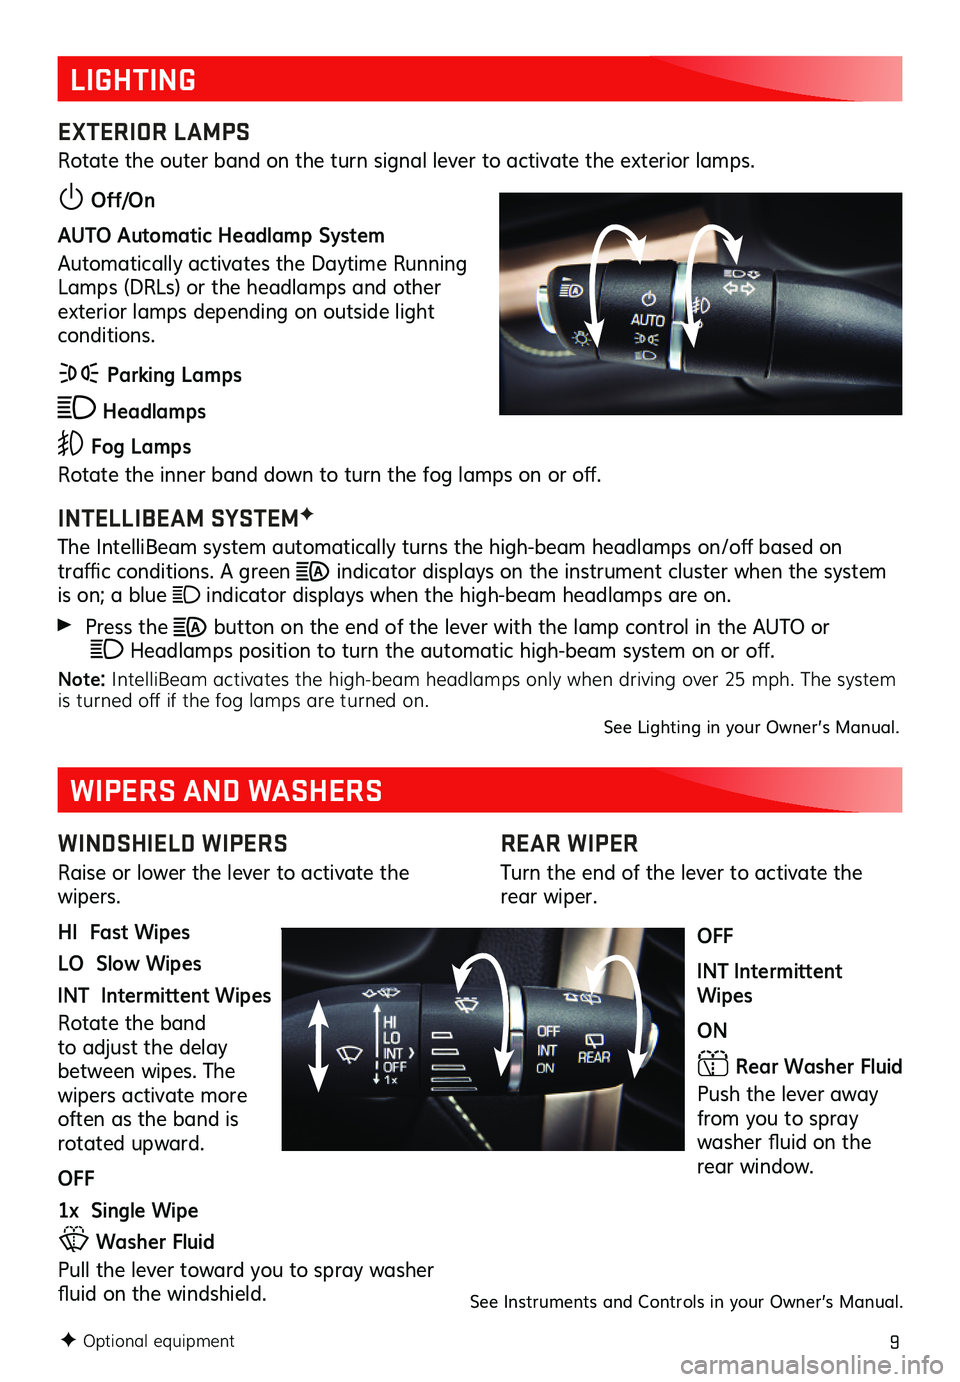
REAR WIPER
Turn the end of the lever to activate the rear wiper.
OFF
INT Intermittent Wipes
ON
Rear Washer Fluid
Push the lever away from you to spray washer fluid on the rear window.
LIGHTING
EXTERIOR LAMPS
Rotate the outer band on the turn signal lever to activate the exterior lamps.
Off/On
AUTO Automatic Headlamp System
Automatically activates the Daytime Running Lamps (DRLs) or the headlamps and other exterior lamps depending on outside light conditions.
Parking Lamps
Headlamps
Fog Lamps
Rotate the inner band down to turn the fog lamps on or off.
INTELLIBEAM SYSTEMF
The IntelliBeam system automatically turns the high-beam headlamps on/off based on
traffic conditions. A green indicator displays on the instrument cluster when the system is on; a blue indicator displays when the high-beam headlamps are on.
Press the button on the end of the lever with the lamp control in the AUTO or Headlamps position to turn the automatic high-beam system on or off.
Note: IntelliBeam activates the high-beam headlamps only when driving over 25 mph. The system is turned off if the fog lamps are turned on.See Lighting in your Owner’s Manual.
F Optional equipment
WINDSHIELD WIPERS
Raise or lower the lever to activate the wipers.
HI Fast Wipes
LO Slow Wipes
INT Intermittent Wipes
Rotate the band to adjust the delay between wipes. The
wipers activate more often as the band is rotated upward.
OFF
1x Single Wipe
Washer Fluid
Pull the lever toward you to spray washer fluid on the windshield.
WIPERS AND WASHERS
See Instruments and Controls in your Owner’s Manual.
Page 11 of 20

11
DRIVER INFORMATION CENTER (DIC)
AUDIO STEERING WHEEL CONTROLS
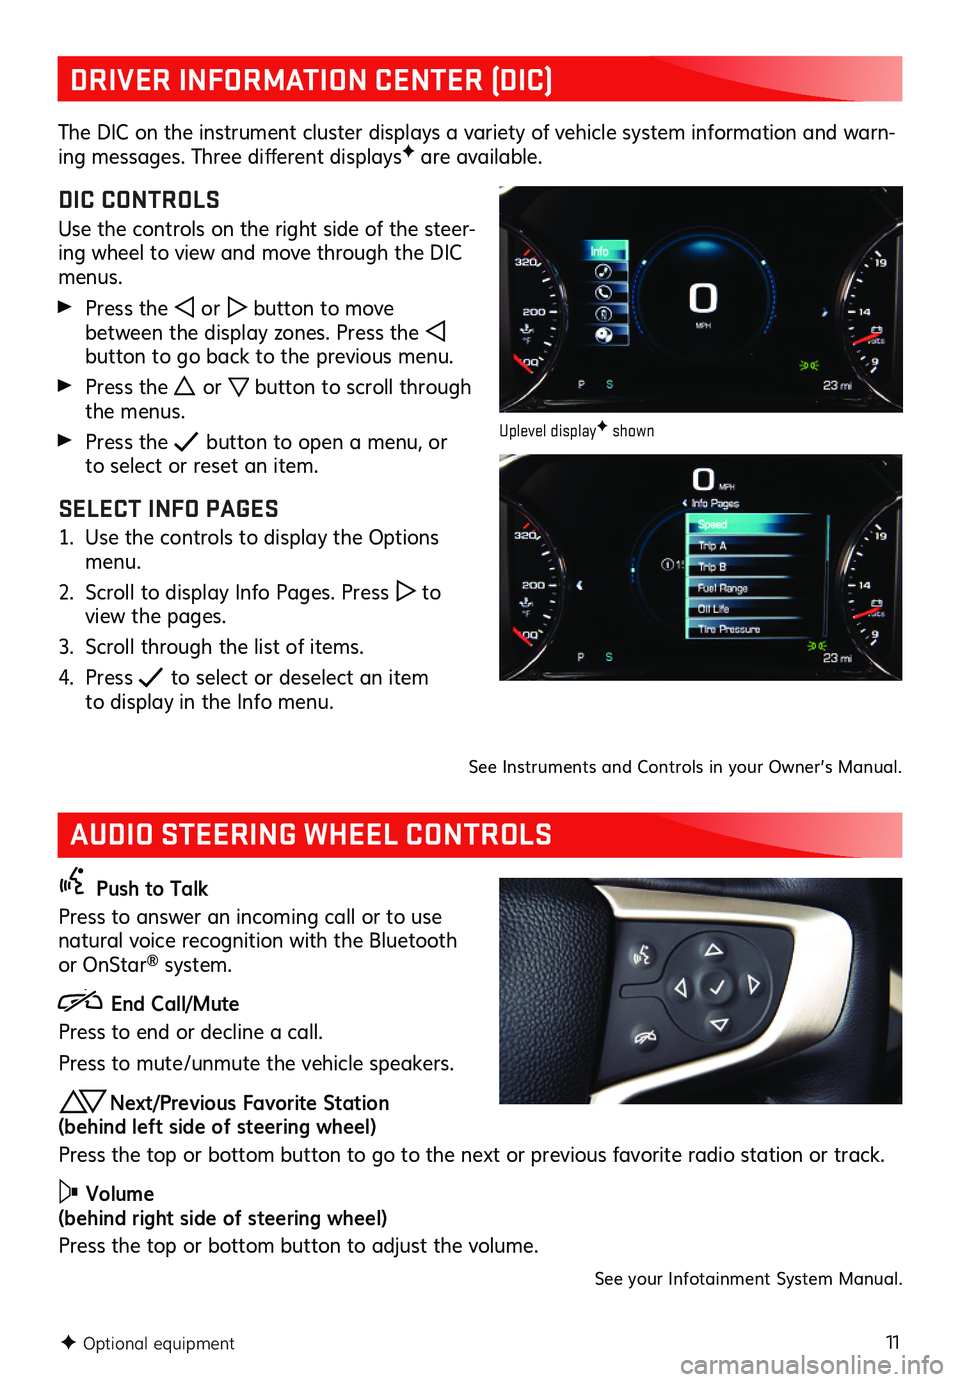
The DIC on the instrument cluster displays a variety of vehicle system information and warn-ing messages. Three different displaysF are available.
DIC CONTROLS
Use the controls on the right side of the steer-ing wheel to view and move through the DIC menus.
Press the or button to move between the display zones. Press the button to go back to the previous menu.
Press the or button to scroll through the menus.
Press the button to open a menu, or to select or reset an item.
SELECT INFO PAGES
1. Use the controls to display the Options menu.
2. Scroll to display Info Pages. Press to view the pages.
3. Scroll through the list of items.
4. Press to select or deselect an item to display in the Info menu.
Push to Talk
Press to answer an incoming call or to use natural voice recognition with the Bluetooth or OnStar® system.
End Call/Mute
Press to end or decline a call.
Press to mute/unmute the vehicle speakers.
Next/Previous Favorite Station (behind left side of steering wheel)
Press the top or bottom button to go to the next or previous favorite radio station or track.
Volume (behind right side of steering wheel)
Press the top or bottom button to adjust the volume.
See your Infotainment System Manual.
F Optional equipment
Uplevel displayF shown
See Instruments and Controls in your Owner’s Manual.
Page 15 of 20

15F Optional equipment
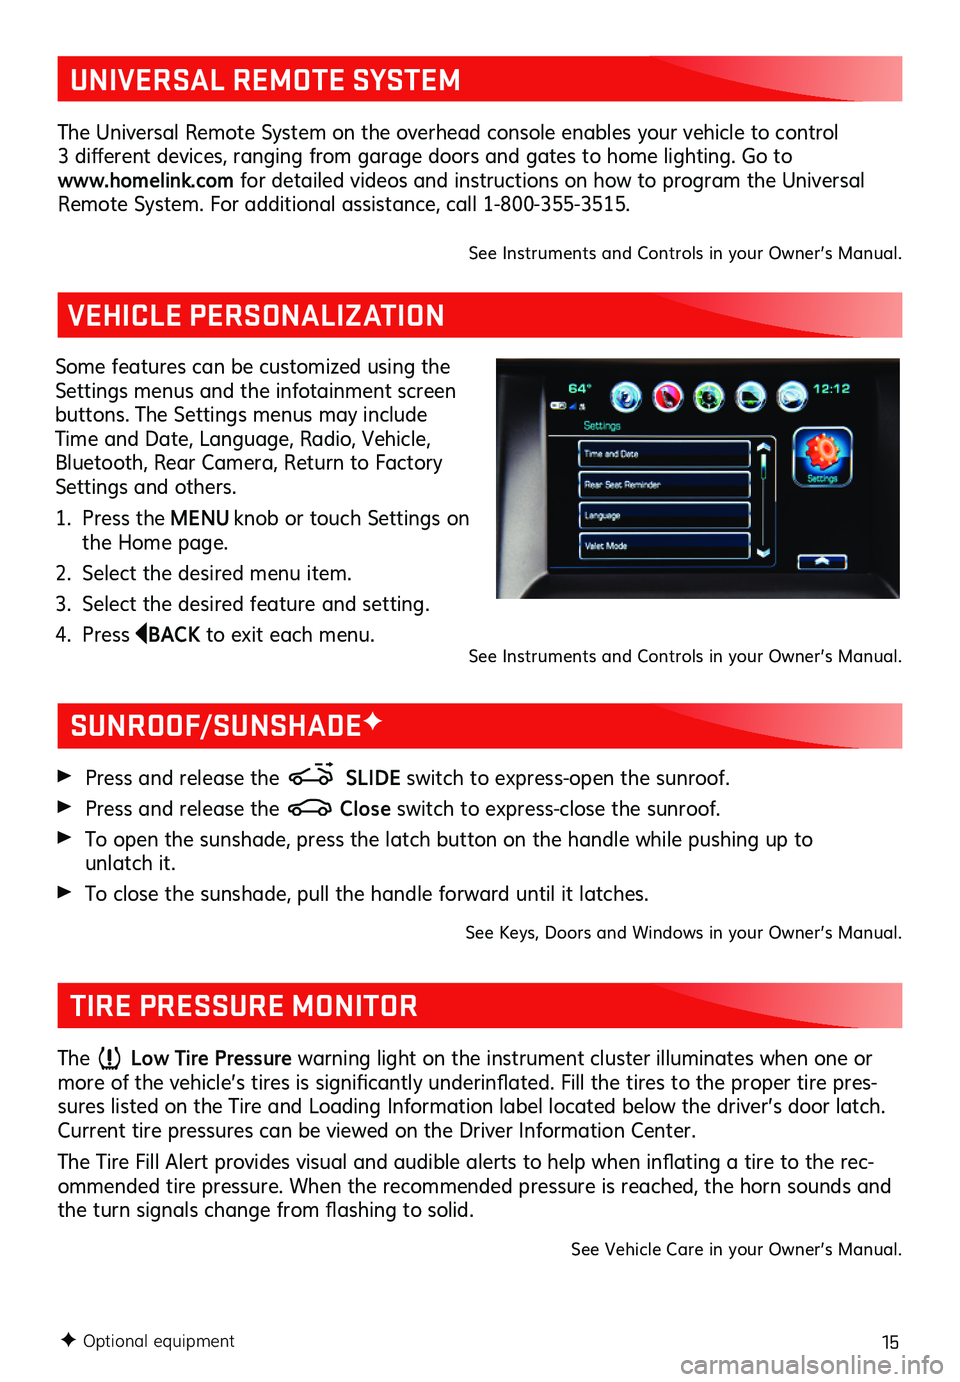
VEHICLE PERSONALIZATION
Some features can be customized using the Settings menus and the infotainment screen buttons. The Settings menus may include Time and Date, Language, Radio, Vehicle, Bluetooth, Rear Camera, Return to Factory Settings and others.
1. Press the MENU knob or touch Settings on the Home page.
2. Select the desired menu item.
3. Select the desired feature and setting.
4. Press BACK to exit each menu.
SUNROOF/SUNSHADEF
TIRE PRESSURE MONITOR
Press and release the SLIDE switch to express-open the sunroof.
Press and release the Close switch to express-close the sunroof.
To open the sunshade, press the latch button on the handle while pushing up to unlatch it.
To close the sunshade, pull the handle forward until it latches.
See Keys, Doors and Windows in your Owner’s Manual.
The Low Tire Pressure warning light on the instrument cluster illuminates when one or more of the vehicle’s tires is significantly underinflated. Fill the tires to the proper tire pres-sures listed on the Tire and Loading Information label located below the driver’s door latch. Current tire pressures can be viewed on the Driver Information Center.
The Tire Fill Alert provides visual and audible alerts to help when inflating a tire to the rec-ommended tire pressure. When the recommended pressure is reached, the horn sounds and the turn signals change from flashing to solid.
See Vehicle Care in your Owner’s Manual.
See Instruments and Controls in your Owner’s Manual.
UNIVERSAL REMOTE SYSTEM
The Universal Remote System on the overhead console enables your vehicle to control 3 different devices, ranging from garage doors and gates to home lighting. Go to www.homelink.com for detailed videos and instructions on how to program the Universal Remote System. For additional assistance, call 1-800-355-3515.
See Instruments and Controls in your Owner’s Manual.
Page 18 of 20

18
CRUISE CONTROL
AUTOMATIC TRANSMISSION
SETTING CRUISE CONTROL
1. Press the On/Off button. The Cruise Control symbol will illuminate in white on the instrument cluster.
2. When traveling at the desired speed, press the SET– button to set the speed. The symbol will illuminate in green on the instrument cluster.
ADJUSTING CRUISE CONTROL
RES+ Resume/Accelerate
Press to resume a set speed. When the
system is active, press to increase speed.
SET– Set/Coast
When the system is active, press to decrease speed.
Cancel
Press to cancel the Cruise Control without erasing the set speed from memory. Pressing the brake pedal will also cancel the Cruise Control.
The set speed is erased when Cruise Control or the vehicle ignition is turned off.
ADAPTIVE CRUISE CONTROLF
The system maintains the Cruise Control set speed and a following gap — the time between your vehicle and a vehicle detected directly ahead — by accelerating or braking automati-cally while you continue to steer.
Following Gap
Press to select a following gap setting of Far, Medium, or Near. This is also the Forward Collision AlertF setting.See Driving and Operating in your Owner’s Manual.
ELECTRONIC RANGE SELECT MODE
Electronic Range Select Mode allows you to choose the top gear limit. It can be used to limit the vehicle’s speed when driving on a downhill grade or towing a trailer.
1. Move the shift lever to L (Manual Mode).
2. Press the + (plus) or – (minus) button on the shift lever to increase or decrease the gear range available. The current gear will be displayed on the Driver Information Center.
If vehicle speed is too high or too low for the requested gear, the shift will not occur.
See Driving and Operating in your Owner’s Manual.
F Optional equipment
Page 19 of 20

19
TRACTION SELECT
The Traction Select system automatically adjusts various vehicle controls based on driv-ing preferences, weather and road conditions.
Rotate the Traction Select knob on the
center console to select:
Tour
All-Wheel Drive (AWD models only)
Sport
Snow/Ice (front-wheel drive models only)
Off-Road (AWD models only)
Tow/Haul
The AWD indicator will illuminate when an AWD mode is selected.
If the vehicle is in Tour or AWD mode, it will stay in that mode through future ignition cycles.
See Driving and Operating in your Owner’s Manual.
F Optional equipment
ACTIVE TOWF
HILL DESCENT CONTROLF
REAR VISION CAMERA CENTER GUIDELINE
Active Tow displays a center guideline on the Rear Vision Camera display to help align the vehicle’s hitch barF with a trailer coupler.
1. Touch the Camera button on the infotainment screen.
2. On the Rear Vision Camera display screen, select the trailer guidance line button to view the center guideline.
TRAILER VIEW
To check the trailer when driving above 5 mph, touch the Camera button on the infotain-ment screen. The Rear View Camera displays the rear view of the vehicle. Press X to exit the view. The view is exited automatically after 8 seconds.
See Driving and Operating in your Owner’s Manual.
Hill Descent Control sets and maintains vehicle speed from 2–14 mph while descending a very steep incline in a forward or reverse gear.
Press the Hill Descent Control button on the center console. Vehicle speed must be below 31 mph to turn on the system.
Increase or decrease speed by applying the accelerator or brake pedal, or use the Cruise Control +/– buttons on the steering wheel. The adjusted speed becomes the new set speed. The symbol flashes on the instrument cluster when the system is actively applying the brakes to maintain vehicle speed.
See Driving and Operating in your Owner’s Manual.