2019 GMC ACADIA wheel
[x] Cancel search: wheelPage 2 of 20

2
Memory Seat Buttons
Instrument Panel Illumination Control
Turn Signal Lever/Exterior Lamp Controls/IntelliBeam ButtonFWindshield Wipers Lever
Engine Start-Stop Button
Driver Information Center
Power Liftgate Control
Cruise Control/Forward Collision AlertF/Heated Steering WheelF Buttons
Power Mirror/ Window Controls
Audio Volume Controls (behind steering wheel)
Driver Information Center Controls/Voice Recognition Buttons
Audio Next-Previous Favorite Station Controls (behind steering wheel)
Steering Wheel Adjustment Lever
Electric Parking Brake Switch
INSTRUMENT PANEL
Check Engine
Engine Oil Pressure
Lane Keep Assist
Airbag Readiness
Cruise Control Set
Service Electric Parking Brake
Traction Control/StabiliTrak Active
Charging System
Security
Seat Belt Reminder
Brake System Warning
BRAKE Electric Parking Brake
Symbols
Page 6 of 20
6
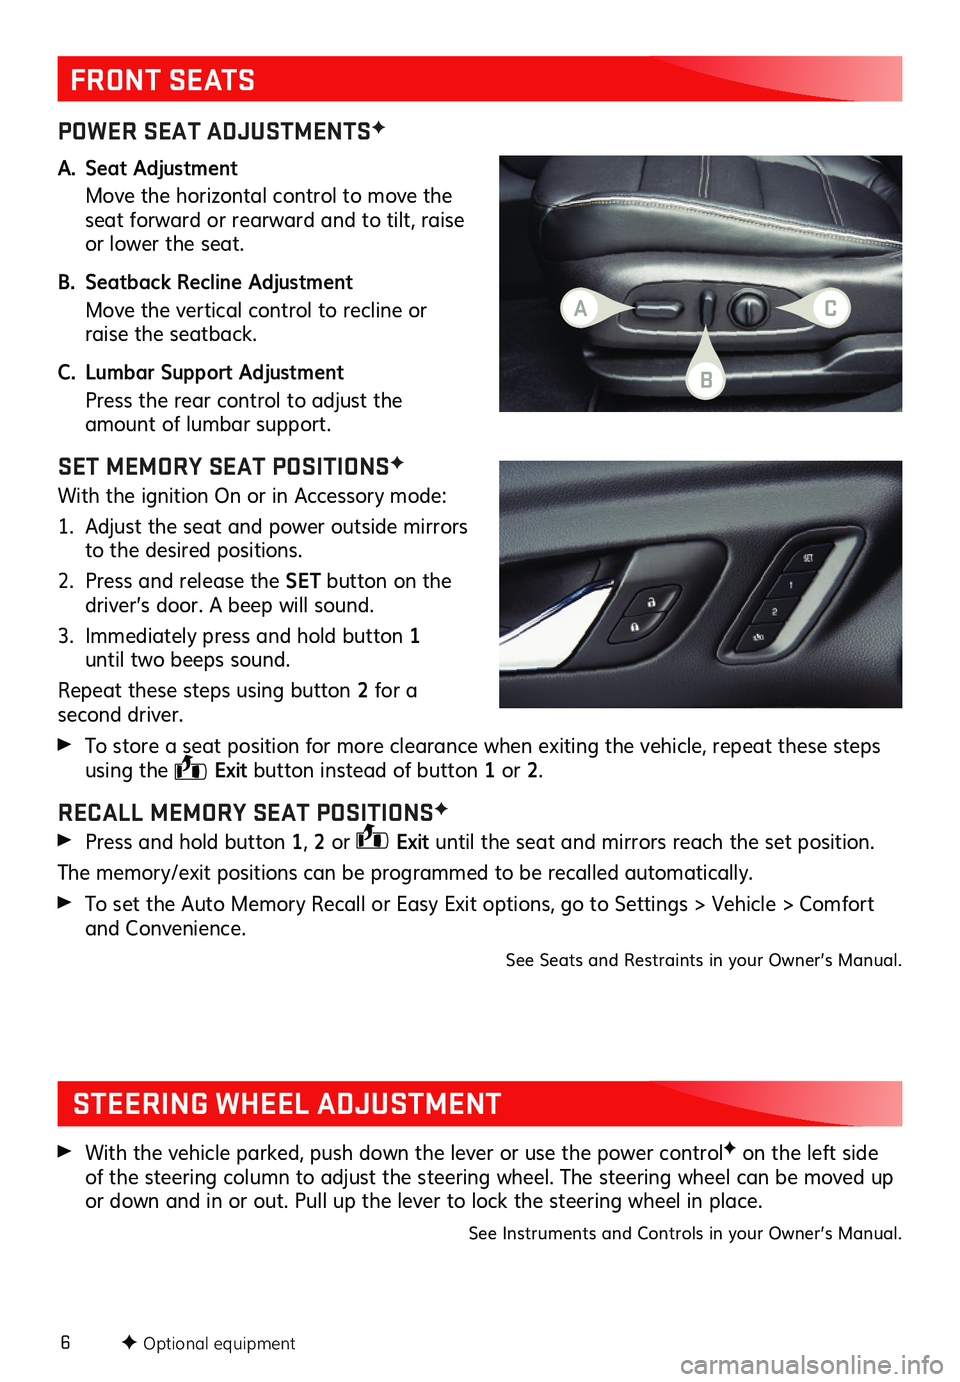
POWER SEAT ADJUSTMENTSF
A. Seat Adjustment
Move the horizontal control to move the seat forward or rearward and to tilt, raise or lower the seat.
B. Seatback Recline Adjustment
Move the vertical control to recline or raise the seatback.
C. Lumbar Support Adjustment
Press the rear control to adjust the amount of lumbar support.
SET MEMORY SEAT POSITIONSF
With the ignition On or in Accessory mode:
1. Adjust the seat and power outside mirrors to the desired positions.
2. Press and release the SET button on the driver’s door. A beep will sound.
3. Immediately press and hold button 1 until two beeps sound.
Repeat these steps using button 2 for a second driver.
To store a seat position for more clearance when exiting the vehicle, repeat these steps using the Exit button instead of button 1 or 2.
RECALL MEMORY SEAT POSITIONSF
Press and hold button 1, 2 or Exit until the seat and mirrors reach the set position.
The memory/exit positions can be programmed to be recalled automatically.
To set the Auto Memory Recall or Easy Exit options, go to Settings > Vehicle > Comfort and Convenience.
See Seats and Restraints in your Owner’s Manual.
FRONT SEATS
STEERING WHEEL ADJUSTMENT
With the vehicle parked, push down the lever or use the power controlF on the left side of the steering column to adjust the steering wheel. The steering wheel can be moved up or down and in or out. Pull up the lever to lock the steering wheel in place.
See Instruments and Controls in your Owner’s Manual.
F Optional equipment
AC
B
Page 10 of 20
10
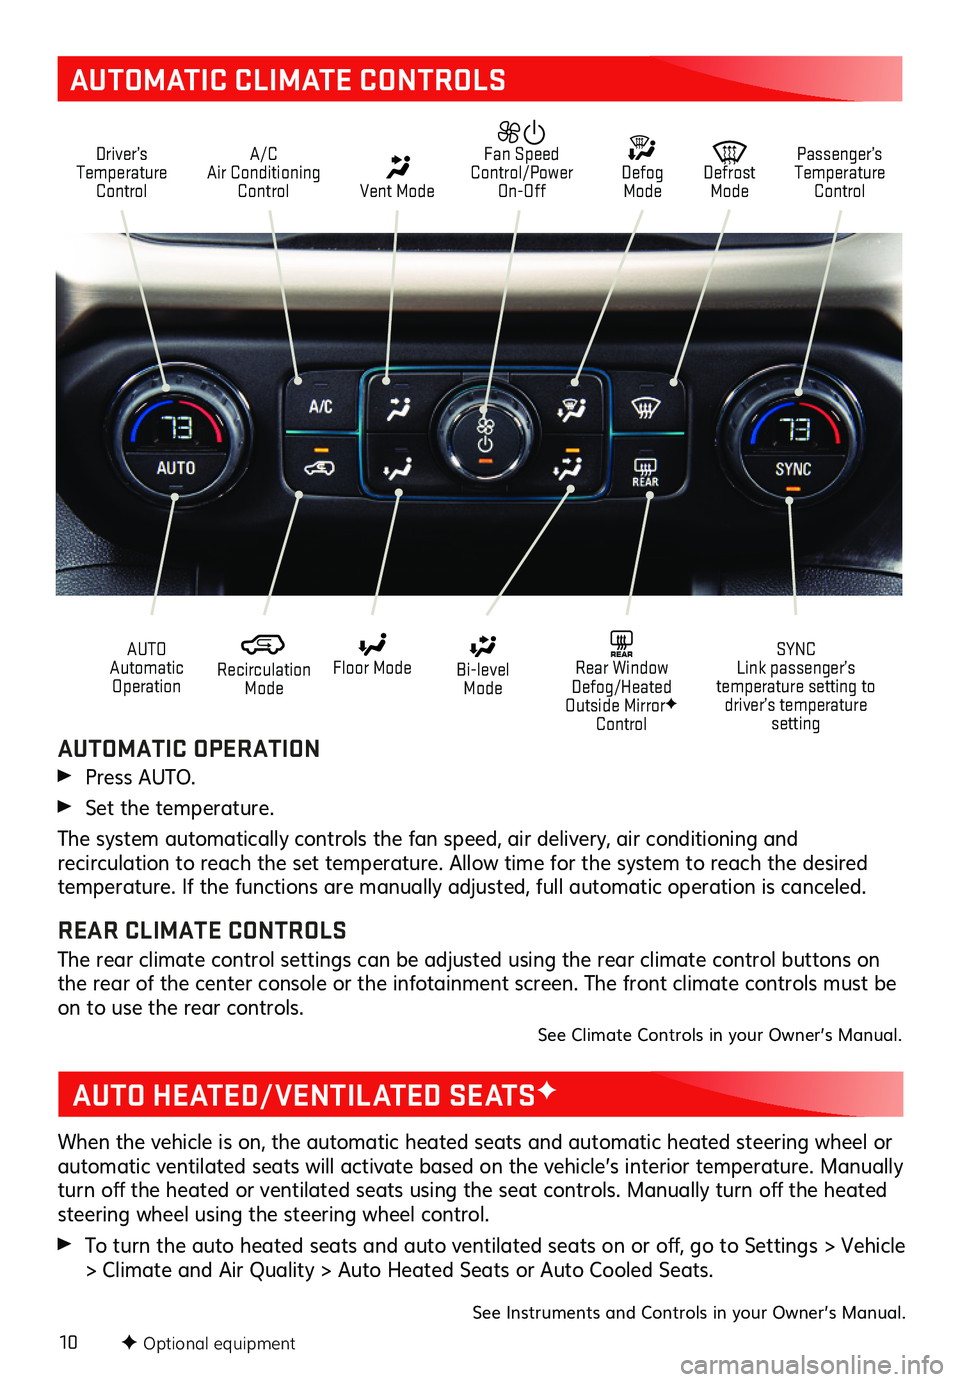
AUTOMATIC CLIMATE CONTROLS
Driver’s Temperature Control
A/C Air Conditioning Control Vent Mode
Defrost Mode
Defog Mode
Passenger’s Temperature Control
Fan Speed Control/Power On-Off
Recirculation Mode
Floor Mode Bi-level Mode
SYNC Link passenger’s temperature setting to driver’s temperature setting
REAR Rear Window Defog/Heated Outside MirrorF Control
AUTO Automatic Operation
F Optional equipment
AUTOMATIC OPERATION
Press AUTO.
Set the temperature.
The system automatically controls the fan speed, air delivery, air conditioning and
recirculation to reach the set temperature. Allow time for the system to reach the desired temperature. If the functions are manually adjusted, full automatic operation is canceled.
REAR CLIMATE CONTROLS
The rear climate control settings can be adjusted using the rear climate control buttons on the rear of the center console or the infotainment screen. The front climate controls must be on to use the rear controls.See Climate Controls in your Owner’s Manual.
AUTO HEATED/VENTILATED SEATSF
When the vehicle is on, the automatic heated seats and automatic heated steering wheel or automatic ventilated seats will activate based on the vehicle’s interior temperature. Manually turn off the heated or ventilated seats using the seat controls. Manually turn off the heated steering wheel using the steering wheel control.
To turn the auto heated seats and auto ventilated seats on or off, go to Settings > Vehicle > Climate and Air Quality > Auto Heated Seats or Auto Cooled Seats.
See Instruments and Controls in your Owner’s Manual.
Page 11 of 20
11
DRIVER INFORMATION CENTER (DIC)
AUDIO STEERING WHEEL CONTROLS
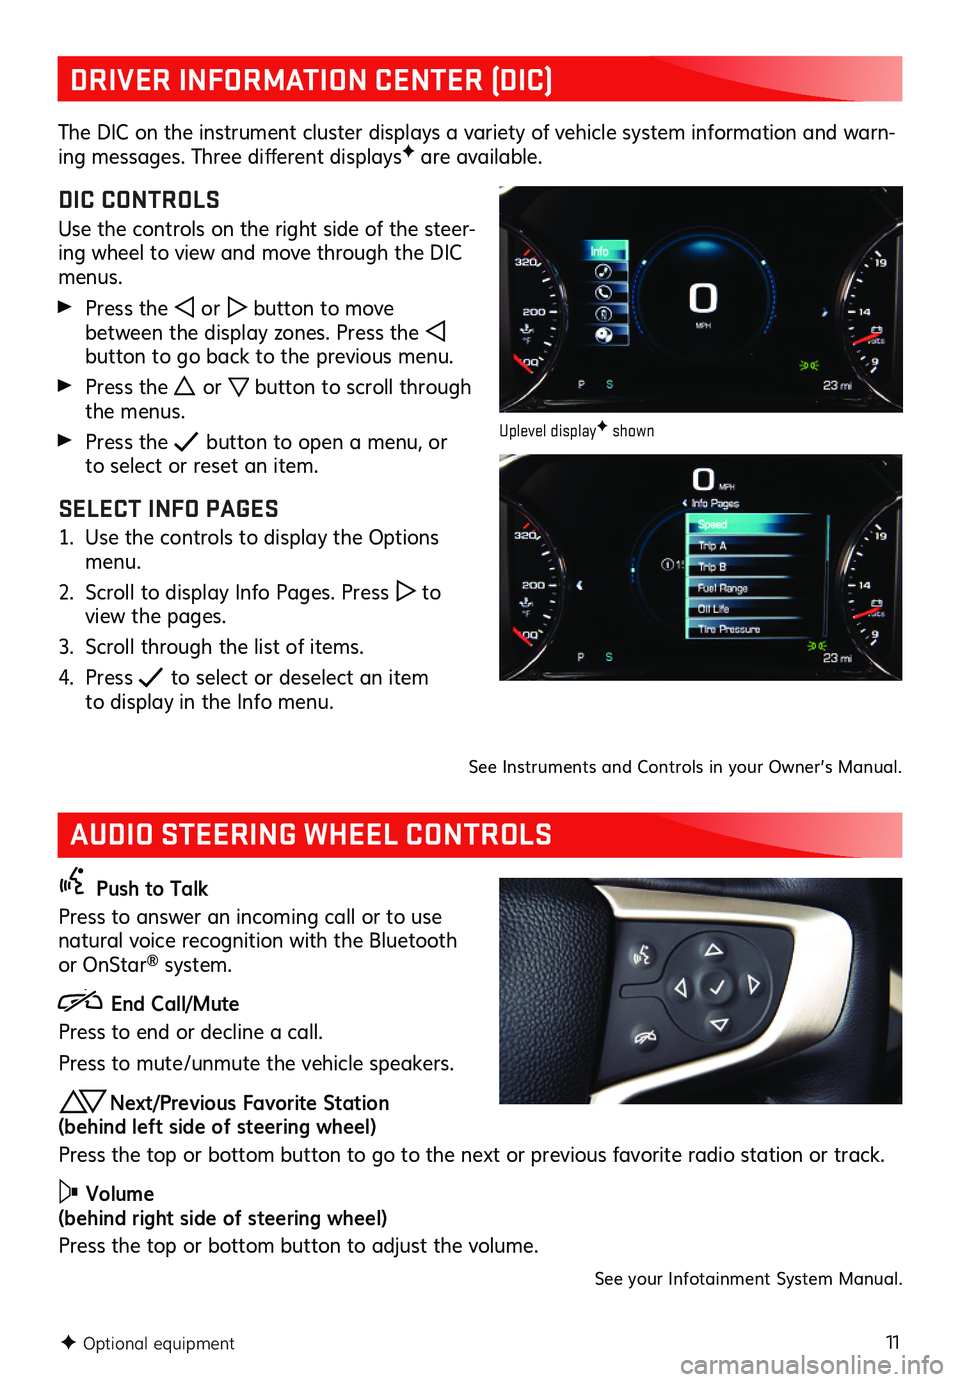
The DIC on the instrument cluster displays a variety of vehicle system information and warn-ing messages. Three different displaysF are available.
DIC CONTROLS
Use the controls on the right side of the steer-ing wheel to view and move through the DIC menus.
Press the or button to move between the display zones. Press the button to go back to the previous menu.
Press the or button to scroll through the menus.
Press the button to open a menu, or to select or reset an item.
SELECT INFO PAGES
1. Use the controls to display the Options menu.
2. Scroll to display Info Pages. Press to view the pages.
3. Scroll through the list of items.
4. Press to select or deselect an item to display in the Info menu.
Push to Talk
Press to answer an incoming call or to use natural voice recognition with the Bluetooth or OnStar® system.
End Call/Mute
Press to end or decline a call.
Press to mute/unmute the vehicle speakers.
Next/Previous Favorite Station (behind left side of steering wheel)
Press the top or bottom button to go to the next or previous favorite radio station or track.
Volume (behind right side of steering wheel)
Press the top or bottom button to adjust the volume.
See your Infotainment System Manual.
F Optional equipment
Uplevel displayF shown
See Instruments and Controls in your Owner’s Manual.
Page 13 of 20
13
INFOTAINMENT SYSTEM
SETTING THE TIME
1. Touch Settings on the Home page.
2. Touch Time and Date.
3. Touch Set Time.
4. Touch the arrows to adjust the hours and minutes.
5. Press the BACK button to exit the menu.
STORING FAVORITES
Radio stations from all bands (AM, FM or SiriusXMF), media (song, artist, etc.), phone
contacts and navigation destinationsF can be stored in any order on the favorites list.
1. Display the desired radio station, media favorite, contact or destination.
2. Touch the Interaction Selector at the bottom of the screen to display the favorite screen buttons.
3. Touch and hold one of the favorite screen buttons until a beep is heard.
4. Repeat the steps to store another favorite item.
Note: To change the number of favorites displayed, go to Settings > Radio.
NATURAL VOICE RECOGNITIONF
Control the music source and make phone calls hands-free (after pairing your Bluetooth-enabled phone) using the natural voice recognition system.
1. Press the Push to Talk button on the steering wheel.
2. The radio will play a prompt followed by a beep.
3. After the beep, say what you want it to do using natural speech.
• Example Phone command (using your paired phone): “Call Amanda” or “Call 555-1212”
• Example Media Music Device Search command (when connected to USB only): “Play artist [name]” or “Play song [name]”
• Example Radio command: “Tune FM 104.3” or “Tune XM Classic Vinyl”
• Help: Say “Help” for voice recognition assistance
VOICE PASS-THRU
Voice Pass-Thru allows access to the voice recognition commands on a compatible cell phone; i.e. Siri or Voice Command. Visit my.gmc.com/ learn for more information.
To activate phone voice recognition, press and hold the Push to Talk button on the steering wheel for 2 seconds.
PORTABLE AUDIO DEVICES
USB ports and accessory power outlets are located in the vehicle to connect portable audio devices. Use the USB ports to connect and charge mobile devices.
Connect an iPod®, iPhone®, MP3 Player, or a USB flash drive to a USB port. Search for music on-screen or by voice commands. Some USB ports are for charging only.
Touch the Audio icon or press the MEDIA buttonF to select a portable device as the audio source.See Infotainment System in your Owner’s Manual.
F Optional equipment
Page 14 of 20
14
BLUETOOTH® SYSTEM
4G LTE WI-FI® HOTSPOT
With the vehicle’s built-in Wi-Fi hotspot, up to 7 devices (smartphones, tablets and laptops) can be connected to high-speed internet using the 4G LTE signal.
To retrieve the SSID and password for the hotspot, go to Settings > Wi-Fi > Manage Wi-Fi Networks.
Note: For more information on use and system limitations, visit my.gmc.com/ learn.
See Instruments and Controls in your Owner’s Manual.
Before using a Bluetooth-enabled device in the vehicle, it must be paired with the in- vehicle Bluetooth system. The pairing process is disabled when the vehicle is moving. Not all devices will support all functions. Visit my.gmc.com/ learn for more information.
PAIR A PHONE
1. To use voice recognition, press the Push to Talk button on the steering wheel; after the beep, say “Pair Phone”; or use the infotainment screen to select the Phone icon > Phones > Pair Device.
2. Start the pairing process on the phone. From your phone’s Bluetooth settings, select the name shown on the infotainment screen.
3. Confirm the codes that appear on the infotainment screen and the phone.
4. When pairing is complete, the phone screen is displayed. Your phone book may be down-loaded depending on the phone. See Infotainment System in your Owner’s Manual.
INFOTAINMENT SYSTEM
APPLE CARPLAY
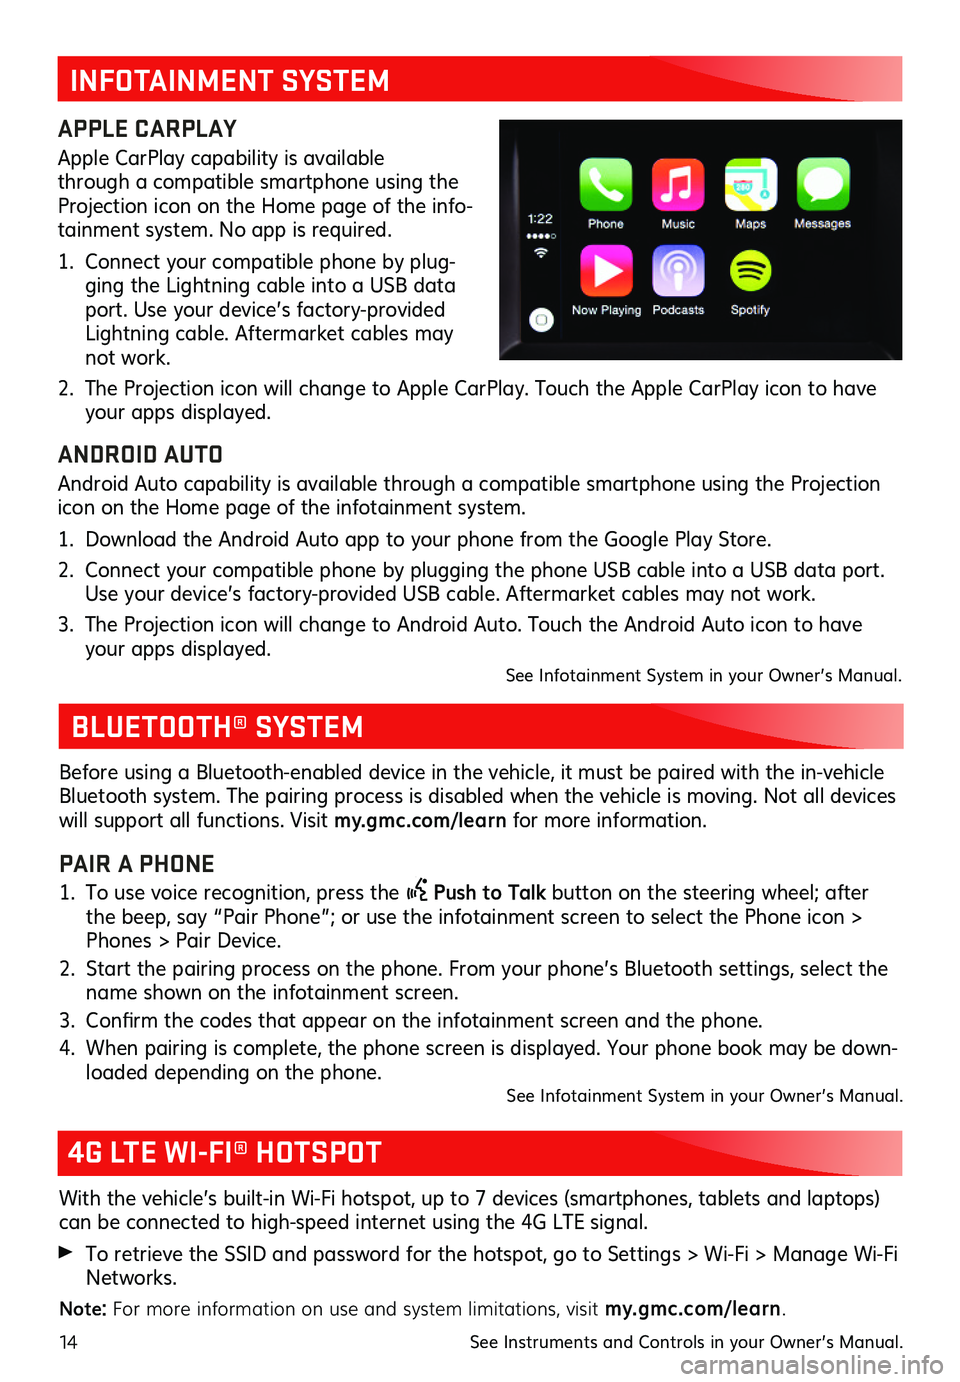
Apple CarPlay capability is available through a compatible smartphone using the Projection icon on the Home page of the info-tainment system. No app is required.
1. Connect your compatible phone by plug-ging the Lightning cable into a USB data port. Use your device’s factory-provided Lightning cable. Aftermarket cables may not work.
2. The Projection icon will change to Apple CarPlay. Touch the Apple CarPlay icon to have your apps displayed.
ANDROID AUTO
Android Auto capability is available through a compatible smartphone using the Projection icon on the Home page of the infotainment system.
1. Download the Android Auto app to your phone from the Google Play Store.
2. Connect your compatible phone by plugging the phone USB cable into a USB data port. Use your device’s factory-provided USB cable. Aftermarket cables may not work.
3. The Projection icon will change to Android Auto. Touch the Android Auto icon to have your apps displayed. See Infotainment System in your Owner’s Manual.
Page 16 of 20
16
DRIVER ASSISTANCE SYSTEMS
Safety or driver assistance features are no substitute for the driver’s responsibility to operate the vehicle in a safe manner. The driver should remain attentive to traffic, surroundings and road conditions at all times. Read your Owner’s Manual for important feature limitations and information.
SAFETY ALERT SEATF – The driver’s seat pulses — left side, right side or simultaneously — to alert the driver of the direction of potential hazards.
Audible alerts or seat pulsing alerts may be selected. To change the alert settings, go to Settings > Vehicle > Collision/Detection > Alert Type.
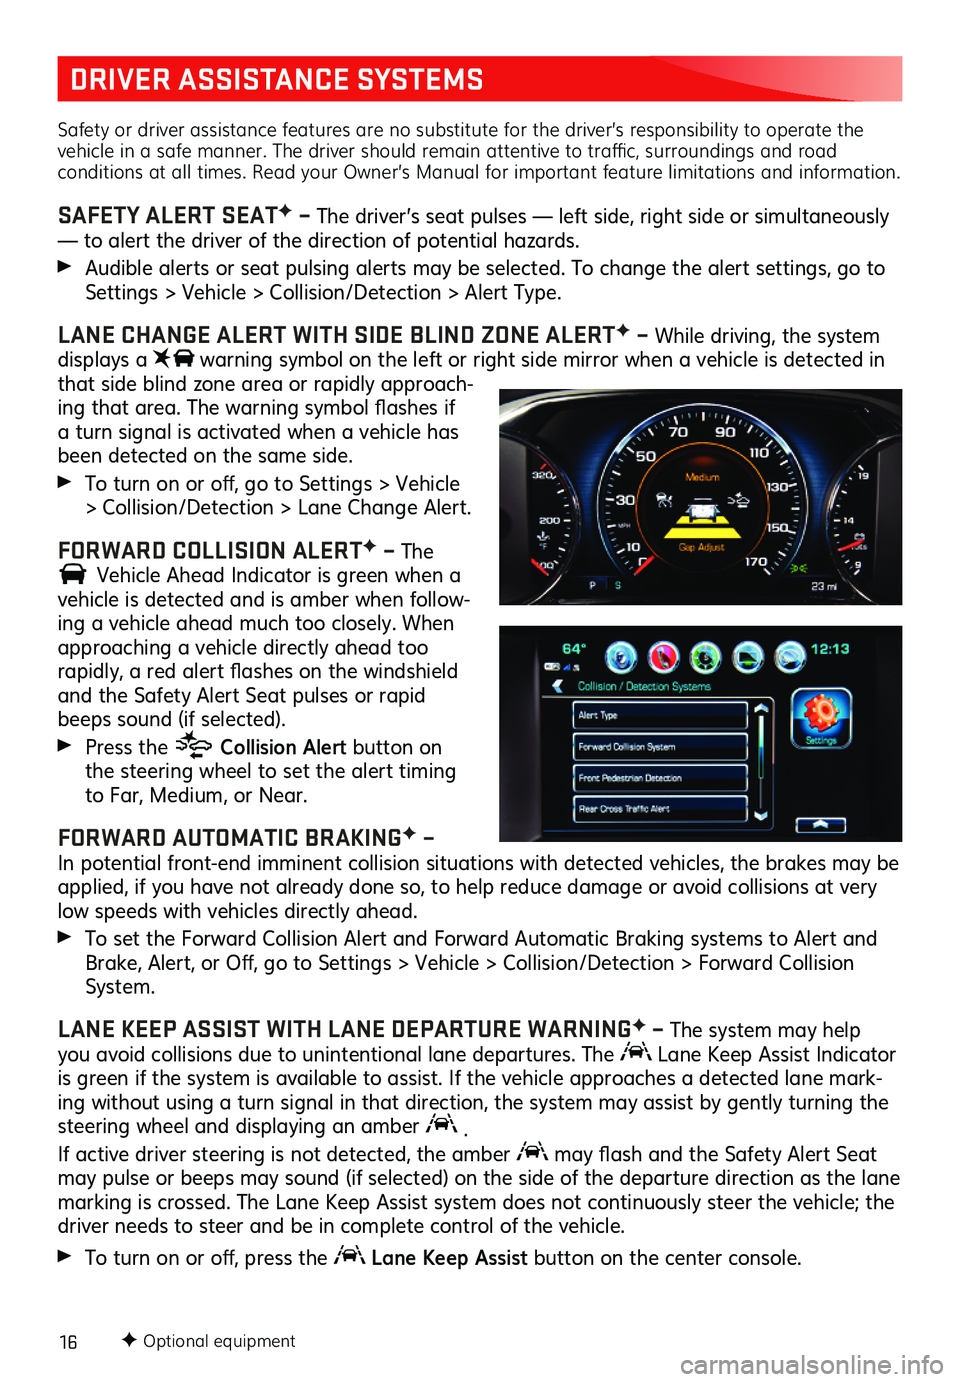
LANE CHANGE ALERT WITH SIDE BLIND ZONE ALERTF – While driving, the system displays a warning symbol on the left or right side mirror when a vehicle is detected in that side blind zone area or rapidly approach-ing that area. The warning symbol flashes if a turn signal is activated when a vehicle has been detected on the same side.
To turn on or off, go to Settings > Vehicle > Collision/Detection > Lane Change Alert.
FORWARD COLLISION ALERTF – The
Vehicle Ahead Indicator is green when a
vehicle is detected and is amber when follow-ing a vehicle ahead much too closely. When approaching a vehicle directly ahead too
rapidly, a red alert flashes on the windshield and the Safety Alert Seat pulses or rapid beeps sound (if selected).
Press the Collision Alert button on the steering wheel to set the alert timing to Far, Medium, or Near.
FORWARD AUTOMATIC BRAKINGF – In potential front-end imminent collision situations with detected vehicles, the brakes may be applied, if you have not already done so, to help reduce damage or avoid collisions at very low speeds with vehicles directly ahead.
To set the Forward Collision Alert and Forward Automatic Braking systems to Alert and Brake, Alert, or Off, go to Settings > Vehicle > Collision/Detection > Forward Collision System.
LANE KEEP ASSIST WITH LANE DEPARTURE WARNINGF – The system may help you avoid collisions due to unintentional lane departures. The Lane Keep Assist Indicator is green if the system is available to assist. If the vehicle approaches a detected lane mark-ing without using a turn signal in that direction, the system may assist by gently turning the steering wheel and displaying an amber .
If active driver steering is not detected, the amber may flash and the Safety Alert Seat may pulse or beeps may sound (if selected) on the side of the departure direction as the lane marking is crossed. The Lane Keep Assist system does not continuously steer the vehicle; the driver needs to steer and be in complete control of the vehicle.
To turn on or off, press the Lane Keep Assist button on the center console.
F Optional equipment
Page 17 of 20

17
DRIVER ASSISTANCE SYSTEMS
TRACTION CONTROL AND STABILITRAK SYSTEMS – The traction control system limits wheelspin and the StabiliTrak® stability control system assists with directional control of the vehicle in difficult driving conditions. Both systems turn on automatically every time the vehicle is started. Turn off traction control if the vehicle is stuck and rocking the vehicle is required.
Press the Traction Control/StabiliTrak Off button on the center console to turn traction control on or off.
FRONT PEDESTRIAN BRAKINGF – During daytime driving, the system detects
pedestrians directly ahead up to a distance of approximately 131 feet and displays an amber indicator. When approaching a detected pedestrian too quickly, a red alert flashes on the windshield and the Safety Alert Seat pulses or rapid beeps sound (if selected). The system may prepare the brakes or automatically brake the vehicle, if you have not already done so.
To set to Alert and Brake, Alert, or Off, go to Settings > Vehicle > Collision/Detection > Front Pedestrian Detection.
FRONTF AND REAR VISION CAMERA – When the vehicle is in Reverse, a view of the area behind the vehicle displays on the infotainment screen. After shifting from Reverse to Drive, a view of the area in front of the vehicle displays. Vehicle speed must be below 8 mph.
SURROUND VISIONF – The Surround Vision system displays a rear or front camera view along with a view of the area surrounding the vehicle on the infotainment screen when the vehicle is in Reverse or Drive below 5 mph.
Touch Front or Rear Camera on the camera screen to display the front or rear view.
Touch the Guidance Lines button on the camera screen to turn the guidelines on or off.
FRONTF AND REARF PARK ASSIST – During low-speed parking maneuvers, the system provides “distance to closest object” information on the Driver Information Center and the Safety Alert Seat pulses or a beep sounds (if selected). When an object is very close, the Safety Alert Seat pulses or 5 beeps sound (if selected).
REAR CROSS TRAFFIC ALERTF – When the vehicle is in Reverse, the system warns of cross-traffic coming in either direction by displaying a red alert on the infotainment screen and the left or right side of the Safety Alert Seat pulses or beeps sound (if selected).
To turn the Park Assist and Rear Cross Traffic Alert systems on or off, press the Park Assist button on the center console.
F Optional equipment
See Driving and Operating in your Owner’s Manual.