2019 FORD F650/750 trailer
[x] Cancel search: trailerPage 198 of 387
Engine lubrication for severe
service operation
The following conditions define severe
operation for which engine operation with
SAE 5W-40 API CJ-4 is recommended. Oil
and oil filter change intervals will be
determined by the Intelligent Oil Life
Monitor™ as noted previously.
•
Frequent or extended idling (over 10
minutes per hour of normal driving).
• Low-speed operation/stationary use.
• If vehicle is operated in sustained
ambient temperatures below -9°F
(-23°C) or above 100°F (38°C).
• Frequent low-speed operation,
consistent heavy traffic less than
25 mph (40 km/h)
.
• Operating in severe dust conditions.
• Operating the vehicle off road.
• Towing a trailer over
1,000 mi
(1,600 km).
• Sustained, high-speed driving at Gross
Vehicle Weight Rating (maximum
loaded weight for vehicle operation).
• Use of fuels with sulfur content other
than ultra-low sulfur diesel (ULSD).
• Use of high-sulfur diesel fuel.
CHANGING THE CRANKCASE
VENT FILTER ELEMENT - 6.7L
DIESEL WARNING:
Do not dispose of
engine oil or oil filters in the household
refuse or the public sewage system. Use
an authorized waste disposal facility.
Do not clean or recondition the filter
element. We recommend that you demand the use
of genuine Ford and Motorcraft® parts
whenever your vehicle requires scheduled
maintenance or repair. Use the correct
specification filter element. See
Motorcraft Parts
(page 257).
Note: Operating your vehicle without a filter
element or with an unapproved filter
element may result in damage to the turbo
charger or exchanger and could lead to
engine damage that may not be covered by
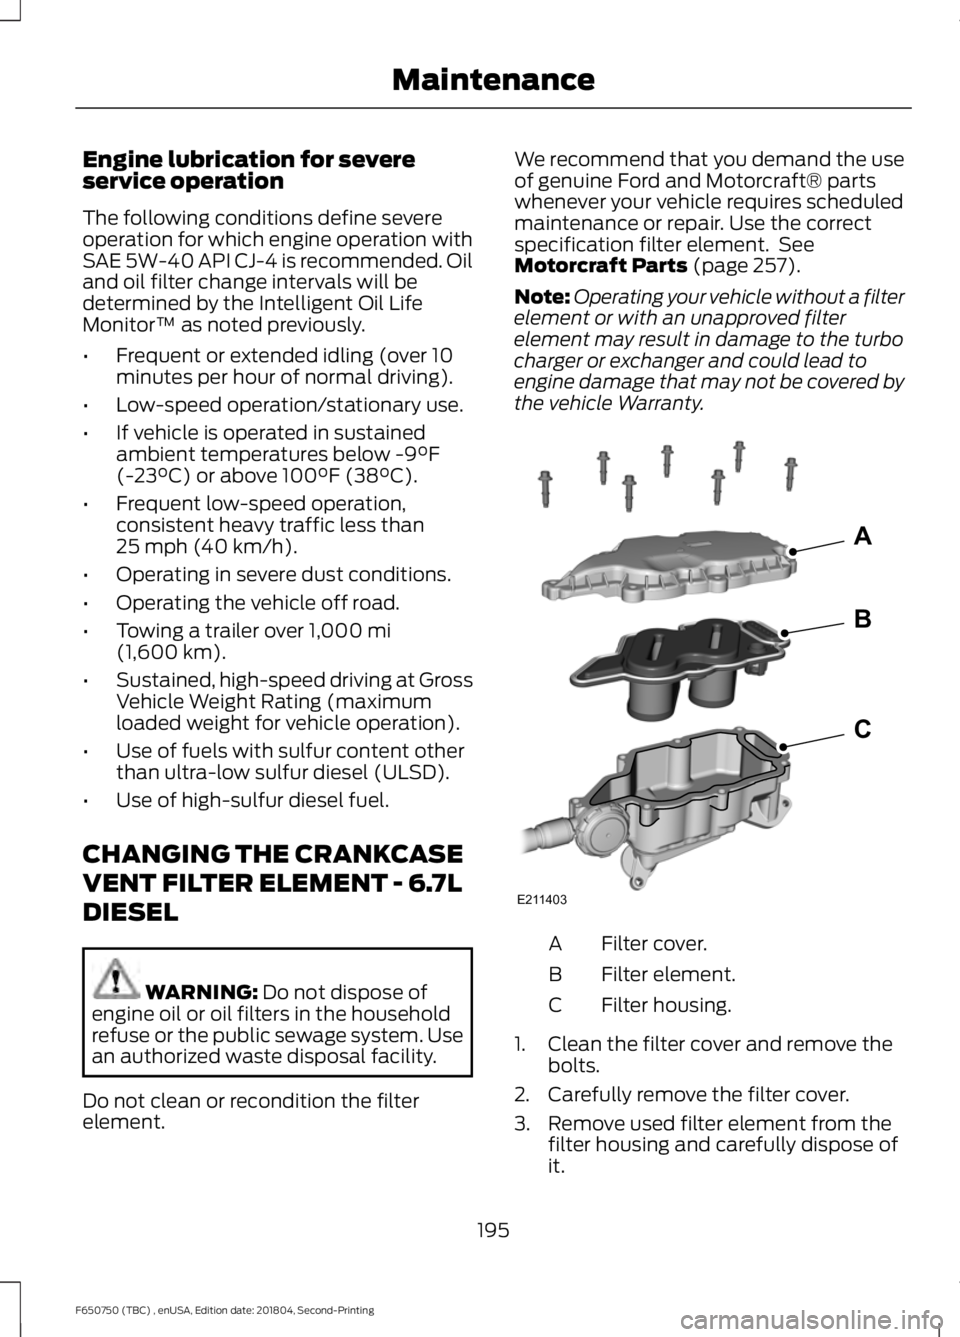
the vehicle Warranty. Filter cover.
A
Filter element.
B
Filter housing.
C
1. Clean the filter cover and remove the bolts.
2. Carefully remove the filter cover.
3. Remove used filter element from the filter housing and carefully dispose of
it.
195
F650750 (TBC) , enUSA, Edition date: 201804, Second-Printing MaintenanceE211403
A
B
C
Page 203 of 387
Engine-driven Cooling Fan
Your vehicle may have an engine driven
cooling fan drive also called a fan clutch.
This fan drive changes the fan speed to
match the vehicle
’s changing cooling air
flow requirements. Fan speed, fan noise
level and fuel consumption all will increase
based on the driving conditions that
include trailer towing, hill climbing, heavy
loads, high speed and high ambient
temperature, individually or in combination.
The fan drive is designed to provide the
minimum fan speed and resulting
minimum fan noise and fuel consumption
required to meet the ever-changing vehicle
cooling air flow requirements. You can hear
the amount of fan noise increasing and
decreasing as the engine power
requirements and vehicle driving conditions
change as you drive. This is normal to the
operation of your vehicle. You may also
hear high levels of the fan when the engine
is first started and should normally
decrease after driving for a short time.
ENGINE COOLANT CHECK -
6.8L WARNING: Do not remove the
coolant reservoir cap when the engine is
on or the cooling system is hot. Wait 10
minutes for the cooling system to cool
down. Cover the coolant reservoir cap
with a thick cloth to prevent the
possibility of scalding and slowly remove
the cap. Failure to follow this instruction
could result in personal injury. WARNING:
Do not put coolant in
the windshield washer reservoir. If
sprayed on the windshield, coolant could
make it difficult to see through the
windshield. WARNING:
To reduce the risk of
personal injury, make sure the engine is
cool before unscrewing the coolant
pressure relief cap. The cooling system
is under pressure. Steam and hot liquid
can come out forcefully when you loosen
the cap slightly. WARNING:
Do not add coolant
further than the MAX mark.
When the engine is cold, check the
concentration and level of the coolant at
the intervals listed in the scheduled
maintenance information. See Scheduled
Maintenance
(page 322).
Note: Make sure that the coolant level is
between the
MIN and the MAX marks on
the coolant reservoir.
Note: Coolant expands when it is hot. The
level may extend beyond the
MAX mark.
Maintain coolant concentration within
48% to 50%, which equates to a freeze
point between -30°F (-34°C) and -34°F
(-37°C). Coolant concentration should be
checked using a refractometer. We
recommend Robinair® Coolant and
Battery Refractometer 75240 (Rotunda
tool part number: ROB75240). We do not
recommend the use of hydrometers or
coolant test strips for measuring coolant
concentration.
Note: Automotive fluids are not
interchangeable. Do not use coolant or
windshield washer fluid outside of its
specified function and vehicle location.
Note: Do not use stop leak pellets, cooling
system sealants, or additives as they can
cause damage to the engine cooling or
heating systems. Resulting component
damage may not be covered by the vehicle
Warranty.
200
F650750 (TBC) , enUSA, Edition date: 201804, Second-Printing Maintenance
Page 206 of 387
Your vehicle has limited engine power
when in the fail-safe mode, drive your
vehicle with caution. Your vehicle does not
maintain high-speed operation and the
engine may operate poorly.
Remember that the engine is capable of
automatically shutting down to prevent
engine damage. In this situation:
1. Pull off the road as soon as safely
possible and switch the engine off.
2. If you are a member of a roadside assistance program, we recommend
that you contact your roadside
assistance service provider.
3. If this is not possible, wait a short period for the engine to cool.
4. Check the coolant level. If the coolant level is at or below the minimum mark,
add prediluted coolant immediately.
5. When the engine temperature cools, you can re-start the engine. Have your
vehicle checked as soon as possible to
minimize engine damage.
Note: Driving your vehicle without repair
increases the chance of engine damage.
Engine Coolant Temperature
Management (If Equipped) WARNING:
To reduce the risk of
crash and injury, be prepared that the
vehicle speed may reduce and the
vehicle may not be able to accelerate
with full power until the coolant
temperature reduces.
If you tow a trailer with your vehicle, the
engine may temporarily reach a higher
temperature during severe operating
conditions, for example ascending a long
or steep grade in high ambient
temperatures. At this time, you may notice the coolant
temperature gauge moves toward the red
zone and a message may appear in the
information display.
You may notice a reduction in vehicle
speed caused by reduced engine power in
order to manage the engine coolant
temperature. Your vehicle may enter this
mode if certain high-temperature and
high-load conditions take place. The
amount of speed reduction depends on
vehicle loading, grade and ambient
temperature. If this occurs, there is no
need to pull off the road. You can continue
to drive your vehicle.
The air conditioning may automatically
turn on and off during severe operating
conditions to protect the engine from
overheating. When the coolant
temperature decreases to the normal
operating temperature, the air conditioning
turns on.
If the coolant temperature gauge moves
fully into the red zone, or if the coolant
temperature warning or service engine
soon messages appear in your information
display, do the following:
1. Pull off the road as soon as safely
possible and shift the transmission into
park (P).
2. Leave the engine running until the coolant temperature gauge needle
returns to the normal position. After
several minutes, if the temperature
does not drop, follow the remaining
steps.
3. Switch the engine off and wait for it to
cool. Check the coolant level.
4. If the coolant level is at or below the minimum mark, add prediluted coolant
immediately.
5. If the coolant level is normal, restart the engine and continue.
203
F650750 (TBC) , enUSA, Edition date: 201804, Second-Printing Maintenance
Page 226 of 387
Never use compressed air or dry
sweeping to clean the work area. Use an
industrial vacuum cleaner with a HEPA
filter system and rags soaked in water
and wrung until nearly dry. Dispose of
used rags with care to avoid getting dust
in the air. Use an approved respirator
when emptying vacuum cleaners and
handling used rags.
Worker clean-up: Wash your hands
before eating, drinking or smoking.
Vacuum your work clothes after use and
then launder them separately, without
shaking them, to prevent fiber dust
getting into the air.
Your vehicle is equipped with
non-asbestos brake linings. However,
exposure to excessive amounts of brake
material (whether asbestos or
non-asbestos, fiberglass, mineral wool,
aramid or carbon) may be a serious health
hazard.
Air Brakes WARNING: Do not manually
adjust the automatic slack adjusters to
correct excessive push rod stroke as it
may result in reduced brake
effectiveness and a vehicle crash.
Excessive push rod stroke indicates that
a problem exists with the automatic
adjuster, with the installation of the
adjuster, or with foundation brake
components that manual adjustment
does not remedy. Seek service from a
qualified facility for excessive push rod
stroke. Inspection and Adjustment
Establish a regular schedule for periodic
cleaning, lubrication and adjustment
inspection based on vehicle use. Exact
maintenance intervals are difficult to
predetermine due to vehicle applications
and operating conditions. If you are
uncertain of the proper schedule for your
vehicle, contact an authorized dealer.
Regular inspections should include:
•
Periodic checking (every service
interval) of push rod travel or brake
adjustment. This is essential for
effective braking. Brake chamber push
rods on original equipment chambers
now incorporate an orange paint
marker near the base of the push rod
as a stroke indicator to aid in
adjustment checks. If the push rod is
clean and the brakes are out of
adjustment, you can see the orange
marker protruding from the chamber
when the brakes are applied.
• Checking the brake lining (every service
interval). When brake linings or blocks
wear within 0.063 in (1.6 mm) they
must be replaced.
• Periodic checking (every service
interval) of the air compressor filter.
Check the filter minder and when the
indicator is near or on the red line
marked
Service, replace the filter and
reset the service filter minder.
Do not back off or disconnect the front
brakes so that they are less effective,
letting the rear brakes do all the stopping
of your vehicle. Do not overlook the brakes
on the trailer either. Brake condition on the
trailer is just as important as the tractor.
Proper brake balance on trucks and
tractor-trailers is essential for effective
braking.
223
F650750 (TBC) , enUSA, Edition date: 201804, Second-Printing Maintenance
Page 335 of 387

Towing a Trailer
Inspect and lubricate U-joints.
Inspect frequently, service
as required
See axle maintenance items under Exceptions.
Inspect the wheels and related components for abnormal
noise, wear, looseness or drag.
Every
5,000 mi (8,000 km)
Change engine oil and filter.
Every
5,000 mi (8,000 km)
or six months Inspect and lubricate U-joints.
Rotate tires1
, inspect tires for wear and measure tread
depth.
Every
7,500 mi (12,000 km)
Replace spark plugs.
Every
60,000 mi
(96,000 km)
1 Vehicles with dual rear wheels should rotate the front wheels when specified; rear wheels
only if unusual wear is noted. Extensive Idling or Low-speed Driving for Long Distances, as in Heavy Commercial Use
(Such as Delivery, Taxi, Patrol Car or Livery)
Replace engine air filter.
Inspect frequently, service
as required
Inspect brake system.
Every
5,000 mi (8,000 km)
Inspect wheels and related components for abnormal
noise, wear, looseness or drag.
Lubricate control arm and steering ball joints if equipped
with grease fittings.
Inspect and lubricate U-joints.
Every
5,000 mi (8,000 km)
or six months
Change engine oil and filter.
Every
5,000 mi (8,000 km),
six months or 200 engine
hours
332
F650750 (TBC) , enUSA, Edition date: 201804, Second-Printing Scheduled Maintenance
Page 337 of 387
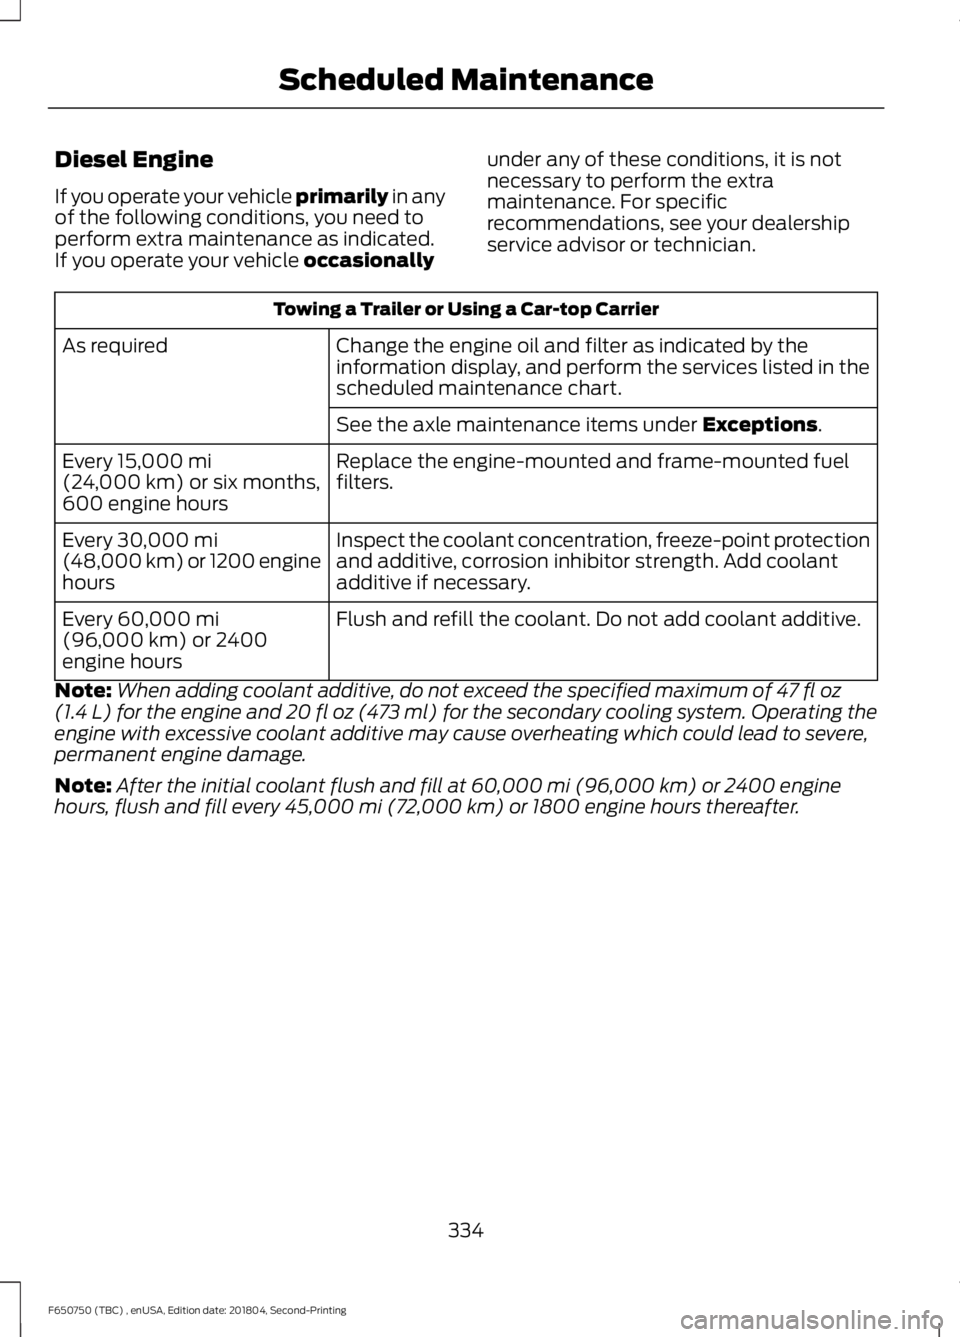
Diesel Engine
If you operate your vehicle primarily in any
of the following conditions, you need to
perform extra maintenance as indicated.
If you operate your vehicle
occasionally under any of these conditions, it is not
necessary to perform the extra
maintenance. For specific
recommendations, see your dealership
service advisor or technician. Towing a Trailer or Using a Car-top Carrier
Change the engine oil and filter as indicated by the
information display, and perform the services listed in the
scheduled maintenance chart.
As required
See the axle maintenance items under
Exceptions.
Replace the engine-mounted and frame-mounted fuel
filters.
Every
15,000 mi
(24,000 km) or six months,
600 engine hours
Inspect the coolant concentration, freeze-point protection
and additive, corrosion inhibitor strength. Add coolant
additive if necessary.
Every
30,000 mi
(48,000 km) or 1200 engine
hours
Flush and refill the coolant. Do not add coolant additive.
Every
60,000 mi
(96,000 km) or 2400
engine hours
Note: When adding coolant additive, do not exceed the specified maximum of
47 fl oz
(1.4 L) for the engine and 20 fl oz (473 ml) for the secondary cooling system. Operating the
engine with excessive coolant additive may cause overheating which could lead to severe,
permanent engine damage.
Note: After the initial coolant flush and fill at
60,000 mi (96,000 km) or 2400 engine
hours, flush and fill every 45,000 mi (72,000 km) or 1800 engine hours thereafter.
334
F650750 (TBC) , enUSA, Edition date: 201804, Second-Printing Scheduled Maintenance
Page 343 of 387
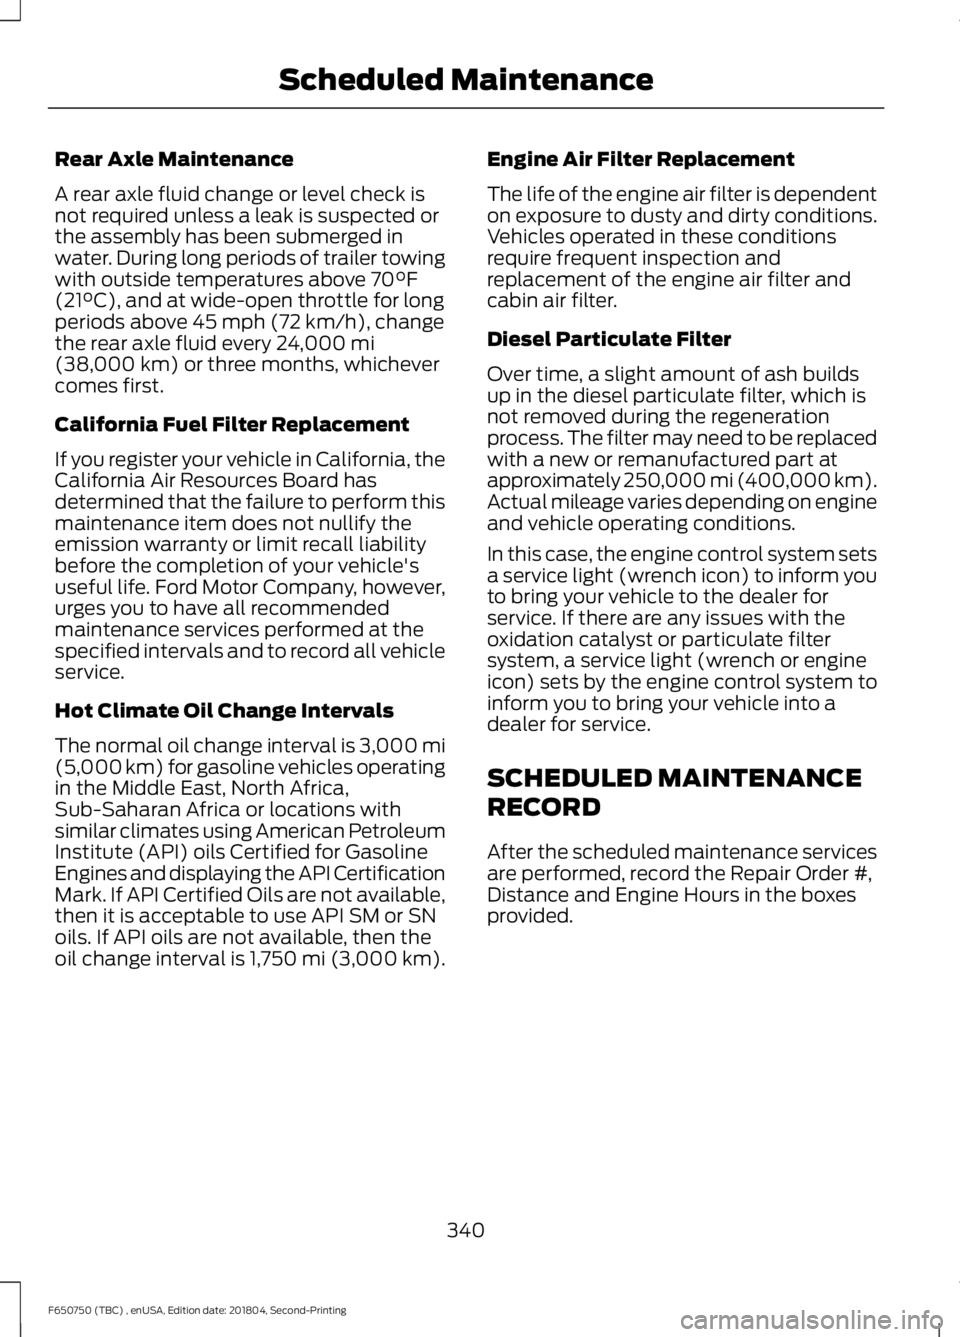
Rear Axle Maintenance
A rear axle fluid change or level check is
not required unless a leak is suspected or
the assembly has been submerged in
water. During long periods of trailer towing
with outside temperatures above 70°F
(21°C), and at wide-open throttle for long
periods above 45 mph (72 km/h), change
the rear axle fluid every 24,000 mi
(38,000 km) or three months, whichever
comes first.
California Fuel Filter Replacement
If you register your vehicle in California, the
California Air Resources Board has
determined that the failure to perform this
maintenance item does not nullify the
emission warranty or limit recall liability
before the completion of your vehicle's
useful life. Ford Motor Company, however,
urges you to have all recommended
maintenance services performed at the
specified intervals and to record all vehicle
service.
Hot Climate Oil Change Intervals
The normal oil change interval is 3,000 mi
(5,000 km) for gasoline vehicles operating
in the Middle East, North Africa,
Sub-Saharan Africa or locations with
similar climates using American Petroleum
Institute (API) oils Certified for Gasoline
Engines and displaying the API Certification
Mark. If API Certified Oils are not available,
then it is acceptable to use API SM or SN
oils. If API oils are not available, then the
oil change interval is 1,750 mi (3,000 km). Engine Air Filter Replacement
The life of the engine air filter is dependent
on exposure to dusty and dirty conditions.
Vehicles operated in these conditions
require frequent inspection and
replacement of the engine air filter and
cabin air filter.
Diesel Particulate Filter
Over time, a slight amount of ash builds
up in the diesel particulate filter, which is
not removed during the regeneration
process. The filter may need to be replaced
with a new or remanufactured part at
approximately 250,000 mi (400,000 km).
Actual mileage varies depending on engine
and vehicle operating conditions.
In this case, the engine control system sets
a service light (wrench icon) to inform you
to bring your vehicle to the dealer for
service. If there are any issues with the
oxidation catalyst or particulate filter
system, a service light (wrench or engine
icon) sets by the engine control system to
inform you to bring your vehicle into a
dealer for service.
SCHEDULED MAINTENANCE
RECORD
After the scheduled maintenance services
are performed, record the Repair Order #,
Distance and Engine Hours in the boxes
provided.
340
F650750 (TBC) , enUSA, Edition date: 201804, Second-Printing Scheduled Maintenance
Page 378 of 387

2
2-Speed Rear Axle.........................................121
Axle Shifting........................................................... 121
A
A/C See: Climate Control........................................... 72
About This Manual...........................................7
Diesel Engine Information................................... 8
Minor Troubleshooting Guide............................ 9
Warnings.................................................................... 8
ABS See: Brakes............................................................ 122
ABS driving hints See: Hints on Driving With Anti-Lock
Brakes................................................................. 123
Accessories.....................................................318
Accessories See: Replacement Parts
Recommendation............................................ 13
Adjusting the Headlamps
.........................210
Horizontal Aim Adjustment............................. 211
Vertical Aim Adjustment................................. 210
Adjusting the Steering Wheel...................46
Air Brakes
.........................................................126
Air Chamber Stroke Indication...................... 126
Cam Brakes - Automatic Slack Adjusters............................................................ 127
Emergency Air Brake.......................................... 127
Air Conditioning See: Climate Control........................................... 72
Air Filter See: Changing the Engine Air Filter - 6.7L
Diesel.................................................................. 213
See: Changing the Engine Air Filter - 6.8L..................................................................... 216
Air Induction System Inspection.............221 Chassis-mounted Charge Air Cooler..........222
Air Suspension...............................................142 Air Suspension Dump Button........................ 142
Connecting and Disconnecting a Trailer with Air Suspension and Air Suspension
Dump Button................................................... 142
Suspension Conversions.................................. 142
System Indicator Light...................................... 142
Appendices.....................................................351 At a Glance
.........................................................17
Audible Warnings and Indicators.............63 Beltminder Warning............................................ 63
Door Ajar.................................................................. 63
Headlamps On Warning Chime...................... 63
Key in Ignition Warning Chime........................ 63
Parking Brake On Warning Chime.................. 63
Audio Control..................................................46 Media........................................................................\
. 47
Seek, Next or Previous........................................ 47
Audio Input Jack..........................................284
Audio System.................................................277 General Information.......................................... 277
Audio Unit - Vehicles With: AM/FM/CD/ SYNC..............................................................279
Accessing CD or MP3 Mode.......................... 280
Accessing the Auxiliary Media Sources............................................................. 279
Accessing the Folders..................................... 280
Accessing the Menu......................................... 280
Accessing the Phone Features..................... 280
Adjusting the Volume...................................... 280
Changing Radio Stations................................. 281
Ejecting the CD.................................................... 281
Fast Forwarding the Media............................. 281
Inserting a CD....................................................... 281
Muting the Audio................................................ 281
Playing or Pausing Media................................ 281
Rewinding the Media......................................... 281
Scanning the Audio........................................... 281
Selecting a Frequency Band.......................... 281
Setting the Memory Presets........................... 281
Switching Shuffle Mode On and Off...........281
Switching the Audio Unit On and Off.........281
Using Seek, Fast Forward and Reverse............................................................. 282
Audio Unit - Vehicles With: AM/ FM...................................................................278
Accessing the Clock Settings........................ 278
Accessing the Sound Settings...................... 279
Adjusting the Volume....................................... 279
Changing Radio Stations................................ 279
Selecting the Audio Modes............................ 279
Setting the Memory Presets.......................... 279
Switching the Audio Unit On and Off.........279
Using Seek, Fast Forward and Reverse.............................................................. 279
375
F650750 (TBC) , enUSA, Edition date: 201804, Second-Printing Index