2019 FORD F650/750 service interval reset
[x] Cancel search: service interval resetPage 197 of 387
Do not use supplemental engine oil
additives because they are unnecessary
and could lead to engine damage that may
not be covered by the vehicle Warranty.
Only use oils certified for gasoline engines
by the American Petroleum Institute (API).
An oil with this trademark symbol
conforms to the current engine and
emission system protection standards and
fuel economy requirements of the
International Lubricants Specification
Advisory Committee (ILSAC).
To top up the engine oil level do the
following:
1. Clean the area surrounding the engine
oil filler cap before you remove it.
2. Remove the engine oil filler cap.
3. Add engine oil that meets the correct specification.
4. Recheck the oil level.
5. If the oil level is correct, replace the dipstick and make sure it is fully seated.
6. Replace the engine oil filler cap. Turn it clockwise until you feel a strong
resistance.
Note: Do not add oil further than the
maximum mark. Oil levels above the
maximum mark may cause engine damage.
Note: Make sure you install the oil filler cap
correctly. Note:
Soak up any spillage with an
absorbent cloth immediately.
CHANGING THE ENGINE OIL
AND OIL FILTER WARNING: Do not handle a hot
oil filter with bare hands. WARNING:
Continuous contact
with used motor oil has caused cancer
in laboratory mice. Protect your skin by
washing with soap and water.
If your vehicle is equipped with a diesel
engine, an Intelligent Oil Life Monitor™
calculates the proper oil change service
interval. When the information display
indicates: OIL CHANGE REQUIRED, change
the engine oil and oil filter. See
Information Displays
(page 64).
The engine oil filter protects your engine
by filtering harmful, abrasive or sludge
particles and particles significantly smaller
than most available will-fit filters. See
Motorcraft Parts
(page 258).
1. Unscrew the oil filter and oil pan drain plug and wait for the oil to drain.
2. Replace the filter.
3. Reinstall the oil pan drain plug.
4. Refill the engine with new oil. See Capacities and Specifications (page
261
).
5. For diesel engines, you need to reset the Intelligent Oil Life Monitor™. See
Information Displays
(page 64).
194
F650750 (TBC) , enUSA, Edition date: 201804, Second-Printing MaintenanceE142732
Page 199 of 387
4.
Make sure that the sealing surfaces on
the filter housing and cover are clean
and free of debris.
5. Install the new filter element.
6. Install the filter cover.
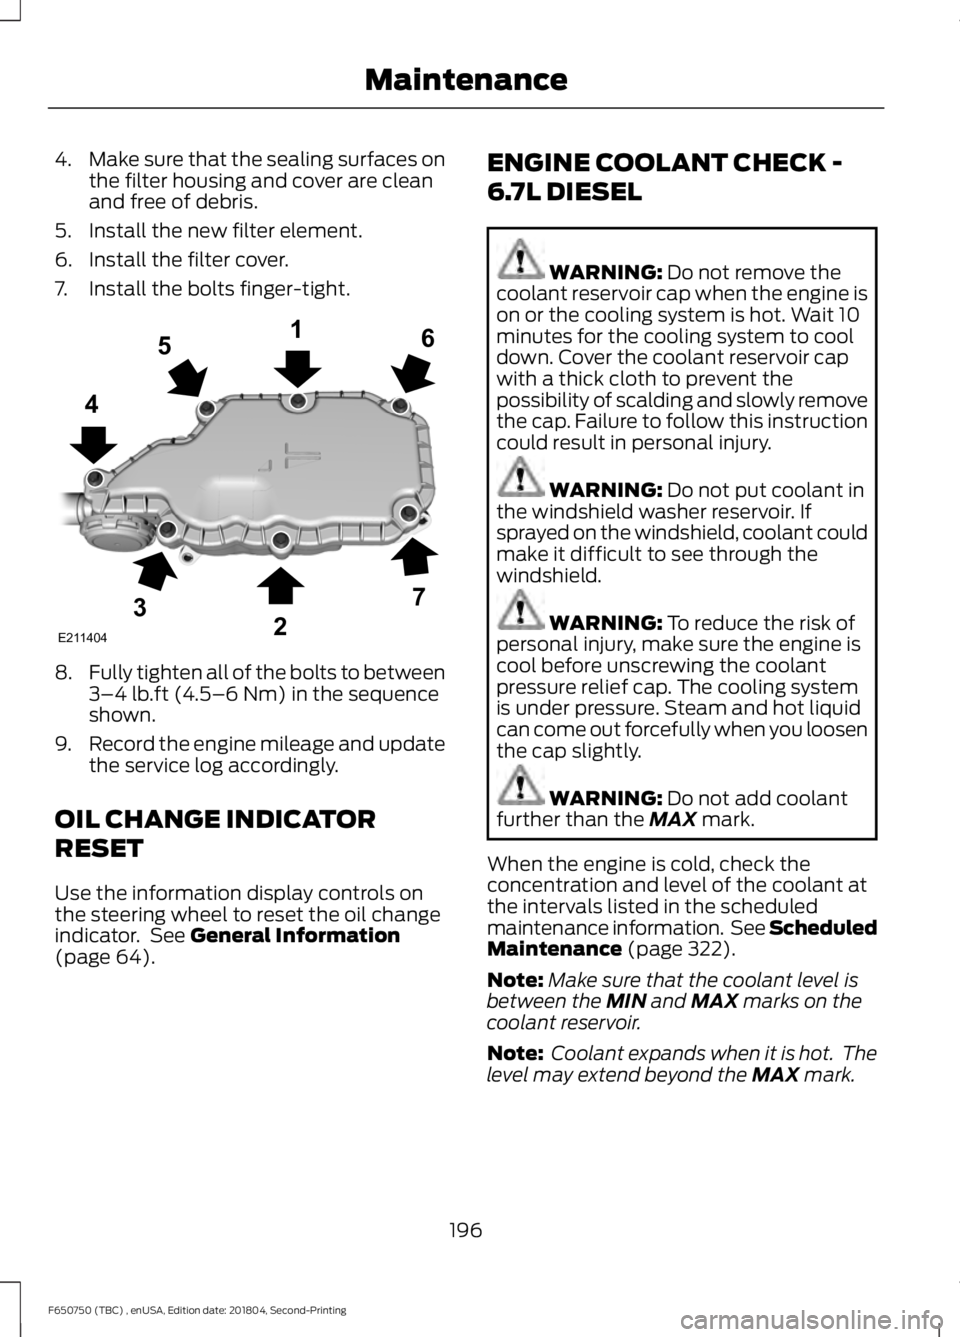
7. Install the bolts finger-tight. 8.
Fully tighten all of the bolts to between
3–4 lb.ft (4.5–6 Nm) in the sequence
shown.
9. Record the engine mileage and update
the service log accordingly.
OIL CHANGE INDICATOR
RESET
Use the information display controls on
the steering wheel to reset the oil change
indicator. See
General Information
(page 64). ENGINE COOLANT CHECK -
6.7L DIESEL WARNING:
Do not remove the
coolant reservoir cap when the engine is
on or the cooling system is hot. Wait 10
minutes for the cooling system to cool
down. Cover the coolant reservoir cap
with a thick cloth to prevent the
possibility of scalding and slowly remove
the cap. Failure to follow this instruction
could result in personal injury. WARNING:
Do not put coolant in
the windshield washer reservoir. If
sprayed on the windshield, coolant could
make it difficult to see through the
windshield. WARNING:
To reduce the risk of
personal injury, make sure the engine is
cool before unscrewing the coolant
pressure relief cap. The cooling system
is under pressure. Steam and hot liquid
can come out forcefully when you loosen
the cap slightly. WARNING:
Do not add coolant
further than the MAX mark.
When the engine is cold, check the
concentration and level of the coolant at
the intervals listed in the scheduled
maintenance information. See Scheduled
Maintenance
(page 322).
Note: Make sure that the coolant level is
between the
MIN and MAX marks on the
coolant reservoir.
Note: Coolant expands when it is hot. The
level may extend beyond the
MAX mark.
196
F650750 (TBC) , enUSA, Edition date: 201804, Second-Printing MaintenanceE211404
165
4
32
7
Page 226 of 387
Never use compressed air or dry
sweeping to clean the work area. Use an
industrial vacuum cleaner with a HEPA
filter system and rags soaked in water
and wrung until nearly dry. Dispose of
used rags with care to avoid getting dust
in the air. Use an approved respirator
when emptying vacuum cleaners and
handling used rags.
Worker clean-up: Wash your hands
before eating, drinking or smoking.
Vacuum your work clothes after use and
then launder them separately, without
shaking them, to prevent fiber dust
getting into the air.
Your vehicle is equipped with
non-asbestos brake linings. However,
exposure to excessive amounts of brake
material (whether asbestos or
non-asbestos, fiberglass, mineral wool,
aramid or carbon) may be a serious health
hazard.
Air Brakes WARNING: Do not manually
adjust the automatic slack adjusters to
correct excessive push rod stroke as it
may result in reduced brake
effectiveness and a vehicle crash.
Excessive push rod stroke indicates that
a problem exists with the automatic
adjuster, with the installation of the
adjuster, or with foundation brake
components that manual adjustment
does not remedy. Seek service from a
qualified facility for excessive push rod
stroke. Inspection and Adjustment
Establish a regular schedule for periodic
cleaning, lubrication and adjustment
inspection based on vehicle use. Exact
maintenance intervals are difficult to
predetermine due to vehicle applications
and operating conditions. If you are
uncertain of the proper schedule for your
vehicle, contact an authorized dealer.
Regular inspections should include:
•
Periodic checking (every service
interval) of push rod travel or brake
adjustment. This is essential for
effective braking. Brake chamber push
rods on original equipment chambers
now incorporate an orange paint
marker near the base of the push rod
as a stroke indicator to aid in
adjustment checks. If the push rod is
clean and the brakes are out of
adjustment, you can see the orange
marker protruding from the chamber
when the brakes are applied.
• Checking the brake lining (every service
interval). When brake linings or blocks
wear within 0.063 in (1.6 mm) they
must be replaced.
• Periodic checking (every service
interval) of the air compressor filter.
Check the filter minder and when the
indicator is near or on the red line
marked
Service, replace the filter and
reset the service filter minder.
Do not back off or disconnect the front
brakes so that they are less effective,
letting the rear brakes do all the stopping
of your vehicle. Do not overlook the brakes
on the trailer either. Brake condition on the
trailer is just as important as the tractor.
Proper brake balance on trucks and
tractor-trailers is essential for effective
braking.
223
F650750 (TBC) , enUSA, Edition date: 201804, Second-Printing Maintenance
Page 326 of 387
A message appears in the information
display when it is time for an oil change.
Make sure you perform the oil change
within two weeks or 500 mi (800 km) of
the message appearing. Make sure you
reset the Intelligent Oil-Life Monitor after
each oil change. See Instrument Cluster
(page
56).
If your information display resets
prematurely or becomes inoperative, you
should perform the oil change interval at
six months or
5,000 mi (8,000 km) from
your last oil change. Never exceed one year
or
10,000 mi (16,000 km) between oil
change intervals.
All Vehicles
Your vehicle is very sophisticated and built
with multiple, complex, performance
systems. Every manufacturer develops
these systems using different
specifications and performance features.
That is why it is important to rely upon your
dealership to properly diagnose and repair
your vehicle.
Ford Motor Company has recommended
maintenance intervals for various parts
and component systems based upon
engineering testing. Ford Motor Company
relies upon this testing to determine the
most appropriate mileage for replacement
of oils and fluids to protect your vehicle at
the lowest overall cost to you and
recommends against maintenance
schedules that deviate from the scheduled
maintenance information.
We strongly recommend the use of only
genuine Ford, Motorcraft or
Ford-authorized re-manufactured
replacement parts engineered for your
vehicle. Additives and Chemicals
This owner's manual and the Ford
Workshop Manual list the recommended
additives and chemicals for your vehicle.
We do not recommend using chemicals or
additives not approved by us as part of
your vehicle
’s normal maintenance. Please
consult your warranty information.
Oils, Fluids and Flushing
In many cases, fluid discoloration is a
normal operating characteristic and, by
itself, does not necessarily indicate a
concern or that the fluid needs to be
changed. However, a qualified expert, such
as the factory-trained technicians at your
dealership, should inspect discolored fluids
that also show signs of overheating or
foreign material contamination
immediately.
Make sure to change your vehicle ’s oils and
fluids at the specified intervals or in
conjunction with a repair. Flushing is a
viable way to change fluid for many vehicle
sub-systems during scheduled
maintenance. It is critical that systems are
flushed only with new fluid that is the same
as that required to fill and operate the
system or using a Ford-approved flushing
chemical.
Scheduled Maintenance Services
Maintenance service adjustments must
conform to specifications contained in this
manual, and those shown on the Important
Engine Information decal. Perform the
following services at scheduled intervals
because they essential to the life and
performance of your vehicle. Ford
recommends that you perform
maintenance on all designated items to
achieve best vehicle operation.
323
F650750 (TBC) , enUSA, Edition date: 201804, Second-Printing Scheduled Maintenance
Page 333 of 387
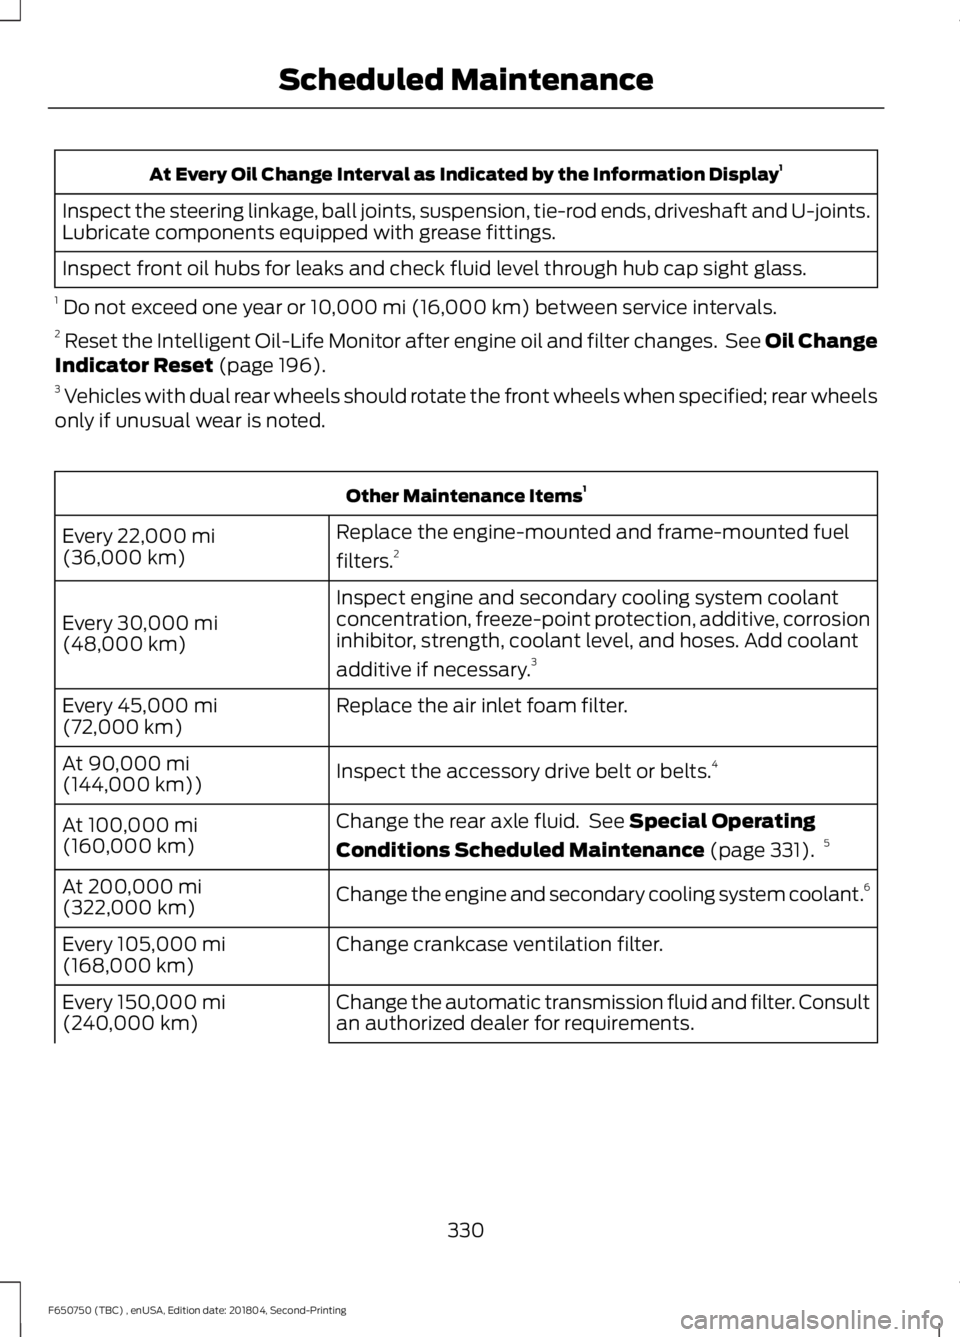
At Every Oil Change Interval as Indicated by the Information Display
1
Inspect the steering linkage, ball joints, suspension, tie-rod ends, driveshaft and U-joints.
Lubricate components equipped with grease fittings.
Inspect front oil hubs for leaks and check fluid level through hub cap sight glass.
1 Do not exceed one year or 10,000 mi (16,000 km) between service intervals.
2 Reset the Intelligent Oil-Life Monitor after engine oil and filter changes. See Oil Change
Indicator Reset
(page 196).
3 Vehicles with dual rear wheels should rotate the front wheels when specified; rear wheels
only if unusual wear is noted. Other Maintenance Items
1
Replace the engine-mounted and frame-mounted fuel
filters. 2
Every
22,000 mi
(36,000 km)
Inspect engine and secondary cooling system coolant
concentration, freeze-point protection, additive, corrosion
inhibitor, strength, coolant level, and hoses. Add coolant
additive if necessary.3
Every
30,000 mi
(48,000 km)
Replace the air inlet foam filter.
Every
45,000 mi
(72,000 km)
Inspect the accessory drive belt or belts. 4
At
90,000 mi
(144,000 km))
Change the rear axle fluid. See
Special Operating
Conditions Scheduled Maintenance
(page 331). 5
At
100,000 mi
(160,000 km)
Change the engine and secondary cooling system coolant. 6
At
200,000 mi
(322,000 km)
Change crankcase ventilation filter.
Every
105,000 mi
(168,000 km)
Change the automatic transmission fluid and filter. Consult
an authorized dealer for requirements.
Every
150,000 mi
(240,000 km)
330
F650750 (TBC) , enUSA, Edition date: 201804, Second-Printing Scheduled Maintenance