2019 FORD F650/750 light
[x] Cancel search: lightPage 243 of 387

C.
Maximum Load Dual lb (kg)
at psi (kPa) cold: Indicates the
maximum load and tire pressure
when the tire is used as a dual;
defined as four tires on the rear
axle (a total of six or more tires on
the vehicle).
D. Maximum Load Single lb
(kg) at psi (kPa) cold:
Indicates
the maximum load and tire
pressure when the tire is used as
a single; defined as two tires
(total) on the rear axle.
Information on T Type Tires
T145/80D16 is an example of a
tire size.
Note: The temporary tire size for
your vehicle may be different from
this example. Tire Quality Grades
do not apply to this type of tire. T type tires have some additional
information beyond those of P
type tires; these differences are
described below:
A.
T:
Indicates a type of tire,
designated by the Tire and Rim
Association, that is intended for
temporary service on cars, sport
utility vehicles, minivans and light
trucks.
B. 145:
Indicates the nominal
width of the tire in millimeters
from sidewall edge to sidewall
edge. In general, the larger the
number, the wider the tire.
240
F650750 (TBC) , enUSA, Edition date: 201804, Second-Printing Wheels and TiresA
BCDE
E142545
Page 246 of 387
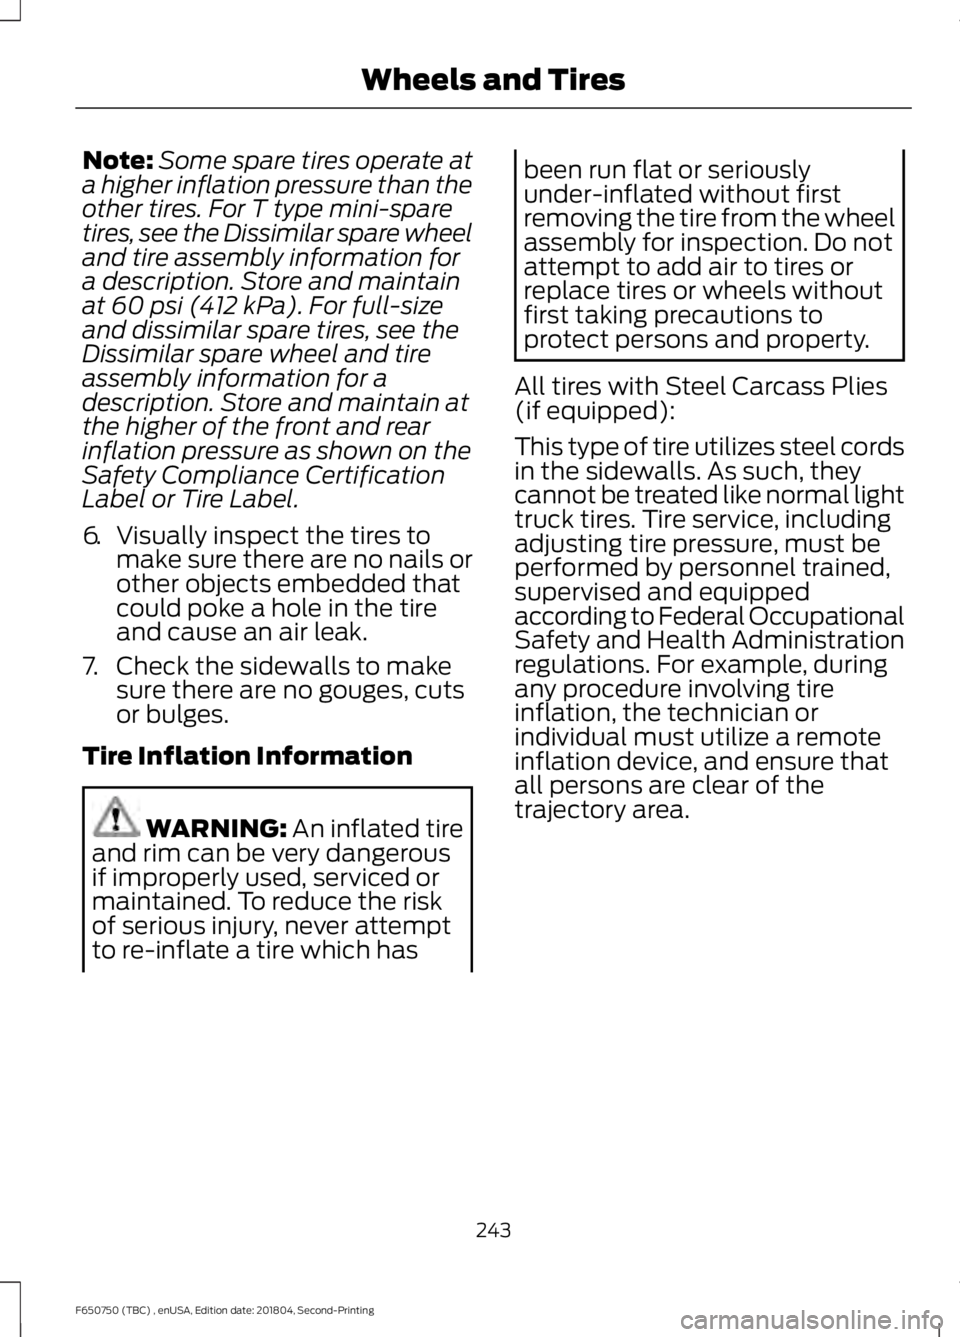
Note:
Some spare tires operate at
a higher inflation pressure than the
other tires. For T type mini-spare
tires, see the Dissimilar spare wheel
and tire assembly information for
a description. Store and maintain
at 60 psi (412 kPa). For full-size
and dissimilar spare tires, see the
Dissimilar spare wheel and tire
assembly information for a
description. Store and maintain at
the higher of the front and rear
inflation pressure as shown on the
Safety Compliance Certification
Label or Tire Label.
6. Visually inspect the tires to
make sure there are no nails or
other objects embedded that
could poke a hole in the tire
and cause an air leak.
7. Check the sidewalls to make sure there are no gouges, cuts
or bulges.
Tire Inflation Information WARNING:
An inflated tire
and rim can be very dangerous
if improperly used, serviced or
maintained. To reduce the risk
of serious injury, never attempt
to re-inflate a tire which has been run flat or seriously
under-inflated without first
removing the tire from the wheel
assembly for inspection. Do not
attempt to add air to tires or
replace tires or wheels without
first taking precautions to
protect persons and property.
All tires with Steel Carcass Plies
(if equipped):
This type of tire utilizes steel cords
in the sidewalls. As such, they
cannot be treated like normal light
truck tires. Tire service, including
adjusting tire pressure, must be
performed by personnel trained,
supervised and equipped
according to Federal Occupational
Safety and Health Administration
regulations. For example, during
any procedure involving tire
inflation, the technician or
individual must utilize a remote
inflation device, and ensure that
all persons are clear of the
trajectory area.
243
F650750 (TBC) , enUSA, Edition date: 201804, Second-Printing Wheels and Tires
Page 278 of 387
BULB SPECIFICATION CHART
Replacement bulbs are specified in the
chart below. Headlamp bulbs must be
marked with an authorized
“D.O.T.” for
North America and an “E” for Europe to
ensure lamp performance, light brightness
and pattern and safe visibility. The correct
bulbs will not damage the lamp assembly
or void the lamp assembly warranty and
will provide quality bulb illumination time. Trade name
Number of Bulbs
Function
H13/9008
2
Headlamps
W5W
2
Side marker lamp - front
3157NA
2
Park/Turn lamp- front
3157
2
Tail/stop/turn/side marker
3157
2
Reverse
3157
1
License plate lamp
912
1
High-mount brake lamp
12V6W
2
Map lamp
578
3
Dome/reading lamps
275
F650750 (TBC) , enUSA, Edition date: 201804, Second-Printing Capacities and SpecificationsE240522
Page 279 of 387
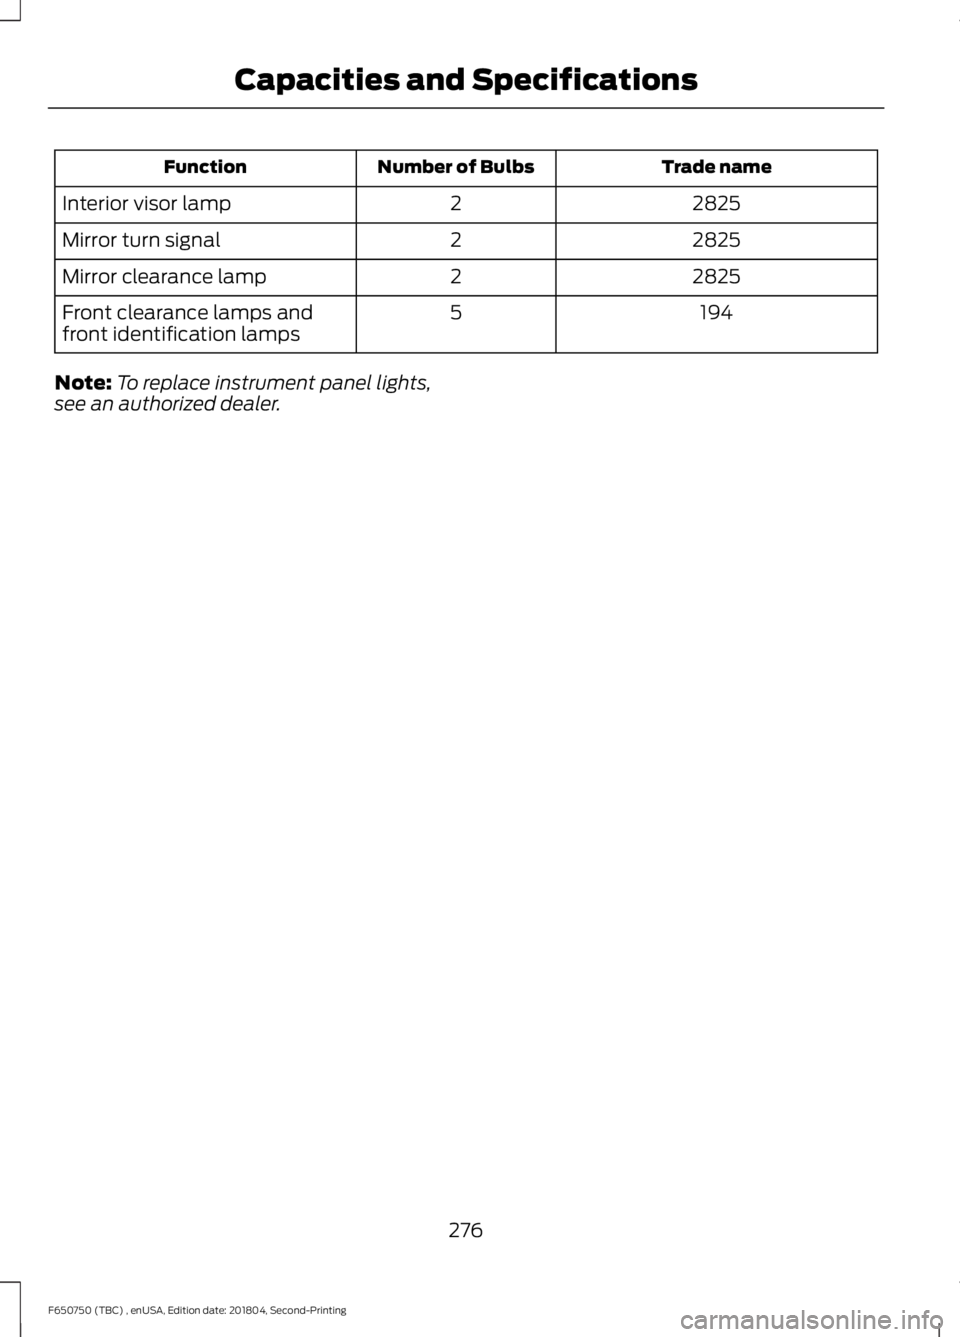
Trade name
Number of Bulbs
Function
2825
2
Interior visor lamp
2825
2
Mirror turn signal
2825
2
Mirror clearance lamp
194
5
Front clearance lamps and
front identification lamps
Note: To replace instrument panel lights,
see an authorized dealer.
276
F650750 (TBC) , enUSA, Edition date: 201804, Second-Printing Capacities and Specifications
Page 281 of 387

Always handle discs by their edges only.
Clean the disc with an approved CD
cleaner only. Wipe it from the center of
the disc toward the edge. Do not clean in
a circular motion.
Do not expose discs to direct sunlight or
heat sources for extended periods.
MP3 and WMA Track and Folder
Structure
Audio systems capable of recognizing and
playing MP3 and WMA individual tracks
and folder structures work as follows:
•
There are two different modes for MP3
and WMA disc playback: MP3 and
WMA track mode (system default) and
MP3 and WMA folder mode.
• MP3 and WMA track mode ignores any
folder structure on the MP3 and WMA
disc. The player numbers each MP3
and WMA track on the disc (noted by
the MP3 or WMA file extension) from
T001 to a maximum of T255. The
maximum number of playable MP3 and
WMA files may be less depending on
the structure of the CD and exact
model of radio present.
• MP3 and WMA folder mode represents
a folder structure consisting of one
level of folders. The CD player numbers
all MP3 and WMA tracks on the disc
(noted by the MP3 or WMA file
extension) and all folders containing
MP3 and WMA files, from F001 (folder)
T001 (track) to F253 T255.
• Creating discs with only one level of
folders helps with navigation through
the disc files.
If you are burning your own MP3 and WMA
discs, it is important to understand how
the system reads the structures you create.
While various files may be present (files
with extensions other than MP3 and
WMA), only files with the MP3 and WMA extension are played; other files are
ignored by the system. This enables you to
use the same MP3 and WMA disc for a
variety of tasks on your work computer,
home computer and your in-vehicle
system.
In track mode, the system displays and
plays the structure as if it were only one
level deep (all MP3 and WMA files play,
regardless of being in a specific folder). In
folder mode, the system only plays the
MP3 and WMA files in the current folder.
AUDIO UNIT - VEHICLES WITH:
AM/FM
WARNING: Driving while
distracted can result in loss of vehicle
control, crash and injury. We strongly
recommend that you use extreme
caution when using any device that may
take your focus off the road. Your
primary responsibility is the safe
operation of your vehicle. We
recommend against the use of any
hand-held device while driving and
encourage the use of voice-operated
systems when possible. Make sure you
are aware of all applicable local laws
that may affect the use of electronic
devices while driving.
Accessing the Clock Settings Press and release to display the
clock.
To set the time, press and hold until the
hours start to flash. Use the center arrow
controls to change the hours, then repeat
to set the minutes. Press again to exit clock
mode.
278
F650750 (TBC) , enUSA, Edition date: 201804, Second-Printing Audio SystemE265935
Page 327 of 387
There are three types of maintenance
intervals for general vehicle environments:
On-Highway, City and Severe Service. In
all applications, monitoring miles
(kilometers) and time and when the engine
is due for an oil change determine the
actual interval. When the engine oil change
is required before the truck lubrication
interval, perform the lubrication at the
same time in order to reduce your vehicle
’s
time out of service.
Air Brake Adjustment WARNING: Failure to maintain
proper air brake adjustment can result
in reduction or loss of braking ability.
A qualified service technician, keeping to
the instructions in the service manual,
should perform air brake inspection and
adjustment or repairs.
Cam Brakes - Automatic Slack
Adjusters WARNING:
Do not manually
adjust the automatic slack adjusters to
correct excessive push rod stroke as it
may result in reduced brake
effectiveness and a vehicle crash.
Excessive push rod stroke indicates that a problem exists with the automatic
adjuster, with the installation of the
adjuster, or with foundation brake
components that manual adjustment
does not remedy. Seek service from a
qualified facility for excessive push rod
stroke.
Inspect standard air brakes equipped with
automatic slack adjusters for proper brake
adjustment as listed in the maintenance
schedule charts.
However, inspect the brakes more
frequently when subjecting them to heavy
use or adverse operating conditions such
as:
• Frequent brake applications while fully
loaded.
• Operation on hilly or mountainous
terrain.
• Frequent operation on dirt, gravel or
mud.
Some aftermarket brake linings also
require more frequent inspections.
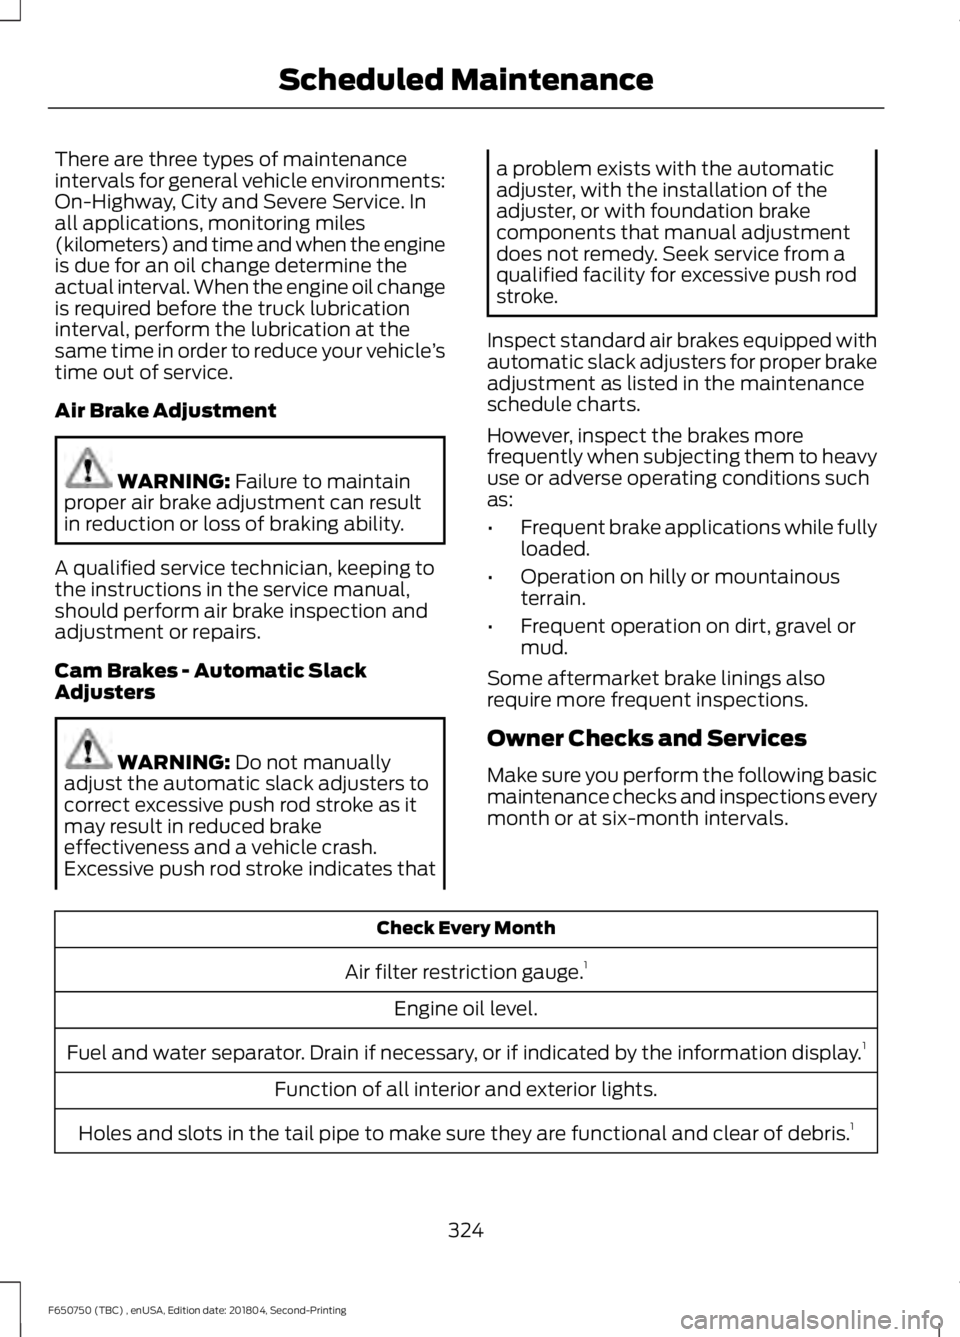
Owner Checks and Services
Make sure you perform the following basic
maintenance checks and inspections every
month or at six-month intervals. Check Every Month
Air filter restriction gauge. 1
Engine oil level.
Fuel and water separator. Drain if necessary, or if indicated by the information display. 1
Function of all interior and exterior lights.
Holes and slots in the tail pipe to make sure they are functional and clear of debris. 1
324
F650750 (TBC) , enUSA, Edition date: 201804, Second-Printing Scheduled Maintenance
Page 343 of 387
Rear Axle Maintenance
A rear axle fluid change or level check is
not required unless a leak is suspected or
the assembly has been submerged in
water. During long periods of trailer towing
with outside temperatures above 70°F
(21°C), and at wide-open throttle for long
periods above 45 mph (72 km/h), change
the rear axle fluid every 24,000 mi
(38,000 km) or three months, whichever
comes first.
California Fuel Filter Replacement
If you register your vehicle in California, the
California Air Resources Board has
determined that the failure to perform this
maintenance item does not nullify the
emission warranty or limit recall liability
before the completion of your vehicle's
useful life. Ford Motor Company, however,
urges you to have all recommended
maintenance services performed at the
specified intervals and to record all vehicle
service.
Hot Climate Oil Change Intervals
The normal oil change interval is 3,000 mi
(5,000 km) for gasoline vehicles operating
in the Middle East, North Africa,
Sub-Saharan Africa or locations with
similar climates using American Petroleum
Institute (API) oils Certified for Gasoline
Engines and displaying the API Certification
Mark. If API Certified Oils are not available,
then it is acceptable to use API SM or SN
oils. If API oils are not available, then the
oil change interval is 1,750 mi (3,000 km). Engine Air Filter Replacement
The life of the engine air filter is dependent
on exposure to dusty and dirty conditions.
Vehicles operated in these conditions
require frequent inspection and
replacement of the engine air filter and
cabin air filter.
Diesel Particulate Filter
Over time, a slight amount of ash builds
up in the diesel particulate filter, which is
not removed during the regeneration
process. The filter may need to be replaced
with a new or remanufactured part at
approximately 250,000 mi (400,000 km).
Actual mileage varies depending on engine
and vehicle operating conditions.
In this case, the engine control system sets
a service light (wrench icon) to inform you
to bring your vehicle to the dealer for
service. If there are any issues with the
oxidation catalyst or particulate filter
system, a service light (wrench or engine
icon) sets by the engine control system to
inform you to bring your vehicle into a
dealer for service.
SCHEDULED MAINTENANCE
RECORD
After the scheduled maintenance services
are performed, record the Repair Order #,
Distance and Engine Hours in the boxes
provided.
340
F650750 (TBC) , enUSA, Edition date: 201804, Second-Printing Scheduled Maintenance
Page 378 of 387

2
2-Speed Rear Axle.........................................121
Axle Shifting........................................................... 121
A
A/C See: Climate Control........................................... 72
About This Manual...........................................7
Diesel Engine Information................................... 8
Minor Troubleshooting Guide............................ 9
Warnings.................................................................... 8
ABS See: Brakes............................................................ 122
ABS driving hints See: Hints on Driving With Anti-Lock
Brakes................................................................. 123
Accessories.....................................................318
Accessories See: Replacement Parts
Recommendation............................................ 13
Adjusting the Headlamps
.........................210
Horizontal Aim Adjustment............................. 211
Vertical Aim Adjustment................................. 210
Adjusting the Steering Wheel...................46
Air Brakes
.........................................................126
Air Chamber Stroke Indication...................... 126
Cam Brakes - Automatic Slack Adjusters............................................................ 127
Emergency Air Brake.......................................... 127
Air Conditioning See: Climate Control........................................... 72
Air Filter See: Changing the Engine Air Filter - 6.7L
Diesel.................................................................. 213
See: Changing the Engine Air Filter - 6.8L..................................................................... 216
Air Induction System Inspection.............221 Chassis-mounted Charge Air Cooler..........222
Air Suspension...............................................142 Air Suspension Dump Button........................ 142
Connecting and Disconnecting a Trailer with Air Suspension and Air Suspension
Dump Button................................................... 142
Suspension Conversions.................................. 142
System Indicator Light...................................... 142
Appendices.....................................................351 At a Glance
.........................................................17
Audible Warnings and Indicators.............63 Beltminder Warning............................................ 63
Door Ajar.................................................................. 63
Headlamps On Warning Chime...................... 63
Key in Ignition Warning Chime........................ 63
Parking Brake On Warning Chime.................. 63
Audio Control..................................................46 Media........................................................................\
. 47
Seek, Next or Previous........................................ 47
Audio Input Jack..........................................284
Audio System.................................................277 General Information.......................................... 277
Audio Unit - Vehicles With: AM/FM/CD/ SYNC..............................................................279
Accessing CD or MP3 Mode.......................... 280
Accessing the Auxiliary Media Sources............................................................. 279
Accessing the Folders..................................... 280
Accessing the Menu......................................... 280
Accessing the Phone Features..................... 280
Adjusting the Volume...................................... 280
Changing Radio Stations................................. 281
Ejecting the CD.................................................... 281
Fast Forwarding the Media............................. 281
Inserting a CD....................................................... 281
Muting the Audio................................................ 281
Playing or Pausing Media................................ 281
Rewinding the Media......................................... 281
Scanning the Audio........................................... 281
Selecting a Frequency Band.......................... 281
Setting the Memory Presets........................... 281
Switching Shuffle Mode On and Off...........281
Switching the Audio Unit On and Off.........281
Using Seek, Fast Forward and Reverse............................................................. 282
Audio Unit - Vehicles With: AM/ FM...................................................................278
Accessing the Clock Settings........................ 278
Accessing the Sound Settings...................... 279
Adjusting the Volume....................................... 279
Changing Radio Stations................................ 279
Selecting the Audio Modes............................ 279
Setting the Memory Presets.......................... 279
Switching the Audio Unit On and Off.........279
Using Seek, Fast Forward and Reverse.............................................................. 279
375
F650750 (TBC) , enUSA, Edition date: 201804, Second-Printing Index