2019 FORD F-150 ECU
[x] Cancel search: ECUPage 225 of 644

You should either know the terrain or
examine maps of the area before driving.
Map out your route before driving in the
area. To maintain steering and braking
control of your vehicle, you must have all
four wheels on the ground and they must
be rolling, not sliding or spinning.
Driving Off-Road With Truck and
Utility Vehicles
Note:
On some models, the initial shift from
two-wheel drive to four-wheel drive while
your vehicle is moving can cause some
momentary clunk and ratcheting sounds.
This is the front drivetrain coming up to
speed and the automatic locking hubs
engaging and is not cause for concern.
Note: Your vehicle may have a front air
dam. Due to low ground clearance, you can
damage it when taking your vehicle off-road.
You can take the air dam off by removing
the bolts that secure it.
Note: Your vehicle may have an underbody
transmission shield and brackets. Due to
low ground clearance, you can damage
them when taking your vehicle off-road.
Remove the shield by disengaging the
fasteners at each corner of the shield. Then,
remove the shield's rear brackets by
removing the bracket to frame bolts.
Four-wheel drive vehicles are specially
equipped for driving on sand, snow, mud
and rough terrain and have operating
characteristics that are somewhat
different from conventional vehicles, both
on and off the road. The transfer case supplies power to all four
wheels. On four-wheel drive vehicles, the
transfer case allows you to select different
4WD modes when necessary. You can find
information on transfer case operation and
shifting procedures in this chapter. You can
find information on transfer case
maintenance in the Maintenance chapter.
You should become thoroughly familiar
with this information before you operate
your vehicle.
Four-wheel drive (when you select a 4WD
mode) uses all four wheels to power your
vehicle. This increases traction, enabling
you to drive over terrain and road
conditions that a conventional two-wheel
drive vehicle cannot.
Basic Operating Principles
•
Drive slower in strong crosswinds which
can affect the normal steering
characteristics of your vehicle.
• When driving your vehicle on surfaces
made slippery by loose sand, water,
gravel, snow or ice proceed with care.
• Do not use 4H or 4L on dry, hard
surfaced roads. Doing so can produce
excessive noise, increase tire wear and
may damage drive components. 4H or
4L modes are only for consistently
slippery or loose surfaces.
If Your Vehicle leaves the Road
If your vehicle leaves the road, reduce your
vehicle speed and avoid severe braking.
When your vehicle speed decreases, ease
your vehicle back onto the road. Do not
turn the steering wheel sharply while
returning your vehicle to the road.
It may be safer to stay on the shoulder of
the road and slow down gradually before
returning to the road. You may lose control
if you do not slow down or if you turn the
steering wheel too sharply or abruptly.
222
F-150 (TFC) Canada/United States of America, enUSA, Edition date: 201808, Third-Printing- Four-Wheel Drive (If Equipped)
Page 245 of 644

When you think your vehicle has enough
space in front and behind it, or you hear a
solid tone from the parking aid
(accompanied by a touchscreen display
message and a chime), bring your vehicle
to a complete stop.
When automatic steering is complete, the
system displays a message and a chime
sounds, indicating that the active park
assist process is finished. You are
responsible for checking the parking job
and making any necessary corrections
before leaving your vehicle.
Deactivating the Park Assist
Feature
Manually deactivate the system by:
•
Pressing the active park assist button
during an active maneuver.
• Grabbing the steering wheel during an
active maneuver. •
Driving above approximately 22 mph
(35 km/h) for 30 seconds during an
active park search.
• Driving above
6 mph (9 km/h) during
automatic steering.
• Switching off the traction control
system.
Certain vehicle conditions can also
deactivate the system, such as:
• Traction control has activated.
• There is an anti-lock brake system
activation or failure.
If a problem occurs with the system, a
warning message displays accompanied
by a tone. Occasional system messages
may occur in normal operation. For
recurring or frequent system faults, contact
an authorized dealer to have your vehicle
serviced.
Troubleshooting the System The System Does Not Look For a Space
The traction control system may be off.
The transmission is in reverse (R). Your vehicle must be moving forward to detect a
parking space. The System Does Not Offer a Particular Space
The sensors may be covered. For example, with snow, ice or dirt. Covered sensors can
affect the system's functionality
There is not enough room in the parking space for your vehicle to safely park.
There is not enough space for the parking maneuver on the opposite side of the parking
space.
242
F-150 (TFC) Canada/United States of America, enUSA, Edition date: 201808, Third-Printing- Parking Aids
Page 279 of 644

LOAD RETAINING FIXTURES (IF
EQUIPPED)
BoxLink
™ Cleats
These cleats attach to the inner box walls
to help you to tie down cargo. The cleats
can be locked to prevent removal or
unlocked for removal.
BoxLink Cleats
Note: Leave the key in the lock when
removing or installing the cleats. The key
cannot be removed from the lock unless it
is in the locked position. A. 275 lb (1,223 N) maximum force
between directly opposed cleats.
B. 600 lb (2,669 N)
maximum force
between diagonally opposed cleats. Secure cargo with up to
275 lb (1,223 N)
force applied between opposing box link
cleats, or up to
600 lb (2,669 N) force
applied between diagonal box link cleats.
Removing Locking BoxLink Cleats
1. Insert the key into the lock and turn clockwise to unlock.
2. Pull bottom of the cleat outward while
pushing top of cleat down.
3. Hold on to the cleat as it clears the mounting slot.
Installing Locking BoxLink Cleats 1. Insert the key into lock and turn
clockwise to unlock.
2. Insert the cleat into the mounting slot and push upward. Make sure the cleat
is fully engaged.
276
F-150 (TFC) Canada/United States of America, enUSA, Edition date: 201808, Third-Printing- Load CarryingE184885 E189558
Page 287 of 644

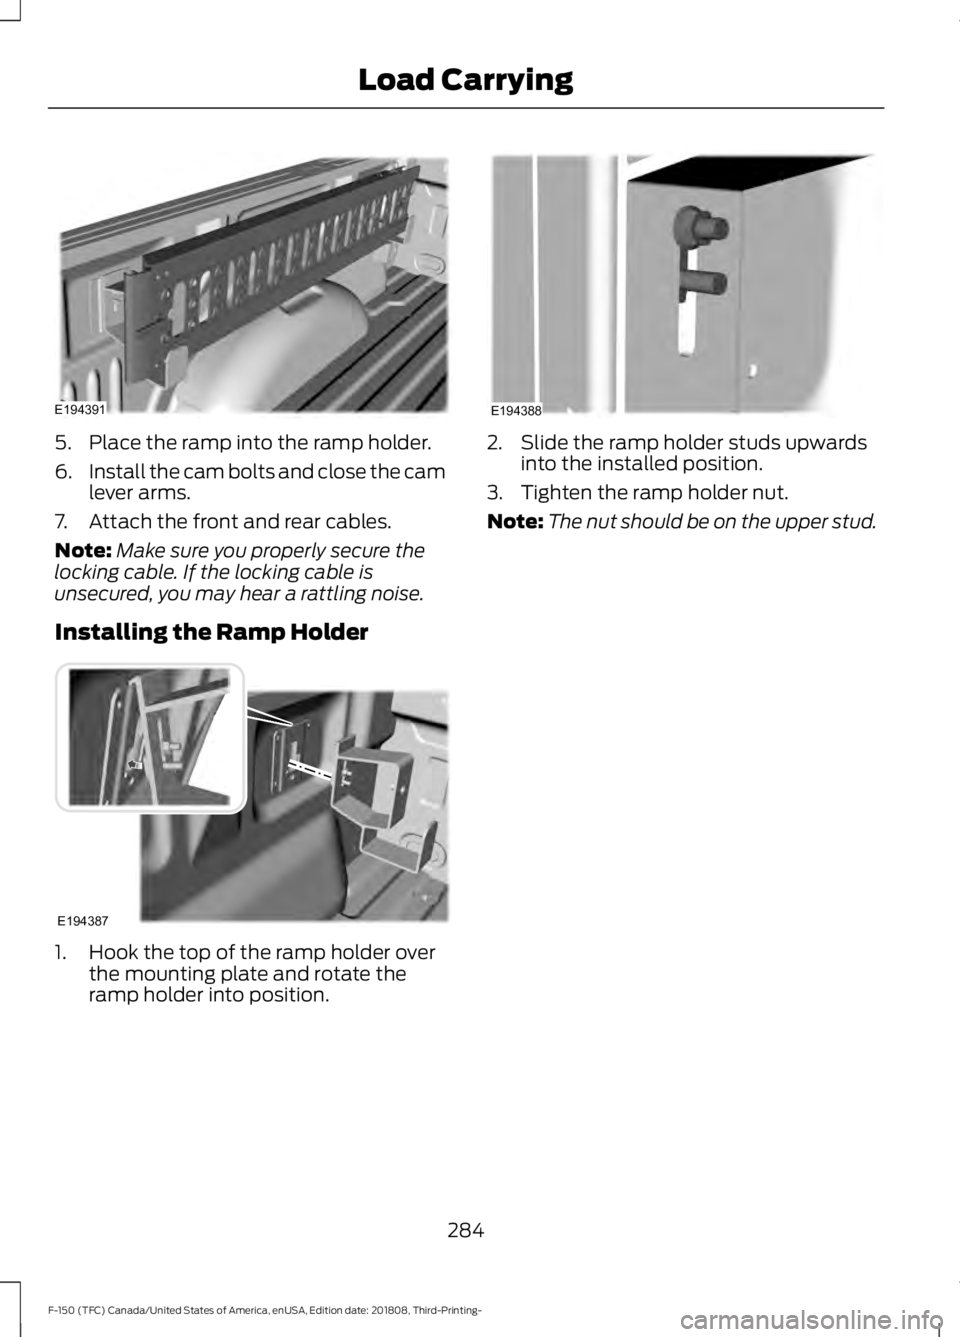
5. Place the ramp into the ramp holder.
6.
Install the cam bolts and close the cam
lever arms.
7. Attach the front and rear cables.
Note: Make sure you properly secure the
locking cable. If the locking cable is
unsecured, you may hear a rattling noise.
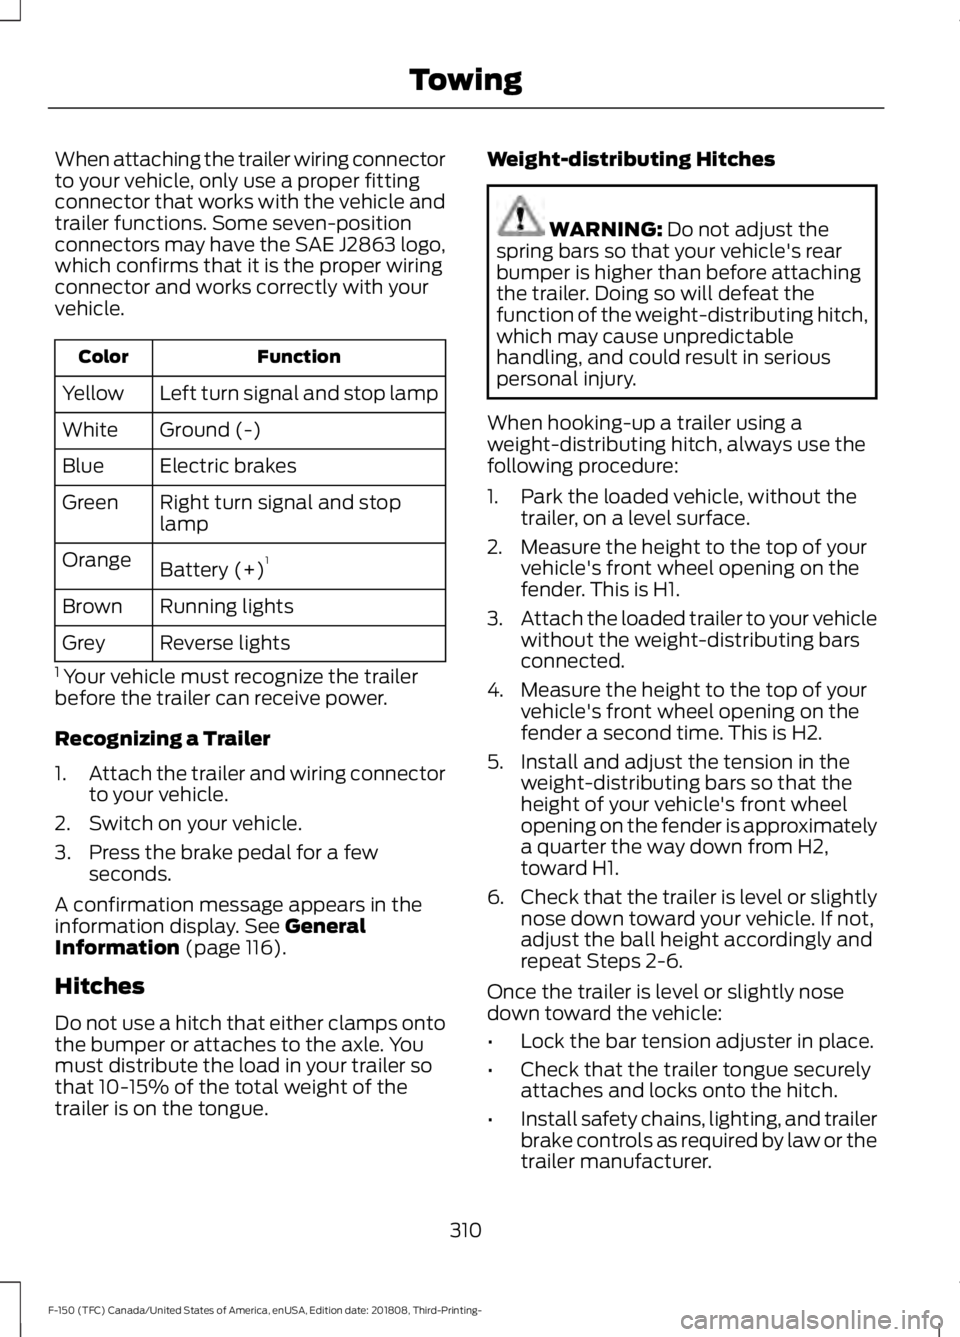
Installing the Ramp Holder 1. Hook the top of the ramp holder over
the mounting plate and rotate the
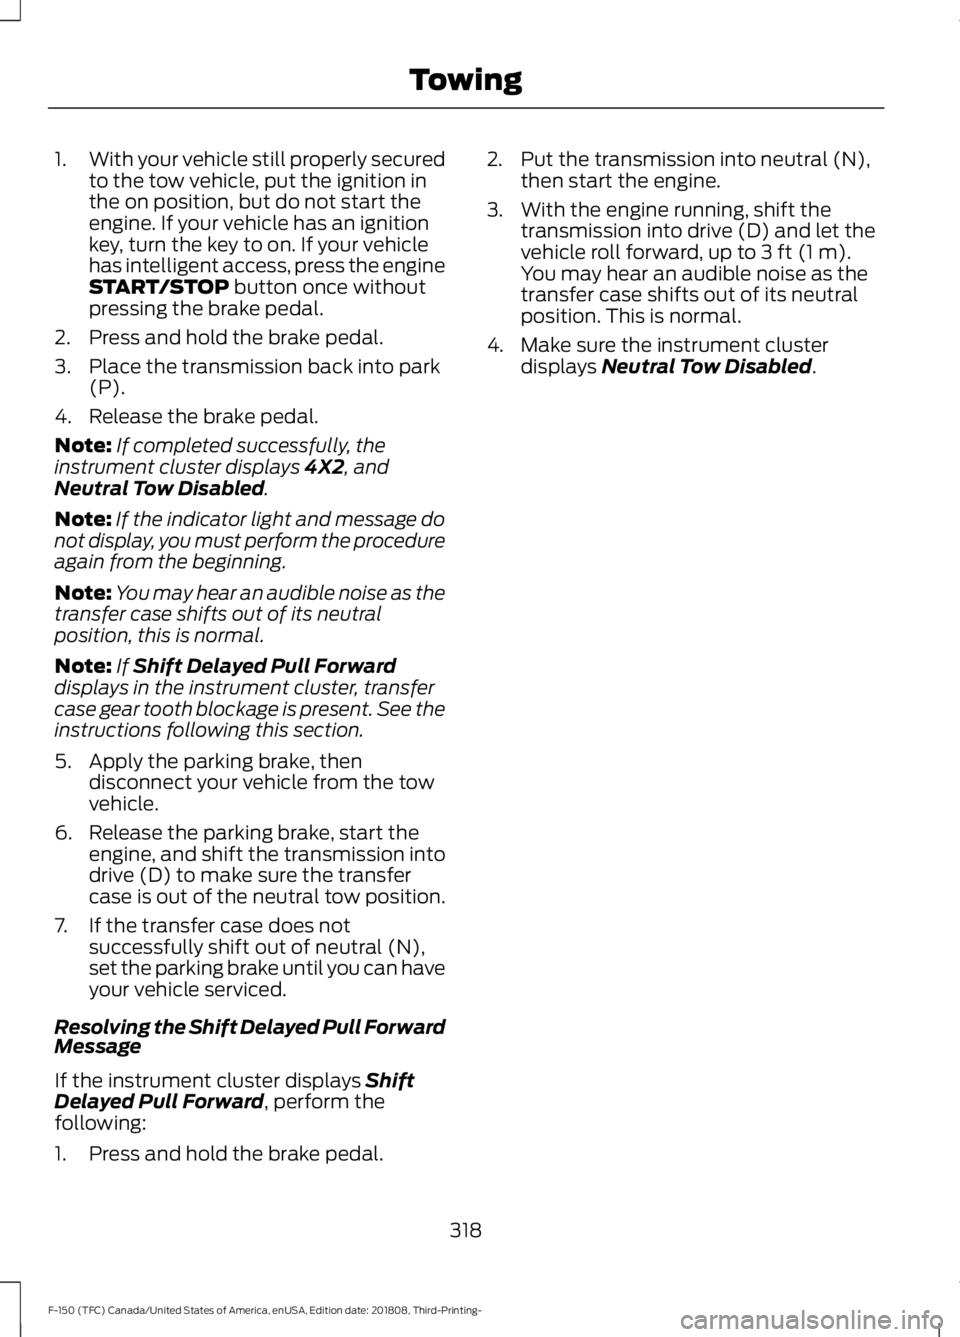
ramp holder into position. 2. Slide the ramp holder studs upwards
into the installed position.
3. Tighten the ramp holder nut.
Note: The nut should be on the upper stud.
284
F-150 (TFC) Canada/United States of America, enUSA, Edition date: 201808, Third-Printing- Load CarryingE194391 E194387 E194388
Page 313 of 644

When attaching the trailer wiring connector
to your vehicle, only use a proper fitting
connector that works with the vehicle and
trailer functions. Some seven-position
connectors may have the SAE J2863 logo,
which confirms that it is the proper wiring
connector and works correctly with your
vehicle.
Function
Color
Left turn signal and stop lamp
Yellow
Ground (-)
White
Electric brakes
Blue
Right turn signal and stop
lamp
Green
Battery (+) 1
Orange
Running lights
Brown
Reverse lights
Grey
1 Your vehicle must recognize the trailer
before the trailer can receive power.
Recognizing a Trailer
1. Attach the trailer and wiring connector
to your vehicle.
2. Switch on your vehicle.
3. Press the brake pedal for a few seconds.
A confirmation message appears in the
information display. See General
Information (page 116).
Hitches
Do not use a hitch that either clamps onto
the bumper or attaches to the axle. You
must distribute the load in your trailer so
that 10-15% of the total weight of the
trailer is on the tongue. Weight-distributing Hitches WARNING:
Do not adjust the
spring bars so that your vehicle's rear
bumper is higher than before attaching
the trailer. Doing so will defeat the
function of the weight-distributing hitch,
which may cause unpredictable
handling, and could result in serious
personal injury.
When hooking-up a trailer using a
weight-distributing hitch, always use the
following procedure:
1. Park the loaded vehicle, without the trailer, on a level surface.
2. Measure the height to the top of your vehicle's front wheel opening on the
fender. This is H1.
3. Attach the loaded trailer to your vehicle
without the weight-distributing bars
connected.
4. Measure the height to the top of your vehicle's front wheel opening on the
fender a second time. This is H2.
5. Install and adjust the tension in the weight-distributing bars so that the
height of your vehicle's front wheel
opening on the fender is approximately
a quarter the way down from H2,
toward H1.
6. Check that the trailer is level or slightly
nose down toward your vehicle. If not,
adjust the ball height accordingly and
repeat Steps 2-6.
Once the trailer is level or slightly nose
down toward the vehicle:
• Lock the bar tension adjuster in place.
• Check that the trailer tongue securely
attaches and locks onto the hitch.
• Install safety chains, lighting, and trailer
brake controls as required by law or the
trailer manufacturer.
310
F-150 (TFC) Canada/United States of America, enUSA, Edition date: 201808, Third-Printing- Towing
Page 320 of 644

Four-wheel Drive Vehicles
You can only tow a four-wheel drive
vehicle with all wheels on the ground by
placing the transfer case in its neutral
position and engaging the
four-wheel-down towing feature. Perform
the steps outlined in the following section
after positioning your vehicle behind the
tow vehicle and properly securing them
together.
Note:
Make sure you properly secure your
vehicle to the tow vehicle.
Note: For F-150 Raptor, please refer to your
Raptor supplement guide.
Four-wheel-down Towing
1. Put the ignition in the on position, but do not start the engine. If your vehicle
has an ignition key, turn the key to on.
If your vehicle has intelligent access,
press the engine START/STOP button
once without pressing the brake pedal.
2. Press and hold the brake pedal.
3. Rotate the four-wheel drive switch to 2H.
4. Shift the transmission to neutral (N).
5. Rotate the four-wheel drive switch from
2H to 4L and back to 2H five
times within seven seconds. If
completed successfully, the
information display shows
NEUTRAL
TOWLEAVE IN N or Neutral Tow
Enabled Leave Transmission in
Neutral
. This indicates that your
vehicle is safe to tow with all wheels
on the ground.
Note: If you do not see the message in the
display, you must perform the procedure
again from the beginning.
Note: You may hear an audible noise as the
transfer case shifts into its neutral position.
This is normal. 6. Leave the transmission in neutral (N)
and turn the ignition as far as it can go
toward the off position. It does not turn
fully off when the transmission is in
neutral (N). If your vehicle has an
ignition key, you must leave the key in
the ignition while towing. To lock and
unlock your vehicle, use the keyless
entry keypad or an extra set of keys. If
your vehicle has intelligent access,
press the engine START/STOP button
once without pressing the brake pedal.
You do not need to leave your keys in
the vehicle. You can lock and unlock
your vehicle as you normally do.
7. Release the brake pedal. WARNING:
Do not disconnect the
battery during recreational towing. It
prevents the transfer case from shifting
properly and may cause the vehicle to
roll, even if the transmission is in park
(P). WARNING:
Shifting the transfer
case to its neutral position for
recreational towing may cause the
vehicle to roll, even if the transmission is
in park (P). It may injure the driver and
others. Make sure you press the foot
brake and the vehicle is in a secure, safe
position when you shift to neutral (N).
Note: Failing to put the transfer case in its
neutral position while towing the vehicle
can damage vehicle components.
Note: You can check four-wheel-down
towing status at any time by opening the
driver's door or turning the ignition to the
accessory or on position. A message
displays in the information display
confirming your vehicle is in neutral tow.
To exit four-wheel-down towing and return
the transfer case to its
2H position:
317
F-150 (TFC) Canada/United States of America, enUSA, Edition date: 201808, Third-Printing- Towing
Page 321 of 644

1.
With your vehicle still properly secured
to the tow vehicle, put the ignition in
the on position, but do not start the
engine. If your vehicle has an ignition
key, turn the key to on. If your vehicle
has intelligent access, press the engine
START/STOP button once without
pressing the brake pedal.
2. Press and hold the brake pedal.
3. Place the transmission back into park (P).
4. Release the brake pedal.
Note: If completed successfully, the
instrument cluster displays
4X2, and
Neutral Tow Disabled.
Note: If the indicator light and message do
not display, you must perform the procedure
again from the beginning.
Note: You may hear an audible noise as the
transfer case shifts out of its neutral
position, this is normal.
Note: If
Shift Delayed Pull Forward
displays in the instrument cluster, transfer
case gear tooth blockage is present. See the
instructions following this section.
5. Apply the parking brake, then disconnect your vehicle from the tow
vehicle.
6. Release the parking brake, start the engine, and shift the transmission into
drive (D) to make sure the transfer
case is out of the neutral tow position.
7. If the transfer case does not successfully shift out of neutral (N),
set the parking brake until you can have
your vehicle serviced.
Resolving the
Shift Delayed Pull Forward
Message
If the instrument cluster displays
Shift
Delayed Pull Forward, perform the
following:
1. Press and hold the brake pedal. 2. Put the transmission into neutral (N),
then start the engine.
3. With the engine running, shift the transmission into drive (D) and let the
vehicle roll forward, up to
3 ft (1 m).
You may hear an audible noise as the
transfer case shifts out of its neutral
position. This is normal.
4. Make sure the instrument cluster displays
Neutral Tow Disabled.
318
F-150 (TFC) Canada/United States of America, enUSA, Edition date: 201808, Third-Printing- Towing
Page 325 of 644

When driving through standing water, drive
very slowly and do not stop your vehicle.
Your brake performance and traction may
be limited. After driving through water and
as soon as it is safe to do so:
•
Lightly press the brake pedal to dry the
brakes and to check that they work.
• Check that the horn works.
• Check that the exterior lights work.
• Turn the steering wheel to check that
the steering power assist works.
FLOOR MATS WARNING: Use a floor mat
designed to fit the footwell of your
vehicle that does not obstruct the pedal
area. Failure to follow this instruction
could result in the loss of control of your
vehicle, personal injury or death. WARNING:
Pedals that cannot
move freely can cause loss of vehicle
control and increase the risk of serious
personal injury. WARNING:
Secure the floor mat
to both retention devices so that it
cannot slip out of position and interfere
with the pedals. Failure to follow this
instruction could result in the loss of
control of your vehicle, personal injury or
death. WARNING:
Do not place
additional floor mats or any other
covering on top of the original floor mats.
This could result in the floor mat
interfering with the operation of the
pedals. Failure to follow this instruction
could result in the loss of control of your
vehicle, personal injury or death. WARNING: Always make sure that
objects cannot fall into the driver foot
well while your vehicle is moving. Objects
that are loose can become trapped
under the pedals causing a loss of
vehicle control. To install the floor mats, position the floor
mat eyelet over the retention post and
press down to lock in position.
To remove the floor mat, reverse the
installation procedure.
Note:
Regularly check the floor mats to
make sure they are secure.
322
F-150 (TFC) Canada/United States of America, enUSA, Edition date: 201808, Third-Printing- Driving HintsE176913 E142666